- How I configured my Synology NAS and Linux to use rsync for backups
- Use case
- Synology NAS
- Linux
- Conclusion
- How to Use Rsync on a Synology NAS
- Conclusion – How to Use Rsync on a Synology NAS
- You Might Also Like
- How to Set Up Synology QuickConnect
- How to Find a Synology NAS on a Network
- Run a Speed Test on a Synology with iPerf3
- Backup a Synology NAS to a Raspberry Pi using Hyper Backup
- This Post Has 8 Comments
How I configured my Synology NAS and Linux to use rsync for backups
I’ve only used Linux as my daily driver for about a year so I still consider myself a newbie. I don’t know about you, but when I’m learning new technologies, there’s a fair bit of searching the web and experimenting. Some of that stuff works but some of it doesn’t.
That’s how I setup my Synology NAS to work with rsync and my Linux desktop the first time around. I eventually got it to work but I didn’t do a good job of documenting how I did it. Plus, I always had this nagging sense that something I tried has misconfigured something that will allow a hostile actor to access my stuff. I finally took the time to reset my Synology so I could setup the NAS and feel confident only the required services are enabled.
Use case
My use case is I have a Linux PC and I want to use rsync to backup my files to my NAS. My NAS is a Synology DS220+ with two Seagate IronWolf 4TB drives setup in a RAID 1 configuration. My PC is a System76 Meercat running PopOS.
Synology NAS
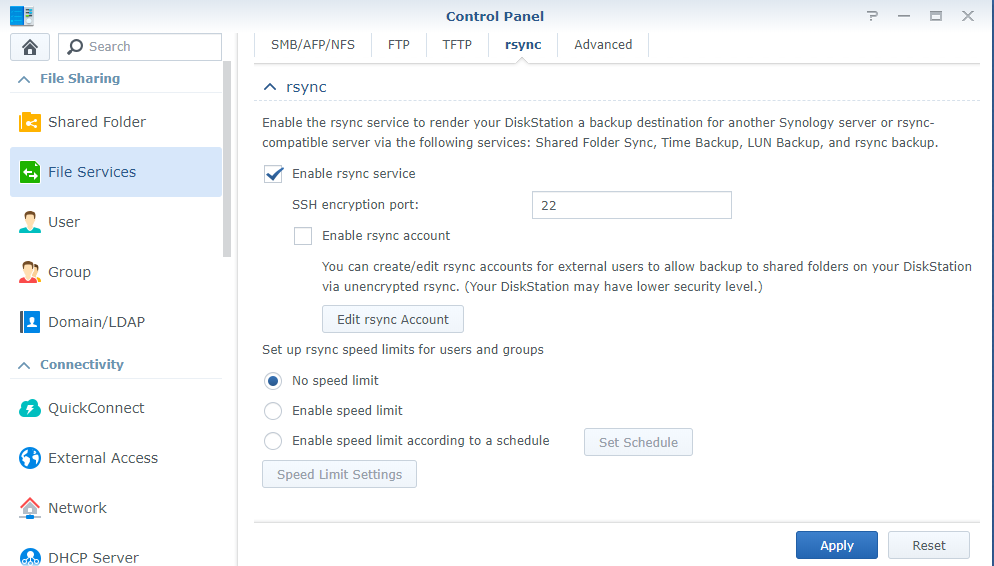
First, I need to enable SSH and rsync on the NAS. I use my web browser to navigate to the IP address of my NAS on port 5000 (http://192.168.1.69:5000/) and log in.
Navigate to Control Panel -> Terminal & SNMP then check the Enable SSH service check box. Select apply.
Navigate to Control Panel -> File Services. Select the rsync tab and select the Enable rsync service check box. Select apply.
Let’s test out ssh by opening a terminal window on the local computer and trying to ssh to our NAS: ssh username@192.168.1.69 . When I did this on a freshly setup NAS, I received the following error message after logging in: Could not chdir to home directory /var/services/homes/username: No such file or directory.
I think it’s probably OK to ignore the error message but that would bother me and brings to light an internal conflict. If I enable user home services on the NAS, does that increase the attack surface?! In the end, the desire for no error message won out. I enabled user home services on my NAS by going here: Control panel -> User & Group -> Advanced -> Enable user home services. Now when I ssh into my NAS, there’s no error message. Very nice.
When I enabled the rsync service, a new share called NetBackup was automatically created so I think I’ll just use that as my backup destination. My computer hostname is cleverly named workstation so I’m going to create a new folder called workstation as a subfolder of the NetBackup share.
Linux
My goal is to do automated backups using cron jobs so I want to add my ssh key to the NAS so I’m not prompted for a password when I run the rsync command.
Open a terminal window and issue the following command: ssh-copy-id username@192.168.1.69 . I’m running these commands on my desktop and you may need to generate ssh keys if you haven’t previously done so on yours.
Now when I ssh to the NAS, I’m logged in using ssh keys, without being prompted for a password.
Here is the bash script that I use to perform my backups:
# init
today=$(date +"%Y%m%d")

# backup crontab
crontab -l > cron-backup.txt

# rsync to nas
rsync -avuz --delete --log-file=$HOME/Backup/$ -backup.log -e ssh ~/.config,.mozilla,.ssh,Backup,Desktop,Documents,Music,Pictures,Projects> username@192.168.1.69:/volume1/NetBackup/$(hostname)
There’s one detail that I struggled to understand about this command so I wanted to document this for anyone else who may be having the same issue.
When I first started building my script, I was trying to rsync to the network share by using this path as my destination: username@192.168.1.69::NetBackup/$(hostname) . I had this working prior to reloading the NAS but I think that’s because I enabled a manual rsync account under Navigate to Control Panel -> File Services -> rsync. This time around, I didn’t want to enable the additional service; I wanted to use the username and password I use to log into the NAS web interface.
I was able to make this destination path work for me: username@192.168.1.69:/volume1/NetBackup/$(hostname) . I kiiiind of understand the difference here because if I ssh into my NAS and execute ls / , I can see there is a folder called volume1 and then I can see there’s a folder called NetBackup under that. I presume there’s some Linux file that I have to go edit and put in exceptions or allowances to allow my account to rsync directly to the SMB file share.
Let’s setup a cron job to perform our backup automatically. Here is my output from crontab -e :
SHELL=/bin/bash

0 21 * * * cd /home/username/Backup && bash backup.sh
I’ve read that cron executes jobs with a limited environment so I’m setting the SHELL statement to make sure it all works OK. This runs my backup daily at 9 PM local time.
Conclusion
So that’s it! My computer now uses rsync to perform a backup to my Synology NAS and it does it automatically, once a day.
My buddy also has a Synology NAS and we’re doing remote backups to each other’s NAS so I do have off-site backups. I’d like to document that process as well so that is in the works!
Here are some resources I used while getting this setup:
Made with ❤️ by Michael Harley using Eleventy.
The content for this site is CC BY-SA 4.0.
The code on this site is MIT.
How to Use Rsync on a Synology NAS
In this tutorial, we will look at how to use Rsync on a Synology NAS.
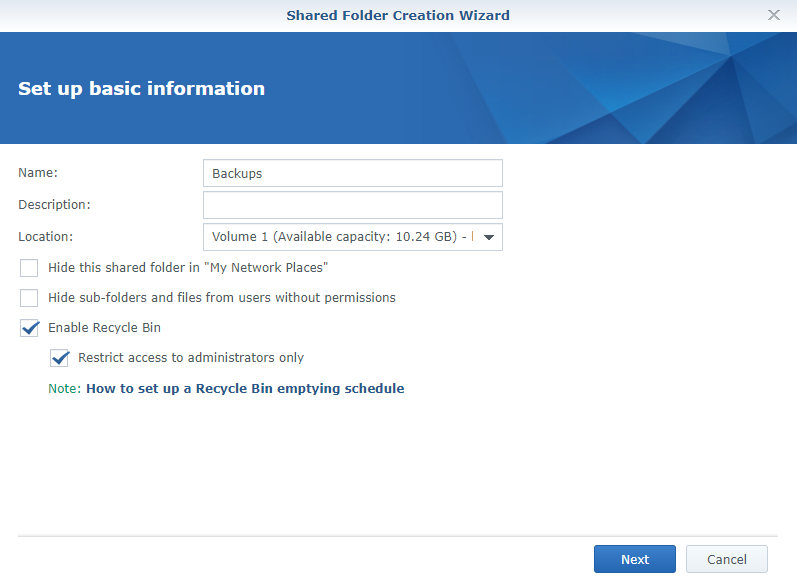
2. Create a Backups shared folder (you can use whatever name you’d like, or can utilize one that already exists) and note the volume number (you will need this later).
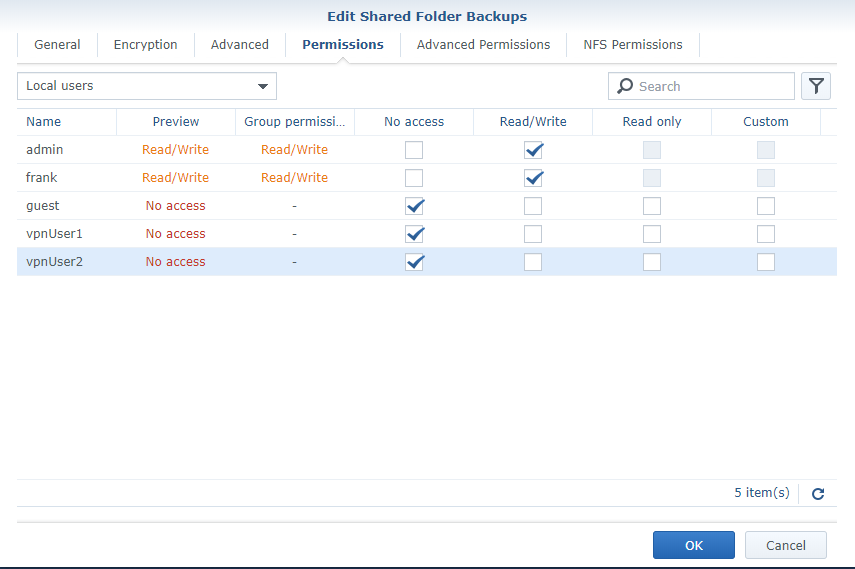
3. Ensure that the user account you will be authenticating with has read/write access to the shared folder.
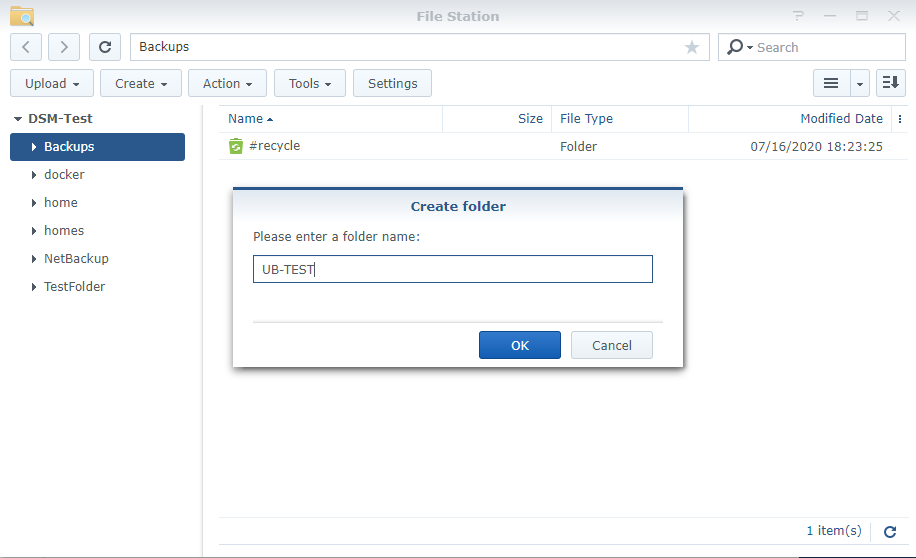
4. Create a subfolder in the shared folder with the name of the PC that you will be backing up (if you don’t want to back up directly to the root folder).
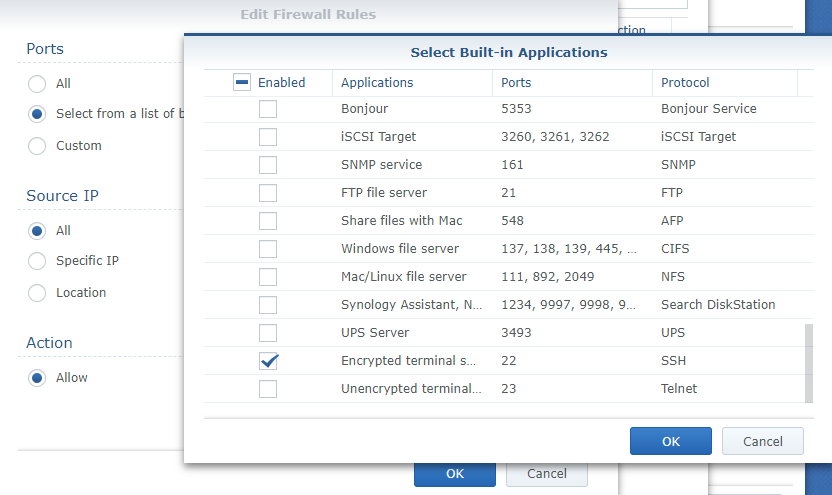
5. If your firewall is enabled, create a firewall rule that opens port 22 for SSH.
NOTE: you can secure this one step further if you’d like by only opening port 22 traffic to internal IP addresses (use your internal IP address range). This rule must be above any “deny” rules that exist.
6. Log in to your Linux PC (or whatever device you’ll be using) and open Terminal. At this point, we will begin to construct our Rsync command. Many different parameters can be added to a Rsync command, but in this tutorial, we will back up our entire Linux hard drive to our Backups device subfolder on our Synology NAS. The Rsync command will be constructed as follows:
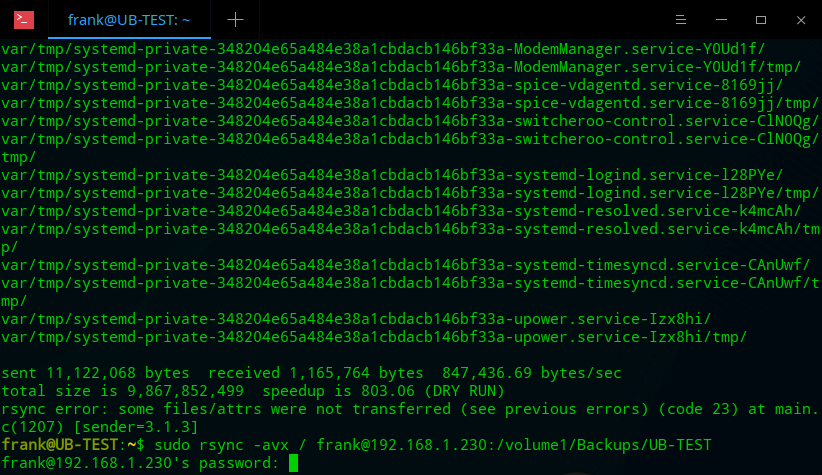
sudo rsync -avnx / [USERNAME]@[NAS IP ADDRESS]:/[NAS VOLUME]/Backups/[DEVICE NAME]
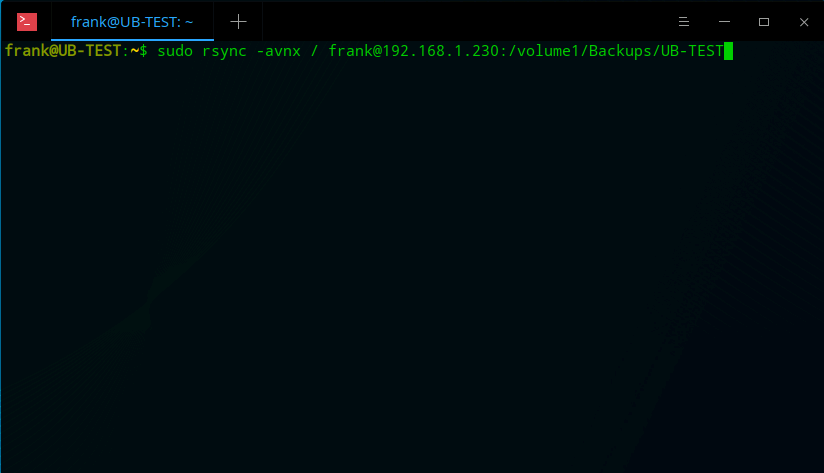
NOTE: the “n” command line parameter above will run a dry run when this is executed. This will NOT copy any files over. It will simply inform the user what files will be copied when the command (with the “n” parameter removed) is executed. It is also important to note that the first “/” in the Rsync command is the source data that we will be copying to the NAS.
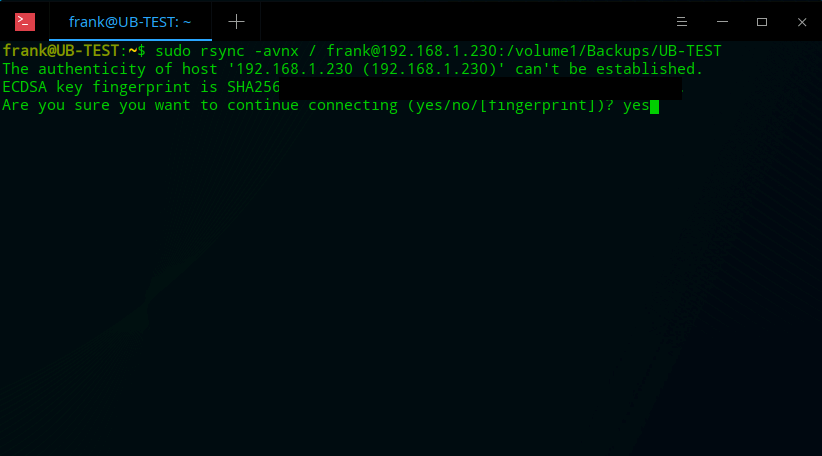
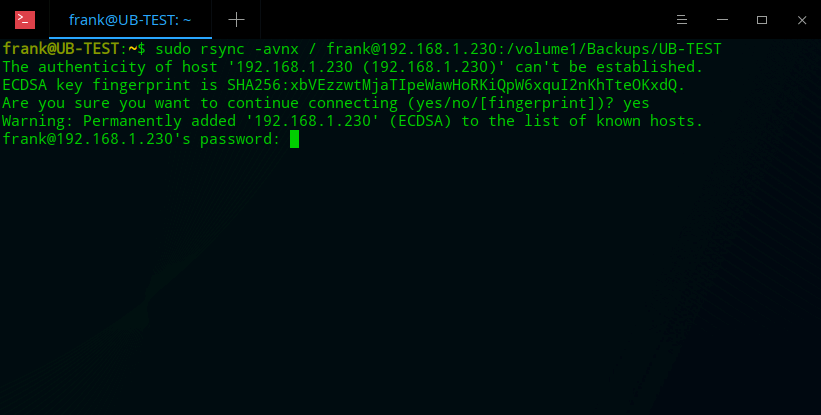
7. If this is your first time running the command, you will be asked to accept the ECDSA key fingerprint. Type yes and select the enter key.
8. Enter the password of your Synology NAS user account that has permission to the shared folder.
NOTE: you might need to enter the password of your Linux user first.
9. When the dry run has finished (assuming the results are what you were expecting), remove the “n” parameter, and run the command. When prompted, enter the NAS password once again.
sudo rsync -avx / [USERNAME]@[NAS IP ADDRESS]:/[NAS VOLUME]/Backups/[PC NAME]
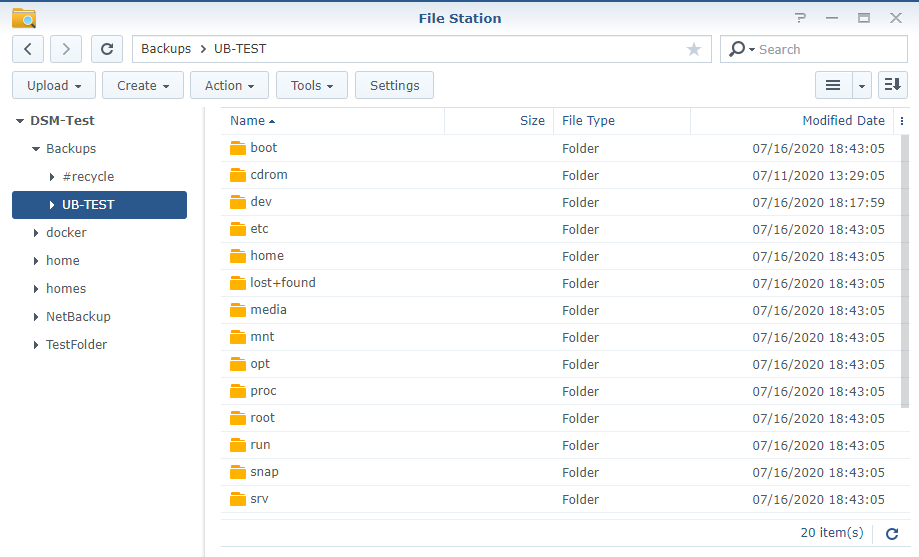
10. When the process is completed, you will see that your files are now on your Synology NAS in the folder we created.
Conclusion – How to Use Rsync on a Synology NAS
This tutorial looked at how to use Rsync on a Synology NAS. The first time executing this, all files will need to be backed up which will take a little longer than subsequent backups. Rsync does incremental backups, which means that it will view the files that are changed and back them up to the Synology NAS.
This process is NOT automated! You can only back up your machines when you execute the command. If you’d like to automate this process by using SSH keys and Cron, please check out our tutorial!
It’s always a good idea to back up your Synology NAS offsite. If you’re interested in doing that, check out our tutorials on how to back up your Synology NAS to a Raspberry Pi or Backblaze B2! Thanks for checking out the tutorial on how to use Rsync on a Synology NAS! If you have any questions on how to use Rsync on a Synology NAS, please leave them in the comments!
You Might Also Like

How to Set Up Synology QuickConnect

May 5, 2022
How to Find a Synology NAS on a Network

July 17, 2022
Run a Speed Test on a Synology with iPerf3

May 9, 2022
Backup a Synology NAS to a Raspberry Pi using Hyper Backup
This Post Has 8 Comments
Does RSYNC keep a continuous back up or does it keep the status synced? Like if I remove folders or anything, will they be removed from the NAS as well or will is just keep everything and never remove stuff?
Rsync is a command that you can run manually or automate using SSH Keys/Cron. By default, Rsync only copies over the file differences, so the initial backup will take a long time but subsequent backups will be significantly quicker. To answer your question, if you run an Rsync today from a Linux PC to a Synology NAS, delete a folder on the Linux PC tomorrow and then run an Rsync again, the folder will still exist on the Synology NAS. Rsync is a great backup tool, but it’s really only good for file-level backups. If you’re interested in doing bare-metal backups, something like Veeam is definitely better. Let me know if you have any other questions!
Not sure what you mean by bare-metal backups, but what I would like is just the current folder structure of the Pi. That way if at some point, a cache or garbage file gets backed up it will be deleted if it’s been deleted on the Pi.