- Android On Linux
- Do you have a Android Phone and a Linux Desktop? Then this is the Place for you!
- Setting Up ADB on Linux
- Part I: Installing the JDK
- Linux Mint Users!
- Part II:Installing Android SDK
- Part III: The Setting-Up Part
- Extras
- How to Install Android Debug Bridge on Linux to Manage your Android Phone
- ADB on Linux
- Installing ADB on Linux
- Verifying ADB Installation
- Using ADB to Manage Android Devices
- Conclusion
- About the author
- Sidratul Muntaha
Android On Linux
Do you have a Android Phone and a Linux Desktop? Then this is the Place for you!
Setting Up ADB on Linux
ADB is a tool used to connect and send commands to your Android phone from a desktop or laptop computer. In other words, it’s like the command center. ADB is a very important tool, it is used for various purposes, from rooting your phone to messing with system codes. A Developer/Themer is crippled without ADB and if you’re just an average user, you will still need it… Don’t you want all that sweet ROMs and Mods? On this guide, I will be using Xubuntu 12.04, a flavour of Ubuntu (No Big Difference Really.)
To set up ADB on Linux, you’ll need to download some files and said files are a bit heavy. Just don’t try to do this on a 512 kbits connection.
Part I: Installing the JDK
First, we’ll need to install the JDK (Java Development Kit.) We’ll need to use Oracle Java instead of OpenJDK in Ubuntu. Thanks to WebUpd8 for providing an installer.
Oracle JDK7 itself is not hosted in the PPA because that’s not allowed by the new Java license (which is also the reason why it has been removed from the official Ubuntu repositories); the package in the PPA automatically downloads (and installs) Oracle Java JDK 7 from its official website and installs it on your computer, just like the flashplugin-installer package does.
Chances are you already have OpenJDK installed, if you do, then run this command in the Terminal.
sudo apt-get purge openjdk*
The command given above will purge OpenJDK. Now we’re ready to install the JDK. Type these commands into the Terminal:
sudo add-apt-repository ppa:webupd8team/java
sudo apt-get update
sudo apt-get install oracle-java7-installer
After the installation finishes, if you want to check if it was successful, then run this command:
It should give an output similar to this:
java version «1.7.0_10»
Java(TM) SE Runtime Environment (build 1.7.0_10-b18)
Java HotSpot(TM) 64-Bit Server VM (build 23.6-b04, mixed mode)
Linux Mint Users!
If you use mint… you don’t need Oracle Java, you can go with OpenJDK
Just open the terminal and issue:
sudo apt-get install openjdk-7-jdk
Part II:Installing Android SDK
The Android Software Development Kit (SDK) includes a comprehensive set of development tools. These include a debugger , librairies, a handset emulator based on QEMU, documentation, sample code, and tutorials. It contains ADB and you’ll need it.
Head over to the Android Developer Website and download the SDK.

Download SDK Tools, not the ADT Bundle.
After you get the .tgz file. Go to your Home and, to keep things organized, I suggest making a folder called “Android” or “Andy” in there and extracting it there. After you’re done extracting, you’ll get a folder called “android-sdk-linux.” We’ll be doing some terminal commands, so, to make the name short, we’ll rename it to “sdk.”
Open “sdk” folder and navigate to “tools” in which you’ll find a file simply called “android” . That is actually the Android SDK Manager. After opening it untick everything other than “Tools” :

Click on “Install 2 Packages”, I already have it installed.
Part III: The Setting-Up Part
On your Android Phone, go to Settings > Applications > Development and in there enable USB Debugging. Plug it into your PC and throw this command in the terminal:
lsusb
You will get an output similar to this:
Bus 001 Device 001: ID 1d6b:0002 Linux Foundation 2.0 root hub
Bus 002 Device 001: ID 1d6b:0001 Linux Foundation 1.1 root hub
Bus 003 Device 001: ID 1d6b:0001 Linux Foundation 1.1 root hub
Bus 004 Device 001: ID 1d6b:0001 Linux Foundation 1.1 root hub
Bus 005 Device 001: ID 1d6b:0001 Linux Foundation 1.1 root hub
Bus 004 Device 003: ID 19d2:fffe ZTE WCDMA Technologies MSM
Bus 001 Device 004: ID 1c9e:9e08 OMEGA TECHNOLOGY
My phone is the last one. To figure out which one is your phone, just disconnect your phone, enter the command and check which one is missing.
See that part in red, that is my the Manufacturer and Model ID of my Andy. Write it down somewhere. Now we need to create a udev rules file, enter this command:
sudo gedit /etc/udev/rules.d/51-android.rules
It creates a text file in which you will have to input some details, Put it in this format:
The Format Explained
#x-x-x-x-x-x = Replace the “x-x-x-x-x-x” with the name of your manufacturer. For example, for Samsung it’s “#Samsung”
ATTR==” xxxx ” = Replace the “xxxx” with your Manufacturer ID, which in my case is 1c9e
ATTR==” xxxx ” = Replace the “xxxx” with your Product ID, which in my case is 9e08.
GROUP=” adbandy “ = I set up a group called adbandy and included myself in it, you don’t have to do it. You can replace adbandy with “plugdev”
After you’re done doing the above, save it and close.
Next, Open your “Home” Directory and configure it to show hidden files and folders by pressing Ctrl + H. A bunch of Files and Folders will show up. Find the .android folder and open it. In there, you will find a file called adb_usb.ini, open it, it’ll look like this:

Replace the red Xs in “0x xxxx ” with your Vendor ID and put it right under “# 1 USB VENDOR ID PER LINE”.
Note: If you don’t have adb_usb.ini, cd to /sdk/tools/ and issue the following commands:
# ./android update adb
# cd ../platform-tools/
# ./adb kill-server
# sudo ./adb start-server
After you are done, it should look like this:

Open a Terminal and shoot this command: —–Note: The “Android” in the command is the folder in which we extracted the SDK in.
cd ~/Android/sdk/platform-tools/
Then enter these commands, one by one:
sudo service udev restart
./adb kill-server
./adb start-server
./adb devices
After you issue the last command, if you get an output like this;

Congratulations, you have successfully set up ADB on your Linux Box.
But if you get a different output then you can move on to the “Extras” Section where problems and there Solutions are given.
Extras
Problem 1: After following all the instructions above, I get the output above with nothing under “List of devices attached”, what do I do?
Solution: I had this problem. After a lot of running around, I found the solution. Run the commands given below. Note: This might not work for some but you can try.
sudo cp /lib/udev/rules.d/40-usb_modeswitch.rules /etc/udev/rules.d/usb_modeswitch.rules
sudo gedit /etc/udev/rules.d/usb_modeswitch.rules
The last command will launch a text file with a lot of stuff in it. At the end of the text file, before the modeswitch_rules_end, add one more entry. The format of the entry is given below, you need to use the details of your phone — The format was explained in the part where we set up udev rules.
#x-x-x-x-x-x
ATTR==»xxxx», ATTR==»xxxx», RUN+=»usb_modeswitch ‘%b/%k'»
Then run:
sudo usb_modeswitch -v 0x 1c9e -p 0x 9e08 -S -R -W
Replace my Manufacturer ID and Product ID with yours…
Problem 2: After doing all the above, I get “. no permissions”
Solution: cd to your platform-tools directory and run these commands:
# sudo service udev restart
# ./adb kill-server
# sudo ./adb start-server
Thank you for taking your time to read this article. This is the first post on Android On Linux.
Comment. Gimme a Thumbs Up. Gimme some Hate. Gimme Whateva. 🙂
If you have any problems, don’t hesitate to let me know.
How to Install Android Debug Bridge on Linux to Manage your Android Phone
![]()
The Android Debug Bridge (ADB, for short) is a versatile command-line tool to communicate with an Android device. Using the ADB, you can perform a variety of actions on the target device, for example, installing and debugging apps, running commands, and more.
In this guide, we will learn how to install ADB on Linux and manage your device with it.
ADB on Linux
There are actually two parts of ADB: one comes with Android and the other one is the desktop client. When the Android device is connected and USB debugging is enabled, we can use the desktop ADB client to send various commands to the Android device. ADB comes as a part of the Android SDK which is available for Windows, Linux, macOS, and others.
However, the ADB tool is also available separately for all the major platforms, including Linux. In most cases, it should be available from the official package repo of the Linux distro.
This guide will feature installation steps on some of the most popular Linux distros.
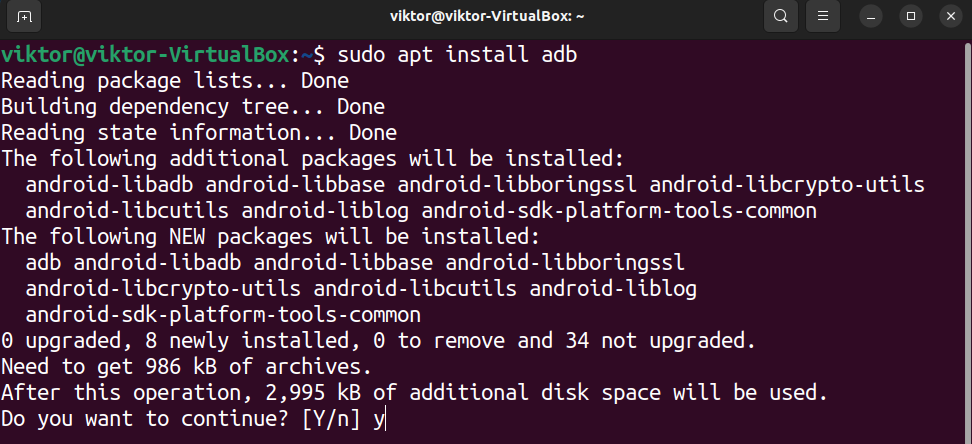
Installing ADB on Linux
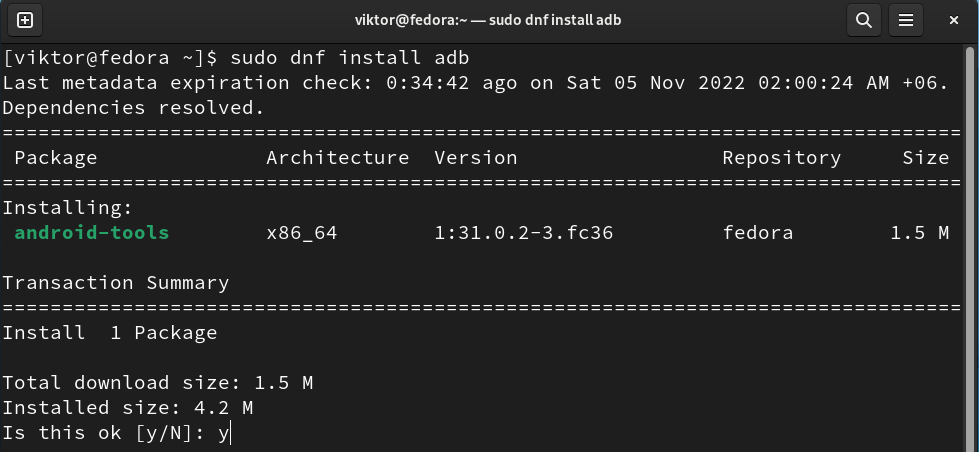
Depending on the Linux distro you are running, follow the proper installation procedure.
Debian/Ubuntu-based distros
RHEL/CentOS/Fedora
OpenSUSE and SUSE Linux Enterprise
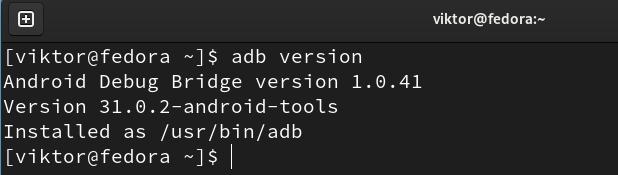
Verifying ADB Installation
Run the following command to verify if the installation was successful:
Using ADB to Manage Android Devices
To use ADB on a device, you have to make sure that it has USB debugging enabled. Check out this guide that demonstrates how to enable USB debugging mode on your Android device.
Once connected to the computer, we can use the ADB command-line tool to perform various tasks.
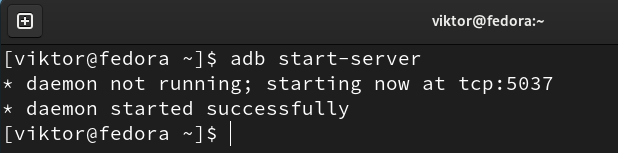
Starting/killing the ADB Server
To use ADB, first, we need to launch the ADB server. Run the following command:
On many occasions, the ADB server instance may become problematic. You can kill the currently running server using the following command:

Listing Connected Devices
Before trying to push any command to the device, we have to make sure that the ADB server is recognizing the connected device(s) properly. The following command will print a list of all the connected devices:
Rebooting the Android Device
To reboot the Android device, use the following ADB command:
We can also instruct the device to boot into other modes like recovery, fastboot, etc. To reboot into recovery, use the following command:
To reboot into fastboot, use the following command:
Note that the fastboot mode is used to flash various system images. To work with your device in fastboot mode, you have to have the fastboot client installed on your desktop.
File Transfer
We can use ADB to perform various common tasks, for example: file transfer.
To copy a file from the desktop to the Android device, use the following command structure:
To copy a file from the Android device to the desktop, use the following command structure instead:
App Management
ADB can install an app on your Android device. However, you need to have the APK package of the app at hand.
The command to install an APK file is as follows:
We can also check the list of installed apps using the following command:
To uninstall a package, use the following command:
Viewing Logs
Using ADB, we can also access the system log of the Android device. To view the log, run the following command:
To get full access to the phone, we can access the ADB shell. It is a direct shell into the Android device, giving us full control over it.
To access the shell, run the following command:
Android is built on top of the Linux kernel. Practically, you can use most of the Linux tools and commands in the shell to perform various tasks.
Conclusion
ADB is a powerful tool that comes as a part of the Android SDK. In this guide, we demonstrated installing the ADB desktop client on Linux. We also highlighted some common ways of using ADB to perform various tasks on any Android device.
Interested in having Android experience on desktop? Check out some of the best Android emulators for PC. You can also manage most of these emulators through the ADB interface.
About the author
Sidratul Muntaha
Student of CSE. I love Linux and playing with tech and gadgets. I use both Ubuntu and Linux Mint.