- How to install Anaconda Navigator on Ubuntu 20.04 LTS or CentOS Linux
- Quickstart guide for Mac & Linux using Navigator#
- Creating an account#
- Creating a profile#
- Purchasing a subscription to Anaconda#
- Installing conda software#
- Authenticating to Anaconda#
- Important information about the .condarc file#
- Viewing your .condarc file#
- Adding conda-forge as a channel#
- Using Anaconda behind a firewall or proxy (Optional)#
- Verifying your configurations#
- Installation#
- System requirements#
- Installing Navigator#
- Using Navigator in offline mode#
- Configuring Navigator to work with a local Anaconda Repository#
- Configuring Navigator to work with Anaconda Cloud#
- Uninstalling Navigator#
How to install Anaconda Navigator on Ubuntu 20.04 LTS or CentOS Linux
Python is an object-oriented interpreted computer programming language. Its use has the characteristics of cross-platform. It can be used in Linux, macOS, and Windows systems. When the code written by it runs on different platforms, it is almost impossible Major changes are required, and users all benefit from its convenience.
In addition, the power of Python lies in its wide range of applications, covering artificial intelligence, scientific computing, web development, system operation and maintenance, big data and cloud computing, finance, game development, etc. The prerequisite for realizing its powerful functions is that Python has a large number of standard libraries and third-party libraries with relatively complete functions. Through reference to the library, the development of different fields of business can be realized. However, it is precise because of the huge number of libraries that managing these libraries and maintaining them in time has become an important but highly complex thing.
What is Anaconda?
Anaconda is an integrated Python environment. It can be regarded as an integrated installation of Python that provides python, IPython, an integrated development environment Spyder and many packages, and modules out of the box. The best thing it is quite easy to install even a novice can install it with just one click on windows, macOS, and Linux operating systems.
Anaconda’s individual edition which is open source and free to download and use can be got from its official website.
Anaconda has the following characteristics:
- Open-source
- Simple installation process
- High performance using Python and R language
- Free community support
- Cloud-based repository with over 7,500 data science and machine learning packages
- 1,000+ open source libraries
- ML/AI pipeline in a central development environment, which can be expanded from laptops to thousands of nodes
- Environment manager
- Conda package
- Open source Anaconda Distribution is the easiest way to perform Python/R data science and machine learning
- Develop and train machine learning and deep learning models using sci-kit-learn, TensorFlow and Theano
- Use Dask, NumPy, pandas, and Numba to analyze data with scalability and performance
- Use Matplotlib, Bokeh, Datashader, and Holoviews to visualize the result
Quickstart guide for Mac & Linux using Navigator#
This quickstart guide is intended to help you create an Anaconda account, obtain conda software, and configure it to access your instance of Anaconda while mainly using Anaconda Navigator. If you prefer to use the command line interface (CLI), see the Quickstart guide for Mac & Linux using the CLI to perform these same configurations.
Creating an account#
Go to https://anaconda.cloud/sign-up, where you will be prompted to create an account.
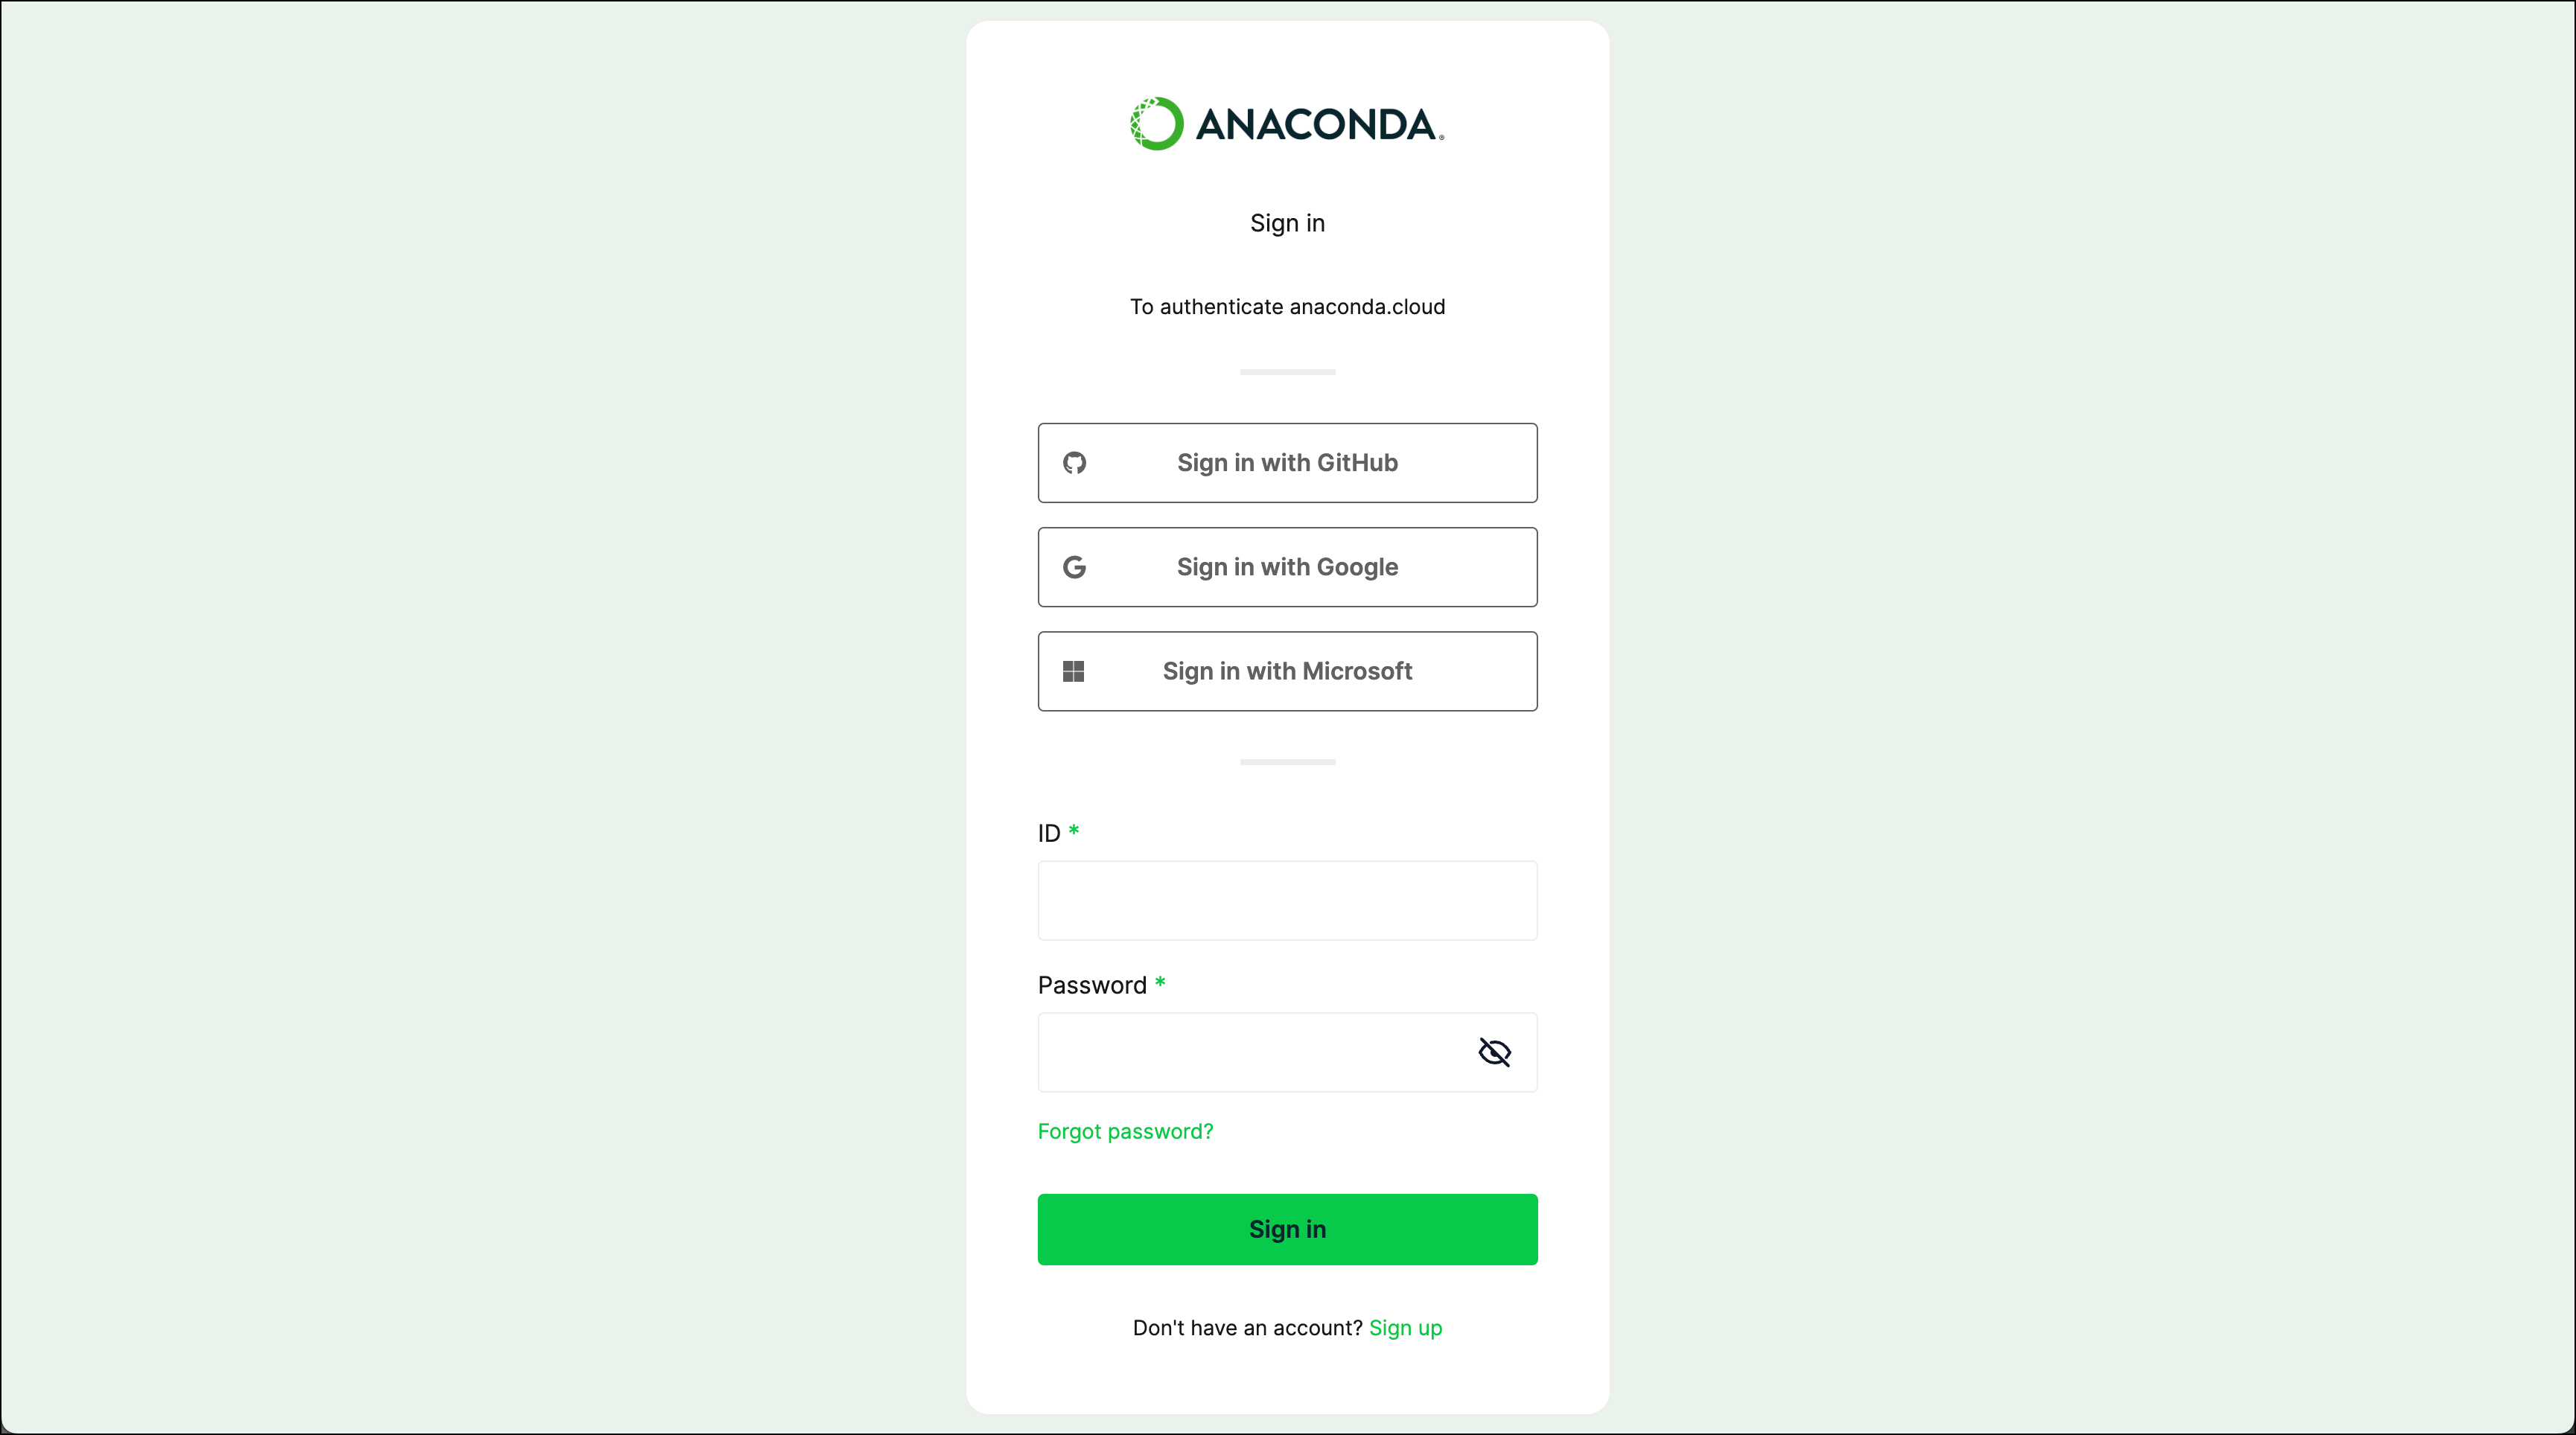
Complete the following steps:
- Enter your email address and a secure password.
- Check the box next to Agree to agree to our Terms of Service.
- Check the Captcha box.
- Click Create My Account.
You will then be directed to the Create a profile page.
Creating a profile#
Fill out the personal information form, check the box if you would like to receive marketing promotions or newsletters, then click Explore Anaconda Cloud.

You will receive a verification email once you have created your profile.
Purchasing a subscription to Anaconda#
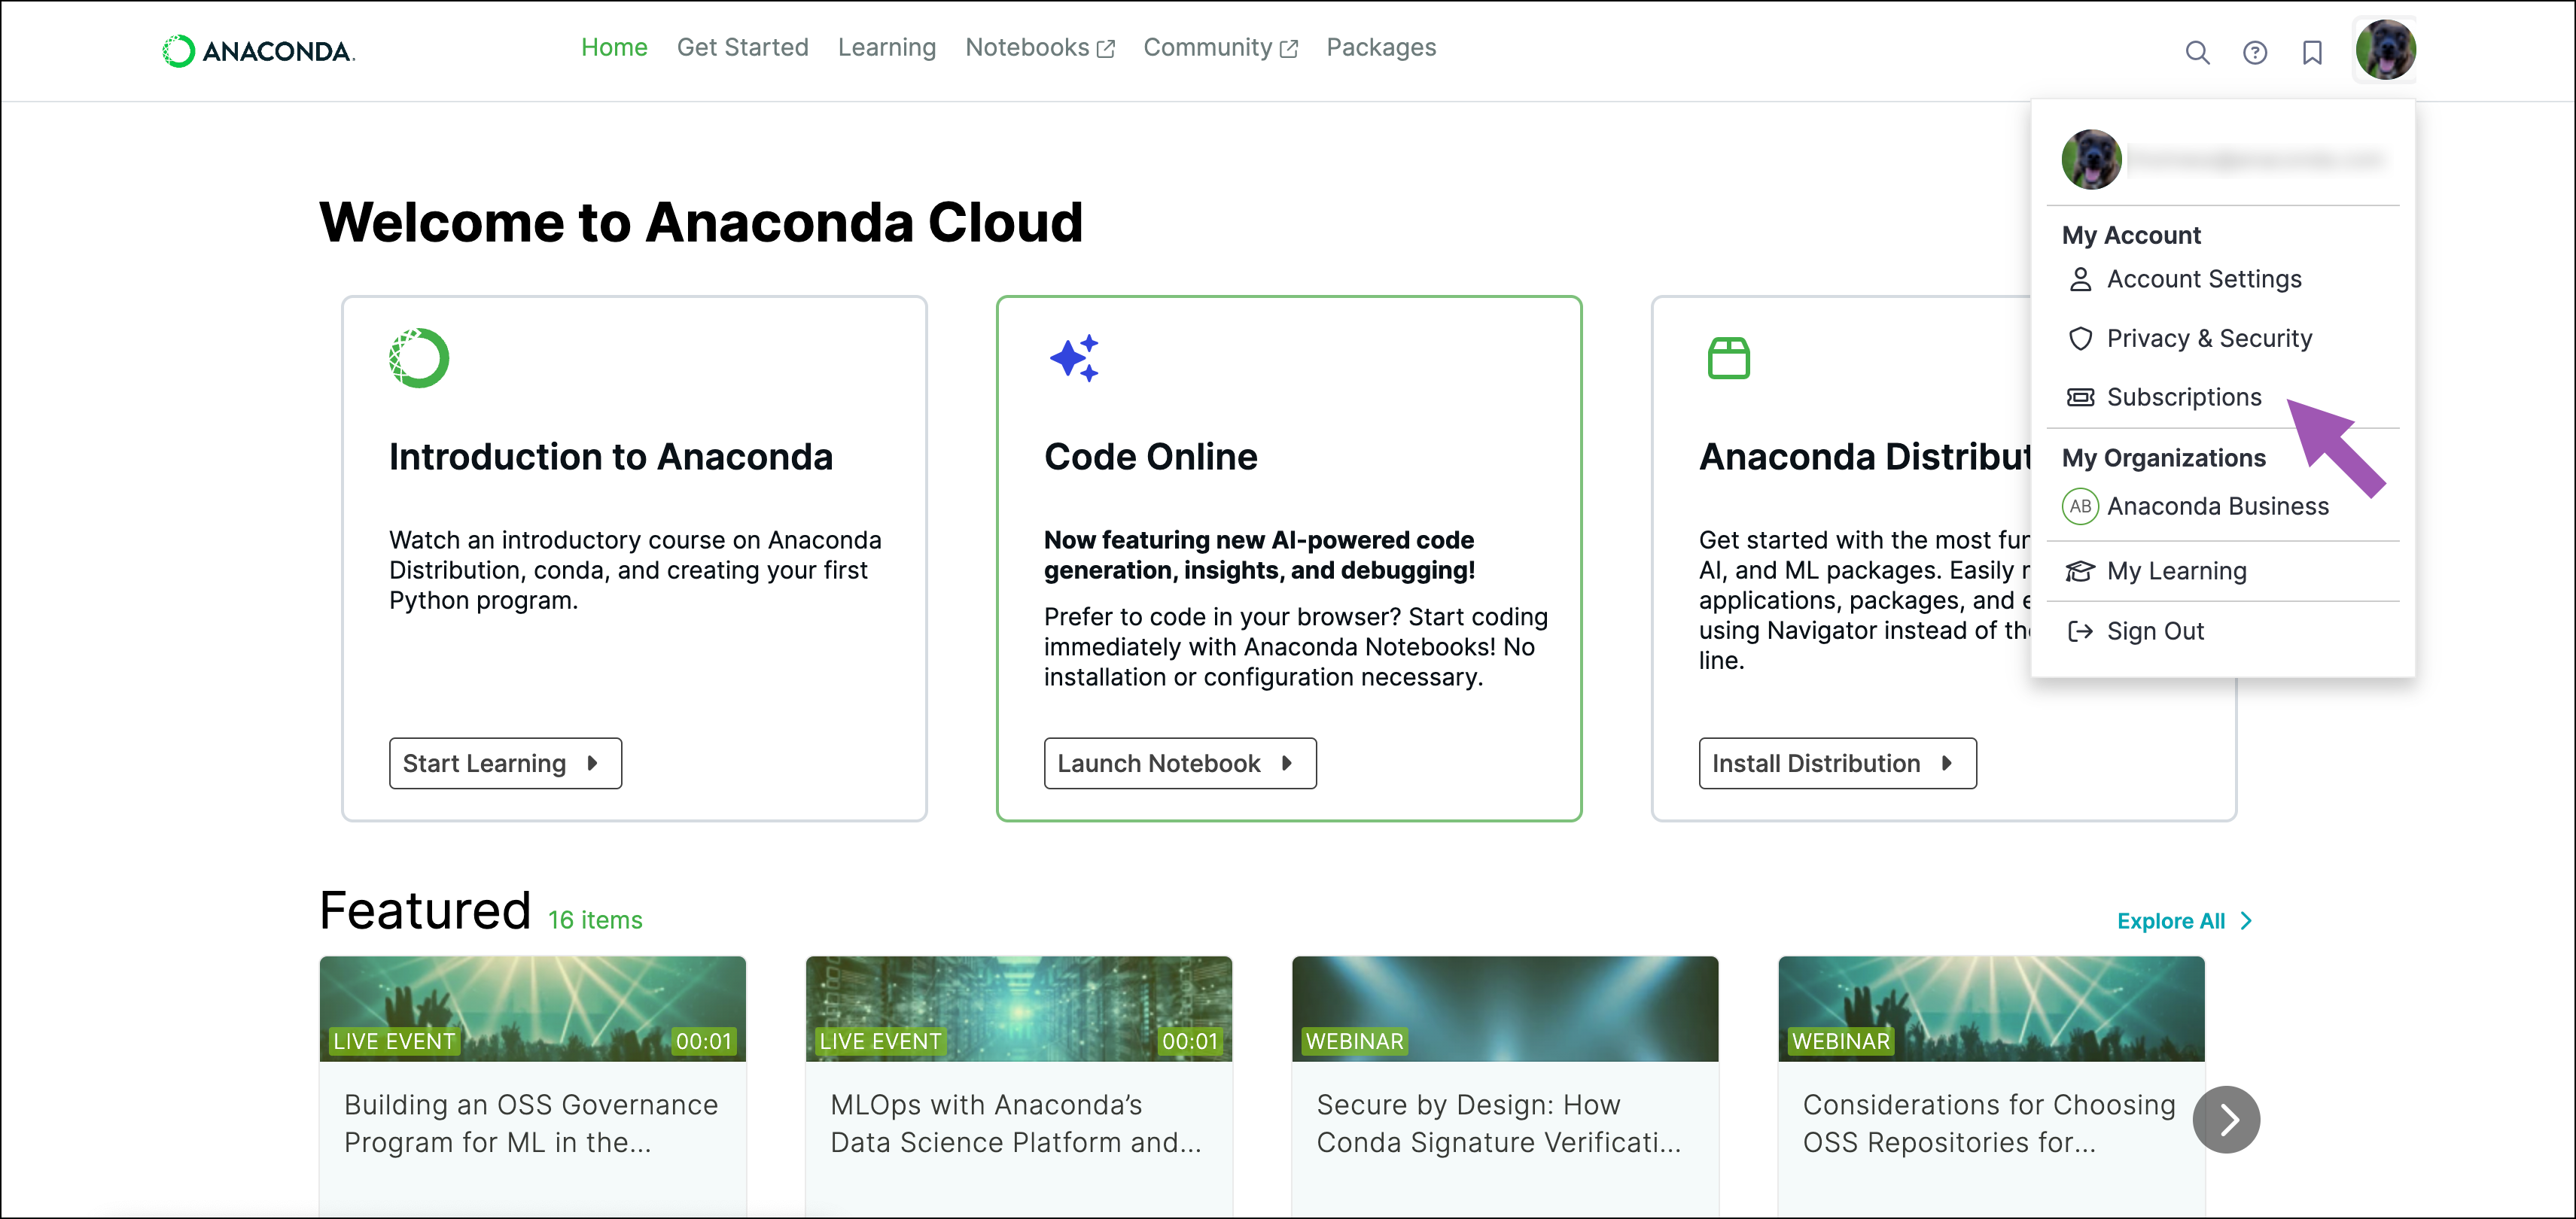
- Sign in to your Anaconda Cloud account.
- Open the user dropdown menu and select Subscriptions.

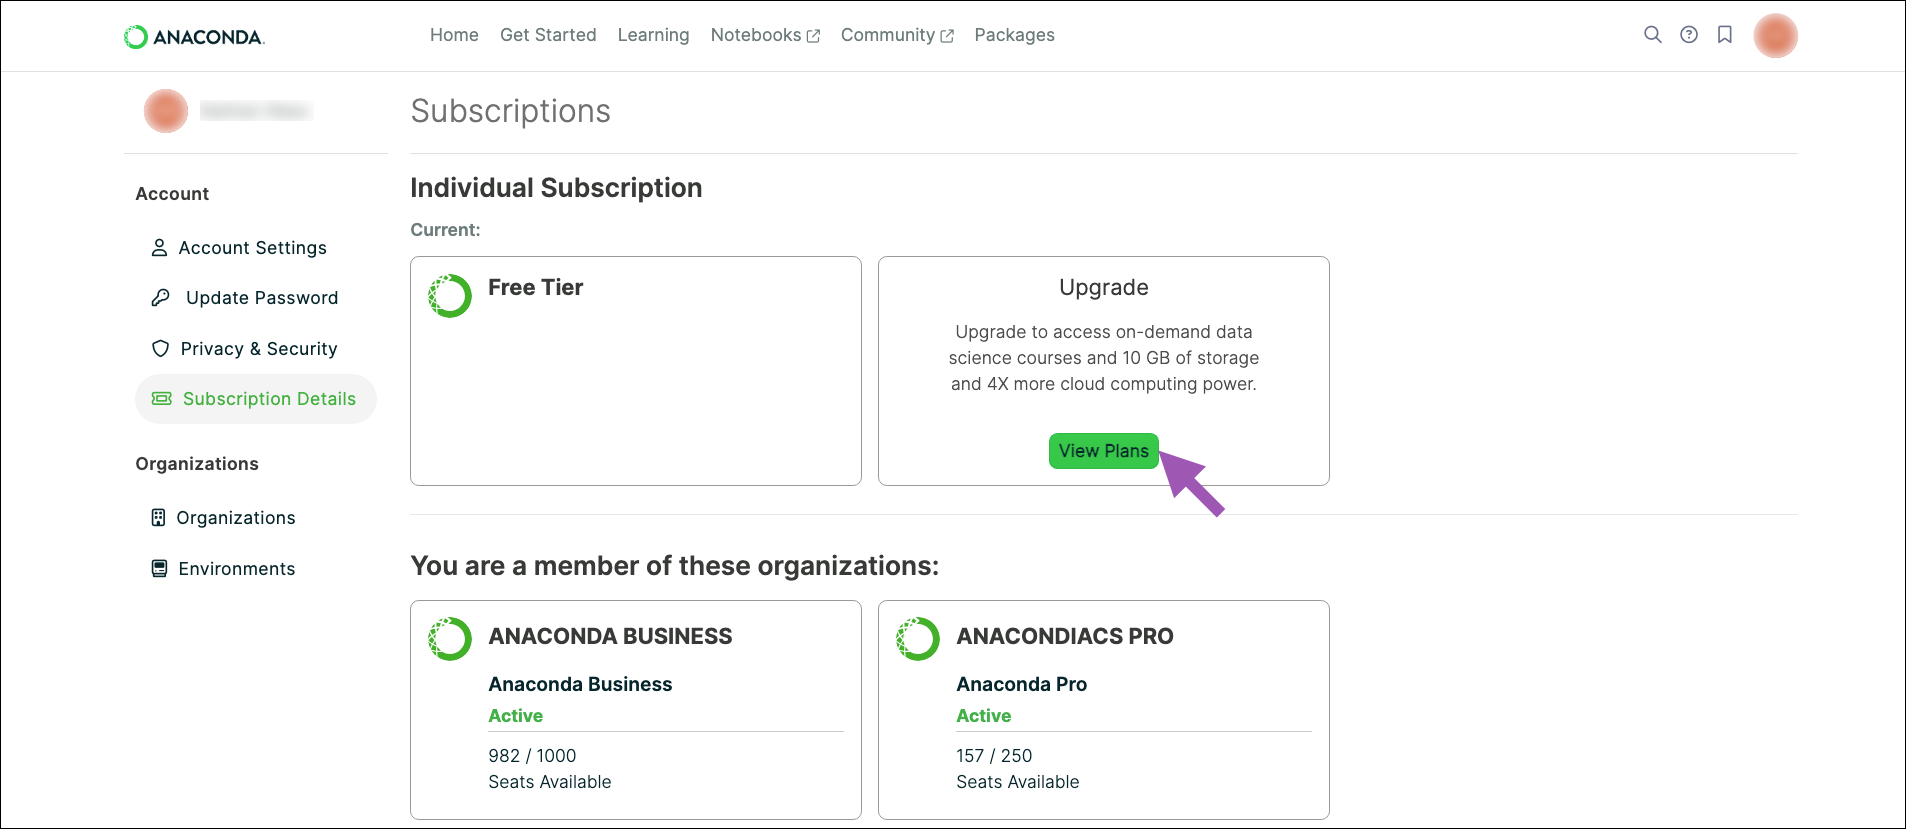
- Select Change Plan.
- Choose a monthly or yearly payment plan, then click Subscribe beneath your preferred tier.
- Enter your organization’s information and your billing information.
- Check the box to agree to the Anaconda EULA, then click Purchase Now.
- You will receive two emails. One is an invoice for your subscription purchase. The other is a welcome email for the organization you created.


Installing conda software#
If you already have Anaconda Distribution installed, you’re all set to move forward!
If you have not installed Anaconda Distribution or Miniconda yet, download either Anaconda Distribution or Miniconda and install it on your system before proceeding with configuration.
Not sure whether you need Anaconda Distribution or Miniconda? Refer to the Downloading conda topic for guidance.
If you choose to download Miniconda, you need to install Anaconda Navigator separately. To install Anaconda Navigator using Miniconda:
- Open a terminal.
- Install Anaconda Navigator by running the following command:
conda install anaconda-navigator
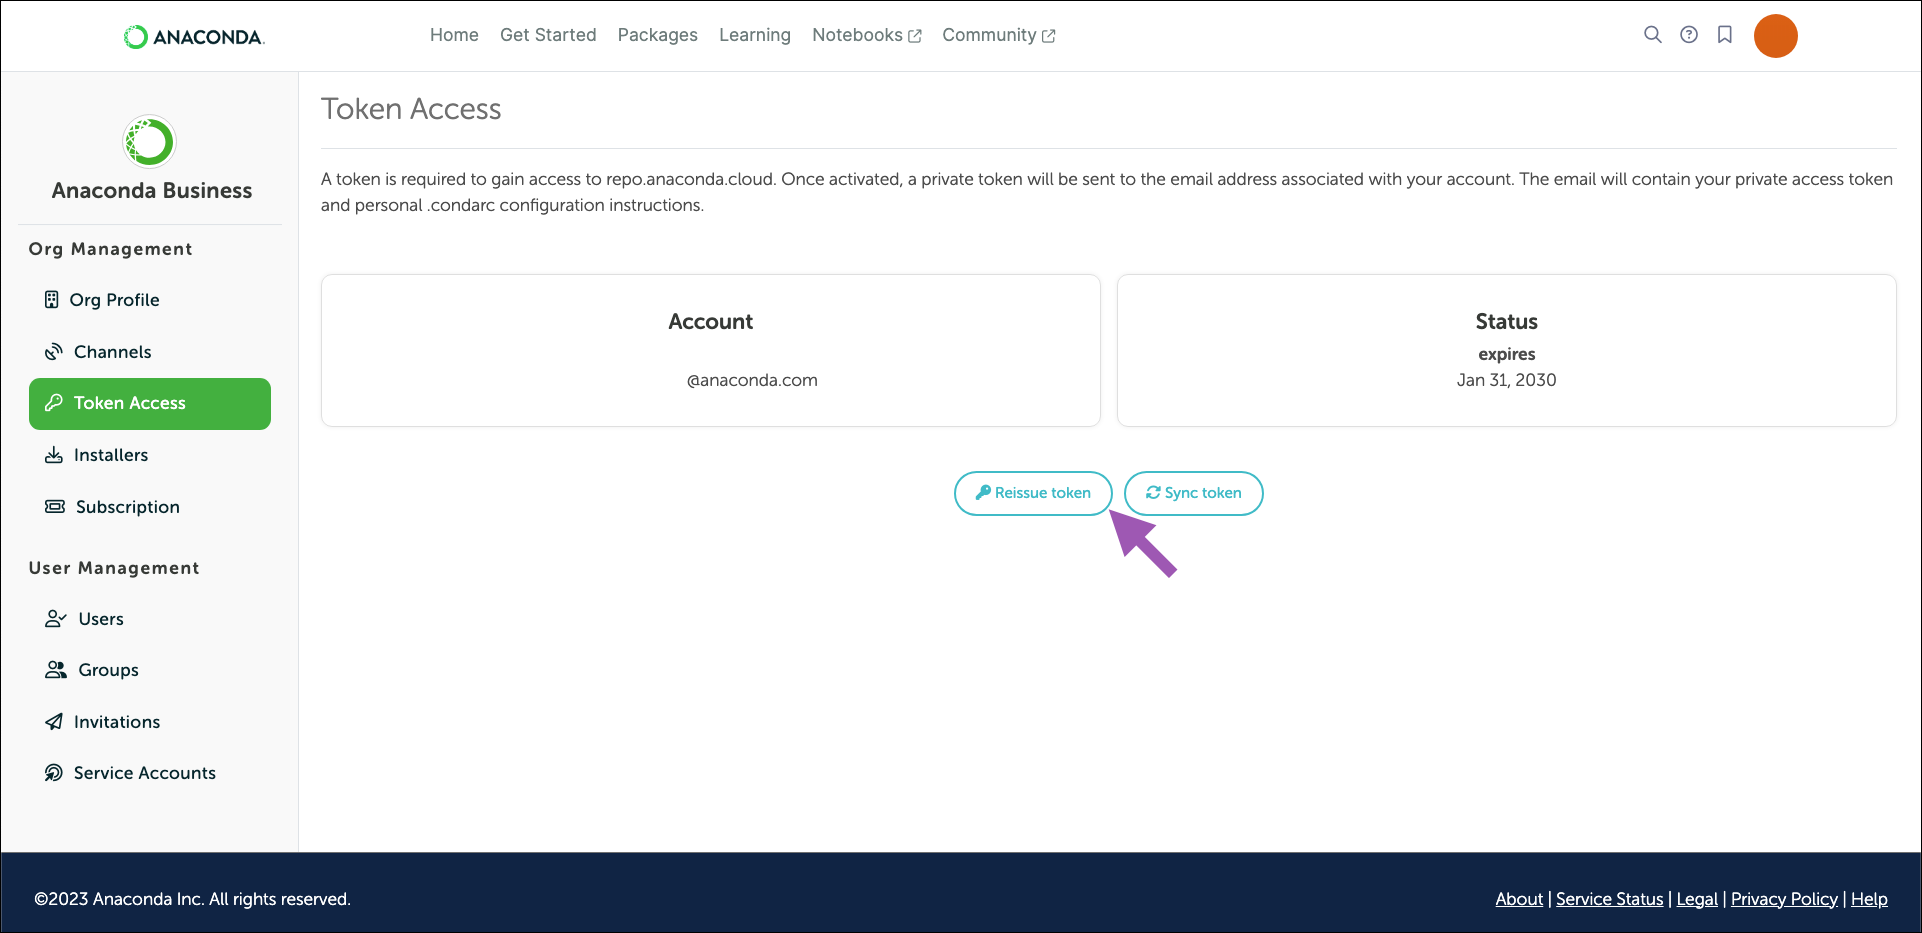
Authenticating to Anaconda#
Anaconda uses private tokens to authenticate users to their organizations. You must be assigned a seat within an organization to activate a token. Once you’re assigned a seat, you can generate a private token for yourself at any time.
- Go to your organization’s page.
- Select Token Access from the left-hand navigation.
- Select Activate token if it is the first time you are receiving a token, or Reissue token if you are obtaining a new token. An automated email containing a private token will be delivered to the address associated with your Anaconda account.
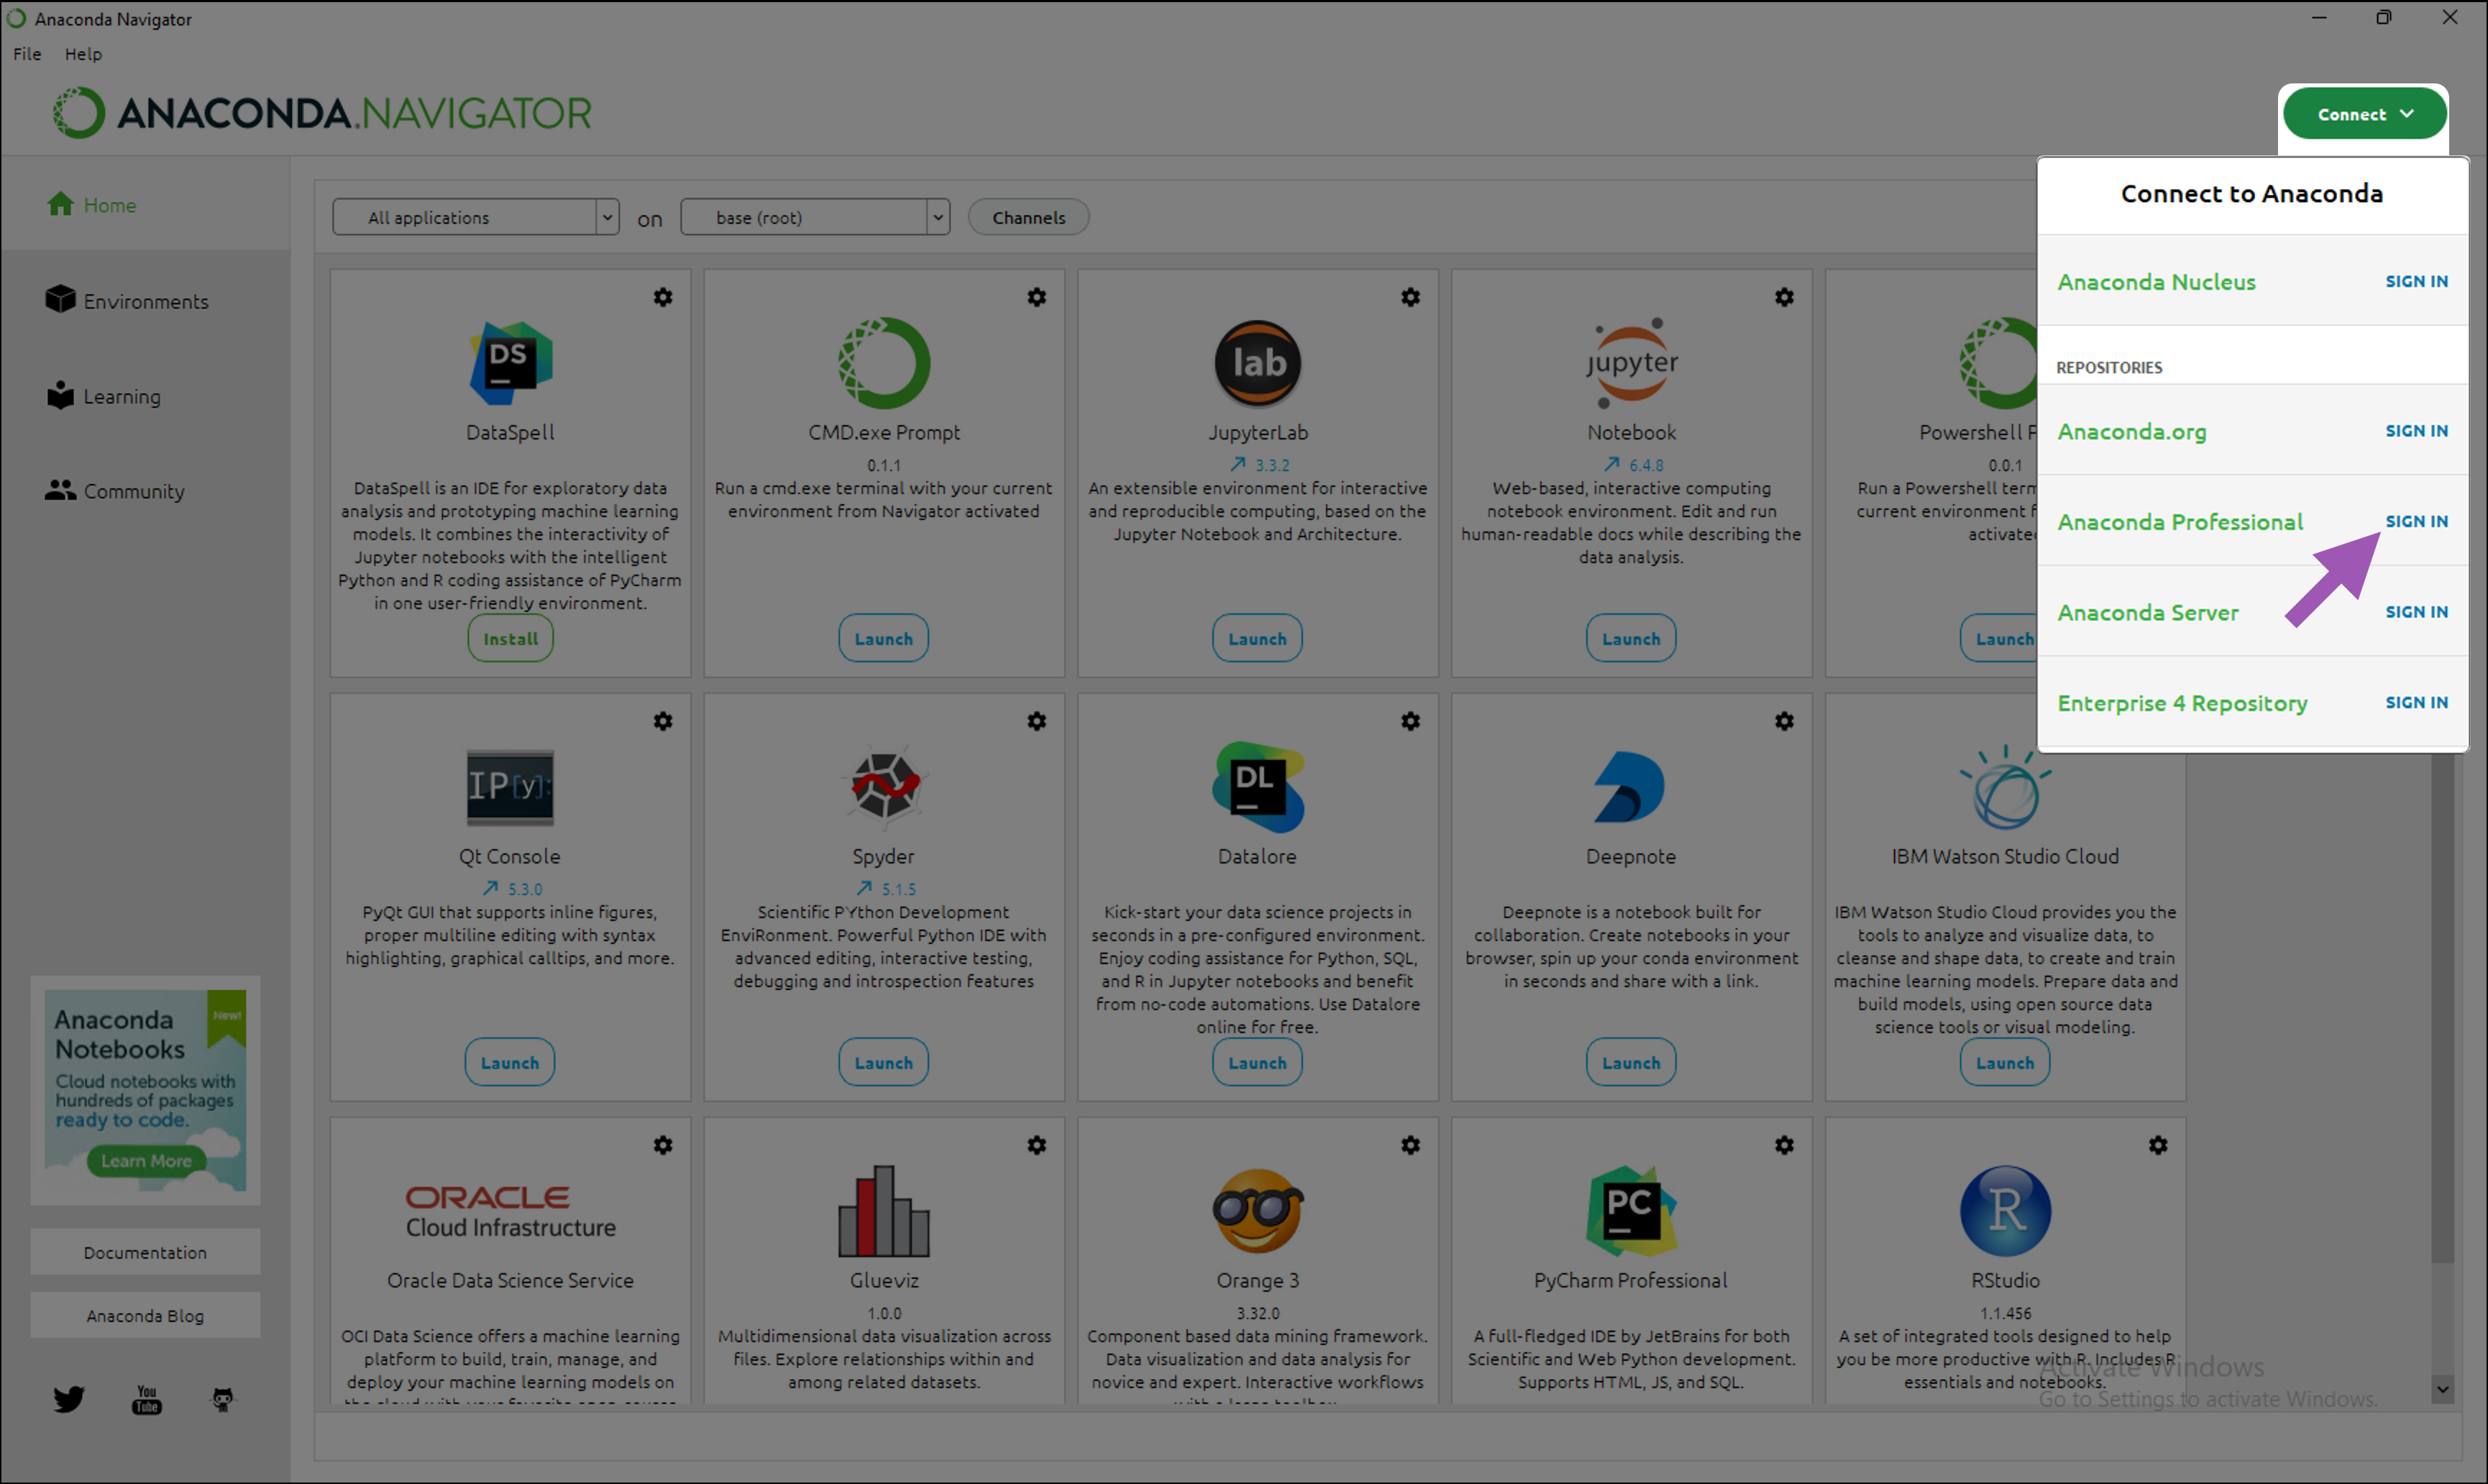
- Launch Anaconda Navigator.
- Select Connect, then Sign in to Anaconda Professional using the private token you received in your email.
Important information about the .condarc file#
The .condarc file is a configuration file that tells conda where to look for packages. Here is an example of what your .condarc file might look like:
channels: - defaults add_anaconda_token: true restore_free_channel: false default_channels: - https://repo.anaconda.cloud/repo/main - https://repo.anaconda.cloud/repo/r - https://repo.anaconda.cloud/repo/msys2
Conda searches for requested packages in the channel listed at the top of the channels: list first. If that channel contains the requested package, it is downloaded from that channel.
If the requested package is not located in that channel, conda will search for the package in the next entry of the channels: list.
When conda reaches the defaults entry of the channels: list, it searches the channels listed under the default_channels: list, in the same descending order.
In this example, conda will look in the default channels in listed order, starting with https://repo.anaconda.cloud/repo/main, then https://repo.anaconda.cloud/repo/r, and finally, in https://repo.anaconda.cloud/repo/msys2.
For more information regarding the .condarc file, see the official conda documentation.
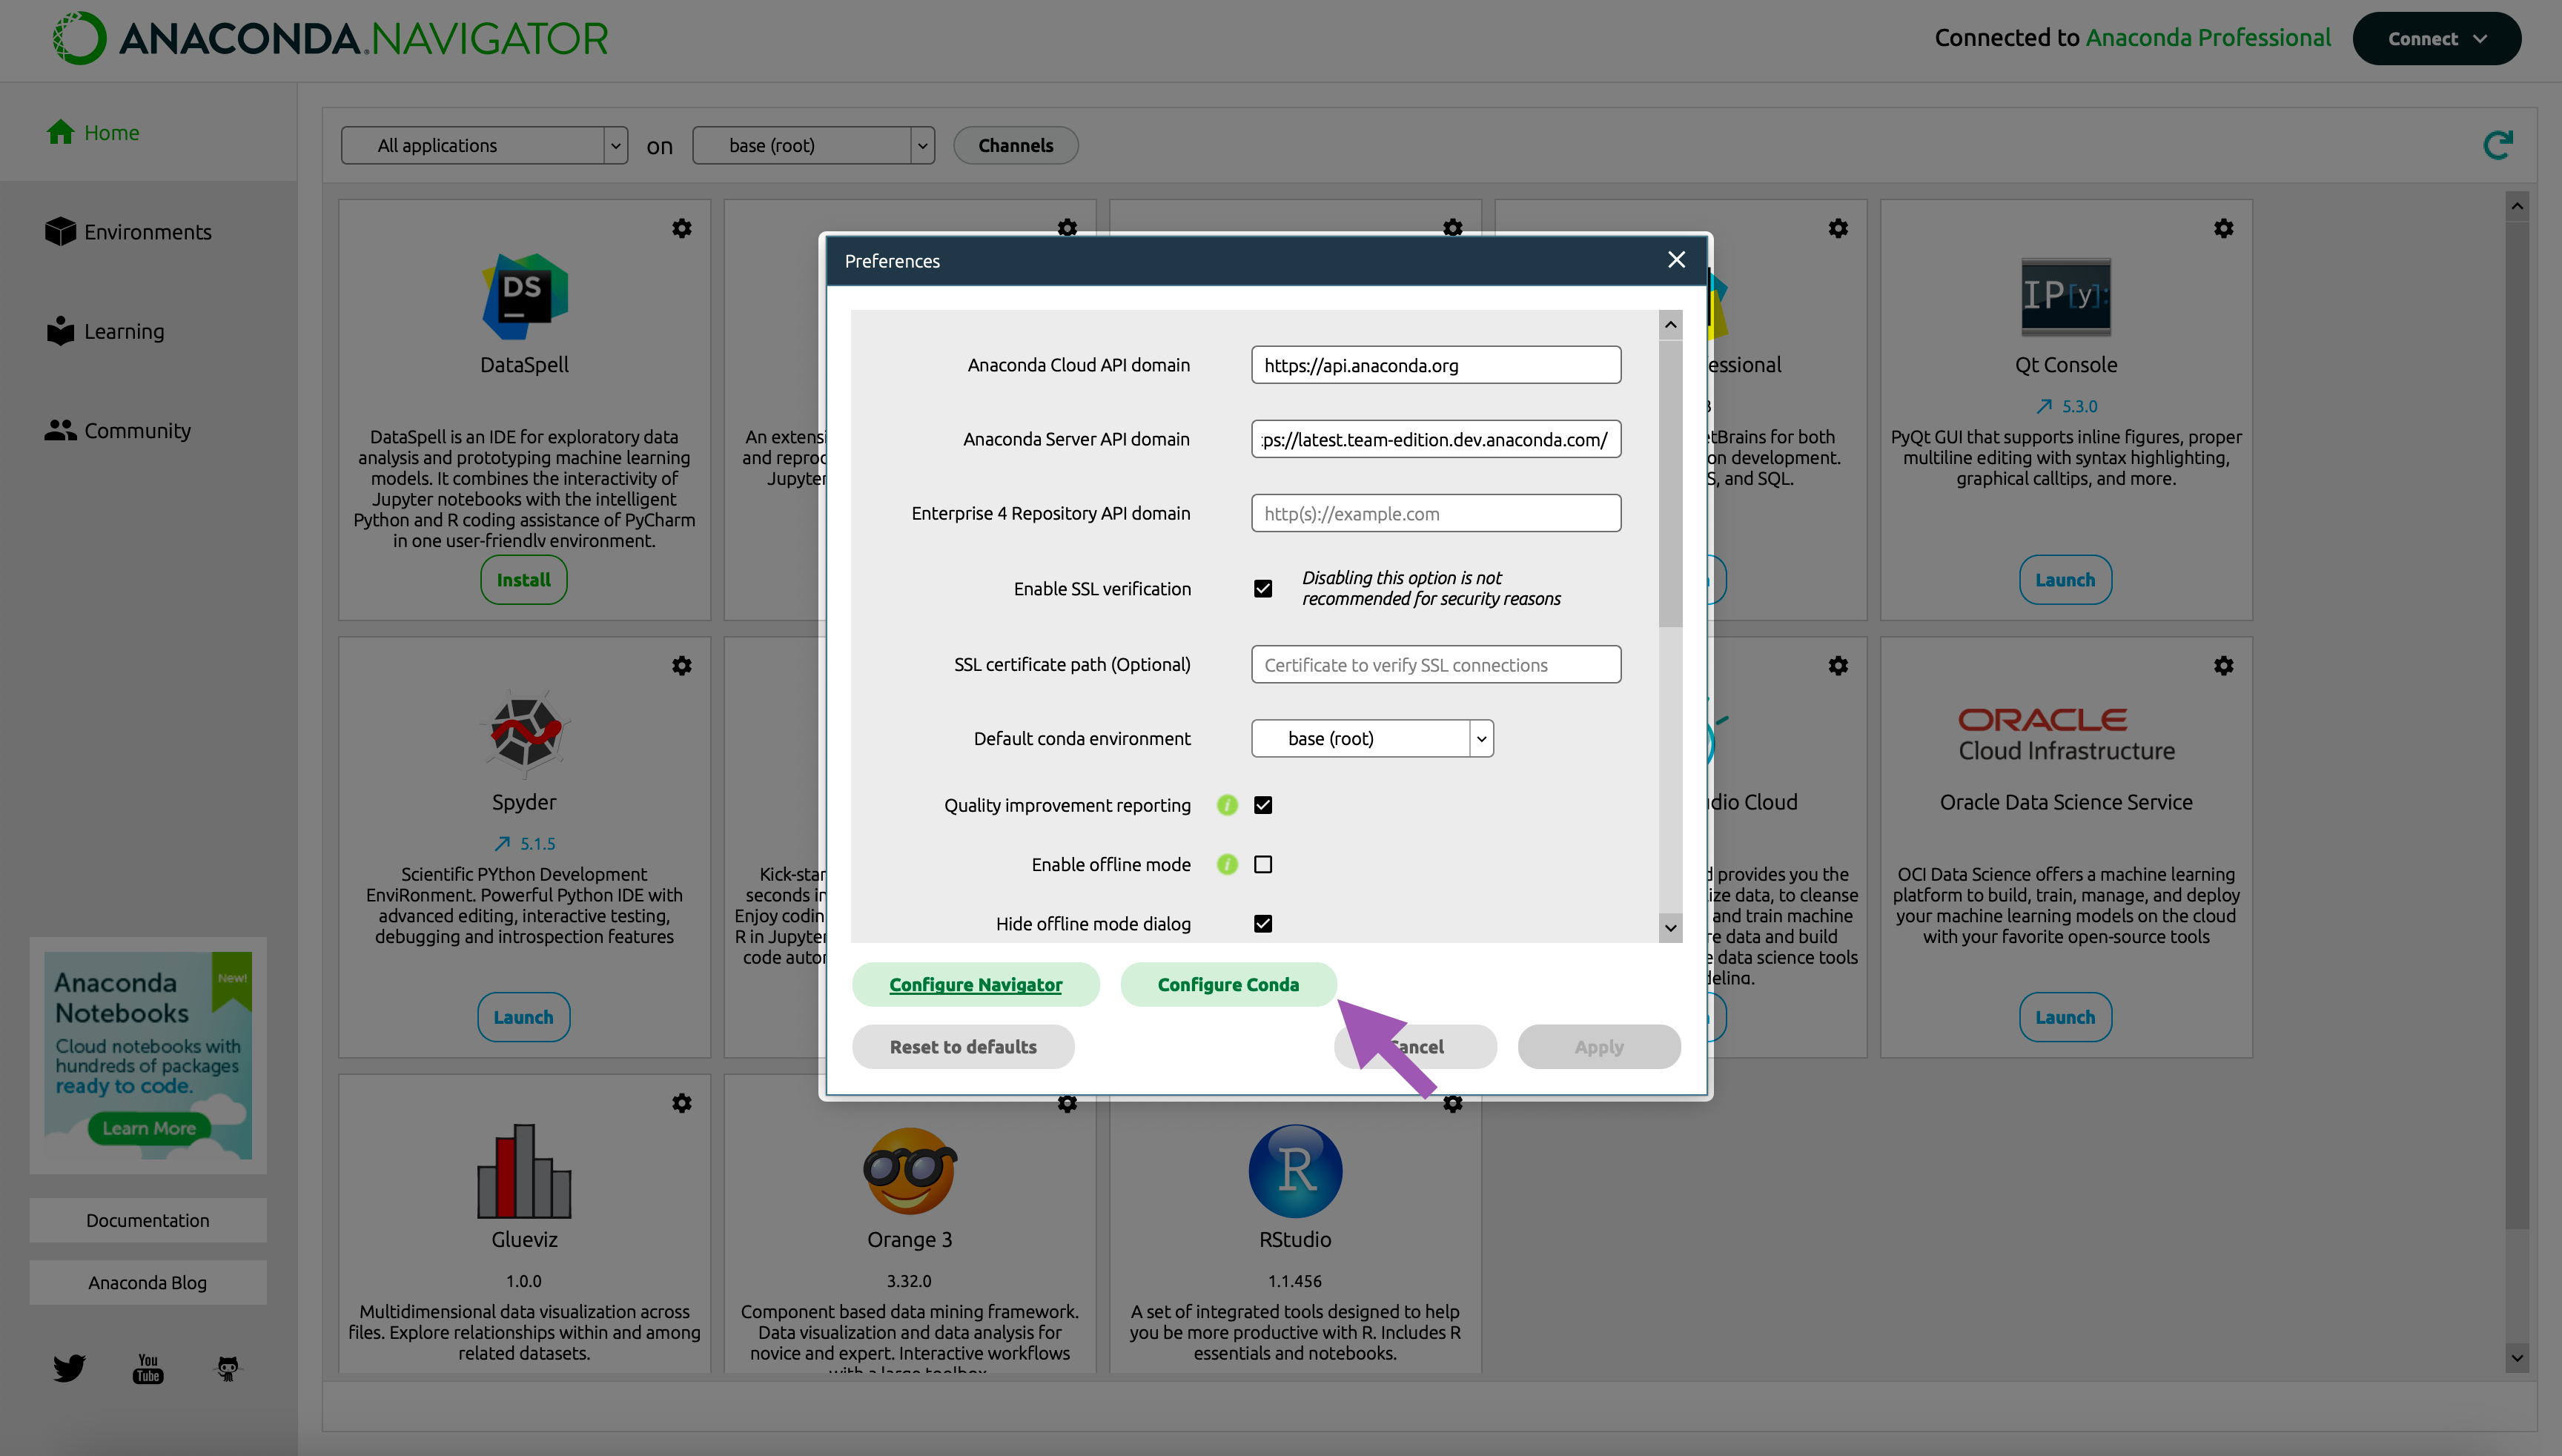
Viewing your .condarc file#
To view your .condarc file in Anaconda Navigator, navigate to Preferences from the menu bar and select Configure Conda.
Adding conda-forge as a channel#
If you need to install packages from the conda-forge repository:
- Select Channels, then click Add….
- Enter conda-forge as your channel.
- Press return to add the channel.
- Click Update channels to instruct navigator to update the channels: list in your .condarc file.
Using Anaconda behind a firewall or proxy (Optional)#
Some companies have security policies that prevent communications on their network with external servers, like Anaconda. Under these circumstances, you’ll need to connect to your company’s firewall/proxy server in order to download packages successfully.
To connect to a firewall/proxy server, you’ll need to include a proxy_servers: section in the .condarc file that contains the URL to the proxy server. This entry must also contain a username and password for logging in to the proxy server. Speak with your IT Administrator if you do not have this information.
There are no commands to include this portion of the .condarc file, so you need to manually include the following lines:
# Replace with the username for your proxy server # Replace with the password for your proxy server # Replace with the URL to your proxy server proxy_servers: http: http://:@:8080 https: https://:@:8443
You’ll also need to work with your IT team to allowlist connections to the main package repositories once you’ve configured your connection to the firewall/proxy server. The main package repositories are:
In some situations, it is necessary to export the HTTP_PROXY and HTTPS_PROXY environment variables to utilize the proxy server. To export your environment variables, open a terminal and run the following commands:
# Replace with the username for your proxy server # Replace with the password for your proxy server # Replace with the URL to your proxy server export HTTP_PROXY=http://:@:8080 export HTTPS_PROXY=https://:@:8443
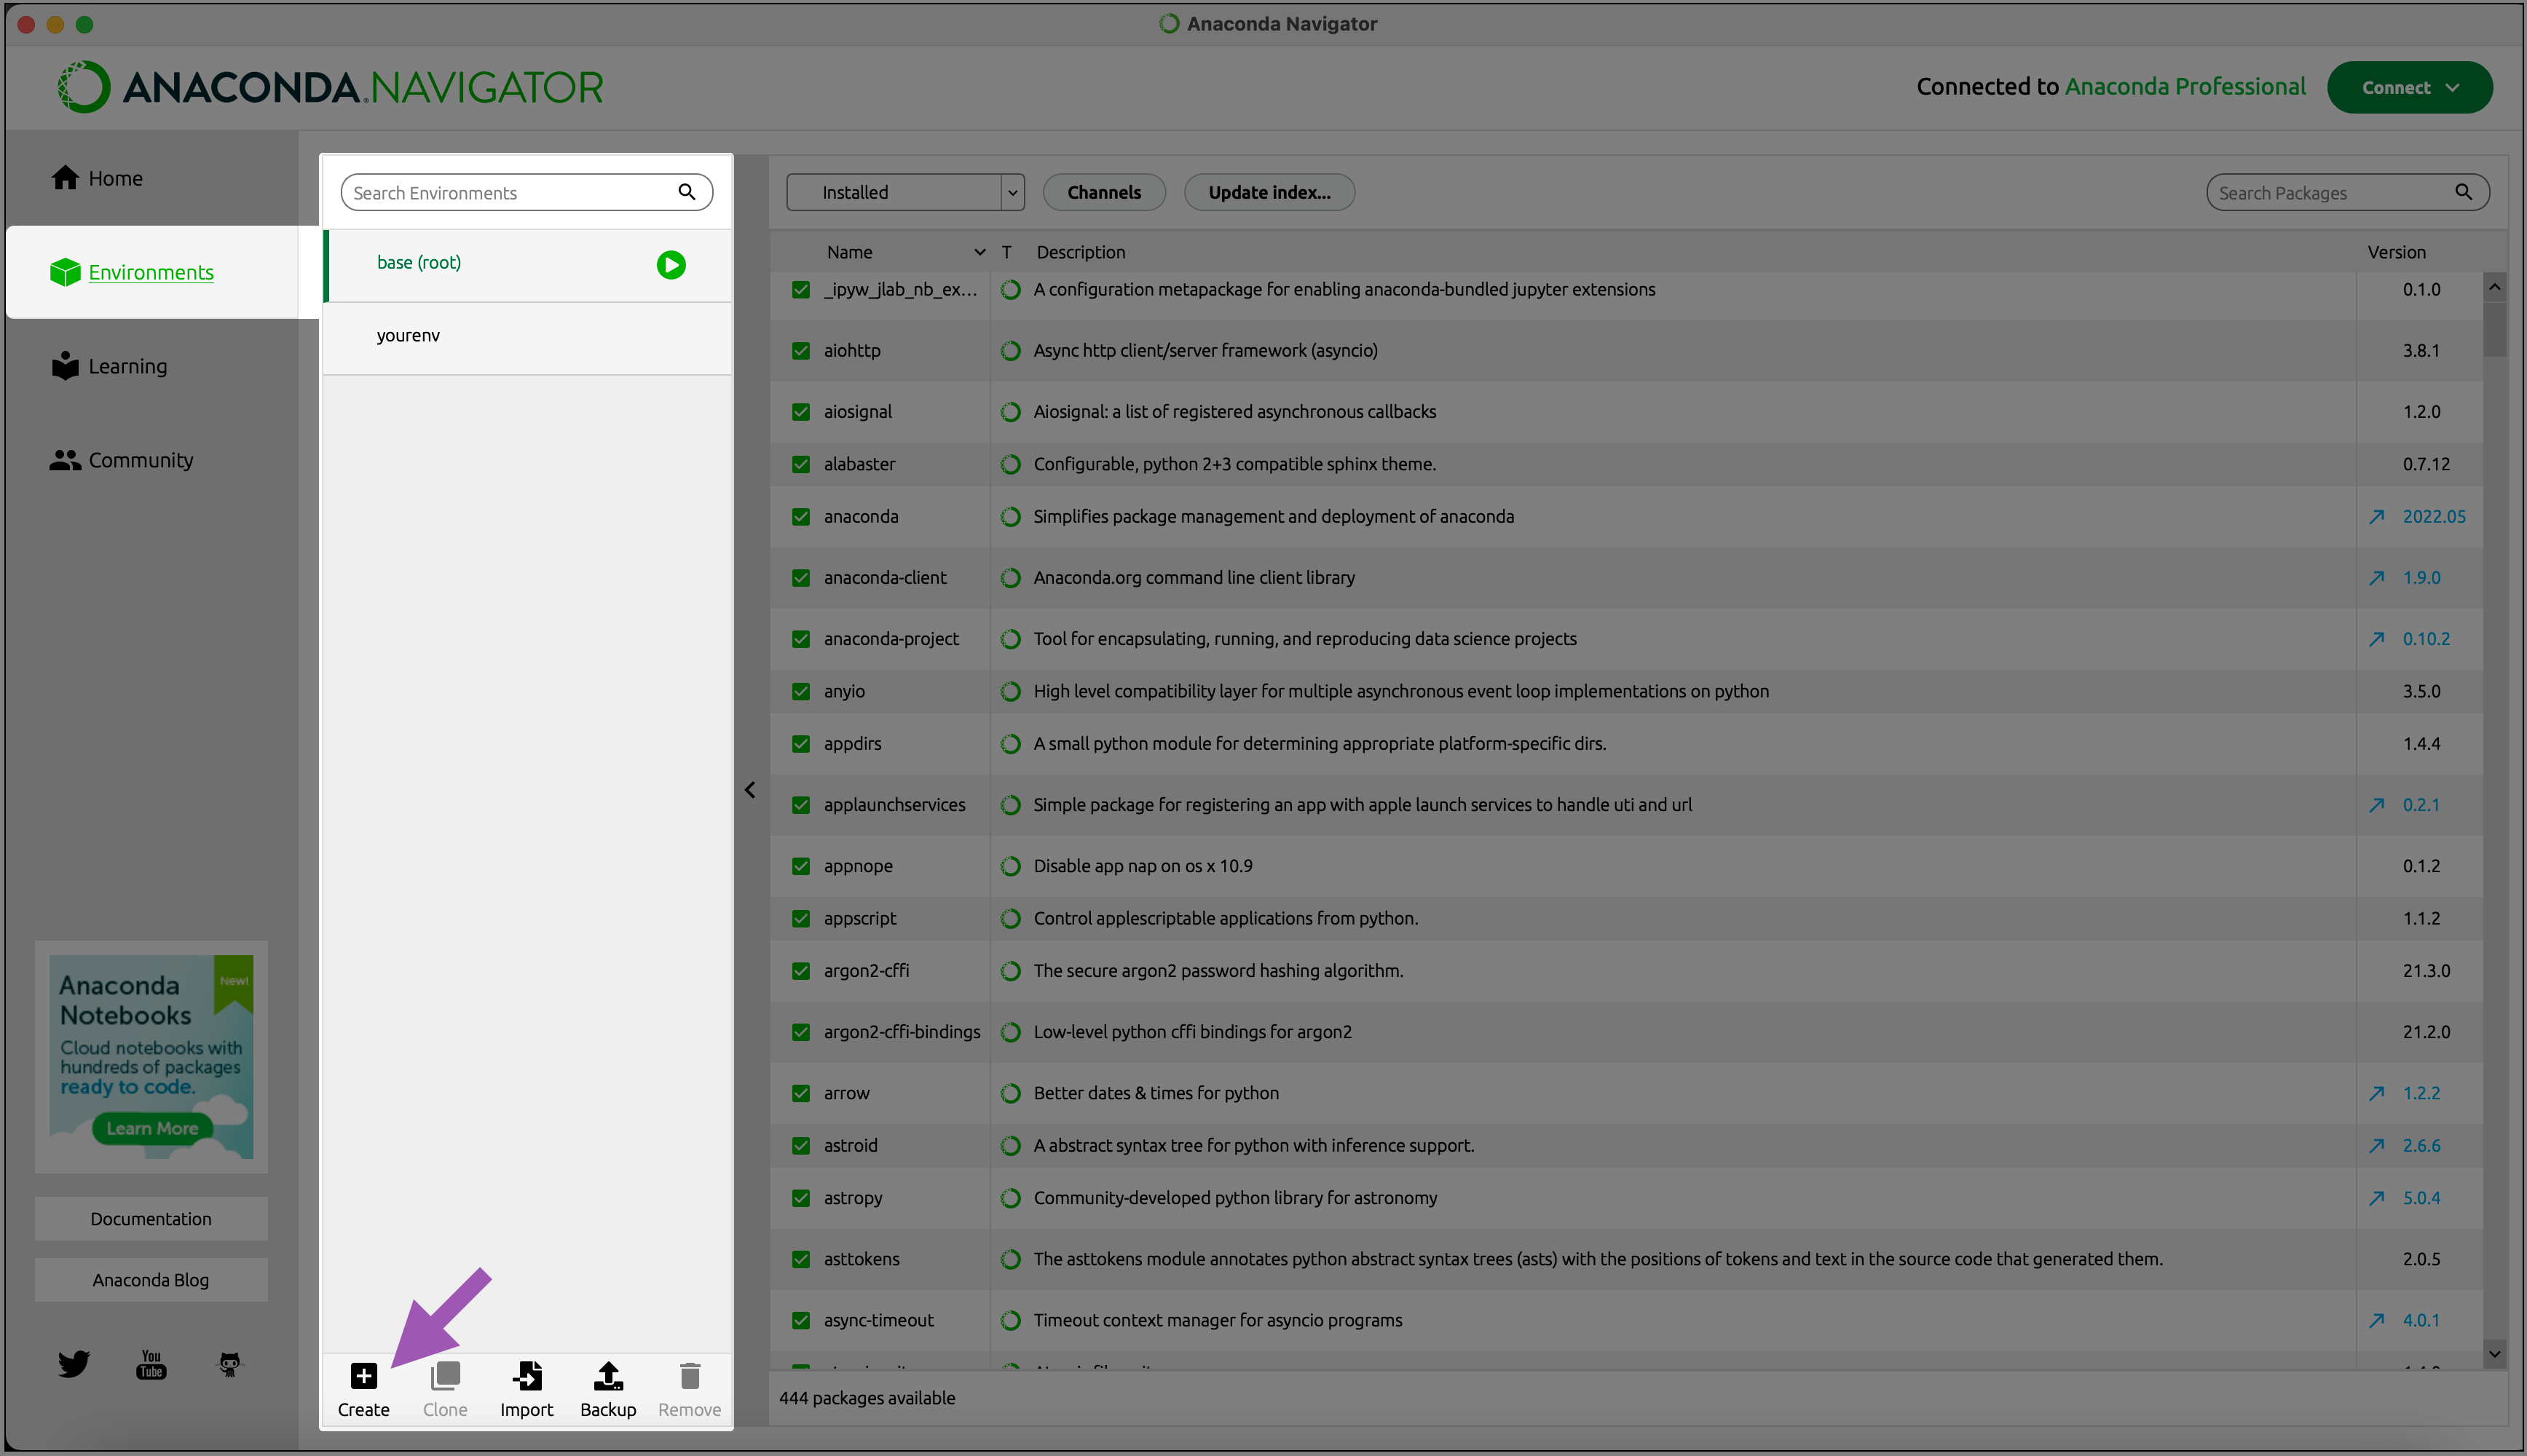
Verifying your configurations#
To test your configurations and verify that conda downloads packages from anaconda.cloud, complete the following procedure:
- Go to Environments in the left-hand navigation, then select Create at the bottom of the window.
- Enter a name for your environment and select a version of Python (3.10 is preferred) from the dropdown menu, then click Create.
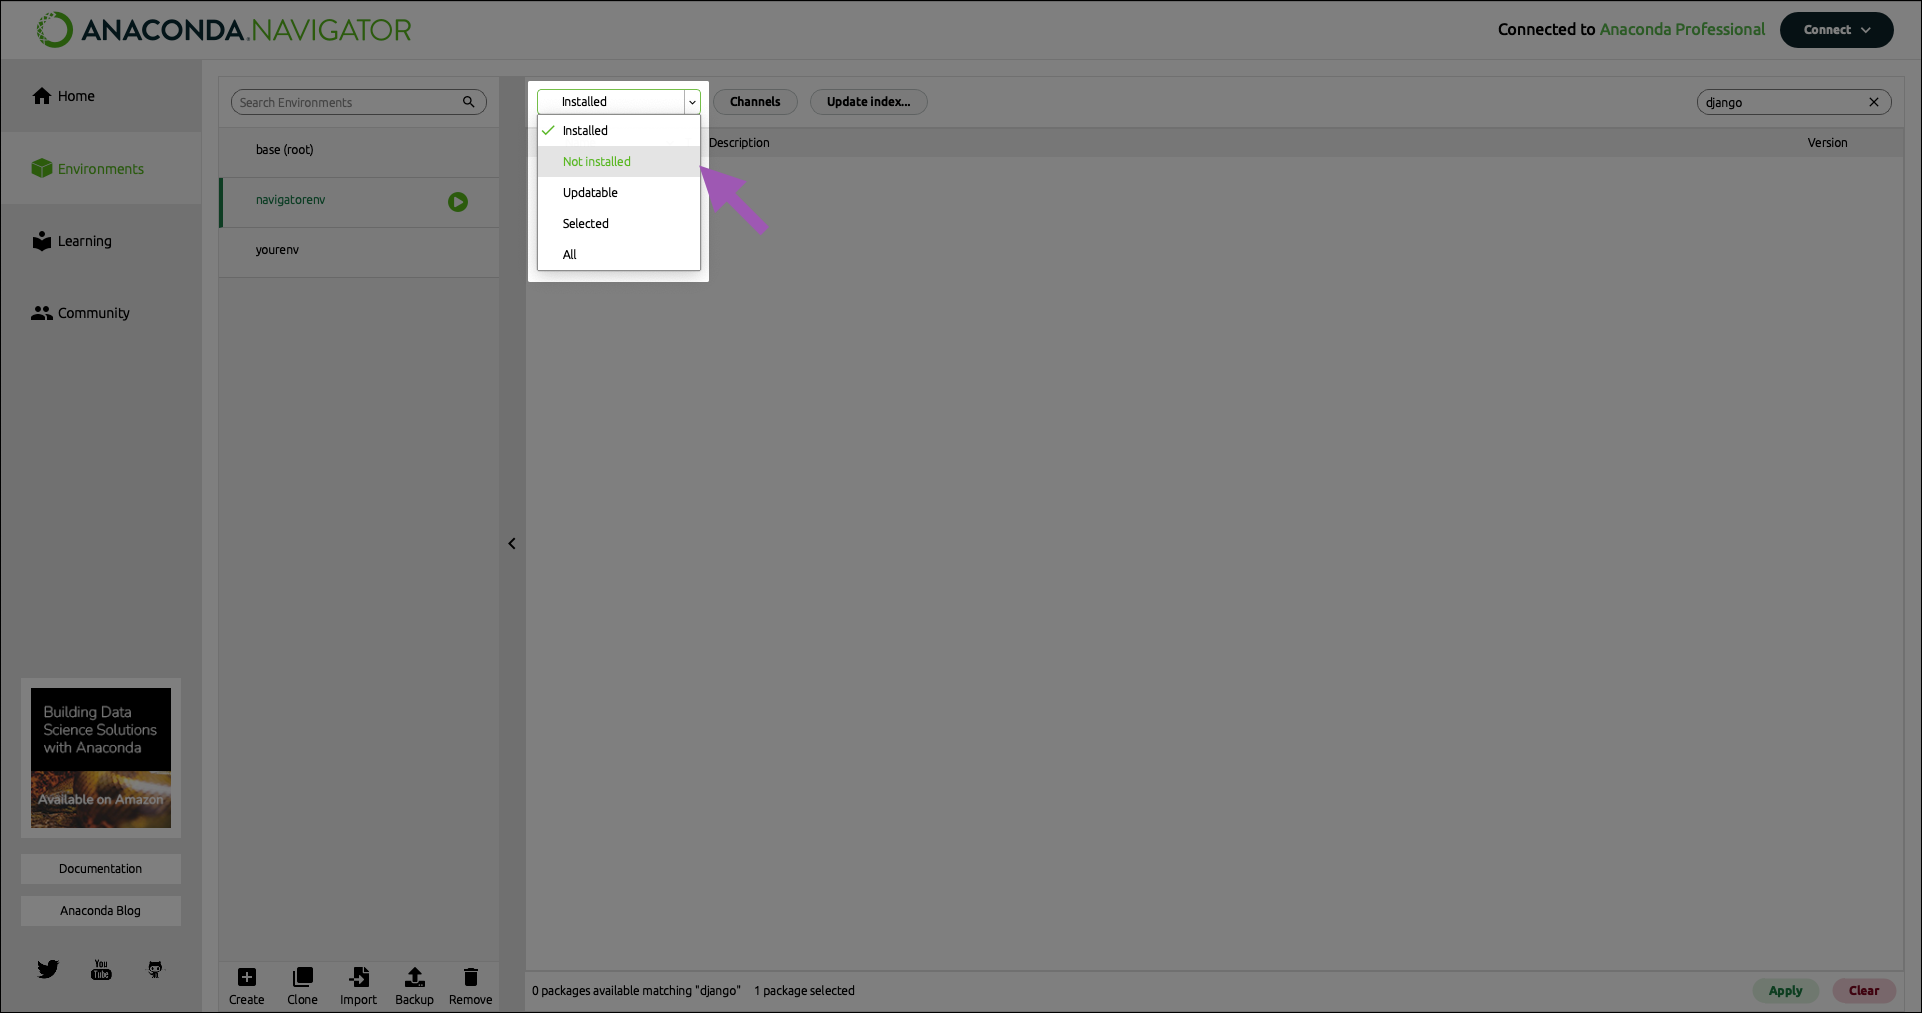
- Change the package selector to Not installed. This will show you packages that are available from your channel but are not installed on your machine.
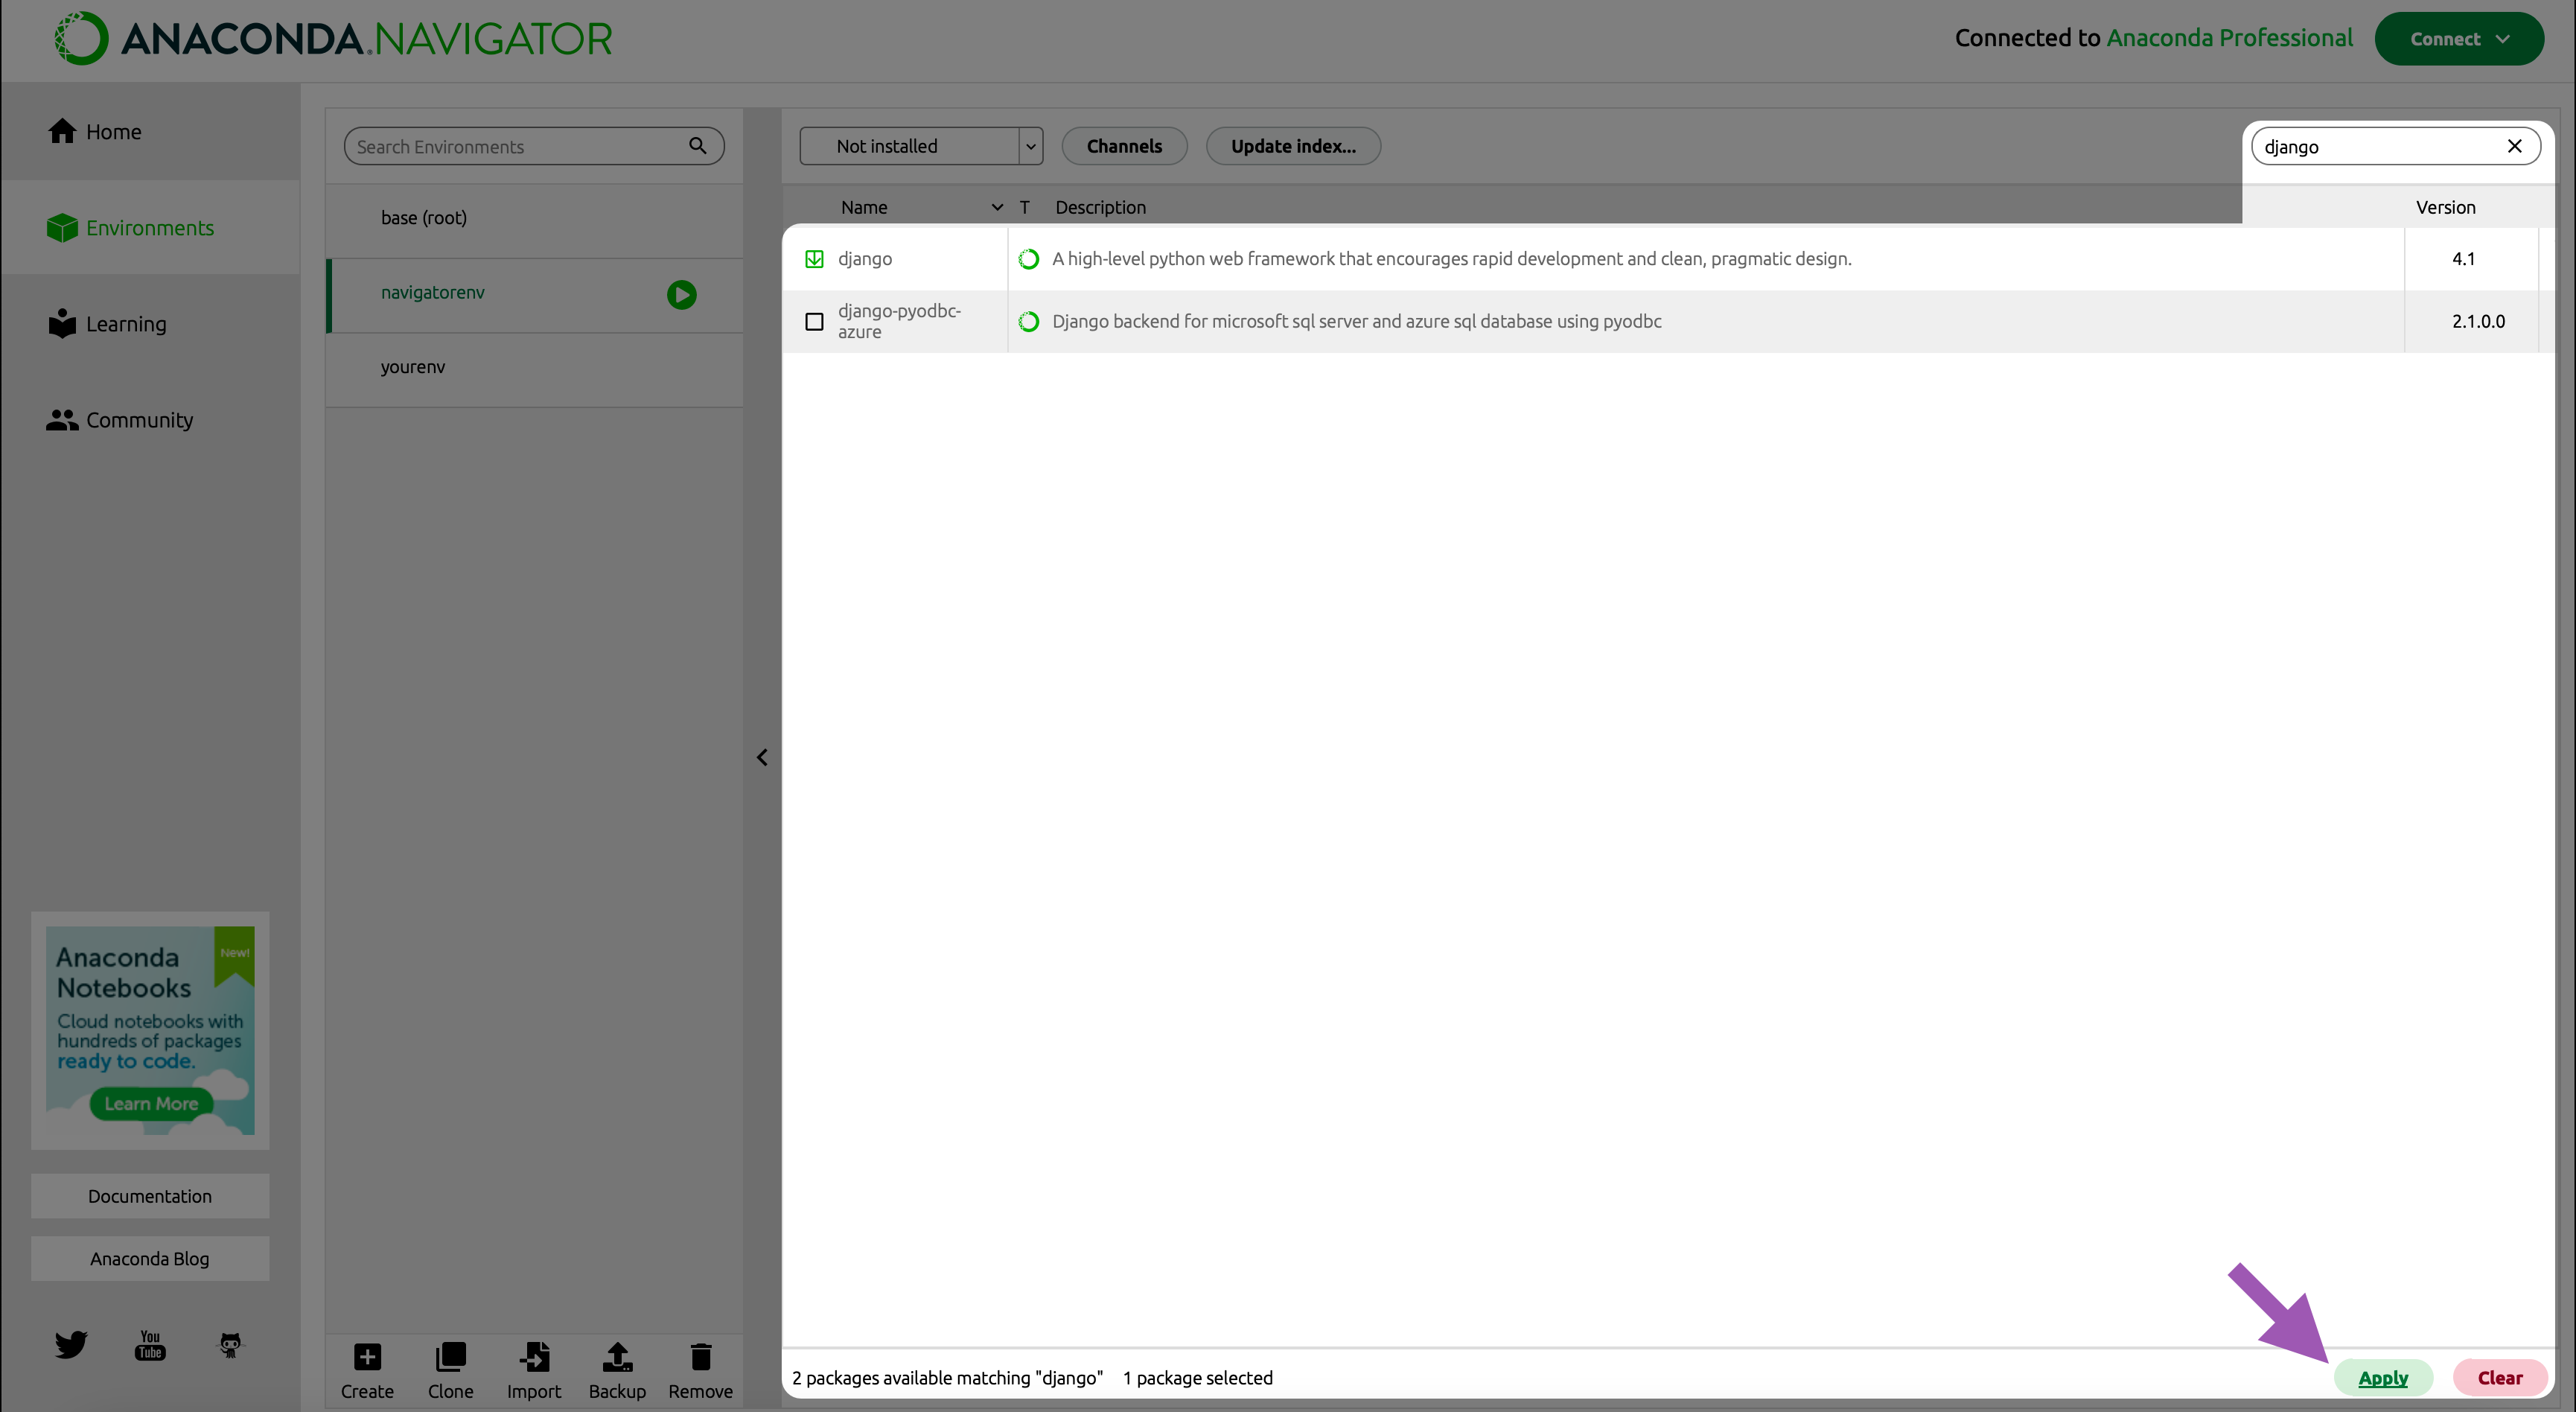
- If you know the name of the package you need, you can enter it in the search bar to locate the package. Select a package to download and click Apply.
- Click Apply to install the selected packages (and their dependencies).
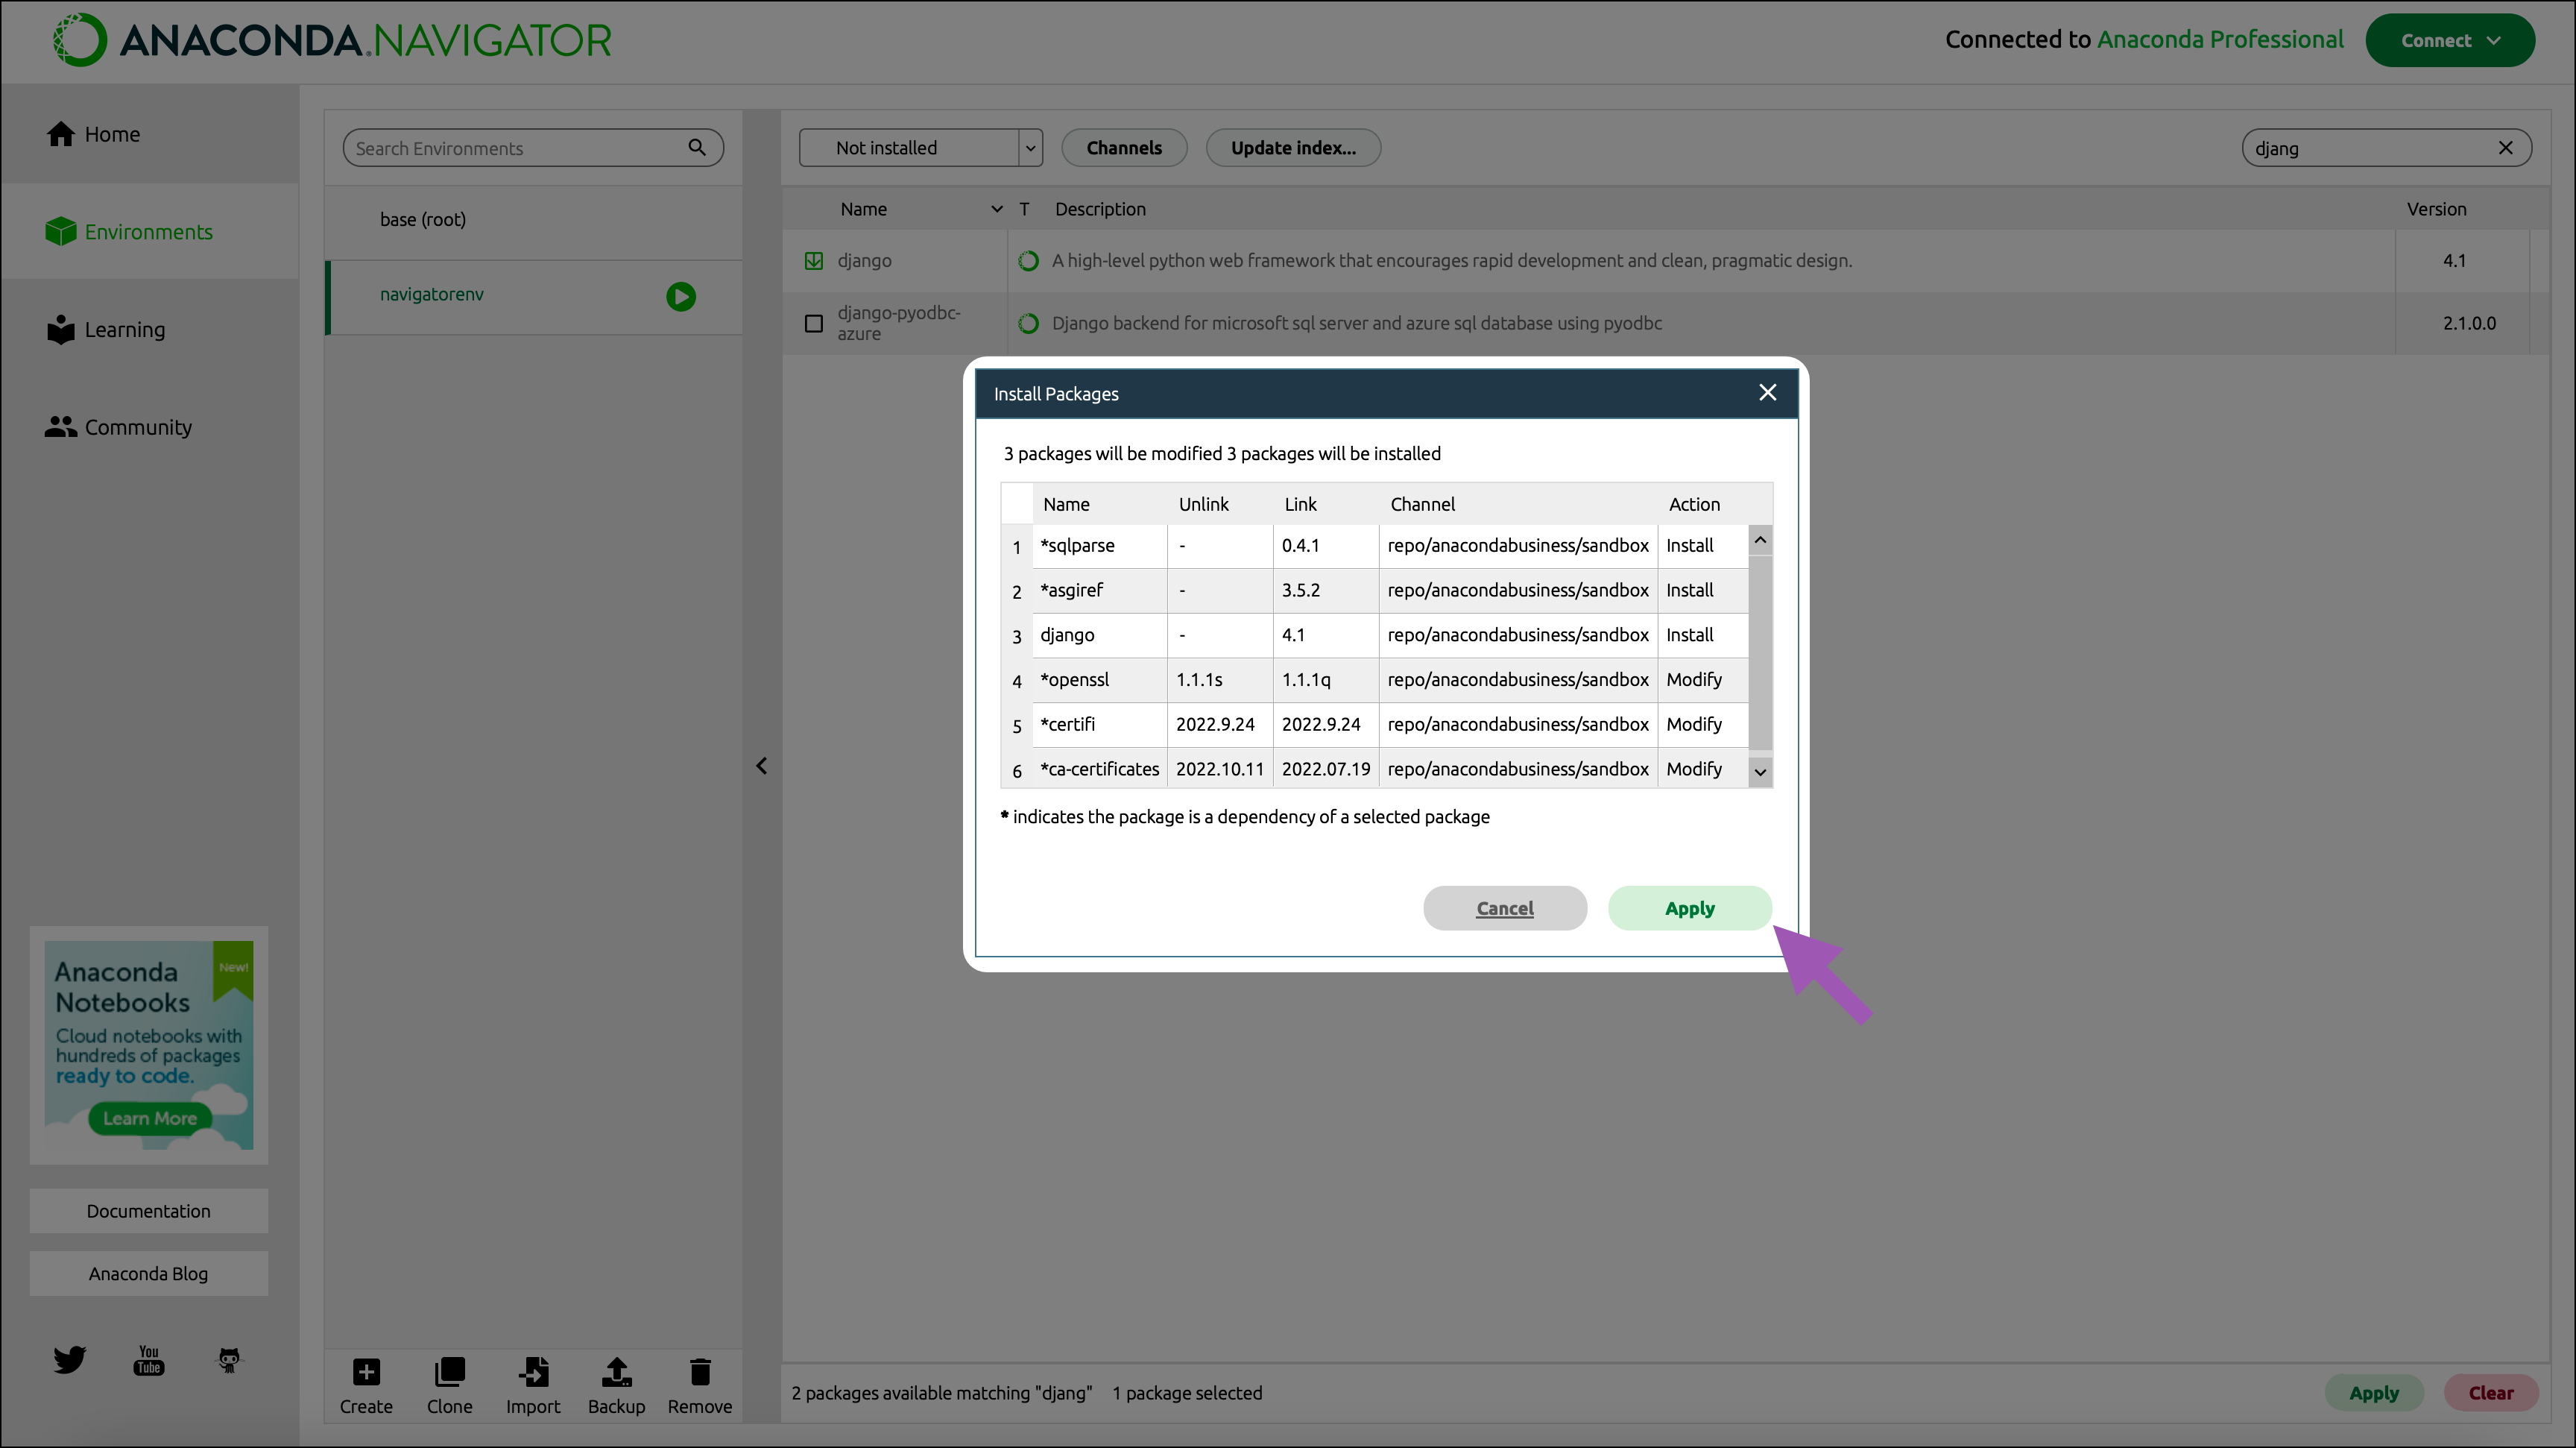
Note The Channel column will display your organization’s channel path, if correctly configured.
Quickstart guide for Windows using Navigator
Installation#
This topic explains how to install or uninstall Anaconda Navigator.
System requirements#
Operating systems: Navigator supports the same operating systems that the Anaconda Distribution supports. These include:
The most current installation of Navigator also supports Python versions 2.7 and 3.5+.
Installing Navigator#
Navigator is automatically installed when you install Anaconda Distribution version 4.0.0 or higher.
If you have Miniconda or a version of Anaconda Distribution older than 4.0.0 installed, install Navigator from Anaconda Prompt, Terminal, or other command line interface by running the command conda install anaconda-navigator .
For more information on using Navigator, see the Getting started section of this documentation.
Using Navigator in offline mode#
To use Navigator in online mode , you must be able to reach these sites, so you may need to add them to an allowlist in your network’s firewall settings.
- https://repo.anaconda.com for repositories and installers
- https://conda.anaconda.org for conda-forge and other channels on anaconda.org
- google-public-dns-a.google.com (8.8.8.8:53) to check internet connectivity with Google Public DNS
Configuring Navigator to work with a local Anaconda Repository#
If you’re an Enterprise tier subscriber, you can configure Navigator to search for packages in your local Anaconda Repository instead of searching on Anaconda.org.
To configure Navigator to search in a local Anaconda Repository:
- Open the Preferences dialog from the top menu bar. In Windows, this is the File menu. In macOS, it is either the Anaconda Navigator or python menu, depending on your launch method.
- In the Anaconda API domain field, type the address of your local Anaconda Repository.
- Click Apply.
- At the top of the Navigator window, click Connect.
- In the Connect dropdown, click Sign in for your preferred repository.
- Follow the instructions in the dialog box that appears to finish connecting Navigator to your repository.


Configuring Navigator to work with Anaconda Cloud#
You can register for an Anaconda Cloud account for free at https://anaconda.cloud/sign-up. An Anaconda Cloud account gives you access to cloud backups for your environments and access to Anaconda’s cloud notebooks and free learning resources.
Once you have become an Anaconda Cloud member, sign in to Anaconda Cloud from Navigator. To connect Navigator to Anaconda Cloud:

- At the top of the Navigator window, click Connect.
- In the Connect dropdown, click Sign in by Anaconda Cloud.
- Enter your email address and password.
- Click Sign in.
Uninstalling Navigator#
To uninstall Anaconda Navigator, open the Anaconda Prompt (Terminal on macOS or Linux), and enter the following command:
conda remove anaconda-navigator
For instructions on uninstalling all of Anaconda Distribution, see Uninstalling Anaconda Distribution .