- Install Linux Inside Windows Using VirtualBox [Step by Step Guide]
- Installing Linux inside Windows using VirtualBox
- Requirements
- Troubleshooting: AMD-V is disabled in the BIOS
- Any questions?
- Best Practices for running Linux on Hyper-V
- Tuning Linux File Systems on Dynamic VHDX Files
- Grub Menu Timeout on Generation 2 Virtual Machines
- PxE Boot on Generation 2 Virtual Machines
- Use static MAC addresses with failover clustering
- Use Hyper-V-specific network adapters, not the legacy network adapter
- Use I/O scheduler noop/none for better disk I/O performance
- NUMA
- Reserve more memory for kdump
- Shrinking VHDX or expanding VHD and VHDX files can result in erroneous GPT partition tables
- Additional References
Install Linux Inside Windows Using VirtualBox [Step by Step Guide]
Using Linux in a virtual machine allows you to try Linux within Windows. This step-by-step guide shows you how to install Linux inside Windows using VirtualBox.
- You can clean everything from your system and install Linux.
- You can dual boot Linux with Windows and choose one of the operating systems at the boot time.
- You can even install Linux within Windows from Microsoft Store (though this only provides you with the command line version of Linux).
But if you want to use Linux without making any changes to your Windows system, you can go the virtual machine route.
Basically, you install and use Linux like any regular Windows application. When you just want to try Linux for limited use, virtual machines provide the most comfortable option.
In this tutorial, I’ll show you how to install Linux inside Windows using VirtualBox.
Installing Linux inside Windows using VirtualBox
VirtualBox is free and open source virtualization software from Oracle. It enables you to install other operating systems in virtual machines. It is recommended that your system should have at least 4GB of RAM to get decent performance from the virtual operating system.
Requirements
- Good internet connection to download software and Linux ISO. (You can also use some other computer with an internet connection to download these files.)
- Windows system with at least 12 GB of free space.
- Windows system with 4GB of RAM. (It can work with less RAM as well, but your system will start to lag while using Linux in the virtual machine.)
- Make sure to enable virtualization in the BIOS (some system need it)
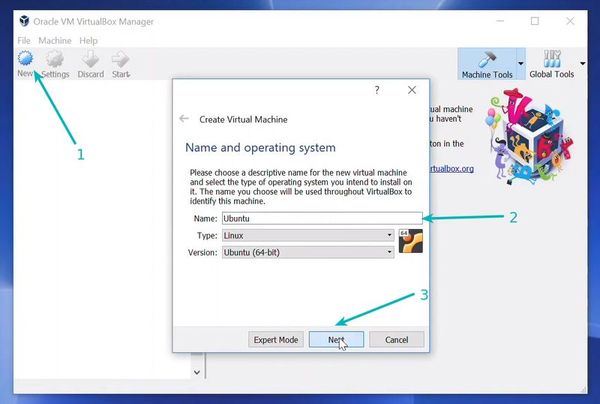
I am installing Ubuntu 17.10 in this tutorial, but the same steps apply to any other Linux distribution. If you prefer videos, you can watch the one below from our YouTube channel:
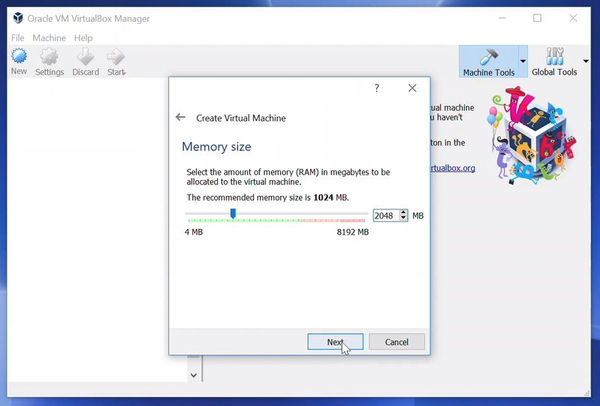
Allocate RAM to the virtual OS. My system has 8GB of RAM and I decided to allocate 2GB of it. You can use more RAM if your system has enough extra.
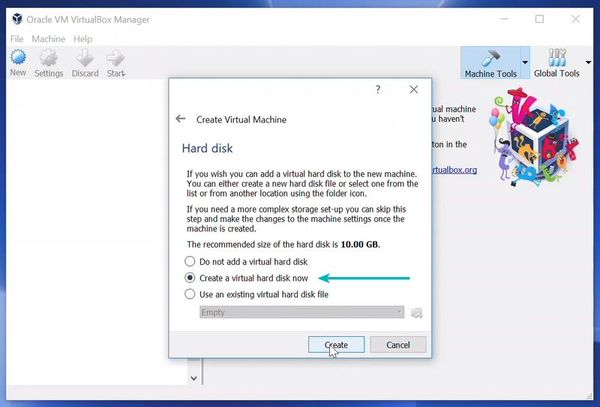
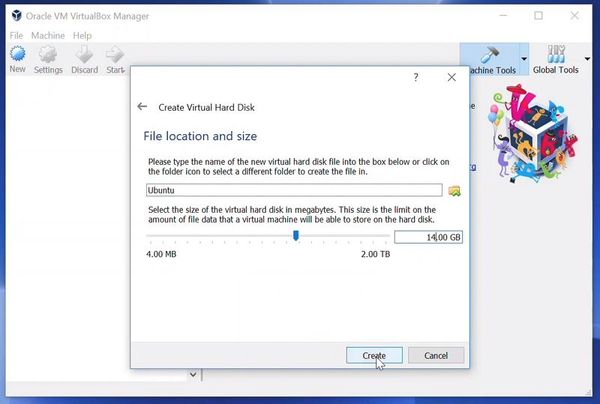
Create a virtual disk. This serves as the hard disk of the virtual Linux system. It is where the virtual system will store its files.
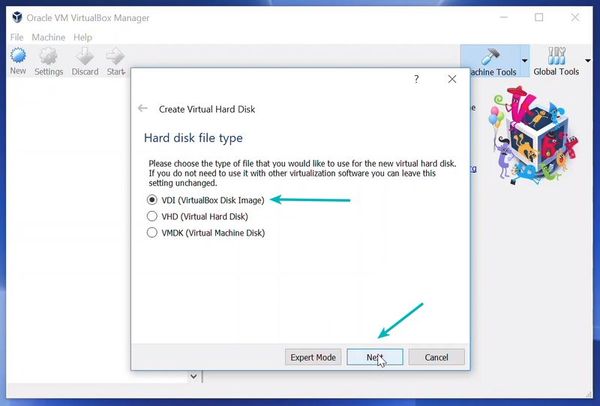
I recommend using the VDI file type here.
You can choose either the “Dynamically allocated” or the “Fixed size” option for creating the virtual hard disk.

The recommended size is 10 GB. However, I suggest giving it more space if possible. 15-20 GB is preferable.
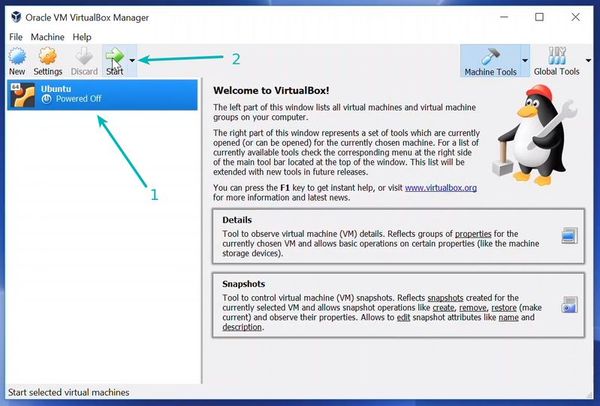
Once everything is in place, it’s time to boot that ISO and install Linux as a virtual operating system.
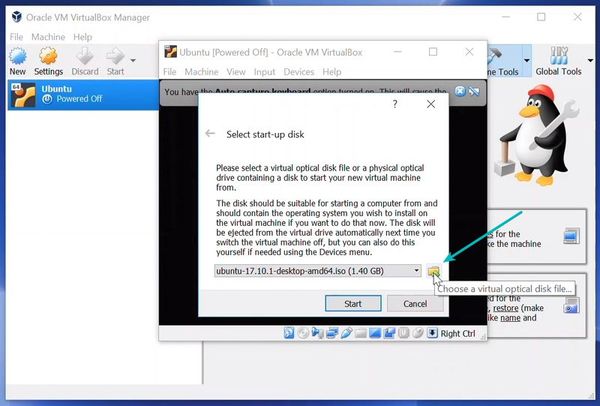
If VirtualBox doesn’t detect the Linux ISO, browse to its location by clicking the folder icon as shown in the picture below:
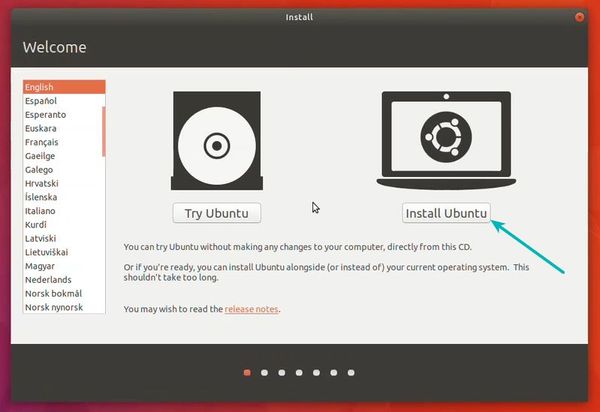
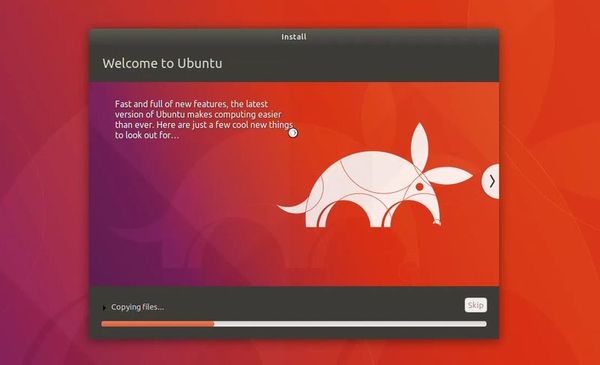
Soon you’ll find yourself inside Linux. You should be presented with the option to install it.
Things from here are Ubuntu-specific. Other Linux distributions may have slightly different looking steps, but it won’t be complicated at all.
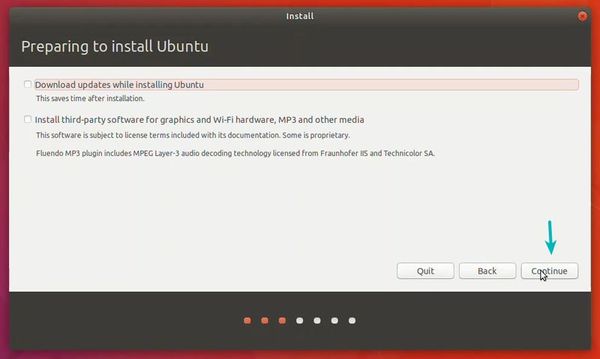
Select ‘Erase disk and install Ubuntu’. Don’t worry. It won’t delete anything on your Windows operating system. You are using the virtual disk space of 15-20GB that we created in previous steps. It won’t impact the real operating system.


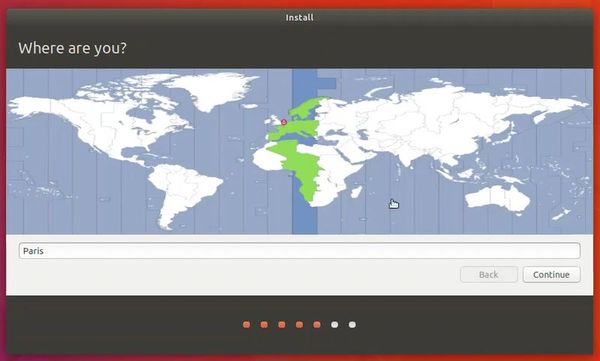
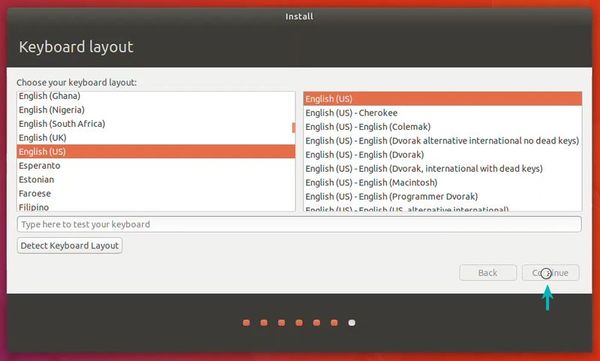
Things are pretty straightforward from here.
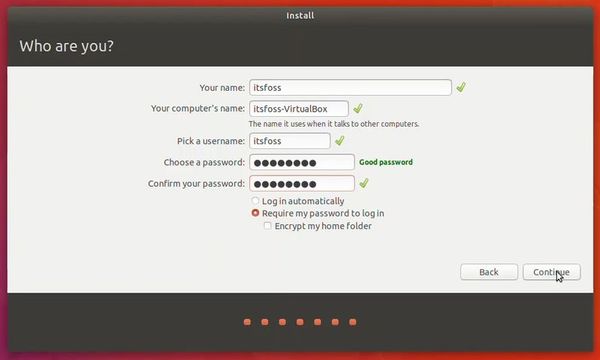
Try to choose a password that you can remember. You can also reset the password in Ubuntu if you forget it.
You are almost done. It may take 10-15 minutes to complete the installation.
Once the installation finishes, restart the virtual system.
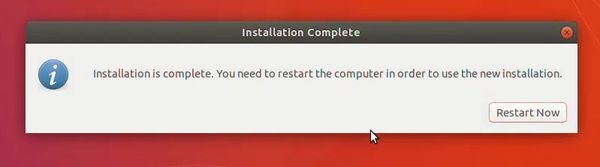
If it gets stuck on the screen below, you may close the VirtualBox.

And that’s all. From now on, just click on the installed Linux virtual machine. You’ll be able to use it directly. The installation is a one time only process. You can even delete the Linux ISO that you downloaded earlier.
I strongly recommend using VirtualBox Guest Additions on Ubuntu for it provides better compatibility and you would be able to use copy-paste and drag-drop between Linux and Windows.
Troubleshooting: AMD-V is disabled in the BIOS
If you face this error while using the virtual machine:
Not in a hypervisor partition (HVP=0) (VERR_NEM_NOT_AVAILABLE).
AMD-V is disabled in the BIOS (or by the host OS) (VERR_SVM_DISABLED).
Result Code:
E_FAIL (0x80004005)
Component:
ConsoleWrap
Interface:
IConsole
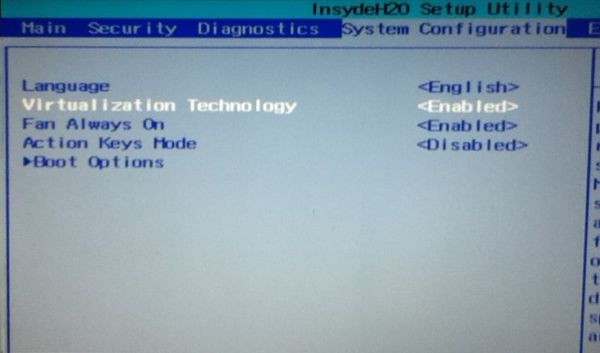
This means that virtualization is blocked on your system. You’ll have to activate it in your BIOS settings first.
Reboot your system and as soon as it powers up, press F2/F10/F12 to access BIOS settings. You have to look for the virtualization option in the BIOS and enable it.
Any questions?
That’s all you need to do to install Linux in VirtualBox on Windows.
If you have any doubts, or if you encounter any issues, please feel free to ask your questions in the comment box below.
Best Practices for running Linux on Hyper-V
Applies to: Windows Server 2022, Azure Stack HCI, version 20H2; Windows Server 2019, Windows Server 2016, Hyper-V Server 2016, Windows Server 2012 R2, Hyper-V Server 2012 R2, Windows Server 2012, Hyper-V Server 2012, Windows Server 2008 R2, Windows 10, Windows 8.1, Windows 8, Windows 7.1, Windows 7
This topic contains a list of recommendations for running Linux virtual machine on Hyper-V.
Tuning Linux File Systems on Dynamic VHDX Files
Some Linux file systems may consume significant amounts of real disk space even when the file system is mostly empty. To reduce the amount of real disk space usage of dynamic VHDX files, consider the following recommendations:
PS > New-VHD -Path C:\MyVHDs\test.vhdx -SizeBytes 127GB -Dynamic -BlockSizeBytes 1MB - The ext4 format is preferred to ext3 because ext4 is more space efficient than ext3 when used with dynamic VHDX files.
- When creating the filesystem specify the number of groups to be 4096, for example:
Grub Menu Timeout on Generation 2 Virtual Machines
Because of legacy hardware being removed from emulation in Generation 2 virtual machines, the grub menu countdown timer counts down too quickly for the grub menu to be displayed, immediately loading the default entry. Until grub is fixed to use the EFI-supported timer, modify /boot/grub/grub.conf, /etc/default/grub, or equivalent to have «timeout=100000» instead of the default «timeout=5».
PxE Boot on Generation 2 Virtual Machines
Because the PIT timer is not present in Generation 2 Virtual Machines, network connections to the PxE TFTP server can be prematurely terminated and prevent the bootloader from reading Grub configuration and loading a kernel from the server.
On Linux distributions other than RHEL 6.x, similar steps can be followed to configure grub v0.97 to load Linux kernels from a PxE server.
Additionally, on RHEL/CentOS 6.6 keyboard and mouse input will not work with the pre-install kernel which prevents specifying installation options in the menu. A serial console must be configured to allow choosing installation options.
- In the efidefault file on the PxE server, add the following kernel parameter «console=ttyS1»
- On the VM in Hyper-V, set up a COM port using this PowerShell cmdlet:
Set-VMComPort -VMName -Number 2 -Path \\.\pipe\dbg1 Specifying a kickstart file to the pre-install kernel would also avoid the need for keyboard and mouse input during installation.
Use static MAC addresses with failover clustering
Linux virtual machines that will be deployed using failover clustering should be configured with a static media access control (MAC) address for each virtual network adapter. In some versions of Linux, the networking configuration may be lost after failover because a new MAC address is assigned to the virtual network adapter. To avoid losing the network configuration, ensure that each virtual network adapter has a static MAC address. You can configure the MAC address by editing the settings of the virtual machine in Hyper-V Manager or Failover Cluster Manager.
Use Hyper-V-specific network adapters, not the legacy network adapter
Configure and use the virtual Ethernet adapter, which is a Hyper-V-specific network card with enhanced performance. If both legacy and Hyper-V-specific network adapters are attached to a virtual machine, the network names in the output of ifconfig -a might show random values such as _tmp12000801310. To avoid this issue, remove all legacy network adapters when using Hyper-V-specific network adapters in a Linux virtual machine.
Use I/O scheduler noop/none for better disk I/O performance
The Linux kernel offers two sets of disk I/O schedulers to reorder requests. One set is for the older ‘blk’ subsystem and one set is for the newer ‘blk-mq’ subsystem. In either case, with today’s solid state disks it is recommended to use a scheduler that passes the scheduling decisions to the underlying Hyper-V hypervisor. For Linux kernels using the ‘blk’ subsystem, this is the “noop” scheduler. For Linux kernels using the ‘blk-mq’ subsystem, this is the “none” scheduler.
For a particular disk, the available schedulers can be seen at this file system location: /sys/class/block/ /queue/scheduler, with the currently selected scheduler in square brackets. You can change the scheduler by writing to this file system location. The change must be added to an initialization script in order to persist across reboots. Consult your Linux distro documentation for details.
NUMA
Linux kernel versions earlier than 2.6.37 don’t support NUMA on Hyper-V with larger VM sizes. This issue primarily impacts older distributions using the upstream Red Hat 2.6.32 kernel, and was fixed in Red Hat Enterprise Linux (RHEL) 6.6 (kernel-2.6.32-504). Systems running custom kernels older than 2.6.37, or RHEL-based kernels older than 2.6.32-504 must set the boot parameter numa=off on the kernel command line in grub.conf. For more information, see Red Hat KB 436883.
Reserve more memory for kdump
In case the dump capture kernel ends up with a panic on boot, reserve more memory for the kernel. For example, change the parameter crashkernel=384M-:128M to crashkernel=384M-:256M in the Ubuntu grub configuration file.
Shrinking VHDX or expanding VHD and VHDX files can result in erroneous GPT partition tables
Hyper-V allows shrinking virtual disk (VHDX) files without regard for any partition, volume, or file system data structures that may exist on the disk. If the VHDX is shrunk to where the end of the VHDX comes before the end of a partition, data can be lost, that partition can become corrupted, or invalid data can be returned when the partition is read.
After resizing a VHD or VHDX, administrators should use a utility like fdisk or parted to update the partition, volume, and file system structures to reflect the change in the size of the disk. Shrinking or expanding the size of a VHD or VHDX that has a GUID Partition Table (GPT) will cause a warning when a partition management tool is used to check the partition layout, and the administrator will be warned to fix the first and secondary GPT headers. This manual step is safe to perform without data loss.