- How to Install VMware Workstation Player in Ubuntu Linux
- Install VMware in Ubuntu 20.04 and 22.04
- Recommended system requirements for installing VMware Workstation Player:
- Step 1: Install required build packages
- Step 2: Download VMware Workstation Player
- Step 3: Installing VMware Player
- Troubleshooting Tip: Failed Installation due to vmmon, vmnet kernel module error
- Step 4: Installing VMware Player
- How to Uninstall VMWare Player from Ubuntu
- Final Words
- Run linux vmware player
- Prerequisites
- Procedure
- What to do next
- How to Install VMware Workstation Player on Ubuntu 18.04
- Prerequisites #
- Installing VMware Workstation Player on Ubuntu #
- 1. Install Required Packages #
- 2. Download VMware Workstation Player #
- 3. Install VMware Workstation Player #
How to Install VMware Workstation Player in Ubuntu Linux
Complete screenshot guide to show you how to install VMware Workstation Player in Ubuntu and Linux Mint.
This quick tutorial shows you how to install VMware Workstation Player on Ubuntu Linux. VMware is one of the best desktop and server virtualization applications on Linux. Some people prefer it more than Oracle’s open-source VirtualBox. With a virtual machine application like VMware, you can run another operating system inside your current operating system. For example, if you want to try another Linux distribution, you can install it on a USB stick and use it as a live USB or install it alongside your current OS. Both are okay, but you have to log out of your current system and boot into another just for trying a new OS. In this scenario, you can install another operating system inside Ubuntu as a virtual machine. You’ll be able to use it without leaving your main OS, i.e. Ubuntu. In this tutorial, I’ll show you how to install VMware Workstation Player in Ubuntu 20.04, 22.04, and future versions. The instructions should also be valid for Linux Mint and other Ubuntu-based distributions. Note: VMWare Workstation is not open-source software.
Install VMware in Ubuntu 20.04 and 22.04

VMware Workstation Player is free for personal and non-commercial use. As an individual, you can use it without paying anything.
Recommended system requirements for installing VMware Workstation Player:
- 2GHz 64-bit processor
- Minimum 4 GB of RAM (8 GB recommended)
- Disk space depends upon the guest operating system you would be installing in the VM
To install VMware Workstation Player in Ubuntu and other Ubuntu-based distributions, follow the steps below:
Step 1: Install required build packages
Open a terminal (Ctrl+Alt+T) and use the command below to install the required build packages and Linux Kernel headers from the build-essential package:
sudo apt install build-essentialStep 2: Download VMware Workstation Player
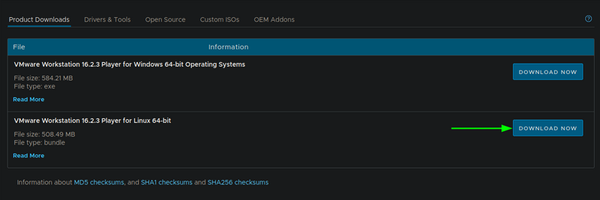
The next step is to download the VMware Workstation Player from their website.
You’ll see options to download VMware Workstation Player for both Windows and Linux. No prizes for guessing that you have to download the Linux version here.
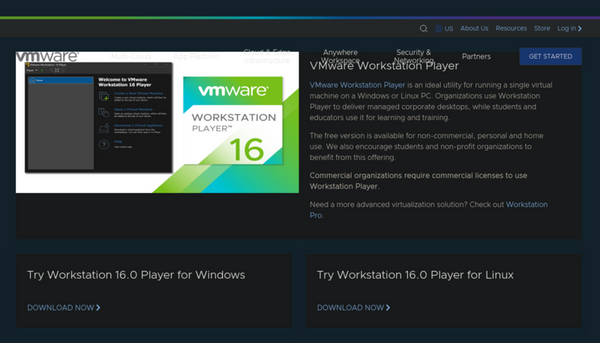
Don’t worry when it starts downloading a .bundle file. That actually is the installer.
Step 3: Installing VMware Player
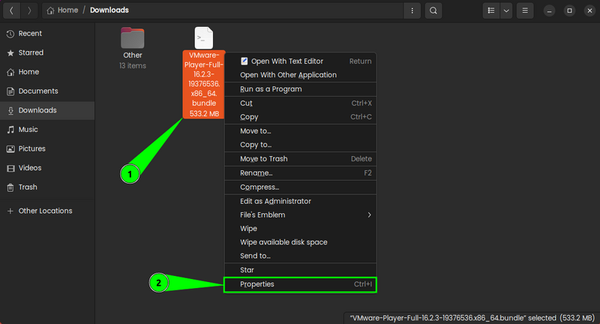
You have to set execute permission on the downloaded installer file.
You can do it graphically without needing the terminal. Just go to the folder where the file was downloaded. Right-click on it and make it executable as shown in the image below:
Head to the permissions tab, and proceed to allow execution of the file as a program.
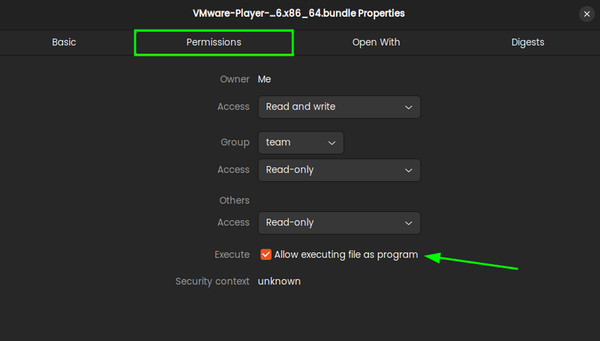
Subsequently, right-click on the file now, and you should see the option to “Run” it. Go ahead with it, and it should start the installation.
Alternatively, you can try the command line:
I am assuming that it has been downloaded to your Downloads directory. If so, use the command below to make the file executable:
chmod +x ~/Downloads/VMware-Player*And then run the installation file:
sudo ~/Downloads/VMware-Player*This will open an installation window.
Troubleshooting Tip: Failed Installation due to vmmon, vmnet kernel module error
On Ubuntu and other distribution using newer kernels, VMware installation gets halted by encountering a vmmon and vmnet kernel module error. To rectify this and continue installation:
First, install prerequisites to compile and install packages from source:
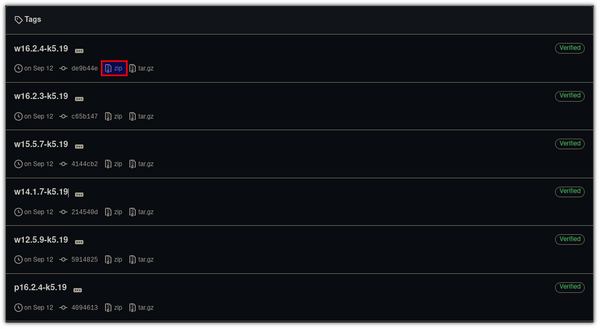
sudo apt install gcc build-essentialGo to https://github.com/mkubecek/vmware-host-modules/tags and choose your VMware Player version and download the zip file
Next, you need to navigate into the extracted directory through the terminal (using the cd command) and use the given commands one by one to create tar files of the modules:
tar -cf vmmon.tar vmmon-only tar -cf vmnet.tar vmnet-onlyNow, copy the recently created tar files to /usr/lib/vmware.modules.source :
sudo cp -v vmmon.tar vmnet.tar /usr/lib/vmware/modules/source/And the last step is to use the given command, and it will install kernel modules in your system:
sudo vmware-modconfig --console --install-allStep 4: Installing VMware Player
From here, it’s no rocket science. Like any other application, follow the on-screen instructions. Here are some of the screenshots for reference:
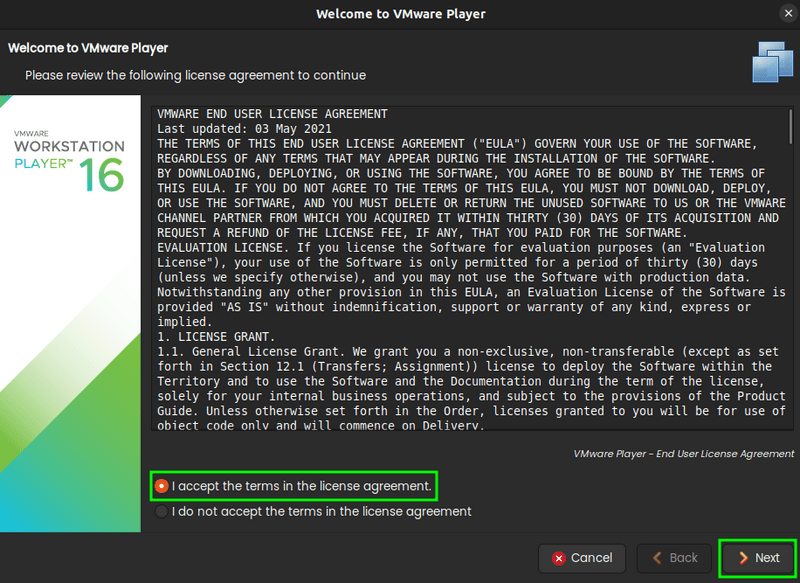
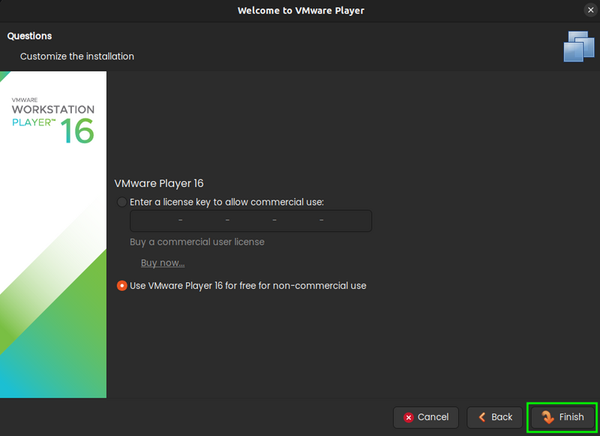
You need to agree to the terms and conditions to proceed. And, then enable/disable the ability to check for updates when you launch VMware Workstation Player.
Next, VMware collects asks you to share some of your user data for improving the user experience. You can select to opt-out of it if you want.
You might also be asked for a license key—do not panic—you do not need one if you want to use the free VMware player for non-commercial purposes. For business use, get the pro edition (where you will get a license key).
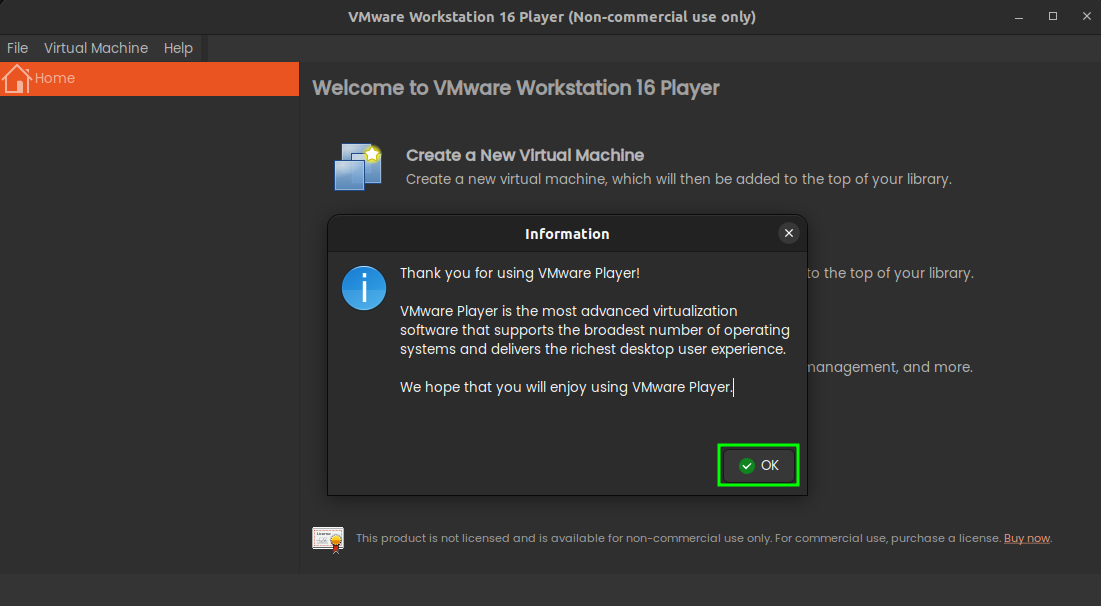
The installation should start, and you will be notified/greeted when it completes.
If you would like to be able to copy-paste between the real OS (host) and the virtual OS (guest) and share files between them, you should also install VMware Tools on Linux.
How to Uninstall VMWare Player from Ubuntu
If your workflow requires more than what VMWare player offers, or you just want to remove it from your system, here are quick steps to uninstall VMWare from Ubuntu:
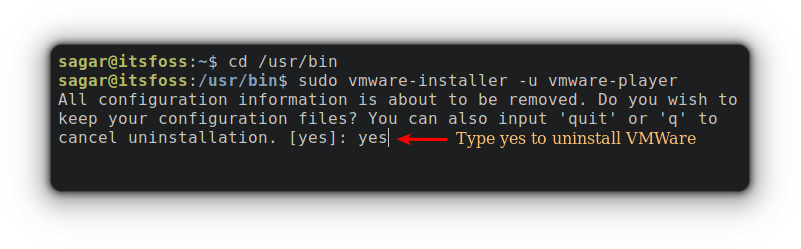
First, change your current directory to /usr/bin :
And use the given command to initiate the uninstallation process:
sudo vmware-installer -u vmware-playerType yes and it will remove VMWare from your system:
Final Words
This was a quick guide on how you can install VMWare in Ubuntu-based distros. I hope this solves your problem and if not, let me know in the comments and I will try my best to come up with a solution.
Do you prefer using VMware Workstation Player? Share your thoughts in the comments down below.
Run linux vmware player
You are using an outdated browser. Please upgrade your browser to improve your experience.
You run the Linux bundle installer to install Workstation Player on a Linux host system. By default, Workstation Player is installed silently, and the installation progress is displayed in the terminal. When Workstation Player is launched for the first time, a dialog box asks you to accept the EULAs and configure necessary settings. At the same time, pure console installation is also supported. You can run the installer with the —console option to install and configure Workstation Player in the terminal, without the first-time dialog box appearing during the first launch.
Prerequisites
- Verify that the host system meets the host system requirements. See Host System Requirements for Workstation Player.
- Obtain the Workstation Player software.
- Familiarize yourself with the Linux command-line installation options. See Linux Command Line Installation Options.
- Verify that you have root access on the host system.
Procedure
- Log in to the Linux host system with the user name that you plan to use when you run Workstation Player .
- Become root.
xxxx-xxxx is the version and build numbers, architecture is i386 or x86_64, and option is a command line option.
If you are using the —console option or installing Workstation Player on a host system that does not support the GUI wizard, press Enter to scroll through and read the license agreement or type q to skip to the [yes/no] prompt.
What to do next
After Workstation Player is installed, you can exit from the root account. You do not need to be root to run Workstation Player .
How to Install VMware Workstation Player on Ubuntu 18.04
VMware is a mature and stable virtualization solution that allows you to run multiple, isolated operating systems on a single machine.
With VMware Workstation Player you can create and run your own virtual machines and evaluate software distributed as a virtual appliance from many software vendors available from VMware’s Solution Exchange .
VMware Workstation Player is not open-source and it is free only for personal non-commercial use. If you are looking for an open-source virtualization platform, you should try Oracle’s VirtualBox .
This tutorial explains how to install VMware Workstation Player on Ubuntu 18.04. The same instructions apply for Ubuntu 16.04 and any other Debian based distribution, including Debian, Linux Mint and Elementary OS.
Prerequisites #
Before continuing with this tutorial, make sure you are logged in as a user with sudo privileges .
For proper installation and operation of VMware Workstation Player, your system should meet the following requirements:
Installing VMware Workstation Player on Ubuntu #
Perform the following steps to install VMware Workstation Player on Ubuntu 18.04:
1. Install Required Packages #
Open your terminal either by using the Ctrl+Alt+T keyboard shortcut or by clicking on the terminal icon and install the build dependencies by typing:
sudo apt updatesudo apt install build-essential linux-headers-generic
2. Download VMware Workstation Player #
To download the latest version of VMware Workstation Player you can either visit the VMware downloads page and download the installation bundle with your web browser or use the following wget command :
wget --user-agent="Mozilla/5.0 (X11; Linux x86_64; rv:60.0) Gecko/20100101 Firefox/60.0" https://www.vmware.com/go/getplayer-linuxOnce the download is completed make the installation file executable using the following chmod command:
At the time of writing this article, the latest version of VMware Workstation Player is version 15.0.0.
3. Install VMware Workstation Player #
The installation is pretty straightforward, just follow the on-screen instructions.
Start the Installation wizard by typing:
A screen similar to the following will be displayed. Accept the terms in the license agreement and click on the Next button.
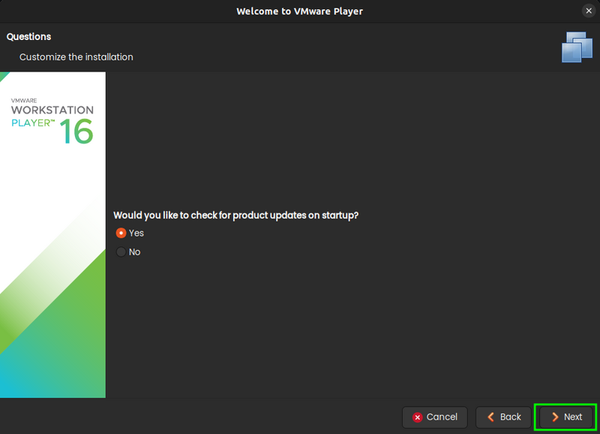
Next, you will be asked whether you like to check for product updates on startup. Make your selection and click on the Next button.
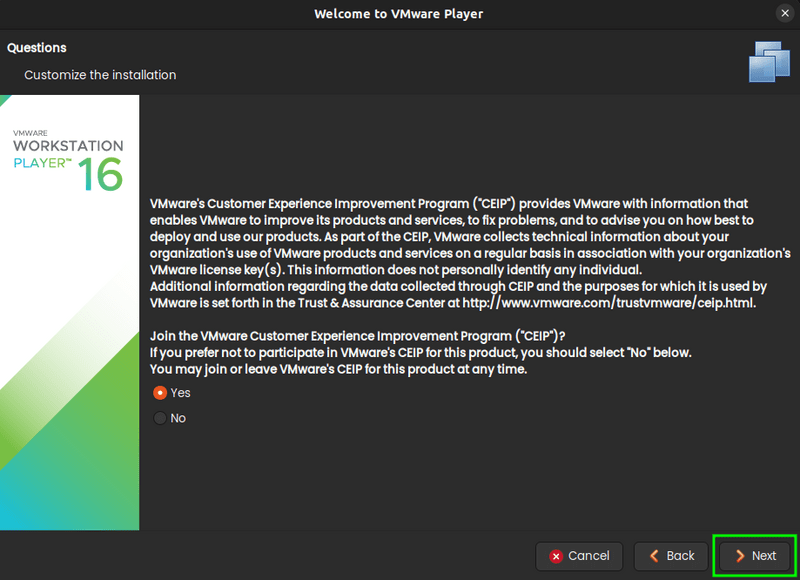
VMware’s Customer Experience Improvement Program (“CEIP”) helps VMware to improve their products and services by sending anonymous system data and usage information to VMware. If you prefer not to participate in the program select No and click on the Next button.
In the next step, you will be prompted to enter the licence key. VMware Workstation Player is free for personal non-commercial use. Purchasing a license key will enable the Pro features an can be used commercially.
If you don’t have a license key, leave the field empty and click on the Next button.
Next, you will see the following page informing you that the VMware Workstation Player is ready to be installed. Click on the Install button.
The installation may take several minutes. During the installation, you will see information about the progress. Once completed the following screen will appear informing you that the Mware Workstation Player is successfully installed.