- How can I run OpenVPN as root in the background, in a script?
- 3 Answers 3
- Way 1: Make sure sudo has a fresh timestamp.
- Way 2: Use sudo -b . In general, this is usually what you want.
- Way 3: But for openvpn , you should probably just run it with —daemon .
- Way 4: Sometimes it’s reasonable to run the whole script as root.
- Connect to VPN Automatically on Ubuntu 20.04/18.04
- Connect to VPN Automatically on Ubuntu 20.04/18.04
- Install Required Packages
- Running OpenVPN Client as Service on Ubuntu 20.04/18.04
- Run OpenVPN Client as a Service
- Automatically Connect to VPN with Network-Manager
- Open Network Manager Connection Editor
- Related Tutorials
- SUPPORT US VIA A VIRTUAL CUP OF COFFEE
How can I run OpenVPN as root in the background, in a script?
This command is blocking and the shell is not released. In order to start an ssh connection afterwards I need to push the openvpn process into the background by typing Ctrl + Z followed by a bg . However, I’d like to call the openvpn connection step and the ssh automatically by calling just my bash file. How do I manage to emulate the Ctrl + Z and bg steps in this file? I’ve tried to append a & to the openvpn command and to place nohup in front of it. Neither works.
This sort of question has been asked multiple times . If you need help you really need to post your script.
It seems to me that this is really not a duplicate of that question, which hardly covers running background programs as root, and does not at all cover how to properly daemonize OpenVPN.
@null I’ve re-edited the title, as requested. OpenVPN is often run as root and, in the situations where it isn’t, the —daemon option may still be used, but you’re right that the part about running it as root is central to this question and ought to be reflected in its title. Thanks for pointing this out!
3 Answers 3
TL;DR: Use sudo -b or, better, openvpn [. ] —daemon .
Since you’re running openvpn (and, less specifically, since you wish to run a program as root in the background), the most commonly dispensed information about how to run commands in the background does not address your situation. You said:
I’ve tried to append a & to the cpenvpn command and to place nohop in front of it. Both does not work.
sudo openvpn ~/my_connection.ovpn Under sudo ‘s default configuration, if you haven’t recently entered your password for sudo in the same terminal (or have logged out and back in on that terminal) then it will ask for your password. But if you run the command in the background by appending & then you won’t be shown the [sudo] password for user: line or given the opportunity to type it in.
So in this situation, running the command, entering your password, and sending it to the background afterwards is an reasonable way to do it, for interactive use.
But it’s not the only way and, as you say, you will not want to do that in a script.
Way 1: Make sure sudo has a fresh timestamp.
You can ensure that sudo has a current timestamp when it is used to run your command, by first running:
Then, after that, you can run:
sudo openvpn ~/my_connection.ovpn & However, it is usually better to avoid & (and nohup ) altogether when you want to run a command in the background with sudo . This is especially the case for scripting.
Way 2: Use sudo -b . In general, this is usually what you want.
Instead, you can run sudo itself in the foreground, but pass the -b flag so sudo causes the command to be run in the background.
sudo -b openvpn ~/my_connection.ovpn This is usually a better way, especially if you are putting the command in a script. With sudo -b you don’t get job control, but in a shell script job control is disabled by default and you shouldn’t usually use it.
-b, --background Run the given command in the background. Note that it is not possible to use shell job control to manipulate background processes started by sudo. Most interactive commands will fail to work properly in background mode. This works because nothing is running in the background until after sudo has recieved your password (if necessary) and determined that you are permitted to run the command.
Way 3: But for openvpn , you should probably just run it with —daemon .
openvpn will run in the background automatically if you run it with the —daemon option:
sudo openvpn ~/my_connection.ovpn --daemon Pass —daemon after your .opvn filename rather than before; the argument following —daemon , if any, is interpreted as the name that the daemonized openvpn process should use. (Do not also append & .)
Whether or not this is appropriate depends on whether or not any interaction must occur after openvpn has been run but before it daemonizes. And that depends, in part, on what is set up in ~/my_connection.ovpn . But if openvpn couldn’t immediately daemonize, then all the other ways of immediately running it in the background will break, too.
Therefore, in any situation where you know you want openvpn to start running in the background, and you know you won’t want to bring it back into the foreground, you should strongly consider the method of invoking it with the —daemon option. This is specific to openvpn —most programs do not support a —daemon option, though many server programs do have some such option. (The name and syntax vary, however.)
To decide whether or not to use this option (and how you want to use it), I recommend you read the openvpn manual page, especially in the section on —daemon . It has a lot of useful information, and I am only quoting the first paragraph here:
--daemon [progname] Become a daemon after all initialization functions are completed. This option will cause all message and error output to be sent to the syslog file (such as /var/log/messages), except for the output of scripts and ifconfig commands, which will go to /dev/null unless otherwise redirected. The syslog redirection occurs immediately at the point that --daemon is parsed on the command line even though the daemonization point occurs later. If one of the --log options is present, it will supercede syslog redirection. The optional progname parameter [. ] Way 4: Sometimes it’s reasonable to run the whole script as root.
If you have a script that carries out multiple actions as root, it doesn’t have any significant activity that would reasonably be run not as root, and there’s never anything useful to come from running the script as a non-root user, then the user of the script should probably just run it as root.
If this is the case, then you should remove sudo from commands in the script. When the script runs as root, there’s no need for sudo . (Though the root user can, by default, run any command as any user including itself with sudo and doesn’t need a password to do so. So if you do leave instances of sudo in the script then it will probably still work.)
If you have any instances of sudo in the script that are actually used to run commands as some other user than root (with -u user ), then you should still keep those instances.
If the whole script is being run as root, then most of the typical ways of making commands run in the background apply, including appending & and, where needed, the use of nohup (which you already know about). For this, though, you should still strongly consider using openvpn with the —daemon option.
Connect to VPN Automatically on Ubuntu 20.04/18.04

Today, we are going to learn how to connect to VPN automatically on Ubuntu 20.04/18.04. There are various scenarios in which you might want to connect to VPN automatically when system boots. In this guide, you will learn how to connect to VPN automatically on Ubuntu 20.04/Ubuntu 18.04 desktop systems, OpenVPN clients.
Connect to VPN Automatically on Ubuntu 20.04/18.04
One of important assumptions we make before we can proceed is that you already have your VPN client configuration file.
You can see a sample OpenVPN client configuration file in our previous guide by following the link below;
- Running OpenVPN client as a service.
- Configure Network Manager to automatically connect to VPN using specific network connection.
Install Required Packages
The following command installs the packages that we will need to configure automatic VPN connection on Ubuntu 20.04/Ubuntu 18.04.
apt install network-manager-openvpn network-manager-openvpn-gnome openvpn openvpn-systemd-resolved -yRunning OpenVPN Client as Service on Ubuntu 20.04/18.04
When you install openvpn package, it creates a /etc/openvpn/client/ directory into which you can place the OpenVPN client configuration file.
Therefore, copy your OpenVPN configuration file, either .conf or .ovpn , into the OpenVPN client configurations directory.
Note that the configuration files under the /etc/openvpn/client/ directory should have the .conf suffix. Hence, if the original file is .ovpn , rename it in the destination directory to .conf as shown below.
sudo cp ~/gentoo.ovpn /etc/openvpn/client/gentoo.confRun OpenVPN Client as a Service
Once the client configuration file is in place, you then start OpenVPN client service. Note that, it is possible to have multiple OpenVPN client configuration files in this directory.
As such, you can use the service, [email protected].service to start your OpenVPN client service using a specific configuration file placed on the /etc/openvpn/client/ directory.
Replace the with the name of your OpenVPN client configuration file, without the suffix, .conf or .ovpn .
For example, to start OpenVPN client service using the gentoo.ovpn , run the service as follows;
● [email protected] - OpenVPN tunnel for gentoo Loaded: loaded (/lib/systemd/system/[email protected]; indirect; vendor preset: enabled) Active: active (running) since Sun 2020-06-14 12:30:56 EAT; 5s ago Docs: man:openvpn(8) https://community.openvpn.net/openvpn/wiki/Openvpn24ManPage https://community.openvpn.net/openvpn/wiki/HOWTO Main PID: 5556 (openvpn) Status: "Initialization Sequence Completed" Tasks: 1 (limit: 2315) CGroup: /system.slice/system-openvpn\x2dclient.slice/[email protected] └─5556 /usr/sbin/openvpn --suppress-timestamps --nobind --config gentoo.conf Jun 14 12:30:57 amos openvpn[5556]: ROUTE_GATEWAY 10.0.2.2/255.255.255.0 IFACE=enp0s3 HWADDR=08:00:27:4b:ff:18 Jun 14 12:30:57 amos openvpn[5556]: TUN/TAP device tun0 opened Jun 14 12:30:57 amos openvpn[5556]: TUN/TAP TX queue length set to 100 Jun 14 12:30:57 amos openvpn[5556]: do_ifconfig, tt->did_ifconfig_ipv6_setup=0 Jun 14 12:30:57 amos openvpn[5556]: /sbin/ip link set dev tun0 up mtu 1500 Jun 14 12:30:57 amos openvpn[5556]: /sbin/ip addr add dev tun0 10.8.0.2/24 broadcast 10.8.0.255 Jun 14 12:30:57 amos openvpn[5556]: /sbin/ip route add 192.168.57.6/32 via 10.0.2.2 Jun 14 12:30:57 amos openvpn[5556]: /sbin/ip route add 0.0.0.0/1 via 10.8.0.1 Jun 14 12:30:57 amos openvpn[5556]: /sbin/ip route add 128.0.0.0/1 via 10.8.0.1 Jun 14 12:30:57 amos openvpn[5556]: Initialization Sequence CompletedIf you see the line, Initialization Sequence Completed then your vpn connection has been established successfully.
Checking the assigned address;
6: tun0: mtu 1500 qdisc fq_codel state UNKNOWN group default qlen 100 link/none inet 10.8.0.2/24 brd 10.8.0.255 scope global tun0 valid_lft forever preferred_lft forever inet6 fe80::6b22:1d7f:5ef2:1db3/64 scope link stable-privacy valid_lft forever preferred_lft foreverEnable the service to run on system boot to ensure that the VPN connection is initiated automatically on system boot.
Reboot your system and check the status again to confirm.
Automatically Connect to VPN with Network-Manager
To be able to connect to VPN using Network Manager, ensure that you have created a VPN connection profile via Network Manager.
Follow the guide below to learn how to connect to OpenVPN server via the Network Manager;
Open Network Manager Connection Editor
Click on the connection icon at the top right corner on your Ubuntu system and click Edit Connections.
You can as well launch the network manager connection editor by running the command below;
This opens the connection editor wizard.
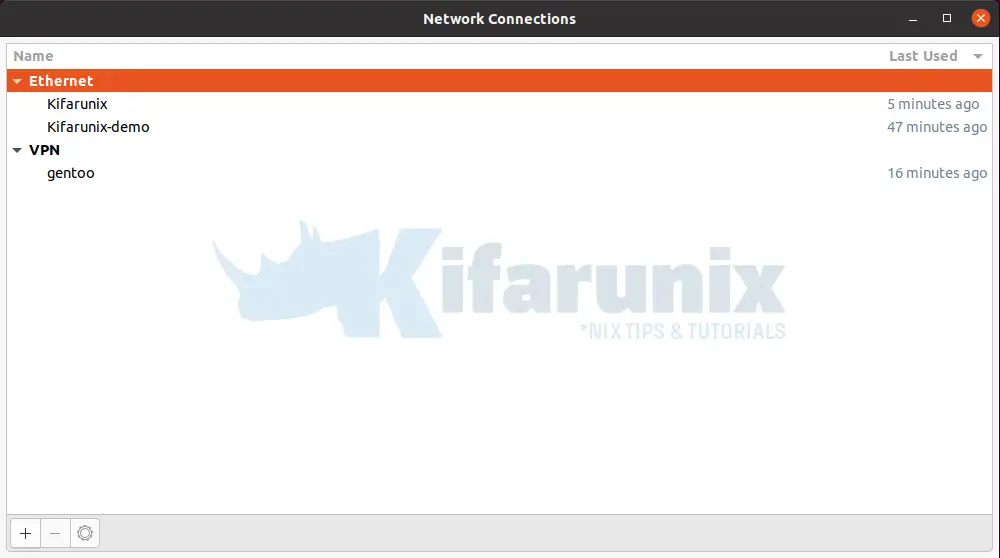
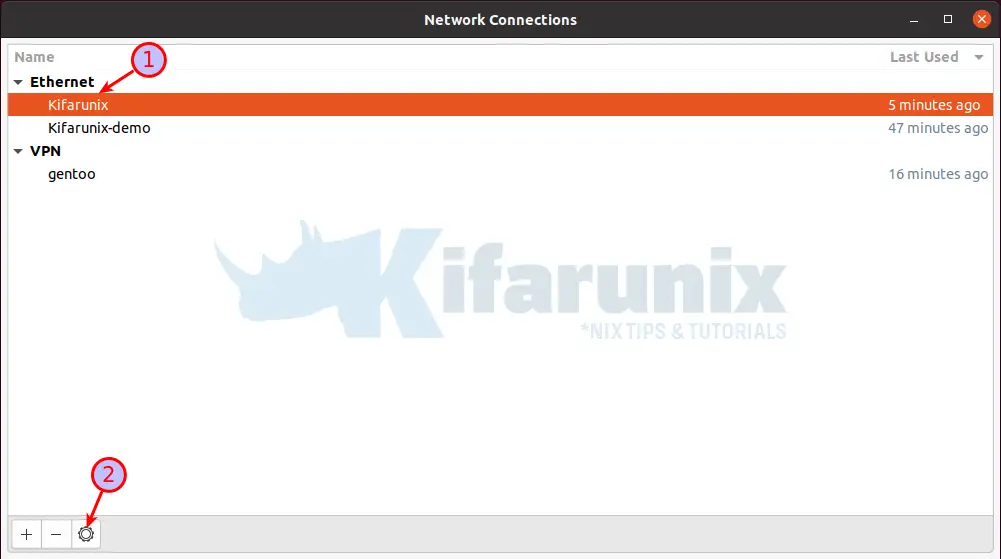
Select the network connection profile under which you want to initiate automatic VPN connection with. For example, in my case, if I want to use the first ethernet connection, Kifarunix, simply select it and click the settings gear at the bottom.
This opens up the specific connection editor. Click on the General tab and select Automatically connect to VPN and choose your VPN connection profile you created before, in our case, it is gentoo.
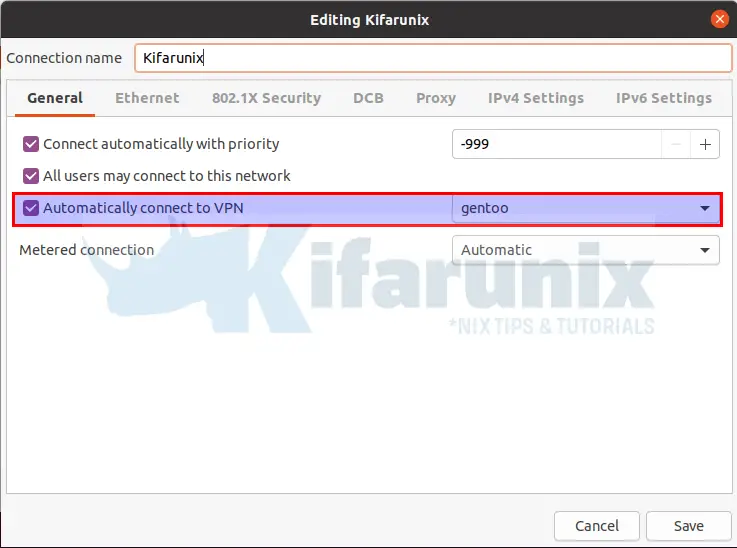
Click Save to update the changes.
Verify this by toggling the connection on and off. Notice that, when you turn on, the VPN connection is also turned on.
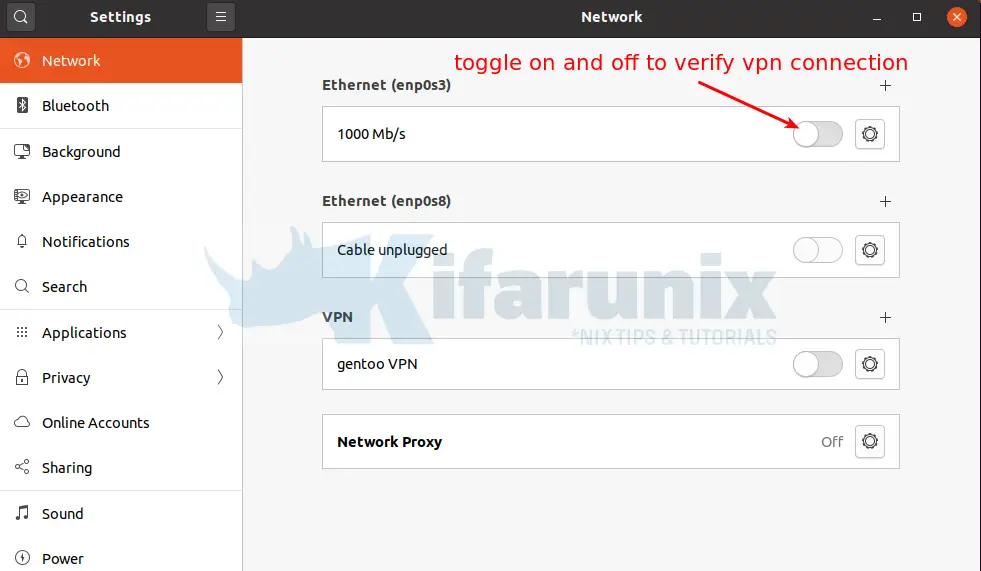
Similarly, you can verify the same by rebooting your system and checking your assigned VPN address.
And that pretty sums it all on how to connect to VPN automatically on Ubuntu 20.04/18.04 .
Related Tutorials
SUPPORT US VIA A VIRTUAL CUP OF COFFEE
We’re passionate about sharing our knowledge and experiences with you through our blog. If you appreciate our efforts, consider buying us a virtual coffee. Your support keeps us motivated and enables us to continually improve, ensuring that we can provide you with the best content possible. Thank you for being a coffee-fueled champion of our work!