- Basics Of Compiling Software From Source Code In Linux
- A Typical Example
- The INSTALL Or README Files
- Install A GitHub Program
- Autogen.sh
- Troubleshooting
- Missing Libraries
- Conclusion
- How to Write, Compile and Run a C Program in Ubuntu and Other Linux Distributions [Beginner’s Tip]
- Method 1: How to run C programs in a Linux terminal
- Method 2: How to run C programs in Linux using a code editor like Visual Studio Code
- Which method do you prefer?
- How to run an application source code on ubuntu?
- 2 Answers 2
- How to install a Program from Source on Linux
- What is the Source Code?
- Formats of Source packages
- Compiling and Installing Source Packages
- Step 1 – Extract the content of archive packages
- For .tar.bz2
Basics Of Compiling Software From Source Code In Linux
From time to time, you may want or need to compile a software/program from the source code. This involves compiling C or C++ code into something we can execute in Linux. Depending on the software you wish to compile, it’s often unnecessary to do so. This is because your distribution will likely have the binary form of the program already in the software repositories.
In fact, you should choose the binary packages over compiling from the source. One reason is that it could potentially introduce problems for your system. However, if ever the time should come where you need compile from source, this guide will give you some basic pointers.
A Typical Example
Let’s take a program written in either C or C++. Downloading the source code often involves either downloading and unpacking a package (often a tarball), or cloning a git repository. The typical method of operation is the execution of these three commands: $
./configure $ make $ sudo make install
The first command runs the configure script that analyses the libraries installed on your system. If a required library isn’t installed, it will report it and you will need to install it. Not only will you need the library installed, but also the development files must be present as well. Source code files use the functionality found in these libraries.
After the configure command is executed, you should have a Makefile present. By running ‘make’, it will read the Makefile in the current directory and start running the compiler (gcc for C, or g++ for C++) to compile the software.
The third command isn’t strictly essential but is recommended for system-wide access, that is running the executable from anywhere in the terminal. This command tells ‘make’ to run instructions for installing the program to the system.
The INSTALL Or README Files
There may be extra instructions that must be completed before compiling can begin. Reading this file (usually INSTALL) should also reveal what development libraries may need to be installed first. Such packages will contain the suffix “-dev” to indicate that these are the development headers and must be installed. The configure script may also require extra parameters as well. README will contain any other information.
You may even find that none of the three commands are run during the whole process. Even variations of make such as qmake (for Qt projects) or cmake could be used instead.
Install A GitHub Program
Let’s begin by installing a text editor called wxMEdit, found on GitHub. Here I demonstrate how to install a program by compiling from source. This is an almost typical example of the scope of this guide. If you visit the GitHub repository, you will see that the readme file has details about the application. There aren’t any compiling instructions so the standard sequence applies, with one difference: autogen.sh.
First, we change to where we wish to store the repository in the terminal and clone it:
$ cd wherever $ git clone git://github.com/wxMEdit/wxMEdit.git
Autogen.sh
If you find this file in the source code, you should run this first before “./configure” as this will perform tasks that will allow you to compile the software successfully. If that is successful, then you can run “./configure”, “make”, and then “sudo make install”, and whatever else you need to run (in this case, nothing else).


Troubleshooting
If you do so regularly, you are bound to encounter certain issues when compiling from source.
Missing Libraries
Remember, it’s not enough for the binary libraries to be installed; the source files or development headers must also be installed as well. The configure script, along with the documentation, will usually alert you of any libraries (development headers) you need to install for a successful compilation. Ensure these are installed on your system.

They’re Installed And Other Errors Occur
Conclusion
Compiling software can either be quite simple, or quite painful. Fortunately, many Linux distributions provide binary packages ready to install so compiling from source isn’t usually necessary. It is better to stick with the binary packages provided by the software repos provided by your distribution if they’re available.
How to Write, Compile and Run a C Program in Ubuntu and Other Linux Distributions [Beginner’s Tip]
Running C program in Linux command line is not that difficult. Running it in a code editor like Visual Studio Code is even easier. Learn both methods.
How do you program in C on Linux? It is indeed very easy and consists of three simple steps. Step 1: Write your program and save the file with a .c extension. For example, my_program.c. Step 2: You compile the program and generate the object file using gcc compiler in a terminal like this:
gcc -o my_program my_program.c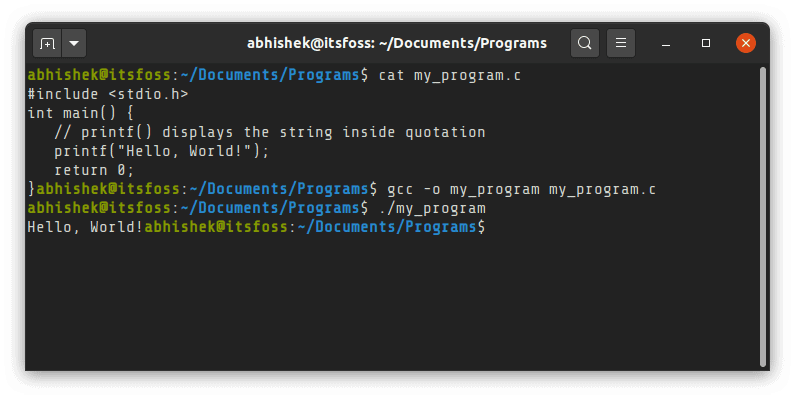
This was just a quick summary of how to compile and run a C program in Linux. If you are new to either C or Linux, I’ll show these steps in detail to make you comfortable coding C programs in a Linux environment. I’ll discuss how to run C programs in a Linux terminal and a code editor.
Method 1: How to run C programs in a Linux terminal
In order to run a C program in Linux, you need to have a C compiler present on your systems. The most popular compiler is gcc (GNU Compiler Collection). You can install gcc using your distribution package manager. In Debian and Ubuntu-based Linux distributions, use the apt command:
Switch to the directory where you have kept your C program (or provide the path) and then generate the object file by compiling the program:
gcc -o my_program my_program.cKeep in mind that it is optional to provide the output object file (-o my_program). If you won’t do that, an object file named a.out will be automatically generated. But this is not good because it will be overwritten for each C program and you won’t be able to know which program the a.out object file belongs to. Once your object file is generated, run it to run the C program. It is already executable. Simply use it like this:
And it will display the desired output if your program is correct. As you can see, this is not very different from running C++ programs in Linux.
Every time you make a change in your program, you have to compile it first and then run the generated object file to run the C program.
Method 2: How to run C programs in Linux using a code editor like Visual Studio Code
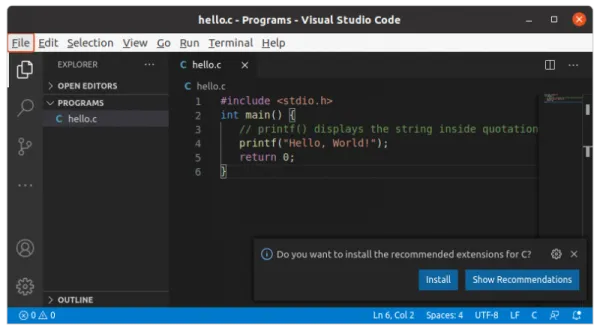
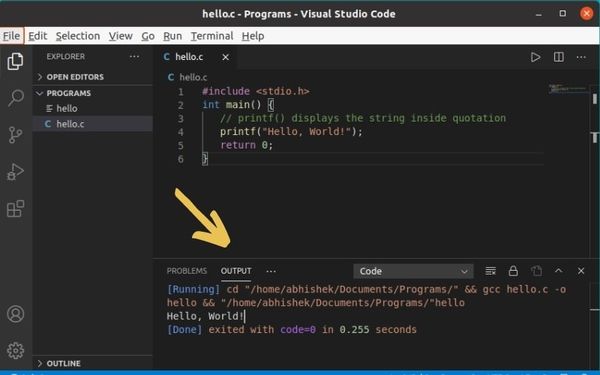
Not everyone is comfortable with the command line and terminal and I totally understand that. You can use a proper C/C++ IDE like Eclipse or Code Blocks but they are often too heavy programs and more suitable for large projects. I recommend using an open-source code editor like Visual Studio Code or Atom. These are basically text editors and you can install add-ons to compile and run programs directly from the graphical code editor. I am using Visual Studio Code editor in this example. It’s a hugely popular open-source code editor from Microsoft. First thing first, install Visual Studio Code in Ubuntu from the software centre. For other distributions, please check your Linux distribution’s package manager or software centre. You may also check the official website for more information. Start Visual Studio Code and open/create a project and create your C program here. I am using a sample Hello World program. You must ensure the gcc compiler is installed on your Linux system.
Next, you would want to use an extension that allows you to run the C code. Microsoft may prompt you for installing its own extension for the C/C++ programs but it is complicated to set up and hence I won’t recommend it. Instead, I suggest using the Code Runner extension. It’s a no-nonsense extension and you can run C and C++ code easily without additional configuration. Go to the Extensions tab, search for ‘Code Runner,’ and install it. 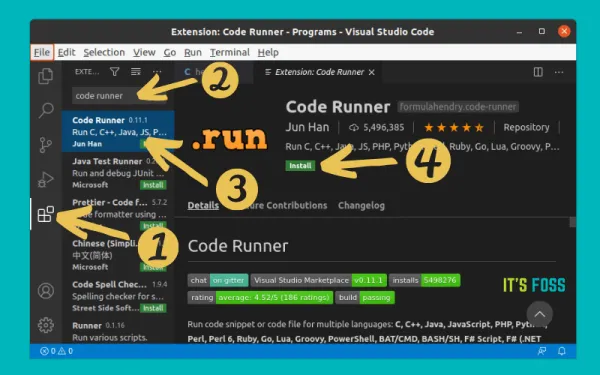 Restart Visual Studio Code. Now, you should be able to run the C code by using one of the following ways:
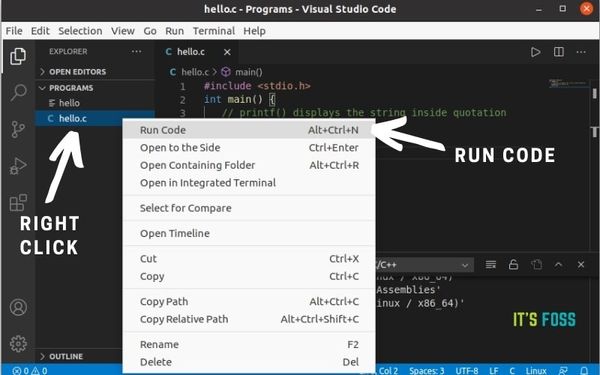
- Using the shortcut Ctrl+Alt+N.
- Press F1 and then select or type Run Code.
- Right-click the text editor and click Run code from the context menu.
When you run the program, it is compiled automatically and then run. You can see the output in the terminal that is opened at the bottom of the editor. What could be better than this?
Which method do you prefer?
If you prefer a video to learn about installing and running C programs in Linx, check out the below Video tutorial.
How to run an application source code on ubuntu?
I am a new user on ubuntu. My project is to modify an application source code on ubuntu. I had already download an application source code which is using C++. Firstly i need to check whether the original source code can run successfully, how to run it on ubuntu?
2 Answers 2
Before you try any of the following methods check README or INSTALL file it would be carrying whole info on installation. I’ll give you some common installation methods. Make sure to do all the following things as root otherwise it may cause such «Permission Denied» errors. An easy way to do everything as root : At the beginning write sudo bash . It would open a bash as root it reduces lots of efforts writing sudo every time.
First extract the source code with
What ever your app is if it can be installed it should have a Make file in it. If there is a file named MAKE your app source work is now easy as pie.
Just lead the terminal to the source code folder cd /path/to/source/ (use tab key instead of writing whole path) and then write make It may ask you to configure and if it ask so it would also give instructions how to do so. Configurations are dependent on app so I can’t help on it without the app name.
If it doesn’t ask to config, it’ll be easier now just write make install and you’re done.
There might be some errors like some packges requires so just install packges using apt. i.e. apt-get install packgename
In case the first method goes wrong with error i.e «Make file not found» this may work.
Check if there is a bin folder in the source, lead the terminal to the bin folder.
Run a proper executable you think is the main executable of the app using ./appname in this case the app is portable and you can use it without installation. Probably this method never works in case you have the zero compiled source code.
Or there may be such APPNAME.sh anything like install.sh run it with sh something.sh and if it runs without errors it’s all yours.
However you can always install well known apps using apt.
How to install a Program from Source on Linux

O ne of the things open source programs are great to work with is flexibility. You can access the source code, which means that you can turn it into anything you want. Users have the permission to configure it however desired so that they can make it suit any system or add/remove any feature. Program developers often release their program in what is known as source code.
What is the Source Code?
The source code is a collection of code written using a readable programming language, which is typically a plain text. It is then transformed by a compiler into binary code for making ready to install packages like .deb, rpm, etc.. Most of the popular packages are readily packaged into the easily executable deb and rpm packages, but there are also thousands of other packages that aren’t compiled. Developers provide them ‘as is’ in the source code format.
Formats of Source packages
The most common formats and the ones that we are going to show here are .tar.xz, .tar.gz and .tar.bz2 packages. TAR is an archiving utility provided by GNU. The different formats use different archiving methods. Other than that, there is not much difference between the three.
Compiling and Installing Source Packages
We are going to show three different package types with three different scenarios. These are the situations that you are most likely to find while installing any kind of source package. The following image shows the three packages that I have:

Step 1 – Extract the content of archive packages
First off, extracting the source packages. The following are the commands for all three kinds of packages: