- Run tor on linux
- 2. Configure Tor Project’s Repository
- 3. Install Tor
- 4. Install obfs4proxy
- 5. Edit your Tor config file, usually located at /etc/tor/torrc and replace its content with:
- 6. Restart Tor
- 7. Monitor your logs
- 8. Final Notes
- INSTALLATION
- Command-line method
- Run tor on linux
- macOS
- Debian / Ubuntu
- Fedora
- FreeBSD
- OpenBSD
- Installing Tor from source
- Run tor on linux
- 2. Настройте репозиторий Tor Project
- 3. Установите Tor
- 4. Установите obfs4proxy
- 5. Найдите файл настроек Tor (обычно тут: /etc/tor/torrc ), откройте и замените содержимое на:
- 6. Перезапустите Tor
- 7. Следите за логами
- 8. В завершение
Run tor on linux
One of the most important things to keep your relay secure is to install security updates timely and ideally automatically so you can not forget about it. Follow the instructions to enable automatic software updates for your operating system.
2. Configure Tor Project’s Repository
Configuring the Tor Project’s package repository for Debian/Ubuntu is recommended and documented on Support portal. Please follow those instructions before proceeding.
Note: Ubuntu users need to get Tor from the Tor Project’s repository.
3. Install Tor
Ensure you update the packages database before installing the package, than call apt to install it:
# apt update # apt install tor 4. Install obfs4proxy
On Debian, the latest version obfs4proxy package is available in stable-backports. By default, backports packages are not installed, so to install the latest version of obfs4proxy you need to use the following command sudo apt install -t bullseye-backports obfs4proxy or to pin the package with a config similar to this one that you will place in /etc/apt/preferences.d/obfs4proxy.pref .
Explanation: tor meta, always run latest version of obfs4proxy Package: obfs4proxy Pin: release a=bullseye-backports Pin-Priority: 500 On Ubuntu, bionic, cosmic, disco, eoan, and focal have the package. If you’re running any of them, sudo apt-get install obfs4proxy should work.
5. Edit your Tor config file, usually located at /etc/tor/torrc and replace its content with:
BridgeRelay 1 # Replace "TODO1" with a Tor port of your choice. # This port must be externally reachable. # Avoid port 9001 because it's commonly associated with Tor and censors may be scanning the Internet for this port. ORPort TODO1 ServerTransportPlugin obfs4 exec /usr/bin/obfs4proxy # Replace "TODO2" with an obfs4 port of your choice. # This port must be externally reachable and must be different from the one specified for ORPort. # Avoid port 9001 because it's commonly associated with Tor and censors may be scanning the Internet for this port. ServerTransportListenAddr obfs4 0.0.0.0:TODO2 # Local communication port between Tor and obfs4. Always set this to "auto". # "Ext" means "extended", not "external". Don't try to set a specific port number, nor listen on 0.0.0.0. ExtORPort auto # Replace "" with your email address so we can contact you if there are problems with your bridge. # This is optional but encouraged. ContactInfo # Pick a nickname that you like for your bridge. This is optional. Nickname PickANickname Don’t forget to change the ORPort , ServerTransportListenAddr , ContactInfo , and Nickname options.
- If you decide to use a fixed obfs4 port smaller than 1024 (for example 80 or 443), you will need to give obfs4 CAP_NET_BIND_SERVICE capabilities to bind the port with a non-root user:
sudo setcap cap_net_bind_service=+ep /usr/bin/obfs4proxy
To work around systemd hardening, you will also need to set NoNewPrivileges=no in /lib/systemd/system/tor@default.service and /lib/systemd/system/tor@.service and then run systemctl daemon-reload . For more details, see ticket 18356.
- Note that both Tor’s OR port and its obfs4 port must be reachable. If your bridge is behind a firewall or NAT, make sure to open both ports. You can use our reachability test to see if your obfs4 port is reachable from the Internet.
6. Restart Tor
# systemctl enable --now tor.service Or restart it if it was running already, so configurations take effect:
# systemctl restart tor.service 7. Monitor your logs
To confirm your bridge is running with no issues, you should see something like this (usually in /var/log/syslog or run # journalctl -e -u tor@default ):
[notice] Your Tor server's identity key fingerprint is ' ' [notice] Your Tor bridge's hashed identity key fingerprint is ' ' [notice] Registered server transport 'obfs4' at '[::]:46396' [notice] Tor has successfully opened a circuit. Looks like client functionality is working. [notice] Bootstrapped 100%: Done [notice] Now checking whether ORPort :3818 is reachable. (this may take up to 20 minutes -- look for log messages indicating success) [notice] Self-testing indicates your ORPort is reachable from the outside. Excellent. Publishing server descriptor. 8. Final Notes
If you are having trouble setting up your bridge, have a look at our help section. If your bridge is now running, check out the post-install notes.
INSTALLATION
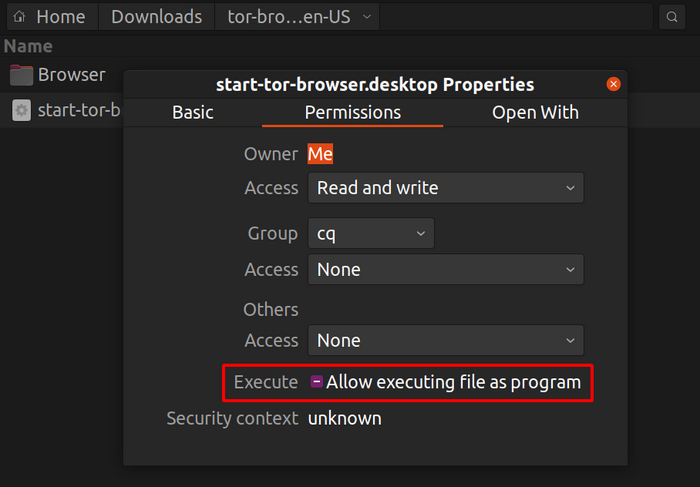
Note: On Ubuntu and some other distros if you try to launch start-tor-browser.desktop a text file might open up. In that case, you will have to change the default behavior and allow running .desktop files as executables. This setting can usually be found in your file manager.
Command-line method
- When the download is complete, extract the archive with the command tar -xf [TB archive] .
- From inside the Tor Browser directory, you can launch Tor Browser by running: ./start-tor-browser.desktop Note: If this command fails to run, you probably need to make the file executable. From within this directory run: chmod +x start-tor-browser.desktop
Some additional flags that can be used with start-tor-browser.desktop from the command-line:
| Flag | Description |
|---|---|
| —register-app | To register Tor Browser as a desktop application. |
| —verbose | To display Tor and Firefox output in the terminal. |
| —log [file] | To record Tor and Firefox output in file (default: tor-browser.log). |
| —detach | To detach from terminal and run Tor Browser in the background. |
| —unregister-app | To unregister Tor Browser as a desktop application. |
Run tor on linux
Admin access: To install Tor you need root privileges. Below all commands that need to be run as root user like apt and dpkg are prepended with ‘#’, while commands to be run as user with ‘$’ resembling the standard prompt in a terminal. To open a root terminal you have several options: sudo su, or sudo -i, or su -i. Note that sudo asks for your user password, while su expects the root password of your system.
macOS
There are two package manager on OS X: Homebrew and Macports. You can use the package manager of your choice.
To install Homebrew follow the instructions on brew.sh.
To install Macports follow the instructions on macports.org/install.php.
If you are using Homebrew in a Terminal window, run:
If you are using Macports in a Terminal window, run:
Debian / Ubuntu
Do not use the packages in Ubuntu’s universe. In the past they have not reliably been updated. That means you could be missing stability and security fixes.
Enable the Torproject package repository by following the instructions.
Fedora
Add the following to /etc/yum.repos.d/tor.repo and then install the tor package.
[tor] name=Tor for Fedora $releasever - $basearch baseurl=https://rpm.torproject.org/fedora/$releasever/$basearch enabled=1 gpgcheck=1 gpgkey=https://rpm.torproject.org/fedora/public_gpg.key cost=100 FreeBSD
OpenBSD
Installing Tor from source
The latest release of Tor can be found on the download page.
If you’re building from source, first install libevent, and make sure you have openssl and zlib (including the -devel packages if applicable).
Now you can run tor as src/app/tor (0.4.3.x and later), or you can run make install (as root if necessary) to install it into /usr/local/, and then you can start it just by running tor.
Run tor on linux
Одно из главных условий защиты узла – своевременно устанавливать обновления безопасности. Лучше делать это автоматически, чтобы не забыть. Следуйте инструкциям по включению автоматического обновления программ для вашей операционной системы.
2. Настройте репозиторий Tor Project
Рекомендуемая настройка репозитория Tor Project для Debian/Ubuntu описана здесь. Пожалуйста, перед продолжением выполните эти шаги.
Внимание: пользователям Ubuntu следует использовать Tor из репозитория Tor Project.
3. Установите Tor
Убедитесь, что обновили пакеты, потом устанавливайте через apt :
# apt update # apt install tor 4. Установите obfs4proxy
On Debian, the latest version obfs4proxy package is available in stable-backports. By default, backports packages are not installed, so to install the latest version of obfs4proxy you need to use the following command sudo apt install -t bullseye-backports obfs4proxy or to pin the package with a config similar to this one that you will place in /etc/apt/preferences.d/obfs4proxy.pref .
Explanation: tor meta, always run latest version of obfs4proxy Package: obfs4proxy Pin: release a=bullseye-backports Pin-Priority: 500 On Ubuntu, bionic, cosmic, disco, eoan, and focal have the package. If you’re running any of them, sudo apt-get install obfs4proxy should work.
Если не получилось, попробуйте создать из исходника.
5. Найдите файл настроек Tor (обычно тут: /etc/tor/torrc ), откройте и замените содержимое на:
BridgeRelay 1 # Замените "TODO1" портом Tor по своему выбору. # Этот порт должен быть доступен извне. # Избегайте порта 9001. Он обычно ассоциируется с Tor. Цензоры могут знать об этом, просматривая Интернет. ORPort TODO1 ServerTransportPlugin obfs4 exec /usr/bin/obfs4proxy # Замените "TODO2" портом obfs4 по своему выбору. # Этот порт должен быть доступен извне и отличаться от порта, указанного для ORPort. # Избегайте порта 9001. Он обычно ассоциируется с Tor. Цензоры могут знать об этом, просматривая Интернет. ServerTransportListenAddr obfs4 0.0.0.0:TODO2 # Местный коммуникационный порт между Tor и obfs4. Всегда выбирайте значение "auto". # "Ext" значит "расширенный", а не "внешний". Не пытайтесь установить конкретный номер порта или слушать 0.0.0.0. ExtORPort auto # Замените "" вашим адресом email, чтобы мы могли связаться с вами в случае проблем с вашим мостом. # Это необязательно, но желательно. ContactInfo # Выберите название для своего моста. (Это необязательно). Nickname PickANickname Не забудьте изменить опции ORPort , ServerTransportListenAddr , ContactInfo и Nickname .
- Если решите использовать фиксированный порт obfs4 со значением менее 1024 (например, 80 или 443), вам нужно дать obfs4 CAP_NET_BIND_SERVICE право связать порт с пользователем без прав суперпользователя:
sudo setcap cap_net_bind_service=+ep /usr/bin/obfs4proxy
Для большей защиты systemd вам также понадобится установить NoNewPrivileges=no в /lib/systemd/system/tor@default.service и /lib/systemd/system/tor@.service , а затем запустить systemctl daemon-reload . Подробнее см. заявку 18356.
- Обратите внимание: и OR-порт Tor, и порт obfs4 должны быть доступны. Если ваш мост находится за межсетевым экраном или NAT, убедитесь, что оба порта открыты. Чтобы проверить, доступен ли obfs4-порт из Интернета, можете использовать наш тест.
6. Перезапустите Tor
# systemctl enable --now tor.service А если Tor уже работает, перезапустите, чтобы изменения вступили в силу:
# systemctl restart tor.service 7. Следите за логами
Доказательством того, что ваш мост работает без проблем, служит примерно такая запись (обычно в /var/log/syslog , или выполните # journalctl -e -u tor@default ):
[notice] Your Tor server's identity key fingerprint is ' ' [notice] Your Tor bridge's hashed identity key fingerprint is ' ' [notice] Registered server transport 'obfs4' at '[::]:46396' [notice] Tor has successfully opened a circuit. Looks like client functionality is working. [notice] Bootstrapped 100%: Done [notice] Now checking whether ORPort :3818 is reachable. (this may take up to 20 minutes -- look for log messages indicating success) [notice] Self-testing indicates your ORPort is reachable from the outside. Excellent. Publishing server descriptor. 8. В завершение
Если у вас проблемы с настройкой моста, обратите внимание на наш раздел помощи. Если ваш мост работает прямо сейчас, загляните в примечания после установки.