- Run usb linux in windows
- What You’ll Need
- Creating a Bootable Kali USB Drive on Windows (Etcher)
- Creating a Bootable Kali USB Drive on Windows (Rufus)
- Booting A USB Drive In Windows
- Connect USB devices
- Prerequisites
- Install the USBIPD-WIN project
- Install the USBIP tools and hardware database in Linux
- Attach a USB device
- Подключение USB-устройств
- Предварительные требования
- Установка проекта USBIPD-WIN
- Установка средств USBIP и аппаратной базы данных в Linux
- Подключение USB-устройства
Run usb linux in windows
One of the fastest method, for getting up and running with Kali Linux is to run it “live” from a USB drive. This method has several advantages:
- It’s non-destructive — it makes no changes to the host system’s hard drive or installed OS, and to go back to normal operations, you simply remove the Kali Live USB drive and restart the system
- It’s portable — you can carry Kali Linux in your pocket and have it running in minutes on an available system
- It’s customizable — you can roll your own custom Kali Linux ISO image and put it onto a USB drive using the same procedures
- It’s potentially persistent — with a bit of extra effort, you can configure your Kali Linux “live” USB drive to have persistent storage, so the data you collect is saved across reboots
In order to do this, we first need to create a bootable USB drive which has been set up from an ISO image of Kali Linux.
The specifics of this procedure will vary depending on whether you’re doing it on a Linux, macOS/OS X, or Windows system.
What You’ll Need
- A verified copy of the appropriate ISO image of the latest Kali build image for the system you’ll be running it on.
- If you’re running under Windows, there is not one tool that is considered the overall best for imaging. We recommend Etcher(installer or portable) as it is simpler to use, however Rufus is another popular option with its advance options. If one does not work for you, consider the other.
- A USB drive, 8GB or larger (Systems with a direct SD card slot can use an SD card with similar capacity. The procedure is identical.)
During this procedure, you might see some warnings telling you that Kali Linux contains malware, trojan, virus or whatever. This message usually comes from Windows Defender or USB Defender, or a third-party antivirus. Those warnings are expected: Kali Linux is packed with pentesting tools that are likely to be flagged as malware. Just ignore the warnings.
Creating a Bootable Kali USB Drive on Windows (Etcher)
- Plug your USB drive into an available USB port on your Windows PC, note which drive designator (e.g. “ G:\ ”) it uses once it mounts, and launch Etcher.
- Click Flash from file, and locate the Kali Linux ISO file to be imaged with.
- Click Select target and choose the USB drive you want to make bootable.
- Click the Flash! button once ready.
Note: You may get a UAC prompt asking for administrator privileges that you will need to accept.

5. Once Etcher alerts you that the image has been flashed, you can safely remove the USB drive and proceed to boot into Kali with it.
At the time of writing, Etcher will use MBR. This is to allow for the most hardware compatibility.
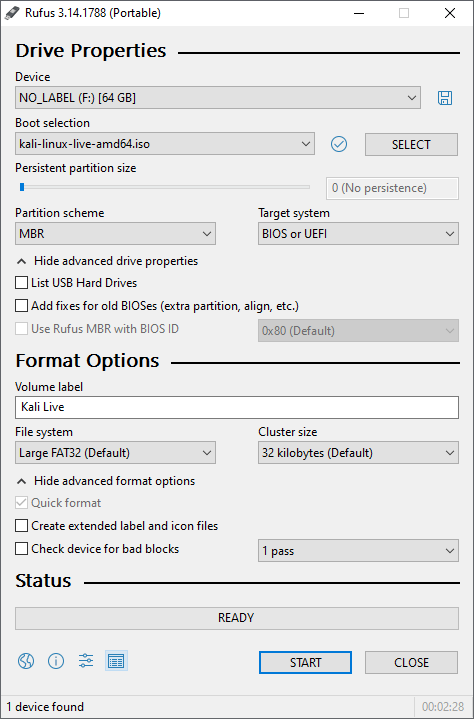
Creating a Bootable Kali USB Drive on Windows (Rufus)
- Plug your USB drive into an available USB port on your Windows PC, note which drive designator (e.g. “ G:\ ”) it uses once it mounts, and launch Rufus.
- With Device, check the dropdown list of options for the USB drive (e.g. “ G:\ ” and size).
- Boot selection needs to point to point to the Kali Linux ISO file, which can be done by clicking the SELECT button
- Depending on your configuration, you can set the Partition scheme, as well as Target system. If you are not sure, leave it as the default values.
While you can easily create a persistent live usb with the integrated options in Rufus by increasing the persistence slider, this is not the officially supported method (check Adding Persistence to a Kali Linux Live USB Drive), as it doesn’t work for all images, like the Kali Everything Live ISO introduced in release 2022.1.
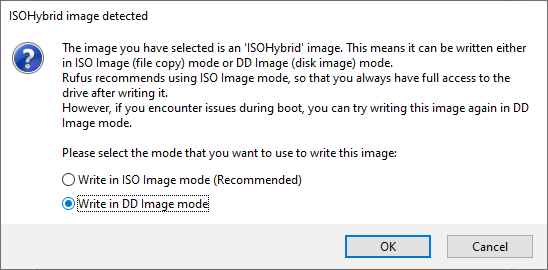
6. You may get a prompt saying about ISOHybird image. Selecting ISO image, will allow you to edit the files from the Kali Linux ISO, but at the potential lose of hardware compatibility. As a result, we recommend selecting DD Image.
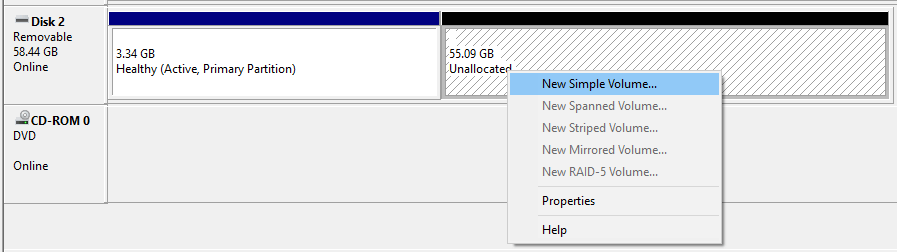
Note: If you select “DD Image” option, you can create another partition on the USB drive, allowing you to use the rest of the space. Start -> Run (Windows + R) -> diskmgmt.msc -> Locate the USB drive -> Right-click in “Unallocated” -> New Simple Volume -> Follow the rest of the wizard with next, next, next…
Booting A USB Drive In Windows
Depending on the system (such as BIOS or UEFI), as well as the version of Windows, and how they are each configured, you may need to re-image the USB drive.
- Master Boot Record (MBR) is often used on legacy systems that use BIOS as well as UEFI which has Compatibility Support Module (CSM) enabled
- GUID Partition Table (GPT) is required where UEFI has CSM disabled, forcing to use the modern standard
After writing the image to the USB drive, reboot Windows with the USB inserted. Depending on the motherboard manufacture, will also depend on the next stage. Some motherboard’s support a “temporary” boot menu, allowing for a one off selection. Others you need to enter BIOS/UEFI to configure it to try and boot from USB first. Entering either location, also depends on the motherboard. You can look up on the manufactures website and read the manual, try and read the screen when booting (however the text may be shown too quick or full logos used), or try common key combinations (such as ESC , F1 , F2 , F3 , F4 , F8 , F10 , F11 , F12 or DEL ).
Updated on: 2023-May-18
Author: g0tmi1k
Connect USB devices
This guide will walk through the steps necessary to connect a USB device to a Linux distribution running on WSL 2 using the USB/IP open-source project, usbipd-win.
Setting up the USB/IP project on your Windows machine will enable common developer USB scenarios like flashing an Arduino or accessing a smartcard reader.
Prerequisites
- Running Windows 11 (Build 22000 or later). (Windows 10 support is possible, see note below).
- A machine with an x64/x86 processor is required. (Arm64 is currently not supported with usbipd-win).
- Linux distribution installed and set to WSL 2.
- Running Linux kernel 5.10.60.1 or later.
To check your Windows version and build number, select Windows logo key + R, type winver, select OK. You can update to the latest Windows version by selecting Start > Settings > Windows Update > Check for updates. To check your Linux kernel version, open your Linux distribution and enter the command: uname -a . To manually update to the latest kernel, open PowerShell and enter the command: ‘wsl —update`.
Windows 11 is recommended for connecting USB devices to a Linux distribution running on WSL 2. However, Windows 10 can be used to connect USB devices by building your own USBIP enabled WSL 2 kernel following the instructions in the USBIPD-WIN project repo.
Install the USBIPD-WIN project
Support for connecting USB devices is not natively available in WSL, so you will need to install the open-source usbipd-win project.
- Go to the latest release page for the usbipd-win project.
- Select the .msi file, which will download the installer. (You may get a warning asking you to confirm that you trust this download).
- Run the downloaded usbipd-win_x.msi installer file.
Alternatively, you can also install the usbipd-win project using Windows Package Manager (winget). If you have already installed winget, just use the command: winget install —interactive —exact dorssel.usbipd-win to install usbipd-win. If you leave out —interactive, winget may immediately restart your computer if that is required to install the drivers.
- A service called usbipd (display name: USBIP Device Host). You can check the status of this service using the Services app from Windows.
- A command line tool usbipd . The location of this tool will be added to the PATH environment variable.
- A firewall rule called usbipd to allow all local subnets to connect to the service. You can modify this firewall rule to fine tune access control.
Install the USBIP tools and hardware database in Linux
Once the USB/IP project has completed installing, you will need to install the user space tools and a database of USB hardware identifiers. These instructions are for Ubuntu — other distributions may require a different usbip client package.
On Ubuntu, run this command:
sudo apt install linux-tools-generic hwdata sudo update-alternatives --install /usr/local/bin/usbip usbip /usr/lib/linux-tools/*-generic/usbip 20 At this point a service is running on Windows to share USB devices, and the necessary tools are installed in WSL to attach to shared devices.
Attach a USB device
Before attaching your USB device, ensure that a WSL command line is open. This will keep the WSL 2 lightweight VM active.
- List all of the USB devices connected to Windows by opening PowerShell in administrator mode and entering the command:
To learn more about how this works, see the Windows Command Line Blog and the usbipd-win repo on GitHub.
Подключение USB-устройств
В этом руководстве описаны шаги, необходимые для подключения USB-устройства к дистрибутиву Linux, работающему на WSL 2, с помощью проекта с открытым исходным кодом USB/IP usbipd-win.
Настройка проекта USB/IP на компьютере с Windows позволит реализовать распространенные сценарии РАЗРАБОТКИ USB, такие как мигание Arduino или доступ к средству чтения смарт-карт.
Предварительные требования
- Запуск Windows 11 (сборка 22000 или более поздняя). (Поддержка Windows 10 возможна, см. примечание ниже).
- Требуется компьютер с процессором x64/x86. (Arm64 в настоящее время не поддерживается с usbipd-win).
- Дистрибутив Linux установлен и установлен на WSL 2.
- Запуск ядра Linux 5.10.60.1 или более поздней версии.
Чтобы проверить версию и номер сборки Windows, нажмите клавиши WINDOWS+R, введите winver и щелкните ОК. Вы можете выполнить обновление до последней версии Windows, выбрав Пуск>Параметры>Центр обновления Windows>Проверить наличие обновлений. Чтобы проверка версию ядра Linux, откройте дистрибутив Linux и введите команду . uname -a Чтобы вручную обновить ядро до последней версии, откройте PowerShell и введите команду wsl —update.
Windows 11 рекомендуется для подключения USB-устройств к дистрибутиву Linux, работающему на WSL 2. Однако Windows 10 можно использовать для подключения USB-устройств, создав собственное ядро WSL 2 с поддержкой USBIP, следуя инструкциям в репозитории проекта USBIPD-WIN.
Установка проекта USBIPD-WIN
Поддержка подключения USB-устройств изначально недоступна в WSL, поэтому вам потребуется установить проект usbipd-win с открытым исходным кодом.
- Перейдите на страницу последнего выпуска проекта usbipd-win.
- Выберите файл .msi, который скачивает установщик. (Вы можете получить предупреждение с просьбой подтвердить, что вы доверяете этому скачиванию.)
- Запустите скачанный файл установщика usbipd-win_x.msi.
Кроме того, можно установить проект usbipd-win с помощью Диспетчер пакетов Windows (winget). Если вы уже установили winget, просто используйте команду : winget install —interactive —exact dorssel.usbipd-win , чтобы установить usbipd-win. Если вы опустите параметр —interactive, winget может немедленно перезагрузить компьютер, если это необходимо для установки драйверов.
- Служба с именем usbipd (отображаемое имя: УЗЕЛ устройства USBIP). Состояние этой службы можно проверка с помощью приложения «Службы» из Windows.
- Программа usbipd командной строки . Расположение этого средства будет добавлено в переменную среды PATH.
- Правило брандмауэра, которое usbipd позволяет всем локальным подсетям подключаться к службе. Это правило брандмауэра можно изменить для точной настройки управления доступом.
Установка средств USBIP и аппаратной базы данных в Linux
После завершения установки проекта USB/IP необходимо установить средства пользовательского пространства и базу данных идентификаторов оборудования USB. Эти инструкции предназначены для Ubuntu— для других дистрибутивов может потребоваться другой пакет клиента usbip.
В Ubuntu выполните следующую команду:
sudo apt install linux-tools-generic hwdata sudo update-alternatives --install /usr/local/bin/usbip usbip /usr/lib/linux-tools/*-generic/usbip 20 На этом этапе служба запущена в Windows для совместного использования USB-устройств, и в WSL устанавливаются необходимые средства для подключения к общим устройствам.
Подключение USB-устройства
Перед подключением USB-устройства убедитесь, что открыта командная строка WSL. Это позволит сохранить упрощенную виртуальную машину WSL 2 активной.
- Выведите список всех USB-устройств, подключенных к Windows, открыв PowerShell в режиме администратора и введя команду: