- Configure WiFi Connections
- Establish a Wireless Connection
- Connect to a Hidden Network
- Further Information
- Настройка, установка, подключение Wi-Fi в Ubuntu: через консоль и интерфейс
- Как установить драйвера
- Как подключить WiFi в Ubuntu
- How to configure wifi in Ubuntu
- How to configure wifi in Ubuntu
- Wifi Configuration using command line method
- Wifi configuration using GUI
- Conclusion
Configure WiFi Connections
This section explains how to establish a WiFi connection. It covers creating and modifying connections as well as directly connecting.
Establish a Wireless Connection
This section will show how to establish a wifi connection to the wireless network. Note that directly connecting will implicitly create a connection (that can be seen with “nmcli c”). The naming of such will follow “SSID N” pattern, where N is a number.
First, determine the name of the WiFi interface:
$ nmcli d DEVICE TYPE STATE CONNECTION . wlan0 wifi disconnected -- Make sure the WiFi radio is on (which is its default state):
Then, list the available WiFi networks:
$ nmcli d wifi list * SSID MODE CHAN RATE SIGNAL BARS SECURITY . my_wifi Infra 5 54 Mbit/s 89 ▂▄▆█ WPA2 As an example, to connect to the access point ‘my_wifi’, you would use the following command:
$ nmcli d wifi connect my_wifi password
is the password for the connection which needs to have 8-63 characters or 64 hexadecimal characters to specify a full 256-bit key.
Connect to a Hidden Network
A hidden network is a normal wireless network that simply does not broadcast it’s SSID unless solicited. This means that its name cannot be searched and must be known from some other source.
Issue the following command to create a connection associated with a hidden network :
$ nmcli c add type wifi con-name ifname wlan0 ssid $ nmcli c modify wifi-sec.key-mgmt wpa-psk wifi-sec.psk
Now you can establish a connection by typing:
is an arbitrary name given to the connection and is the password to the network. It needs to have between 8-63 characters or 64 hexadecimal characters in order to specify a full 256-bit key.
Further Information
You will find further information and more detailed examples on following pages:
Настройка, установка, подключение Wi-Fi в Ubuntu: через консоль и интерфейс
![]()
Приветствую тебя мой дорогой читатель! Сегодня мы поговорим о проблемах Ubuntu WiFi. Самым верным способом подключения компьютера с любой операционной системой является провод. Но не всегда возможно прокинуть кабель, поэтому ещё более простой способ коннекта — это Wi-Fi.
Вот тут у пользователей ОС Linux могут возникнуть проблемы, так как не во всех дистрибутивах «Убунты», есть вшитые драйвера вай -фай модуля. Оно и понятно, производители системы специально стараются её не загружать всяким хламом. Раз ты читаешь эти строки, то скорее всего у тебя возникли сложности с настройкой WiFi. Но ничего страшного нет и сейчас мы решим эту злосчастную и противную проблему.
Как установить драйвера
И так в первую очередь нужно узнать – какая модель передатчика стоит внутри. Помимо этого, было бы хорошо узнать наименования компании, которая выпустила передатчик. Для этого открываем консоль и внимательно прописываем команду:
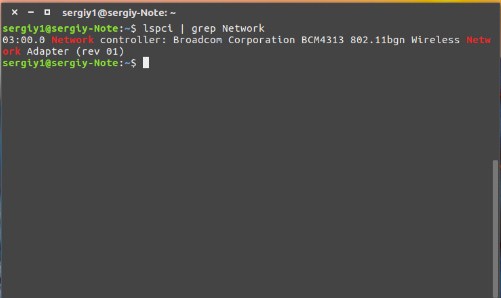
Теперь мы знаем название модели аппаратного передатчика. Осталось скачать драйвер для Linux. Заходим на страницу .
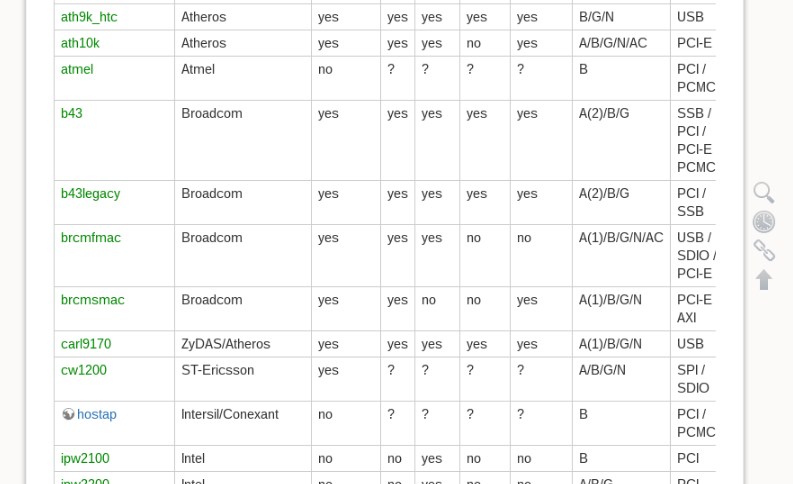
Теперь очень внимательно смотрите во второй столбец – это производитель. Тут может быть несколько вариантов как у меня. Поэтому после этого находим последний столбец – там будет указан тип подключения. Так как я использую внутренний модуль, который подключен к PCI, то выбираю именно этот вариант. Так можно взглянуть на типы поддерживаемых стандартов – «a/b/g/n», чтобы удостовериться, что вы скачиваете, именно то что нужно.
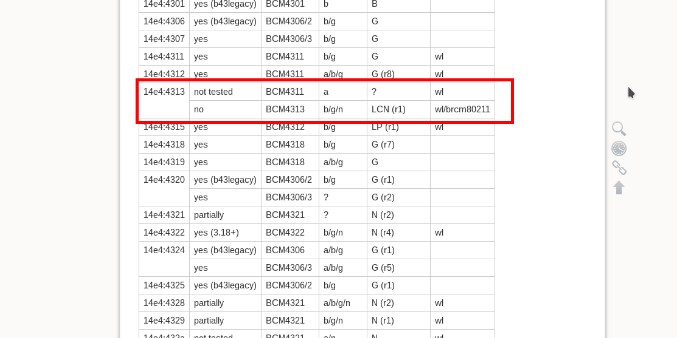
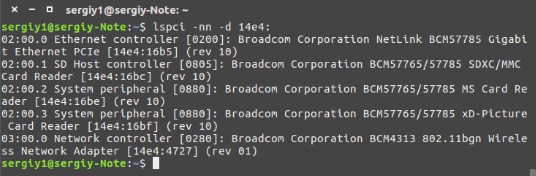
Открываем драйвер, который вы считаете наиболее приемлемым вариантом. Теперь находим в таблице название модели вашего модуля. И так для пущей уверенности, давайте проверим, PCI-ID — это первый столбец. Узнать PCI-ID можно с помощью команды:
Теперь внимательно посмотрите во второй столбец – если драйвер есть, то вы увидите надпись «Yes», если его нет, то «No». Если вы видите, что дров такого типа нет, то возвращаемся на страницу назад и смотрим другой пакет.
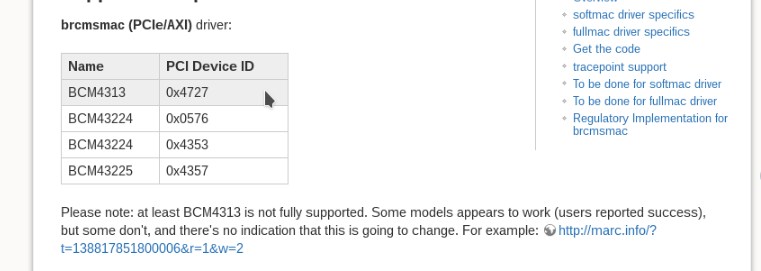
Как только находим нужный драйвер нужно его скачать. Нажимаем по ссылке в самом начале после надписи «For example». Возможно потребуется установка драйвера, но он как уже и было сказано вшит в саму систему.
Но нужно будет установить прошивочку. Поэтому поводу нужно просмотреть в раздел «Firmware installation». Там может быть ссылка на файл и прошивку, которую нужно будет скопировать и скачать. Для каждого драйвера может быть какие-то отдельные нюансы, поэтому просто внимательно прочтите этот момент.
В моём случае, мне нужно скачать пакет и скопировать его в отдельную папочку. Далее нужно будет выгрузить модули по порядку:
$ sudo modprobe -r wl
$ sudo modprobe -r b43
$ sudo modprobe -r b43-legaxy
Также добавляем модули в ЧС, чтобы система их не подгружала.
$ vi /etc/modprobe.d/blacklist-bcm.conf
blacklist b43
blacklist b43-legacy
blacklist wl
Теперь модуль нужно запустить, для этого есть простая команда в консоли:
Все теперь радиоволны вай-фай должны витать вокруг вас. Сразу скажу, что я привел пример на своем аппарате, установка драйверов идёт по тому же принципу, но могут быть не которые различия. Особенно это касается прошивочки – о ней нужно смотреть отдельную инструкцию по своей модели.
Как подключить WiFi в Ubuntu

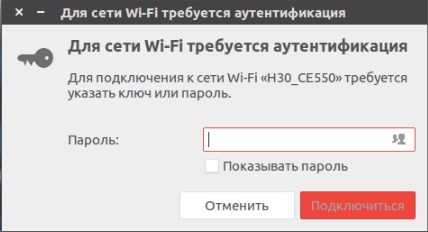
Подключение теперь примерно такое же как в Windows или других ОС. В самом верху вы должны увидеть небольшой значок, который чем-то напоминает треугольник. Просто нажимаем на него, выбираем нужную сеть и вводим пароль. Теперь интернет на компе должен быть.
Бывает такие случаи, когда такой значок просто не появляется или нужно сделать это через командную строку. Чтобы произвести подключение к WiFi откройте консольку. И так всё действия нужно будет сделать ручками, так что приступим.
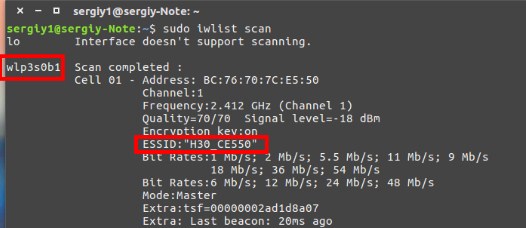
- В строке ESSID будет наименование, которое мы будем использовать для подключения. Далее прописываем:
$ wpa_passphrase ИМЯ_СЕТИ_ESSID > wpa.conf

- Надеюсь, вы уже поняли, что вместо второго слово нужно ввести наименование вашей сети. Далее вписываем ключ подключения.
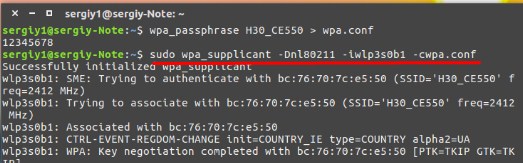
- Теперь для подключения нужно ввести команду как на картинке выше. После «-D» нужно ввести название драйвера. После «-i» название интерфейса, который используется вашим оборудованием. Последнее «-с» — это наименование файла, который мы создали ранее.
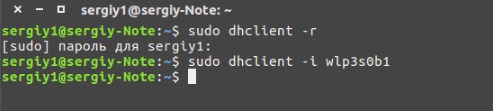
- К маршрутизатору то мы подключились, но теперь нужно получить сетевой адрес и DNS прописать. Открываем новое окно, но не закрывая старое и прописываем:
$ sudo dhclient -r
$ sudo dhclient -i wlp3s0b1
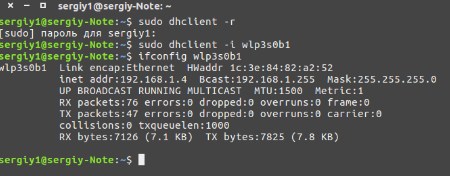
Теперь вы знаете, как быстро настроить WiFi и запустить его, подключение уже должно работать. Можете попробовать пропинговать какой-нибудь сайт, для надёжности. На Линукс все куда сложнее, но после всех шагов, описанных в статье всё должно работать стабильно.

How to configure wifi in Ubuntu
![]()
Nowadays, we are dependent on technology and the great dependency of our lives is on the internet because the internet is the only medium through which we not only communicate to others but also our businesses run globally through the internet. For this to have internet access on our machines we can either use the Ethernet ports to connect to the internet or we can connect by the means of wireless connection known as Wifi.
Now to connect the wifi with the machine, say laptop, we need to configure it. In this write-up, we are going to discuss the configuration settings of the wifi in Ubuntu:
How to configure wifi in Ubuntu
We can configure the wifi by means of two methods either by the graphical interface method (GUI) or by the command line method in the terminal. We will discuss both procedures here in detail.
Wifi Configuration using command line method
We can connect to the wifi using the command line method. For this purpose we will open the terminal and we will find out the name of our wireless network interface. List command “ls” is used to list the files of /sys/class/net.

The output has listed the files present in the /sys/class/net path. We will have the name of the network interface, in our case the name of our network interface is “wlp2s0” We will note down this name. Now we will list the /etc/netplan to find out the network configuration files so we can configure it to connect to the wireless internet:

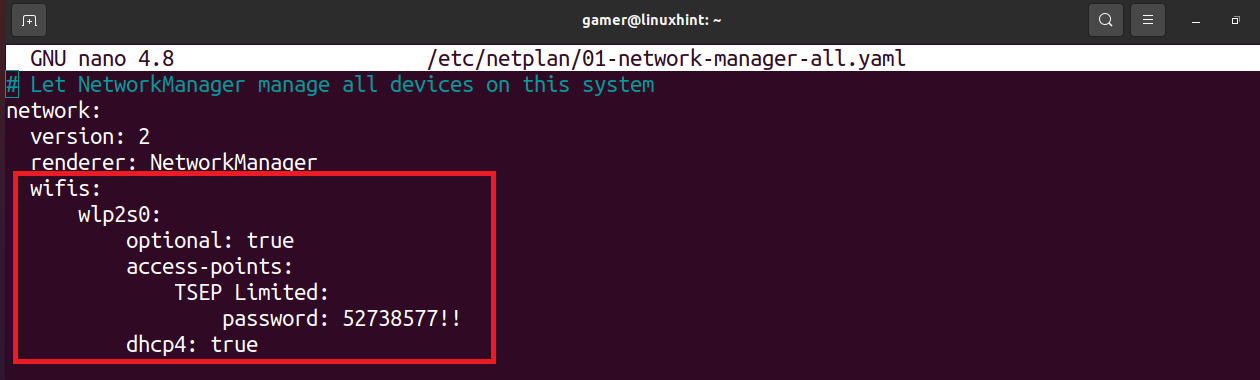
We find out the name of the network configuration file present in the /etc/netplan. Now we will open this command with the help of “nano” to edit it and as “etc” is a root folder we will use the “sudo” command:

After typing the command as we press ENTER key, the configuration file will be open in the editor. Now we will write the following code but while typing the code we will make sure or will take care of this that the alignment should be the same as shown in the figure and also the spacebar should be used for the spaces rather than the use of Tab button.
password: “enter the password of wifi”
In this code, replace the wlp2s0 with your wireless network interface name. Also enter the wifi name and password in the quotes (“ ”) and then remove the (“ ”) as used in the image:
By editing the file press CTRL+S to save the text and then CTRL+X to exit the editor. Now we will run the netlan command to apply configuration settings to be execute:
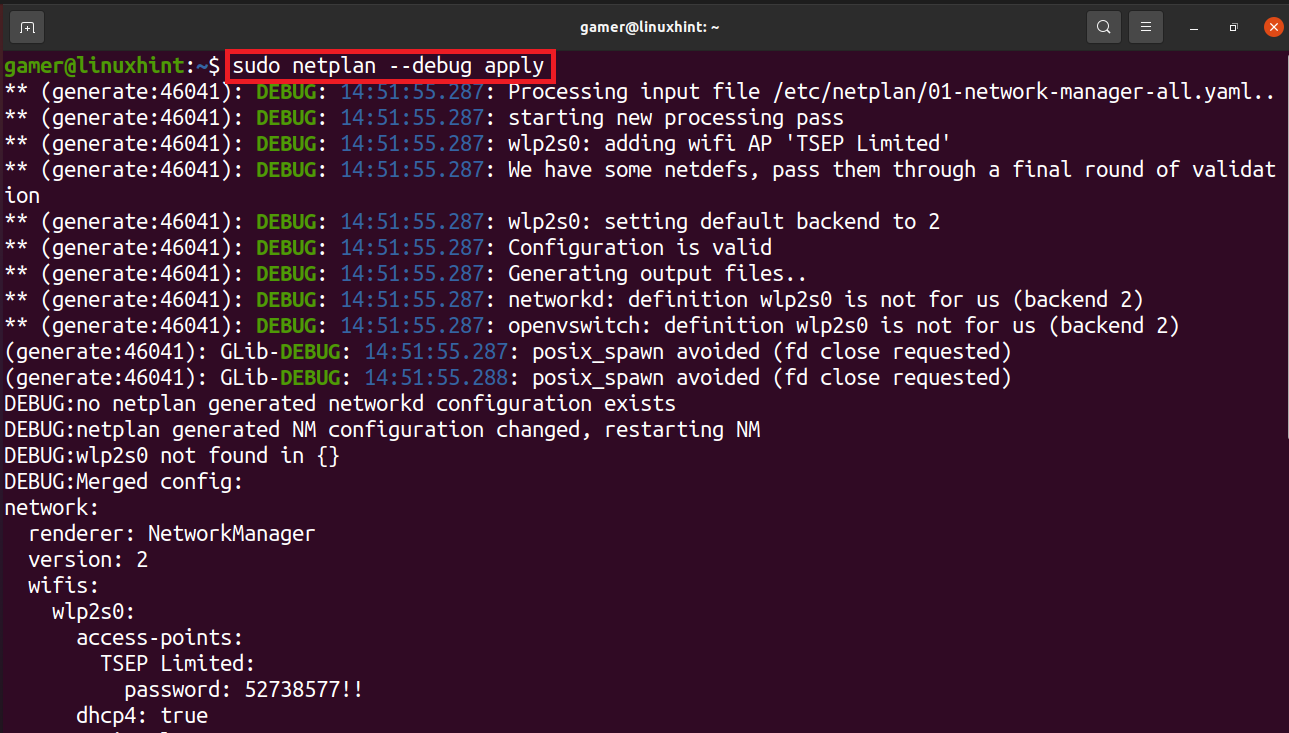
The wifi connection has been established and it is connected to the wifi to which we configured it before. To confirm the wifi connection we will run the command of “ip a”.
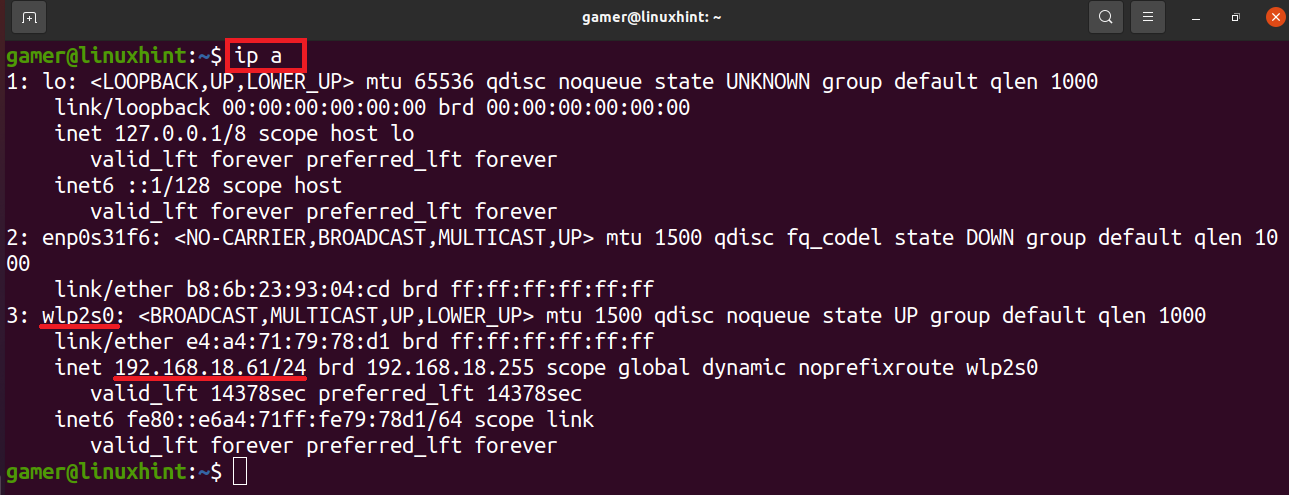
We can note that the ip address of the wifi connection to which it is connected is showing in the wireless network interface. So our wifi is connected successfully after the configuration we did.
Wifi configuration using GUI
We can also connect the wifi manually by using the GUI method. For this purpose we first open the window of Ubuntu.
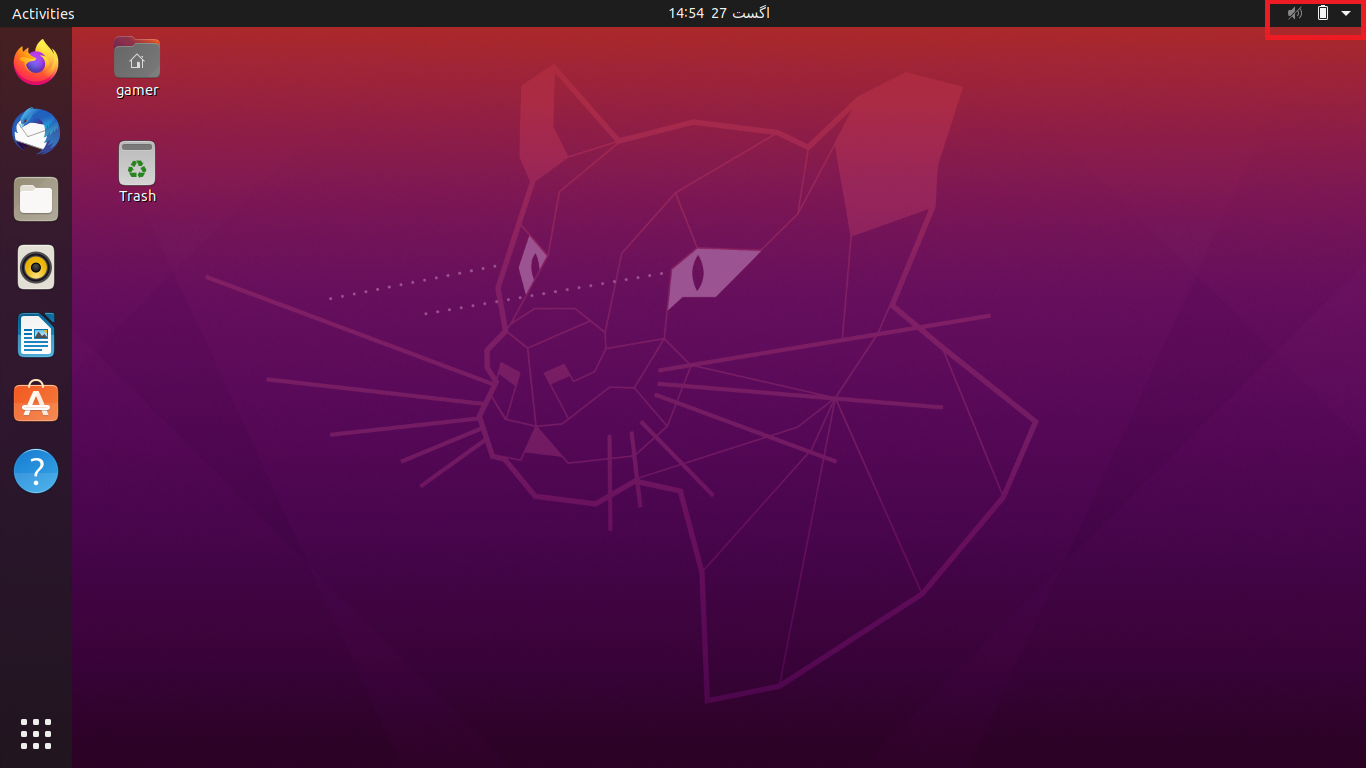
At the top of the window, on the right side, an arrow is present, click on it. When we click there a dialogue box will be opened.
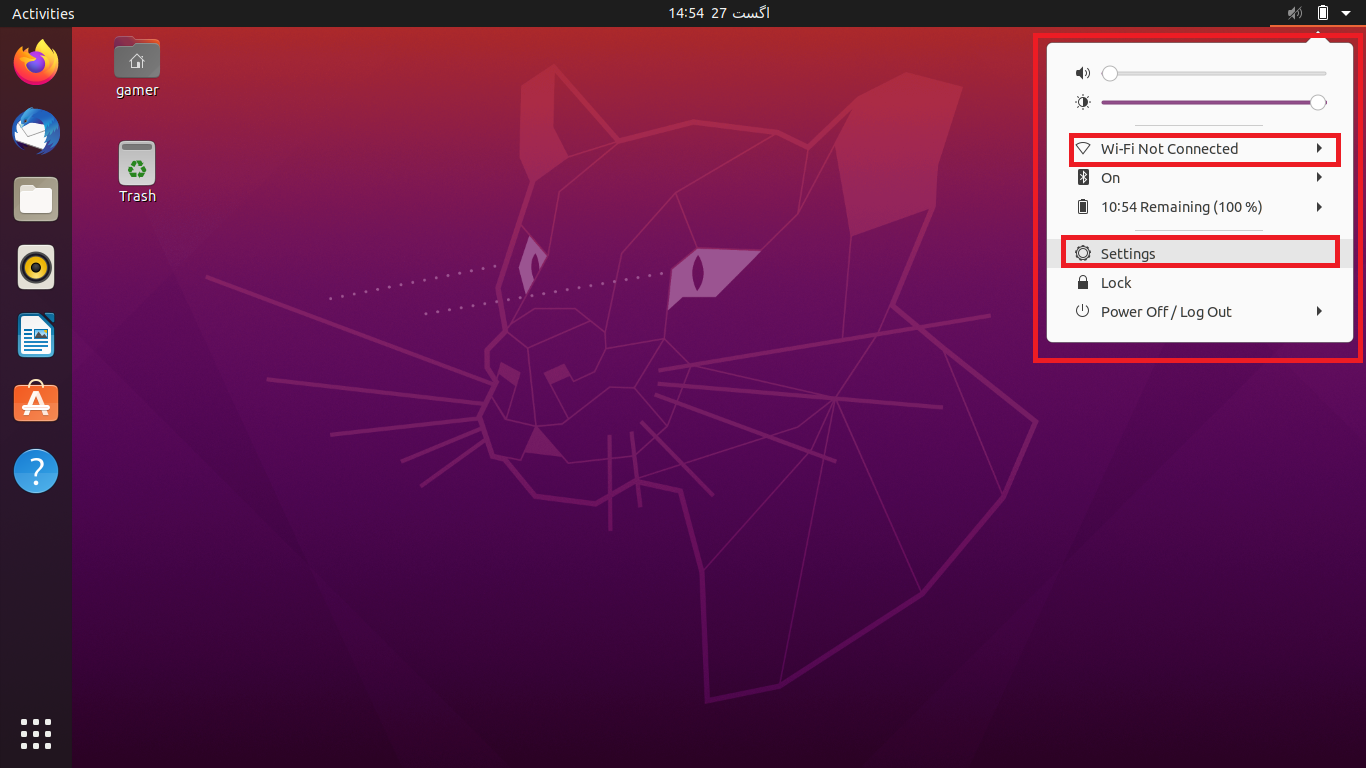
We will click on the “Settings”. Well we can also access directly to the settings of Ubuntu. Moreover we can also click on “Wi-Fi Not Connected” but sometimes this option is not visible so the convenient approach is to go to the Settings. After going to the settings section we will click on the Wi-Fi option present in the left side and a list of connections of all the available networks will be displayed which are in the range of the machine. Choose the required wifi network:
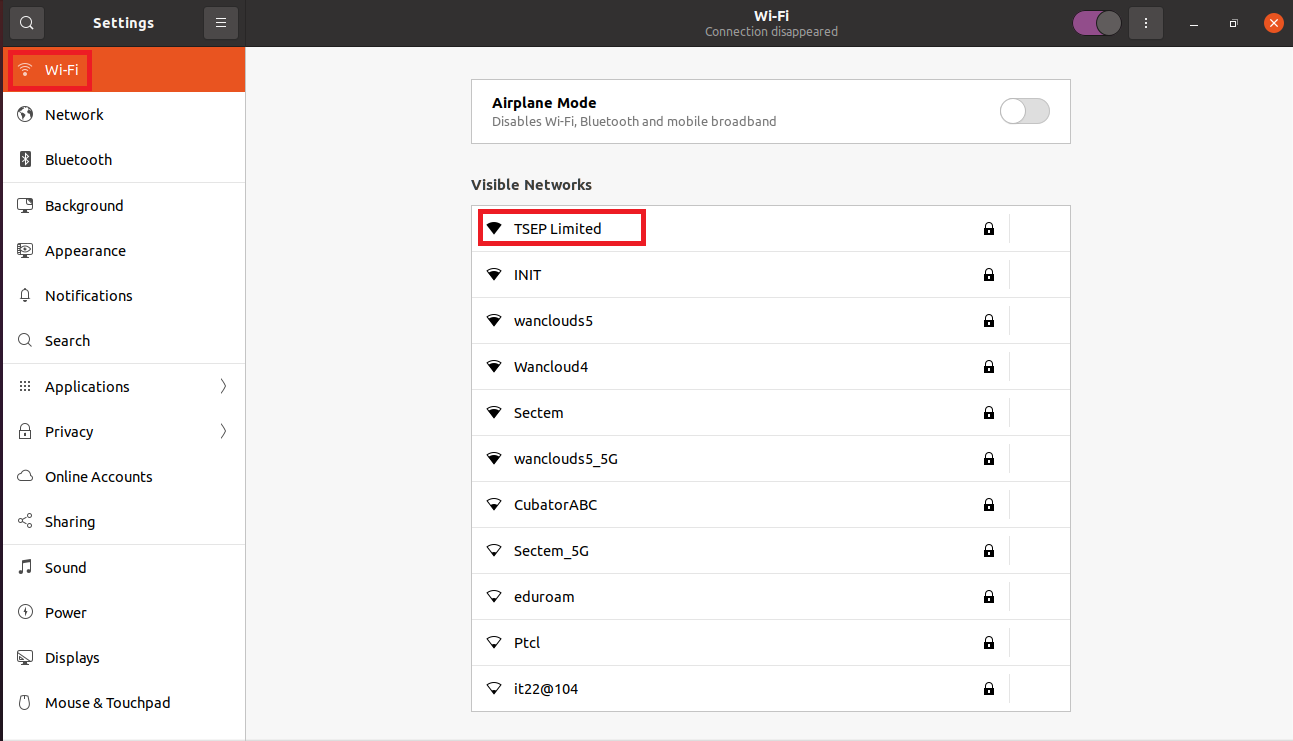
In our case, we are supposed to the connection “TSEP Limited” now as it is protected by a password so on clicking it, a dialogue box will pop up and will ask for the password.
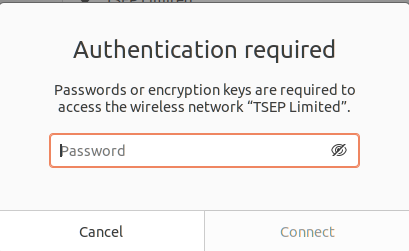
Once we enter the password, click on the Connect option which will be available after entering the password.
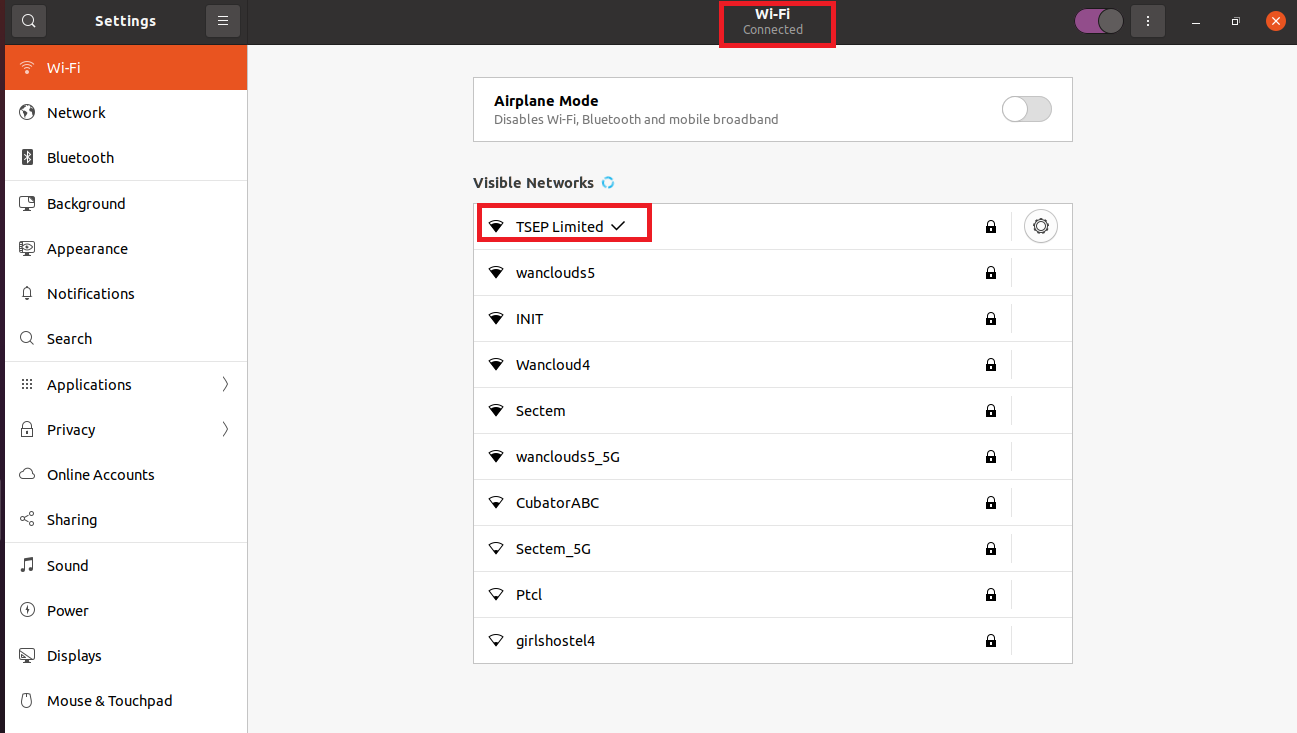
Now we are connected to our wifi network which can be confirmed either by the small arrow with the connection name or at the top under the title of Wi-Fi.
Conclusion
The Internet can be considered nowadays as the basic necessity of life and we can connect to the internet by means of the cables as we have a lot of devices and we want to work while travelling so the easiest way is to connect through the wifi. This write-up is related to how to configure and connect with the wifi in Ubuntu. We have discussed two methods either by the command line method or by GUI (graphical user interface). In the command line method we just open the terminal and with the help of neplan configure the wifi and get connected to it. In the GUI method, we simply connect to the particular wifi network by going to the settings. Though the GUI method is more convenient to connect, sometimes it creates the issue like it will not show your particular wifi connection in that case we can connect to it by means of command line method, the condition is that the wifi device should be in the range of the machine. We hope this follow-up enables you to understand how to configure the wifi devices in Ubuntu.