- Arch Linux User Repository
- khenderick commented on 2021-03-19 06:11 (UTC)
- sdp8483 commented on 2021-02-03 21:41 (UTC)
- keenerd commented on 2020-10-06 09:40 (UTC)
- JohnRobson commented on 2019-12-08 07:04 (UTC)
- keenerd commented on 2018-05-10 02:14 (UTC)
- craftyguy commented on 2017-05-20 15:23 (UTC)
- libcg commented on 2017-05-04 22:21 (UTC)
- ildus commented on 2017-02-21 21:27 (UTC)
- Saleae logic analyzer linux
- Saleae Logic Analyser Clone with Ubuntu Linux
- Sigrok and PulseView With Ubuntu
- Conclusion
- Share this:
- Saleae logic Analyzer With Sigrok Pulseview Install on Linux
Arch Linux User Repository
I have triggered this package to become orphaned, so a new volunteer can adopt it and update it.
khenderick commented on 2021-03-19 06:11 (UTC)
@keenerd: When starting, the software give a notice that the version is outdated, and at this time, version 2.3.22 is offered as download.
sdp8483 commented on 2021-02-03 21:41 (UTC)
I had to add udev rules by following instructions found here: https://schou.dk/linux/saleae/
keenerd commented on 2020-10-06 09:40 (UTC)
What specifically is out of date? 1.2.18 is the latest version at https://www.saleae.com/downloads/
JohnRobson commented on 2019-12-08 07:04 (UTC)
Got keys from plugin meta data ("xcb") loaded library "/opt/saleae-logic/platforms/libqxcb.so" QLibraryPrivate::loadPlugin failed on "/opt/saleae-logic/platforms/libqxcb.so" : "Cannot load library /opt/saleae-logic/platforms/libqxcb.so: (/opt/saleae-logic/libQt5Core.so.5: version `Qt_5.13' not found (required by /usr/lib/libQt5XcbQpa.so.5))" This application failed to start because it could not find or load the Qt platform plugin "xcb" in "/usr/lib/qt/plugins/platforms". Available platform plugins are: xcb. Reinstalling the application may fix this problem. Aborted (core dumped) keenerd commented on 2018-05-10 02:14 (UTC)
I hate to say «Works for me» but it works for me. Can you be more explicit with the error messages?
craftyguy commented on 2017-05-20 15:23 (UTC)
@keenerd Are you still willing/able to maintain this package? It’s broken in its current form, and there have been updates recently. If not, I would gladly take over maintainership!
libcg commented on 2017-05-04 22:21 (UTC)
I needed to install openssl-1.0-compat and add LD_LIBRARY_PATH=/usr/lib/openssl-1.0-compat in /usr/bin/logic to make it work.
ildus commented on 2017-02-21 21:27 (UTC)
hi, there is a new version, i made a diff that you can use to update the package: https://gist.github.com/ildus/188d7bd49b57bf857eac9487da17e886 . Also there was bug in starting script that caused segmentation fault, diff has a fix for it too.
Copyright © 2004-2023 aurweb Development Team.
AUR packages are user produced content. Any use of the provided files is at your own risk.
Saleae logic analyzer linux
Описывается процесс запуска утилиты Logic 2 для 8-канального логического анализатора Saleae. В настоящее время утилита универсальная, она подходит для всех анализаторов от компании Saleae.
1. Перейдите на страничку загрузок [2], выберите «Download for Linux», загрузите двоичный запускаемый образ утилиты анализатора (файл наподобие Logic-2.4.9-linux-x64.AppImage). Сохраните этот файл в папку, где храните все ваши установленные программы, например ~/install.
2. Запустите консоль терминала, перейдите в каталог, где находится файл закачанного образа. Добавьте для этого файла атрибут разрешения запуска.
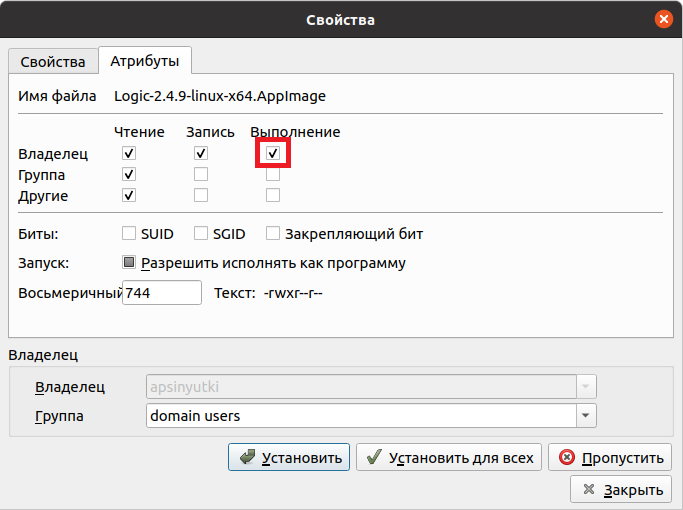
Установить атрибут разрешения запуска можно также из командной строки:
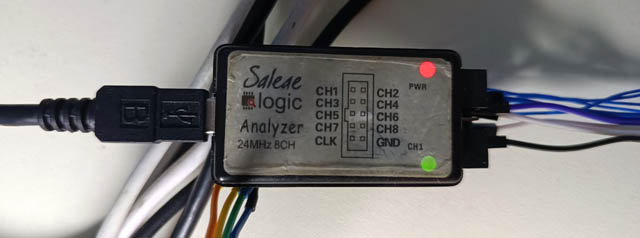
$ cd ~/install $ chmod +x Logic-2.4.9-linux-x64.AppImage 3. Подключите блочок анализатора через USB. На его корпусе должны загореться две лампочки, красная и зеленая.
4. Двойным кликом на файле Logic-2.4.9-linux-x64.AppImage запустите утилиту. Она автоматически обнаружит подключенное устройство анализатора. Также можно запустить утилиту командой в терминале:
[Как пользоваться]
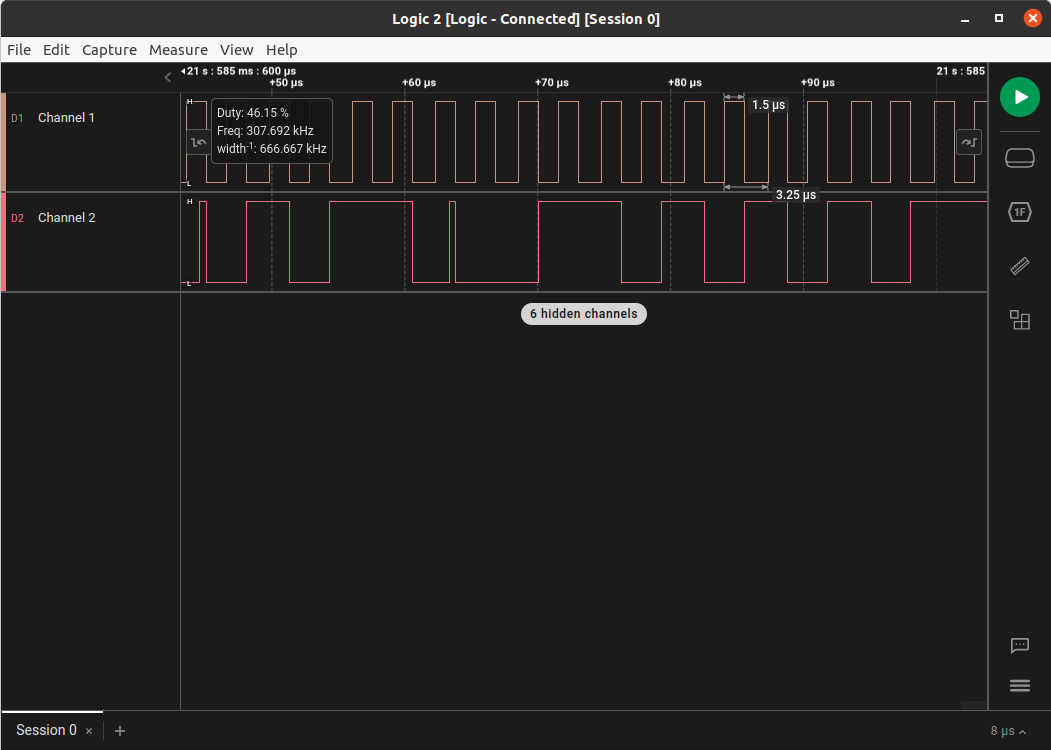
Старт/стоп. Кнопка R или клик мышью на кружок с белой стрелкой запустит или остановит оцифровку выбранных каналов. То же самое делает пункт меню «Capture -> Start/Stop Capture».

Каналы. Анализируемые каналы можно выбрать кликом правой кнопки мыши, появится контекстное меню «Show/Hide Channels».
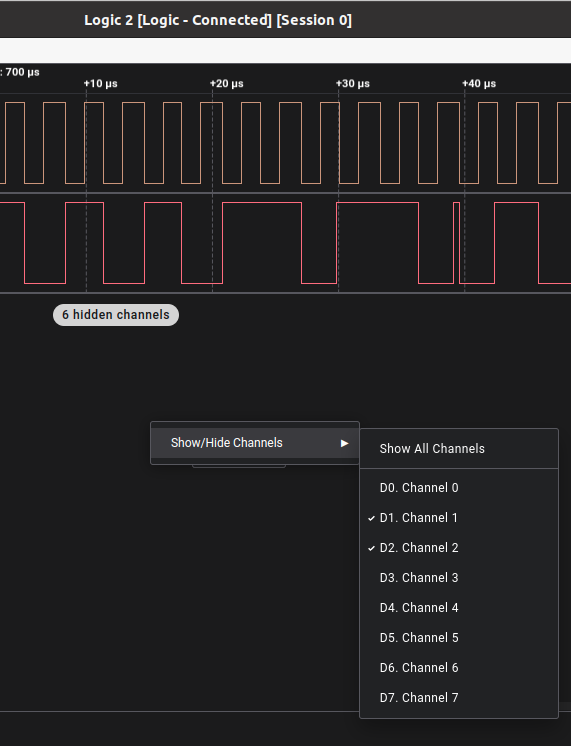
Цифровые входы каналов 0 .. 7 (CH1 .. CH8) имеют встроенную подтяжку к уровню лог. 1. Уровень канала 0 (CH1) индицируется зеленым светодиодом.
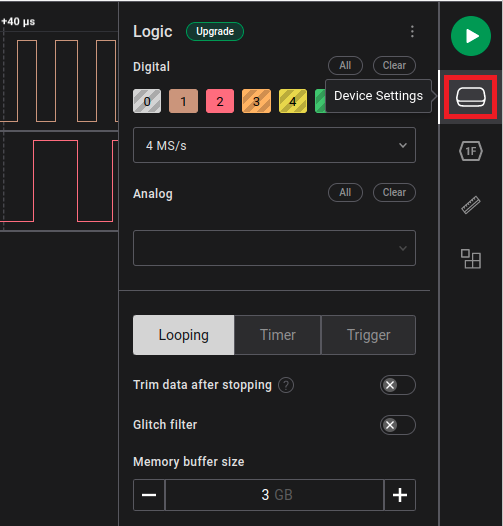
Частота выборок сигнала. Частоту оцифровки в MS/s можно выбрать кликом на значке устройства в правом боковом тулбаре:
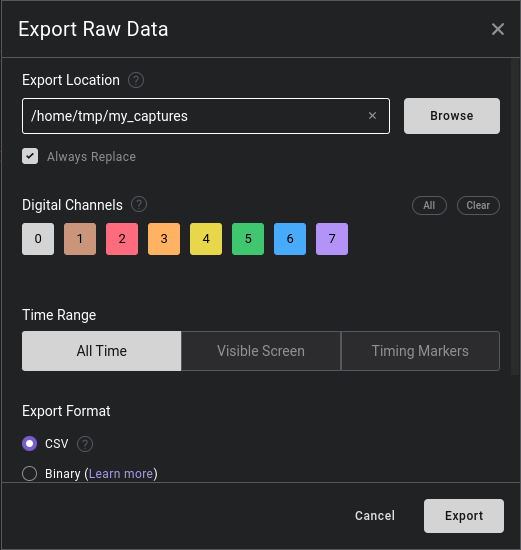
Экспорт оцифровки. Записанные данные можно экспортировать в файл формата CSV или двоичный. Для этого зайдите в меню «File -> Export Data. » (Ctrl+Shift+S), выберите каталог для сохранения, сохраняемые каналы, частоту оцифровки, формат файла и кликните на кнопку Export. Если выбран формат CSV, то будет создан файл текстовый файл digital.csv.
Пример CSV-файла, записанного с частотой дискретизации 4 MS/s:
Time [s],Channel 0,Channel 1,Channel 2,Channel 3,Channel 4,Channel 5,Channel 6,Channel 7 0.000000000,1,0,1,1,1,1,1,1 0.000000750,1,1,1,1,1,1,1,1 0.000002250,1,0,1,1,1,1,1,1 0.000003750,1,1,1,1,1,1,1,1 0.000005250,1,0,0,1,1,1,1,1 0.000007000,1,1,0,1,1,1,1,1 0.000008000,1,1,1,1,1,1,1,1 0.000008500,1,0,0,1,1,1,1,1 0.000010000,1,1,0,1,1,1,1,1 .
Отображение сигналов. Колесиком мыши можно выбрать масштаб времени для отображения сигнала.
[Устранение проблем]
На моей системе Ubuntu 20.04 утилита не могла найти устройство анализатора при запуске под обычным пользователем. Решить проблему можно двумя способами. Первый, самый простой — командой sudo запустить образ AppImage от имени пользователя root:
$ sudo ./Logic-2.4.9-linux-x64.AppImage --no-sandbox Второй (не очень надежный) способ — с помощью udev rules предоставить доступ к устройствам USB не-root приложениям наподобие программ от Saleae. Для этого выполните следующие действия:
1. Запустите утилиту Logic 2 от имени обычного пользователя.
2. Запустите терминал и выполните следующую команду. Эту команду подскажет сама утилита Logic 2 версии 2.4.9 при первом запуске от имени обычного пользователя:
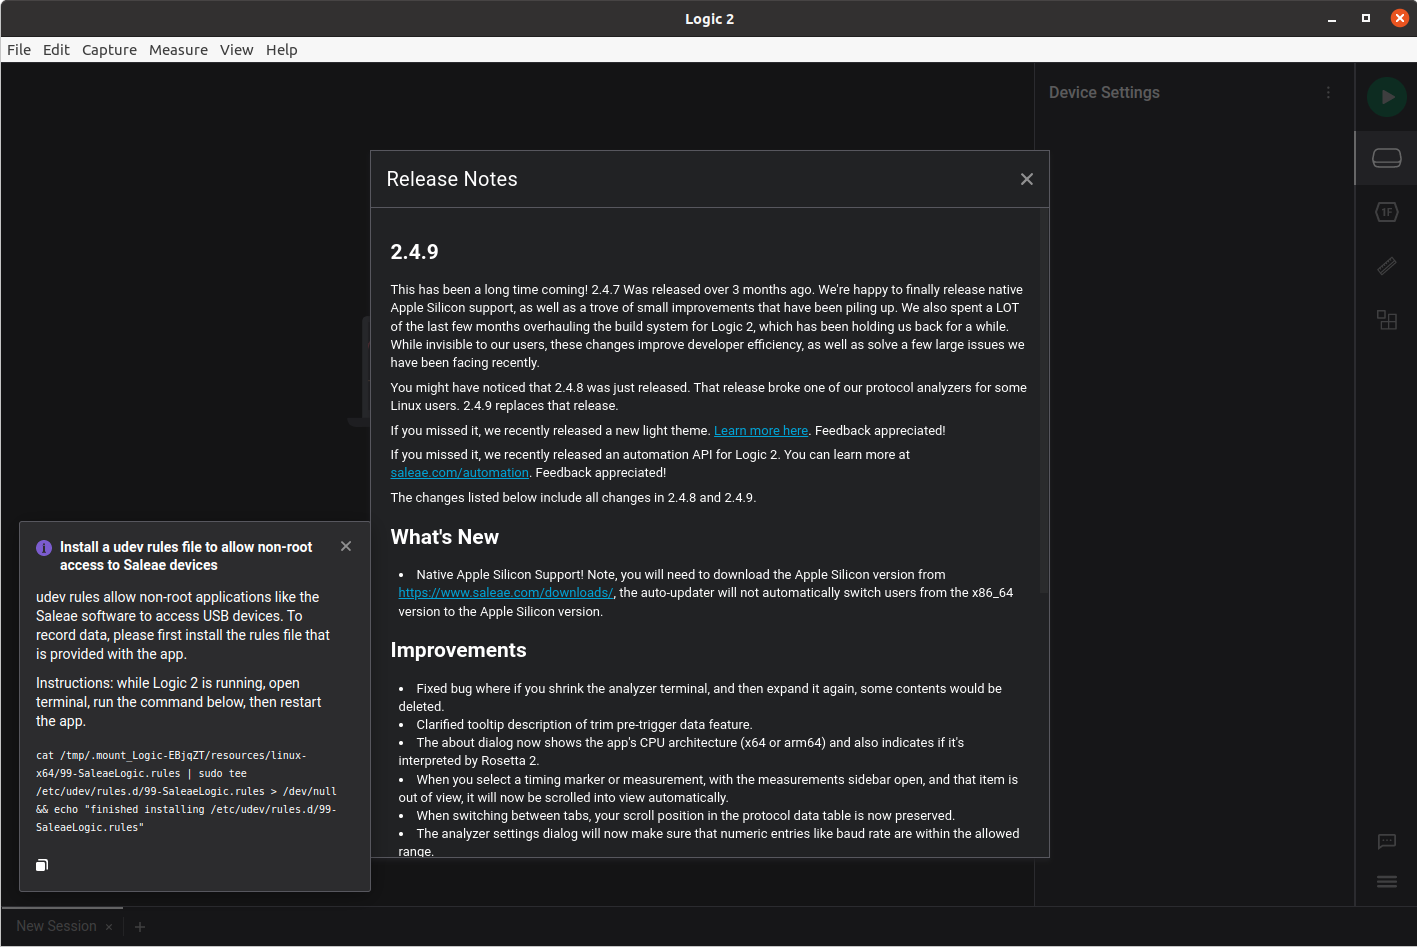
$ cat /tmp/.mount_Logic-EBjqZT/resources/linux-x64/99-SaleaeLogic.rules | sudo tee /etc/udev/rules.d /99-SaleaeLogic.rules > /dev/null && echo "finished installing /etc/udev/rules.d/99-SaleaeLogic.rules" 3. Закройте утилиту Logic 2, и заново запустите её двойным щелчком на файле Logic-2.4.9-linux-x64.AppImage.
1. Saleae logic analyzer Installation site:support.saleae.com.
2. Saleae Downloads site:saleae.com.
3. User Guide site:saleae.com.
4. 230713Saleae-digital-analyzer.zip — утилита Logic 2 версии 2.4.9 для Windows, Linux, Mac.
Saleae Logic Analyser Clone with Ubuntu Linux
The Saleae Logic is an 8 channel 24MHz logic analyser. Soon after its launch people in China opened them up to find that they are pretty simple inside and, as sure as night follows day, little workshops in Shenzen started producing clones impossibly cheaply and to be sold through eBay, AliExpress, etc.
The Real Deal from USA has a lovely CNC-machined case and retails for US$149 plus shipping. The Shenzen version costs about US$8 including shipping. It doesn’t come with a nice cardboard box, a carry-case, an aluminium alloy, CNC-machined enclosure (it’s moulded plastic) and you have to get your own clips to connect to the end of the ribbon cable (figure on another US$5 investment for those). In use the Shenzen version gets a little warm, so you can see some merit of a metal case although CNC-machining from solid billet and then anodising does seem rather over the top. And it’s US$8 including shipping. Eight dollars!
Software support in Linux (sorry, Windows users, this article is not for you) is through packages such as sigrok or even, in theory, the software from Saleae themselves although some have tried that and it’s not working well for them with their clones. Saleae have posted their view (overview: they’re not happy about using their software with clone hardware) of the clones on their website.
Sigrok and PulseView With Ubuntu
Sigrok is a pretty awesome suite of software and supports a wide range of interfaces / instrumentation between your circuit under test and your PC – from little USB logic analysers like the Saleae (and clones) through to digital multimeters and even DSOs. Apparently support for my Owon SDS7102V oscilloscope is underway – looking forward to that!
Whilst you can install sigrok 0.1 easily under Ubuntu 12.04 with apt-get, the version of sigrok-cli that gets installed from the Ubuntu repository is 0.1. This is not cool – the version of sigrok-cli at the time of writing is 0.5.0 and is also compatible with the associated, new GUI: PulseView. So, you really want to install the complete sigrok toolset from source. I’m not going into exact details – the broad idea is written up on the sigrok site. Here are some notes specific to Ubuntu (12.04) that might help. You may want to install at least the following with apt-get install:
automake
libudev-dev
checkinstall
libglib2.0-dev
libbzip-dev
libftdi-dev
sdcc
python3-dev
qt-sdk
libboost-system-dev
libboost-thread-dev
libboost-filesystem-dev
Note that some of these are quite humungous (like the Qt SDK) – make sure that you have a few GB free before embarking on these package installations.
When building sigrok, you’ll see that in reality it comprises several subprojects that you’ll want to build and sudo checkinstall in order:
libsigrok
libsigrokdecode
sigrok-cli
PulseView
I installed the latest versions using git:
git clone git://sigrok.org/libsigrok
git clone git://sigrok.org/libsigrokdecode
git clone git://sigrok.org/sigrok-cli
git clone git://sigrok.org/pulseview
I also had to download, build and checkinstall the latest libusb-1.0 since it’s required by libsigrok to talk to just about all USB-connected signal sources.
Plug in your Logic clone and do a:
Hopefully you will see your Logic clone listed (as fx2lafw):
The following devices were found:
demo — Demo device with 12 channels: D0 D1 D2 D3 D4 D5 D6 D7 A0 A1 A2 A3
fx2lafw:conn=3.67 — Saleae Logic with 8 channels: 0 1 2 3 4 5 6 7
All being well, you should now be have the pulseview binary in your path, so plug in your logic analyser, and connect to your circuit, then start pulseview from the command line. Quick start for pulseview:
- Select Saleae Logic from the listbox on the toolbar.
- Click on the red clip toolbar icon to mute unconnected channels
- Select a decent amount of samples, I chose 1M (million) samples for my SPI example
- Select a reasonable / appropriate sample rate from the toolbar listbox (I used 1MHz)
- Click on the channel labels down the left hand side to give them appropriate names if you want to do protocol decoding
- (Optional) Select Decoders from the menu and choose a protocol decoder that works for your circuit under test (I chose SPI) and you may need to click on the protocol decoder trace to logically connect signal connections to protocol lines.
I connected up one of the standard Nokia 5110 Arduino projects and hooked up a couple of channels as per the above to decode SPI. It took me longer to document this than do it!

Conclusion
Whilst getting the software installed for Ubuntu was no walk in the park compared to the usual Ubuntu Software Centre point-and-click affair, the whole package works really well and, for the price, it’s unbeatable. Hats-off to Joel Holdsworth, in particular, for a very fine job on PulseView.

Share this:
Saleae logic Analyzer With Sigrok Pulseview Install on Linux

Some time ago I bought chinese version of Saleae Logic Analyzer. It’s quite handy 8 CH analyzer for debugging my DIY projects.
Because I mainly use Linux this is small write up (mainly for myself) how to install Sigrok software for Saleae Logic Analyzer.
For now you can still use software provided by Saleae from their homepage (https://www.saleae.com/), but it soon may not work with clones.
Story of Saleae is quite common. Guys developed good product, wrote the software and chinese manufacturers copied it for the 1/10 of the price. Now of course if you like the product and this is a good product, support the developers. But here’s the thing, original product cost 108 USD and for many hobbyists this is not affordable. Especially if you use it maybe once every couple of months.
On Linux Mint 18.2 installation is super simple. All the software is already in repository.
You can use ether the Software Manager or CLI.
I will show you how to use CLI.
sudo apt-get install pulseview -y


if you can’t see the device you can also run pulseview as administrator:
And repeat the device search steps.
If you want to build it yourself from source check out: