- Настройка Samba в Debian 10
- Установка Samba в Debian 10
- Настройка Samba в Debian
- 1. Базовые настройки
- 2. Создание общего ресурса
- 3. Создание пользователя
- Как подключиться к Samba
- Выводы
- Samba linux debian настройка
- 11.5.1.1. Configuring with debconf
- 11.5.1.2. Configuring Manually
- 11.5.2. Samba Client
- 11.5.2.1. The smbclient Program
- 11.5.2.2. Mounting Windows Shares
- 11.5.2.3. Printing on a Shared Printer
Настройка Samba в Debian 10
Samba позволяет открывать доступ к файлам по локальной сети с компьютеров, работающих под управлением любой операционной системы. Samba также обеспечивает управление доступом к этим ресурсам используя только один конфигурационный файл. В Debian большая часть конфигурации создается автоматически, что значительно упрощает настройку сервера Samba.
Когда вы прочитаете эту инструкцию, вы будете знать как установить сервер Samba, как изменить глобальные настройки сервера Samba, как настроить новый общий ресурс, как настроить пользователя Samba и как подключиться к общей папке с другой машины.
Мы будем выполнять установку Samba Debian 10 Buster. Для установки нам потребуется доступ к системе с правами пользователя root. Команды которые начинаются с # — должны выполняться от имени root пользователя, или с применением инструкции sudo. Команды которые начинаются с $ могут выполняться от имени обычного не привилегированного пользователя.
Установка Samba в Debian 10
В Debian вы можете установить сервер Samba прямо из репозиториев. Установка выполняется с помощью одного пакета, потребуется выполнить лишь одну команду:

Настройка Samba в Debian
Настройки Samba находятся в файле /etc/samba/smb.conf. Этот файл содержит общие настройки для Samba, а также сведения об общих ресурсах. Обычно в Debian предоставляются неплохие настройки по умолчанию, которые позволяют начать работать немедленно, что в общем не мешает взглянуть на них и внести изменения там, где это необходимо.
1. Базовые настройки
Первое что вам встретится в верхней части группы глобальных настроек — настройка workgroup. Эта опция определяет имя рабочей группы Windows, частью которой станет ваш сервер. Значение по умолчанию — WORKGROUP, так как такое же значение, по умолчанию в задано в Windows. Если вы изменяли настройки рабочей группы в Windows, измените их также и здесь.
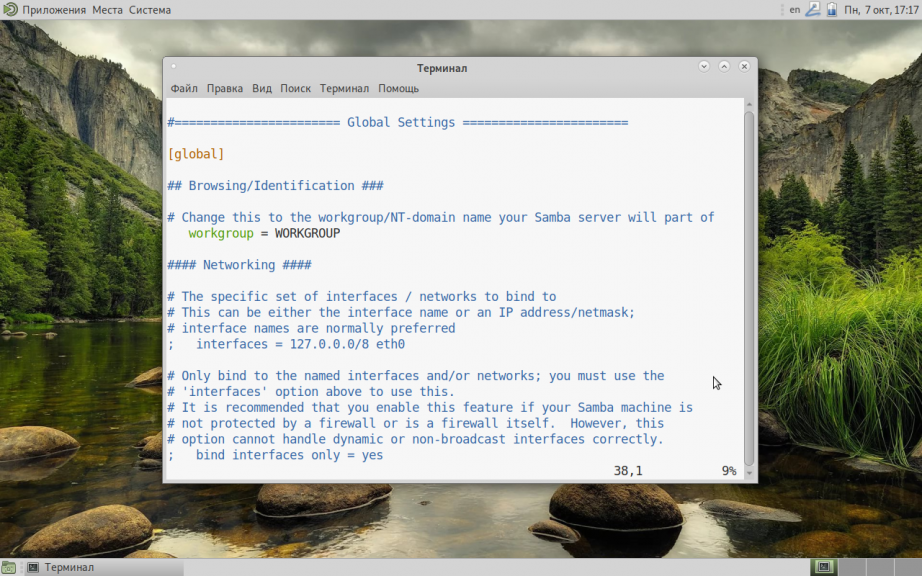
Следующая опция позволит ограничить доступ к вашему серверу. Если вы хотите ограничить доступ к общему ресурсу по ip адресу или маске сети, уберите символ комментария в строке где находится параметр interfaces, и укажите ip адрес или диапазон IP адресов, и интерфейс к которому они могут подключаться.
interfaces = 192.168.1.0/24 eth0
Если такой метод вам не нравится, вы можете добавить параметр hosts allow, чтобы определить, клиентов, которые могут подключаться к общему ресурсу. Укажите IP-адрес или диапазоны адресов.
hosts allow = 127.0.0.1/8 192.168.1.0/24
Остальные параметры из группы глобальных настроек имеют довольно обоснованные значения по умолчанию. Вам не потребуется изменять их для того чтобы запустить свои общие ресурсы. Но не стоит ограничиваться только рассмотренными нами опциями, вы можете исследовать и другие параметры, и настраивать их по своему усмотрению. Настройка Samba Debian 10 практически завершена, осталось создать общую папку и пользователя.
2. Создание общего ресурса
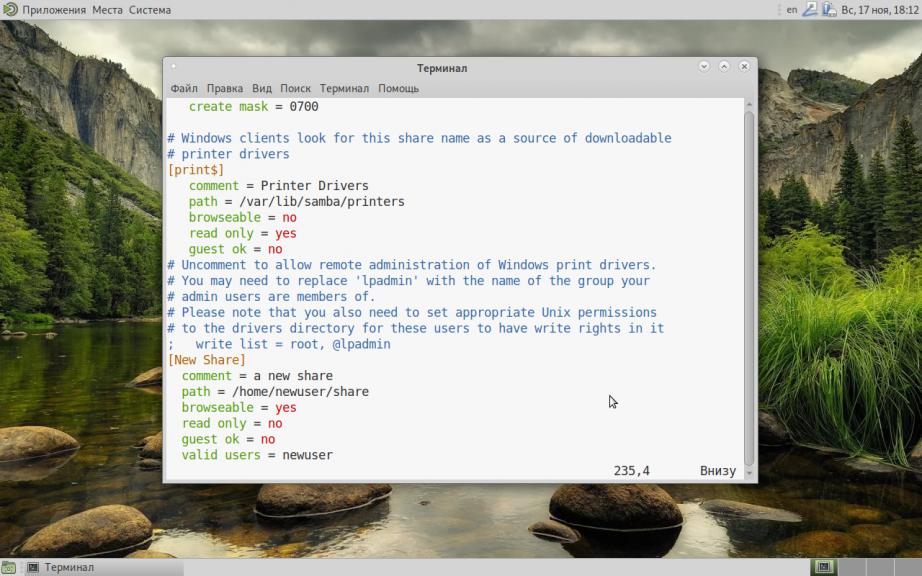
В конфигурационном файле, по умолчанию, уже присутствуют несколько настроек для общих ресурсов. Они дают вам возможность настроить совместное использование домашних папок пользователей системы и принтеров. А доступ к каталогу печати уже открыт. Измените значение параметра browseable на no.
Теперь попробуйте создать свой собственный общий ресурс. Существует масса опций, которые вы можете использовать для своего общего ресурса Samba, но в этом руководстве будут рассмотрены лишь наиболее используемые из них.
Во-первых, дайте имя своему общему ресурсу, и поместите это имя в скобки.
В следующей строке напишите краткий комментарий, описывающий общий ресурс.
Затем задайте путь, эквивалентный абсолютному пути к общей папке.
Выберите, будет ли папка отображаться в файловом менеджере или же ее нужно будет подключать вручную.
Хотите ли вы, чтобы пользователи имели права на запись в общий ресурс или могли подключить его только для чтения?
Смогут ли гости получить доступ к общему ресурсу? В терминах Samba гости — это анонимные пользователи, для которых не существует записи в настройках доступа к общему ресурсу. Если выразиться короче, хотите ли вы защитить общий ресурс паролем, или ограничить доступ к ресурсу только для отдельных пользователей?
Если гости не будут иметь доступ к общей папке, то у кого он будет?
valid users = имя_пользователя
Ну вот и все. Есть еще и другие опции и другие способы выполнить эти базовые шаги, но они дадут вам в итоге приблизительно тот же результат. Если вы точно знаете что вам нужно, этих опций вам будет достаточно. Если соединить все что мы написали выше — у нас получится что-то вроде этого:
[New Share]
comment = A new share
path = /home/newuser/share
browseable = yes
read only = no
guest ok = no
valid users = newuser
Сохраняем и закрываем файл. Затем перезагружаем Samba.
3. Создание пользователя
Для подключения к общей папке, если только вы не используете гостевой доступ, вам потребуется настроить учетные записи пользователей Samba. Это очень быстро, и потребует всего одной команды.
smbpasswd -a имя_пользователя
После этого вам будет предложено ввести пароль для этого пользователя. Это пароль, которым будут защищены доступные ему общие ресурсы.
Как подключиться к Samba
Есть несколько пакетов, которые вам понадобятся для того чтобы подключиться к общему ресурсу Samba. Установите их при помощи следующей команды.
sudo apt install samba-client cifs-utils
Теперь вы можете открыть файловый менеджер и перейти в раздел Сеть. Там вы увидите свой сервер, а также — общий ресурс, который вы только что настроили.


Выводы
Теперь вы знаете как выполняется установка Samba Debian 10 и готовы начать создавать собственные общие папки, а также настраивать к ним доступ с других компьютеров Linux. Ничего другого делать не нужно, и Samba автоматически запустится при загрузке Debian.
Обнаружили ошибку в тексте? Сообщите мне об этом. Выделите текст с ошибкой и нажмите Ctrl+Enter.
Samba linux debian настройка
DOCUMENTATION Going further
The Samba server is extremely configurable and versatile, and can address a great many different use cases matching very different requirements and network architectures. This book only focuses on the use case where Samba is used as a standalone server, but it can also be an NT4 Domain Controller or a full Active Directory Domain Controller, or a simple member of an existing domain (which could be managed by a Windows server).
The samba package contains all the necessary manual pages and in /usr/share/doc/samba/examples/ a wealth of commented example files. If you are looking for a more comprehensive documentation, you may check the Samba website.
TOOL Authenticating with a Windows Server
Winbind gives system administrators the option of using a Windows server as an authentication server. Winbind also integrates cleanly with PAM and NSS. This allows setting up Linux machines where all users of a Windows domain automatically get an account.
More information can be found in the /usr/share/doc/libpam-winbind/examples/pam_winbind/ directory of the libpam-winbind package.
11.5.1.1. Configuring with debconf
The package sets up a minimal configuration during the initial installation in /etc/samba/smb.conf by plainly copying /usr/share/samba/smb.conf . So you should really run dpkg-reconfigure samba-common to adapt it:
On first installation the only piece of required information is the name of the workgroup where the Samba server will belong (the answer is FALCOTNET in our case).
In case of a package update (from the old stable Debian version) or if the SMB server has already been configured to use a WINS server ( wins server ), the package also proposes identifying the WINS server from the information provided by the DHCP daemon. The Falcot Corp administrators rejected this option, since they intend to use the Samba server itself as the WINS server.
11.5.1.2. Configuring Manually
11.5.1.2.1. Changes to smb.conf
The requirements at Falcot require other options to be modified in the /etc/samba/smb.conf configuration file. The following excerpts summarize the changes that were effected in the [global] section.
[. ] [global] ## Browsing/Identification ### # Change this to the workgroup/NT-domain name your Samba server will part of workgroup = FALCOTNET [. ] # Windows Internet Name Serving Support Section: # WINS Support - Tells the NMBD component of Samba to enable its WINS Server wins support = yes[. ] ####### Authentication ####### # Server role. Defines in which mode Samba will operate. Possible # values are "standalone server", "member server", "classic primary # domain controller", "classic backup domain controller", "active # directory domain controller". # # Most people will want "standalone server" or "member server". # Running as "active directory domain controller" will require first # running "samba-tool domain provision" to wipe databases and create a # new domain. server role = standalone server obey pam restrictions = yes [. ] # "security = user" is always a good idea. This will require a Unix account # in this server for every user accessing the server. security = user

Indicates that Samba should act as a Netbios name server (WINS) for the local network. This option had been removed from the default configuration in Buster and must be added manually if desired.

This is the default value for this parameter; however, since it is central to the Samba configuration, filling it explicitly is recommended. Each user must authenticate before accessing any share.
11.5.1.2.2. Adding Users
Each Samba user needs an account on the server; the Unix accounts must be created first, then the user needs to be registered in Samba’s database. The Unix step is done quite normally (using adduser for instance).
Adding an existing user to the Samba database is a matter of running the smbpasswd -a user command; this command asks for the password interactively.
A user can be deleted with the smbpasswd -x user command. A Samba account can also be temporarily disabled (with smbpasswd -d user ) and re-enabled later (with smbpasswd -e user ).
11.5.2. Samba Client
The client features in Samba allow a Linux machine to access Windows shares and shared printers. The required programs are available in the cifs-utils and smbclient packages.
11.5.2.1. The smbclient Program
The smbclient program queries SMB servers. It accepts a -U user option, for connecting to the server under a specific identity. smbclient //server/share accesses the share in an interactive way similar to the command-line FTP client. smbclient -L server lists all available (and visible) shares on a server.
11.5.2.2. Mounting Windows Shares
The mount command allows mounting a Windows share into the Linux filesystem hierarchy (with the help of mount.cifs provided by cifs-utils ).
Пример 11.21. Mounting a Windows share
mount -t cifs //arrakis/shared /shared \ -o credentials=/etc/smb-credentials
username = user password = password
Other options can be specified on the command-line; their full list is available in the mount.cifs (1) manual page. Two options in particular can be interesting: uid and gid allow forcing the owner and group of files available on the mount, so as not to restrict access to root.
//server/shared /shared cifs credentials=/etc/smb-credentials
11.5.2.3. Printing on a Shared Printer
CUPS is an elegant solution for printing from a Linux workstation to a printer shared by a Windows machine. When the smbclient is installed, CUPS allows installing Windows shared printers automatically.
Enter the name that will uniquely identify this printer. Then enter the description and location of the printer. Those are the strings that will be shown to end users to help them identify the printers.
Indicate the manufacturer/model of the printer, or directly provide a working printer description file (PPD).