- Install and Configure Samba
- What you’ll learn
- What you’ll need
- 2. Installing Samba
- 3. Setting up Samba
- What we’ve just added
- 4. Setting up User Accounts and Connecting to Share
- Connecting to Share
- If you’d like to take your configuration further…
- How to share files with Samba
- Career advice
- Install Samba
- Configure your firewall
- Configure Samba
- Create a shared location
- Share files between Linux and Windows computers
- Access Linux from Windows
- 1. Install and configure Samba
- 2. Modify LinuxSE
- 3. Enable your user
- 4. Start Samba
- 4. Configure the firewall
- 5. Access Samba from Windows
- Access Windows from Linux
- 1. Enable file sharing
- 2. Define a shared folder
- 3. Mount the shared folder under Linux
- Summary
- Send your scans to a Linux machine over your network
- 5 open source alternatives to Dropbox
Install and Configure Samba
A Samba file server enables file sharing across different operating systems over a network. It lets you access your desktop files from a laptop and share files with Windows and macOS users.
This guide covers the installation and configuration of Samba on Ubuntu.
What you’ll learn
What you’ll need
If you have everything ready, let’s dive straight into the installation process on the next step!
Originally authored by Aden Padilla.
2. Installing Samba
sudo apt update sudo apt install samba We can check if the installation was successful by running:
The following should be its output:
samba: /usr/sbin/samba /usr/lib/samba /etc/samba /usr/share/samba /usr/share/man/man7/samba.7.gz /usr/share/man/man8/samba.8.gz 3. Setting up Samba
Now that Samba is installed, we need to create a directory for it to share:
The command above creates a new folder sambashare in our home directory which we will share later.
The configuration file for Samba is located at /etc/samba/smb.conf . To add the new directory as a share, we edit the file by running:
sudo nano /etc/samba/smb.conf At the bottom of the file, add the following lines:
[sambashare] comment = Samba on Ubuntu path = /home/username/sambashare read only = no browsable = yes Then press Ctrl-O to save and Ctrl-X to exit from the nano text editor.
What we’ve just added
Now that we have our new share configured, save it and restart Samba for it to take effect:
sudo service smbd restart Update the firewall rules to allow Samba traffic:
4. Setting up User Accounts and Connecting to Share
Since Samba doesn’t use the system account password, we need to set up a Samba password for our user account:
sudo smbpasswd -a username Note
Username used must belong to a system account, else it won’t save.
Connecting to Share

On Ubuntu: Open up the default file manager and click Connect to Server then enter:

On macOS: In the Finder menu, click Go > Connect to Server then enter:
On Windows, open up File Manager and edit the file path to:
Note: ip-address is the Samba server IP address and sambashare is the name of the share.

You’ll be prompted for your credentials. Enter them to connect!
If you’d like to take your configuration further…
How to share files with Samba
Samba provides easy, flexible, cross-platform, and open source collaboration across your organization.
Career advice
The Samba project provides file sharing and print services for computers on a network. It uses the Server Message Block and Common Internet File System (SMB/CIFS) protocol, so the services created by running Samba are available to Linux, macOS, and Windows clients. It’s an essential service to run in organizations that support multiple operating systems, and it’s even useful on homogenous networks.
It’s not difficult to set up, and all you need is at least one server you want to designate as a file-share host (it doesn’t have to be rack mounted and could even be a dedicated workstation). For client access, Samba is either built into the operating system or easily installed from a repository.
Install Samba
On your designated Samba server, install the Samba package:
This command also installs the samba-common-tools and samba-libs packages.
Next, start the SMB and NMB daemons. The SMB daemon manages most Samba services, while the NMB daemon provides NetBIOS services. Here are the commands:
$ systemctl enable --now smb $ systemctl enable --now nmbThat’s the installation. All that’s left is a little configuration.
Configure your firewall
Make sure that your file-share server is accessible over your network by adding the samba service to your firewall config:
$ sudo systemctl enable --now firewalld $ sudo firewall-cmd --list-services cockpit dhcpv6-client ssh $ sudo firewall-cmd --add-service samba successConfigure Samba
Create a directory on the server to hold your shared files and folders, and change the SELinux context to samba_share_t :
$ sudo mkdir /sambashare $ sudo chcon -t samba_share_t /sambashare/To configure shares and users, edit the /etc/samba/smb.conf file. The default file has several good examples of common options, including provisions for shared printers and home directories.
There’s a global section, which defines a workgroup. I arbitrarily set mine to SAMBA . I have no other existing workgroups on my network, so the workgroup hardly matters for my setup. If your organization has a specific workgroup structure, then follow that.
[global] workgroup = SAMBA security = user passdb backend = tdbsam . By default, your Samba server’s NetBIOS name is the server’s Linux hostname. If you don’t have DNS configured on your local network, you can use the server’s IP address when contacting the Samba server.
[ Download the Linux networking cheat sheet to get a list of Linux utilities and commands for managing servers and networks. ]
Create a shared location
To create a new share location, add a section to the /etc/samba/smb.conf configuration file with these two definitions:
[sambashare] path = /sambashare read only = NoShare files between Linux and Windows computers
If you work with different operating systems, it’s handy to be able to share files between them. This article explains how to set up file access between Linux (Fedora 33) and Windows 10 using Samba and mount.cifs.
Samba is the Linux implementation of the SMB/CIFS protocol, allowing direct access to shared folders and printers over a network. Mount.cifs is part of the Samba suite and allows you to mount the CIFS filesystem under Linux.
Caution: These instructions are for sharing files within your private local network or in a virtualized host-only network between a Linux host machine and a virtualized Windows guest. Don’t consider this article a guideline for your corporate network, as it doesn’t implement the necessary cybersecurity considerations.
Access Linux from Windows
This section explains how to access a user’s Linux home directory from Windows File Explorer.
1. Install and configure Samba
Start on your Linux system by installing Samba:
Samba is a system daemon, and its configuration file is located in /etc/samba/smb.conf . Its default configuration should work. If not, this minimal configuration should do the job:
[global] workgroup = SAMBA server string = %h server (Samba %v) invalid users = root security = user [homes] comment = Home Directories browseable = no valid users = %S writable = yesYou can find a detailed description of the parameters in the smb.conf section of the project’s website.
2. Modify LinuxSE
If your Linux distribution is protected by SELinux (as Fedora is), you have to enable Samba to be able to access the user’s home directory:
setsebool -P samba_enable_home_dirs onCheck that the value is set by typing:
getsebool samba_enable_home_dirsYour output should look like this:
![]()
3. Enable your user
Samba uses a set of users and passwords that have permission to connect. Add your Linux user to the set by typing:
You will be prompted for a password. This is a completely new password; it is not the current password for your account. Enter the password you want to use to log in to Samba.
To get a list of allowed user types:
4. Start Samba
Because Samba is a system daemon, you can start it on Fedora with:
This starts Samba for the current session. If you want Samba to start automatically on system startup, enter:
On some systems, the Samba daemon is registered as smbd .
4. Configure the firewall
By default, Samba is blocked by your firewall. Allow Samba to access the network permanently by configuring the firewall.
You can do it on the command line with:
firewall-cmd --add-service=samba --permanentOr you do it graphically with the firewall-config tool:

5. Access Samba from Windows
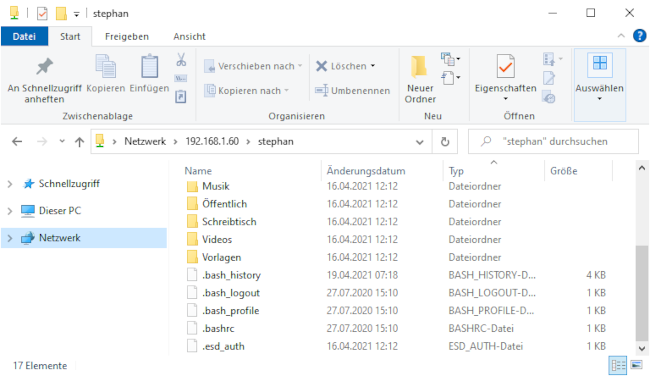
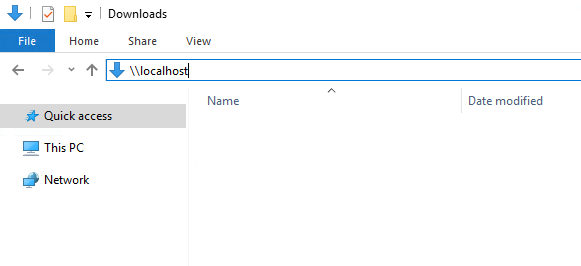
In Windows, open File Explorer. On the address line, type in two backslashes followed by your Linux machine’s address (IP address or hostname):
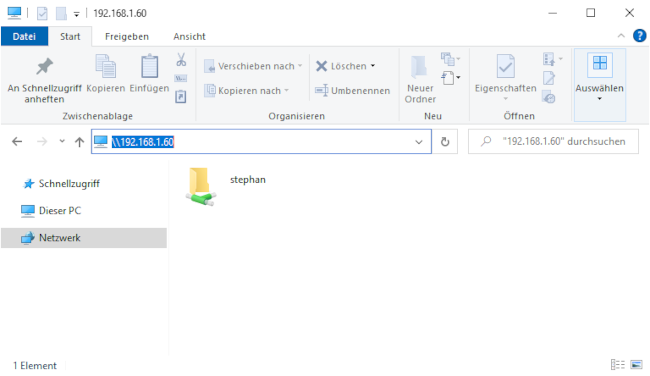
You will be prompted for your login information. Type in the username and password combination from step 3. You should now be able to access your home directory on your Linux machine:
Access Windows from Linux
The following steps explain how to access a shared Windows folder from Linux. To implement them, you need Administrator rights on your Windows user account.
1. Enable file sharing
Open the Network and Sharing Center either by clicking on the
Windows Button > Settings > Network & Internet
or by right-clicking the little monitor icon on the bottom-right of your taskbar:
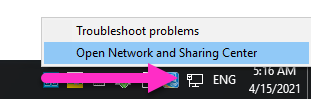
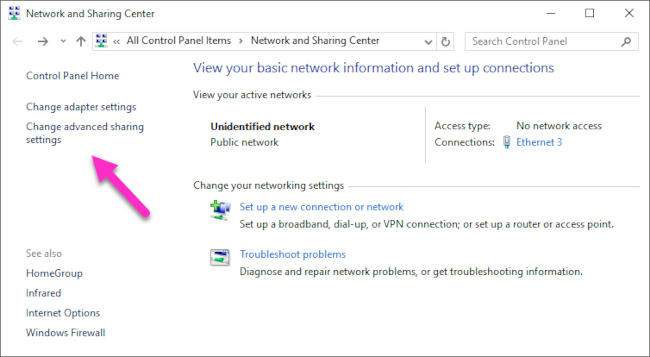
In the window that opens, find the connection you want to use and note its profile. I used Ethernet 3, which is tagged as a Public network.
Caution: Consider changing your local machine’s connection profile to Private if your PC is frequently connected to public networks.
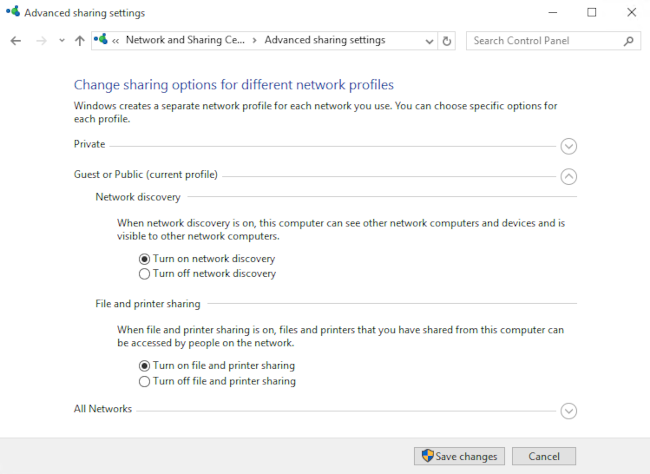
Remember your network profile and click on Change advanced sharing settings:
Select the profile that corresponds to your connection and turn on network discovery and file and printer sharing:
2. Define a shared folder
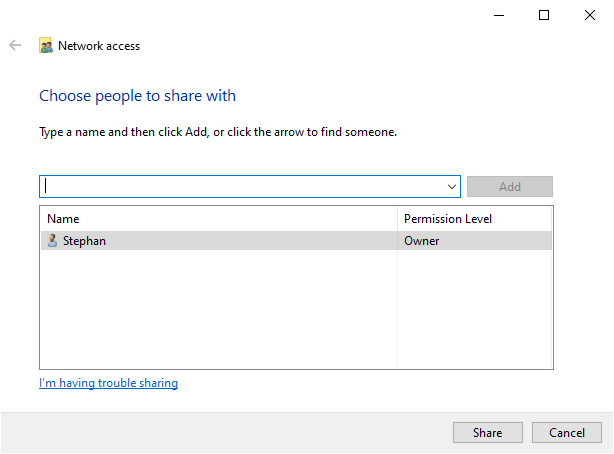
Open the context menu by right-clicking on the folder you want to share, navigate to Give access to, and select Specific people. :
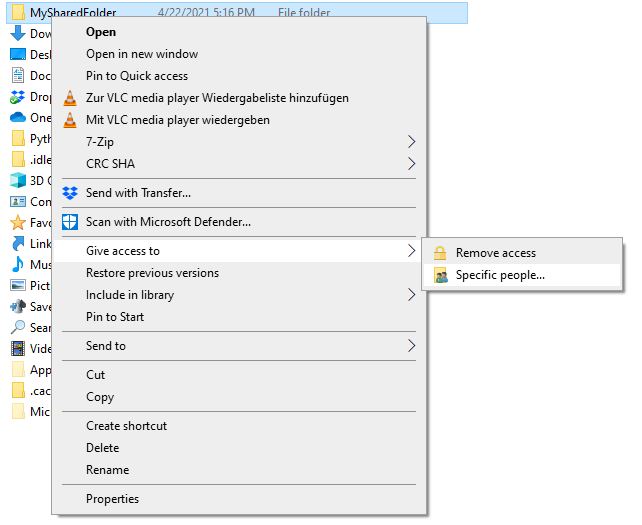
Check whether your current username is on the list. Click on Share to tag this folder as shared:
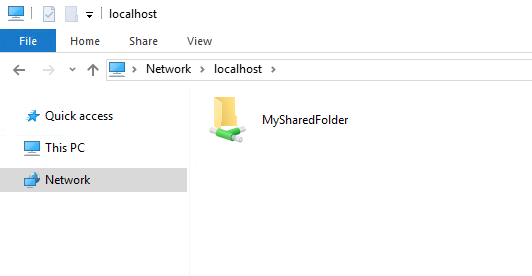
You can display a list of all shared folders by entering \\localhost in File Explorer’s address line:
3. Mount the shared folder under Linux
Go back to your Linux system, open a command shell, and create a new folder where you want to mount the Windows share:
Mounting Windows shares is done with mount.cifs, which should be installed by default. To mount your shared folder temporarily, use:
sudo mount.cifs ///MySharedFolder ~/WindowsShare/ -o user=,uid=$UID- is the Windows PC’s address info (IP or hostname)
- is the user that is allowed to access the shared folder (from step 2)
You will be prompted for your Windows password. Enter it, and you will be able to access the shared folder on Windows with your normal Linux user.
To unmount the shared folder:
You can also mount a Windows shared folder on system startup. Follow these steps to configure your system accordingly.
Summary
This shows how to establish temporary shared folder access that must be renewed after each boot. It is relatively easy to modify this configuration for permanent access. I often switch back and forth between different systems, so I consider it incredibly practical to set up direct file access.

Send your scans to a Linux machine over your network
Set up a Samba share to make a scanner easily accessible by a Linux computer over your network.

5 open source alternatives to Dropbox
Find a filesharing application that doesn’t compromise your security, freedom, or bank balance.