- How to Install Samba on Ubuntu for File Sharing on Windows
- Install and Configure Samba in Ubuntu
- Check Windows Machine WorkGroup Settings
- Anonymous Samba File Sharing
- Testing Anonymous Samba File Sharing
- Secure Samba File Sharing
- Testing Secure Samba File Sharing
- Enable Samba in UFW Firewall in Ubuntu
- Настройка Samba
- Что такое Samba?
- Настройка общих папок в Linux
How to Install Samba on Ubuntu for File Sharing on Windows
Samba is a free/open source and popularly used software for sharing files and print services between Unix-like systems including Linux and Windows hosts on the same network.
In this guide, we will show how to setup Samba4 for basic file sharing between a Ubuntu systems and Windows machines. We will cover two possible scenarios: anonymous (unsecure) as well as secure file sharing.
Note that starting from version 4.0, Samba can be used as an Active Directory (AD) domain controller (DC). We have organized a special series for setting up Samba4 Active Directory Domain Controller, which comprises of key topics under Ubuntu, CentOS, and Windows.
Install and Configure Samba in Ubuntu
Samba server is available to install from the default Ubuntu repositories using the apt package manager tool as shown.
$ sudo apt install samba samba-common python-dnspython
Once samba server installed, now its time to configure samba server as: unsecure anonymous and secure file sharing.
For this, we need to edit the main Samba configuration file /etc/samba/smb.conf (which explain various configuration directives).
First backup the original samba configuration file as follows.
$ sudo cp /etc/samba/smb.conf /etc/samba/smb.conf.orig
Afterwards, we’ll proceed to configure samba for anonymous and secure file sharing services as explained below.
Important: Before moving any further, ensure that the Windows machine is in the same workgroup which will be configured on the Ubuntu server.
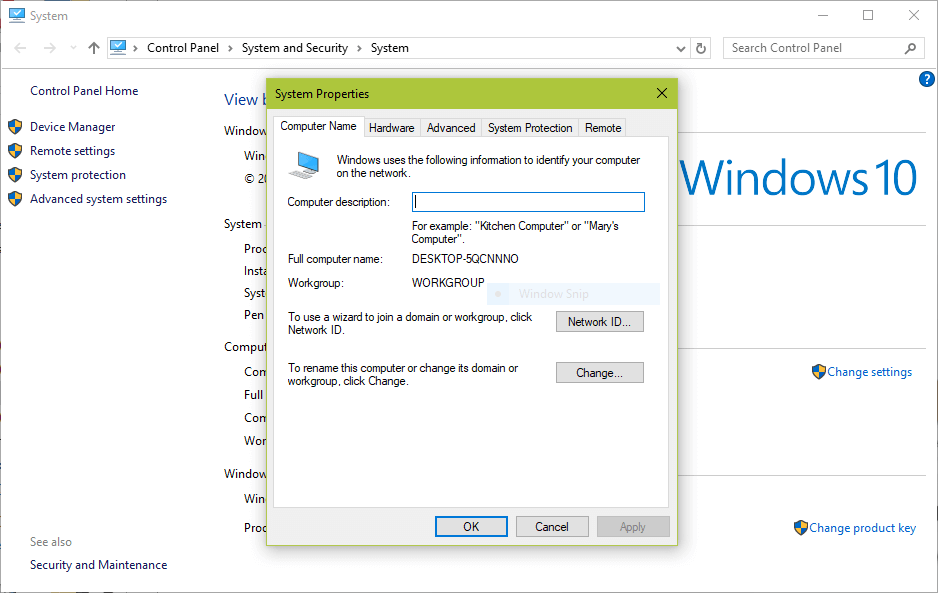
Check Windows Machine WorkGroup Settings
Login into your Windows machine, right click on “This PC” or “My Computer” → Properties → Advanced System Settings → Computer Name to verify the workgroup.
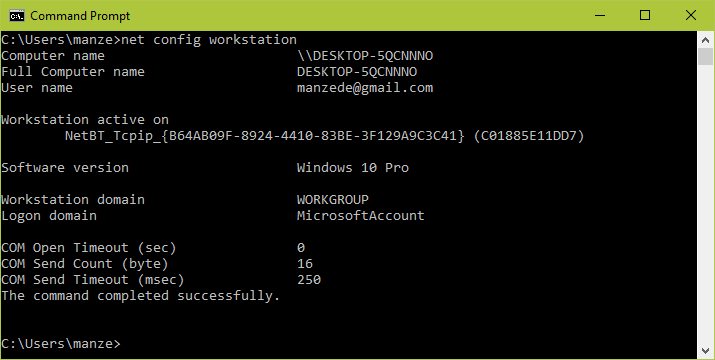
Alternatively, open the command prompt and view it by running the command below and look for “workstation domain”.
Once you know your Windows workgroup its time to move ahead and configure samba server for file sharing.
Anonymous Samba File Sharing
First start by creating a shared samba directory where the files will be stored.
$ sudo mkdir -p /srv/samba/anonymous_shares
Then set the appropriate permissions on the directory.
$ sudo chmod -R 0775 /srv/samba/anonymous_shares $ sudo chown -R nobody:nogroup /srv/samba/anonymous_shares
Now open the configuration file.
$ sudo vi /etc/samba/smb.conf OR $ sudo nano /etc/samba/smb.conf
Next edit or modify the directive settings as described below.
global] workgroup = WORKGROUP netbios name = ubuntu security = user [Anonymous] comment = Anonymous File Server Share path = /srv/samba/anonymous_shares browsable =yes writable = yes guest ok = yes read only = no force user = nobody
Now verify current samba settings by running the command below.
Load smb config files from /etc/samba/smb.conf rlimit_max: increasing rlimit_max (1024) to minimum Windows limit (16384) WARNING: The "syslog" option is deprecated Processing section "[printers]" Processing section "[print$]" Processing section "[Shares]" Loaded services file OK. Server role: ROLE_STANDALONE Press enter to see a dump of your service definitions # Global parameters [global] netbios name = UBUNTU server string = %h server (Samba, Ubuntu) server role = standalone server map to guest = Bad User obey pam restrictions = Yes pam password change = Yes passwd program = /usr/bin/passwd %u passwd chat = *Enter\snew\s*\spassword:* %n\n *Retype\snew\s*\spassword:* %n\n *password\supdated\ssuccessfully* . unix password sync = Yes syslog = 0 log file = /var/log/samba/log.%m max log size = 1000 dns proxy = No usershare allow guests = Yes panic action = /usr/share/samba/panic-action %d idmap config * : backend = tdb [printers] comment = All Printers path = /var/spool/samba create mask = 0700 printable = Yes [print$] comment = Printer Drivers path = /var/lib/samba/printers browseable = No [Anonymous] comment = Anonymous File Server Share path = /srv/samba/anonymous_shares force user = nobody read only = No guest ok = Yes
Then restart Samba services to effect the above changes.
$ sudo systemctl restart smbd [Systemd] $ sudo service smbd restart [Sys V]
Testing Anonymous Samba File Sharing
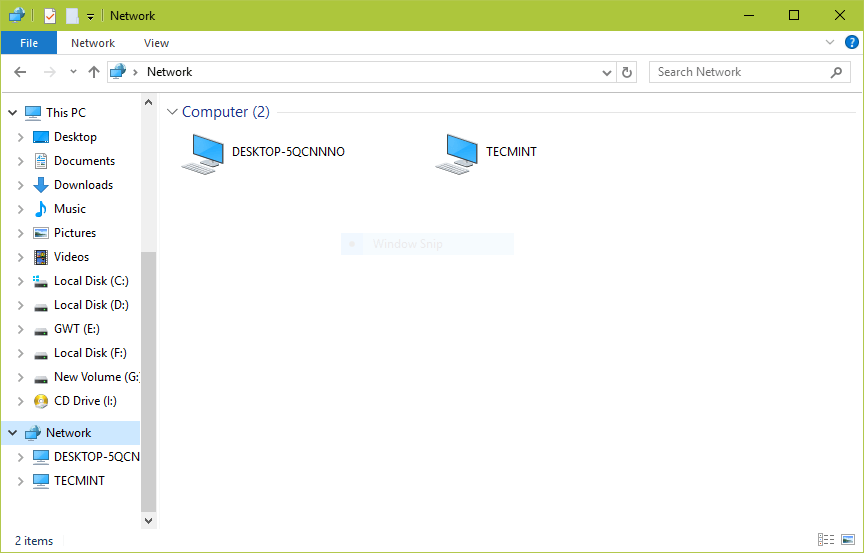
Go to the Windows machine, and open “Network” from a Windows Explorer window. Click on the Ubuntu host (TECMINT for our case), or else try to access the samba server using its IP address.
Note: Use the ifconfig command to get your Ubuntu server IP address.
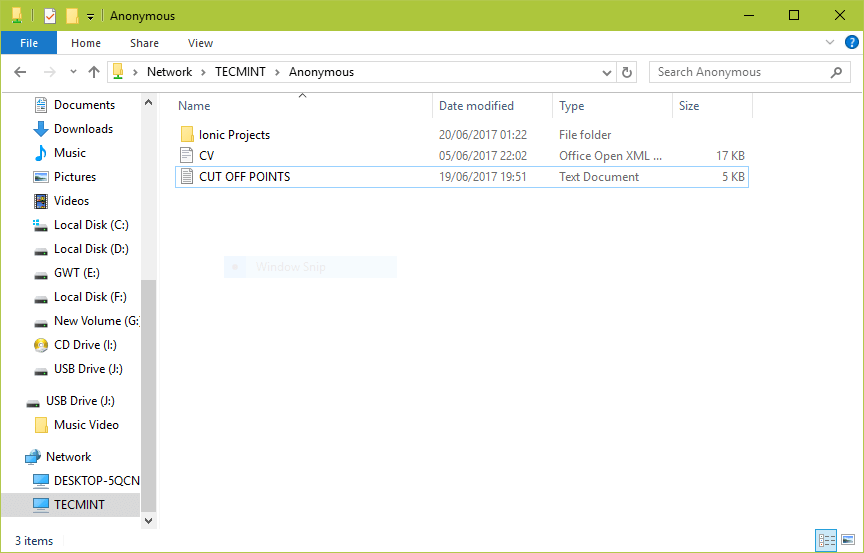
Then open the Anonymous directory and try to add files in there to share with other users.
Secure Samba File Sharing
To password-protect a samba share, you need to create a group “smbgrp” and set a password for each user. In this example I use aaronkilik as user and password as “tecmint“.
$ sudo addgroup smbgrp $ sudo usermod aaronkilik -aG smbgrp $ sudo smbpasswd -a aaronkilik
Note: The samba security mode: security = user requires clients to enter a username and password to connect to shares.
Samba user accounts are separate from system accounts, however, you can optionally install the libpam-winbind package which is used to sync system users and passwords with the samba user database.
$ sudo apt install libpam-winbind
Then create the secure directory where the shared files will be kept.
$ sudo mkdir -p /srv/samba/secure_shares
Next, set the appropriate permissions on the directory.
$ sudo chmod -R 0770 /srv/samba/secure_shares $ sudo chown -R root:smbgrp /srv/samba/secure_shares
Now open the configuration file.
$ sudo vi /etc/samba/smb.conf OR $ sudo nano /etc/samba/smb.conf
Next edit or modify the directive settings as described below.
[Secure] comment = Secure File Server Share path = /srv/samba/secure_shares valid users = @smbgrp guest ok = no writable = yes browsable = yes
Just like before, run this command to see your current samba settings.
Load smb config files from /etc/samba/smb.conf rlimit_max: increasing rlimit_max (1024) to minimum Windows limit (16384) WARNING: The "syslog" option is deprecated Processing section "[printers]" Processing section "[print$]" Processing section "[Shares]" Loaded services file OK. Server role: ROLE_STANDALONE Press enter to see a dump of your service definitions # Global parameters [global] netbios name = UBUNTU server string = %h server (Samba, Ubuntu) server role = standalone server map to guest = Bad User obey pam restrictions = Yes pam password change = Yes passwd program = /usr/bin/passwd %u passwd chat = *Enter\snew\s*\spassword:* %n\n *Retype\snew\s*\spassword:* %n\n *password\supdated\ssuccessfully* . unix password sync = Yes syslog = 0 log file = /var/log/samba/log.%m max log size = 1000 dns proxy = No usershare allow guests = Yes panic action = /usr/share/samba/panic-action %d idmap config * : backend = tdb [printers] comment = All Printers path = /var/spool/samba create mask = 0700 printable = Yes [print$] comment = Printer Drivers path = /var/lib/samba/printers browseable = No [Anonymous] comment = Anonymous File Server Share path = /srv/samba/anonymous_shares force user = nobody read only = No guest ok = Yes [Secure] comment = Secure File Server Share path = /srv/samba/secure_shares valid users = @smbgrp read only = No
Once you done with the above configurations, restart Samba services to apply the changes.
$ sudo systemctl restart smbd [Systemd] $ sudo service smbd restart [Sys V]
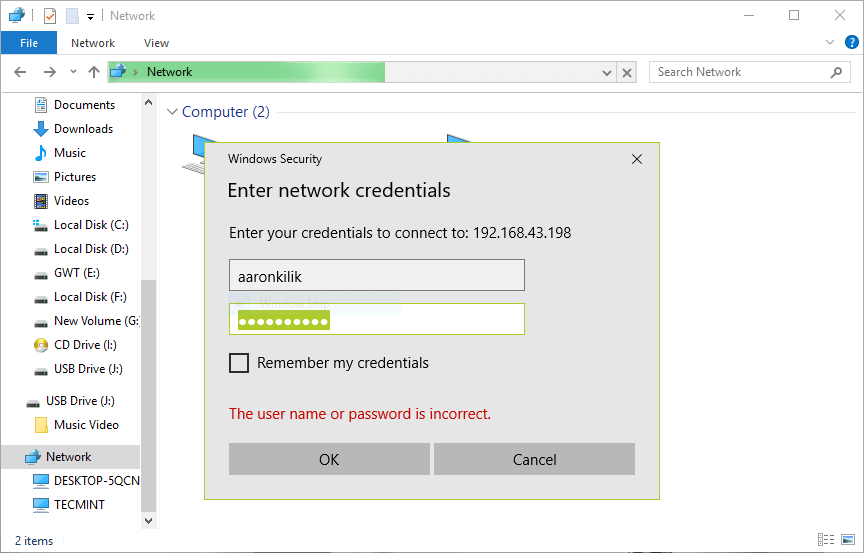
Testing Secure Samba File Sharing
As before, in the Windows machine, and open “Network” from a Windows Explorer window. Click on the Ubuntu host (TECMINT for our case). You may get the error below, if not proceed to the next step.

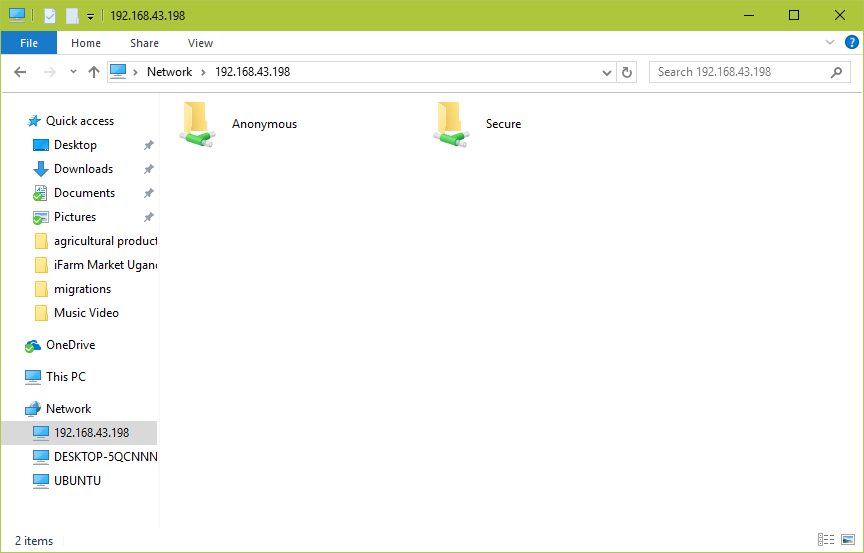
Try to access the server using its IP address, e.g. \\192.168.43.168 like this. Then enter the credentials (username and password) for user aaronkilik and click OK.
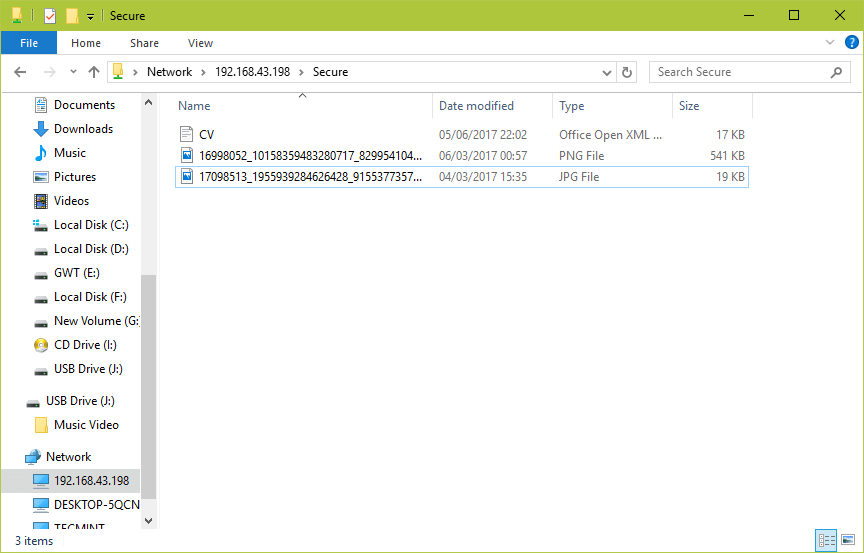
You’ll now view all the shared directories, click on Secure to open it.
You can securely share some files with other permitted users on the network by dropping them in this directory.
Enable Samba in UFW Firewall in Ubuntu
If you have UFW firewall enabled/active on your system, you must add the rules to allow Samba to pass through your firewall.
To test this, we’ve used the 192.168.43.0 network scheme. Run the commands below specifying your network address.
$ sudo ufw allow proto udp to any port 137 from 192.168.43.0/24 $ sudo ufw allow proto udp to any port 138 from 192.168.43.0/24 $ sudo ufw allow proto tcp to any port 139 from 192.168.43.0/24 $ sudo ufw allow proto tcp to any port 445 from 192.168.43.0/24
You can also check out these useful articles concerning Samba file sharing on a network.
That’s all! In this guide, we showed you how to setup Samba4 for anonymous and secure file sharing between Ubuntu and Windows machines. Use the feedback form below to share any thoughts with us.
Настройка Samba
Пожалуй нет ни одного офиса, в котором не применялись бы общие ресурсы локальной сети, будь то папки или принтеры. Крупные и средние компании используют возможности Active Directory, компании поменьше – используют штатные средства ОС Windows или Samba, но на серверах под управлением ОС Linux. Рассмотрим все случаи, как настроить Samba.
Что такое Samba?
Samba – серверное приложение, реализующее доступ клиентских терминалов к папкам, принтерам и дискам про протоколу SMB/CIFS.

Настройка общих папок в Linux
Установка и настройка Samba-сервер для Ubuntu выполняется следующими этапами.
Обновляем информацию о репозиториях и устанавливаем обновления для существующих пакетов в системе:
Устанавливаем пакет Samba:
Создадим резервную копию файла конфигурации:
Создадим директории для файлов, например в каталоге /media:
Важно! По умолчанию, директория /media располагается в корне системы /, для нее редко создается свой раздел. По этой причине возможно переполнение корневого раздела. Во избежание этой неприятной ситуации, рекомендуем монтировать отдельный жесткий диск в /media/samba.
Создаем каталог для всех пользователей:
Изменим права доступа к каталогу:
Также следует воспользоваться командой chown для смены владельца и/или группы.
Создаем директорию для ограниченного круга лиц:
С помощью системных инструментов создадим группу пользователей:
Добавляем пользователей Samba:
Созданных пользователей добавляем в группу:
Изменим группу, которой принадлежит приватная директория:
С помощью инструментов Samba создадим пароль для добавленного пользователя:
С помощью текстового редактора, например, nano, редактируем конфигурационный файл samba:
Удаляем все строки из файла. Вставляем следующие:
[global]
workgroup = WORKGROUP
security = user
map to guest = bad user
wins support = no
dns proxy = no
[public]
path = /media/samba/public
guest ok = yes
force user = nobody
browsable = yes
writable = yes
[private]
path = /media/samba/private
valid users = @smbgrp
guest ok = no
browsable = yes
writable = yes
Сохраняем используя сочетание Ctrl + X, затем нажимаем Y и Enter.
Объясним значения строк. конфигурационный файл состоит из трех секций:
global – данная секция отвечает за общие настройки Samba-сервера;
public и private – секции описания настроек директорий общего доступа.
В секции global присутствуют пять параметров:
- workgroup – рабочая группа. Для упрощения работы пользователей WORKGROUP указывается, как группа по умолчанию. Если в вашей сети имя рабочей группы изменено, то следует изменить это значение и для Samba;
- security – уровень безопасности сервера. Значение user означает авторизацию по паре логин/пароль;
- map to guest – параметр определяет способ обработки запросов. Значение bad user означает, что запросы с неправильным паролем будут отклонены, даже если такое имя пользователя существует;
- wins support – включить или выключить поддержку WINS;
- dns proxy – возможность проксирования запросов к DNS.
Настройки директорий выполняются в соответствующих секциях:
path – полный путь до директории на жестком диске;
guest ok – возможность доступа к каталогу без пароля (гостевой);
browsable – показывать ли каталог (“шару”) на сервере среди прочих. Если параметр установлен как “no”, то доступ будет возможен по полному пути, например ip-addresshidden_directory;
force user – пользователь от которого ведется работа с каталогом. Для повышения безопасности сервера, обычно используют nobody. Главное, не использовать пользователя root – это небезопасно.
writable – установка значения как “yes” позволяет пользователю выполнять действия над файлами внутри каталога – переименование, добавление, удаление, перемещение в подкаталог и копирование;
valid users – список пользователей у которых есть доступ к каталогу. Если пользователей несколько, их имена указываются через запятую. Если необходим доступ для пользователей принадлежащих группе, перед именем группы устанавливается символ ”at” @ (“собака”).
Важно! Имя директории общего доступа, отображаемое пользователям, равно имени секции в которой оно описано.
Проверяем настройки с помощью команды: