- Is there a way to save current state of network configuration in linux into a datafile or set of ip commands like iptables-save?
- 3 Answers 3
- Как настроить статический IP-адрес в Ubuntu Server 20.04
- Определение сетевых интерфейсов
- Настройки локальной сети
- Настройки беспроводной сети
- Применение конфигурации
- Подключение по SSH
- Пример конфигурации
- How to Set Static IP Address and Configure Network in Linux
- Configure Static IP Address in RHEL/CentOS/Fedora:
- Set Static IP Address in Debian / Ubuntu
- Conclusion:
Is there a way to save current state of network configuration in linux into a datafile or set of ip commands like iptables-save?
Let’s say I ran quite a few ip commands and ended up with a required network configuration, but I didn’t save the command history. Instead of rewriting commands in a file or script again, is there a way to dump/save the state of network configuration like iptables-save or mysqldump and so, later we can restore? I see similar thing is possible with netnsh in windows (not sure if it’s exactly the kind of solution I am looking for..havne’t gone through it, but it seems like it dumps the network configuration state). But I can’t find any option in Linux (especially CentOS/RHEL)
iptables-save working for saving iptable rules. I am looking for a similar way to save network configuration. However, I can think of some reasons why it may not be possible to save network configuration entirely, as if a physical interface is missing at the time of restore, few configurations may fail.
3 Answers 3
Some support does exist for saving addresses, routes and rules, using iproute2’s ip command.
For obvious reason, this doesn’t exist for links, even if one could imagine the possibility to save some virtual links, not all («saving» a single side of a veth-pair link with its peer accross an other network namespace? not gonna happen. ), or being able to save a bridge’s and bridge’s ports configurations including vlan etc., this doesn’t appear to exist currently.
ip address save ip address restore ip route save ip route restore ip rule save ip rule restore The dump format is binary and the commands will refuse to save to or restore from a tty.
I suggest restoring addresses before routes (rules can be done at any order), or most saved routes won’t be restored because they can’t satisfy routing conditions depending on addresses. Warning: of course all flush commands below will likely disrupt network connectivity until the restore is done, so this should be avoided from remote network access (or be done in other network namespaces).
- ip address save / ip address restore So to copy addresses from a simple network namespace orig ‘s configuration having a dummy0 interface (to keep the example simple) to a namespace copy :
ip netns add orig ip netns exec orig sh /tmp/address EOF ip netns add copy ip netns exec copy sh lo DOWN dummy0 UNKNOWN 192.0.2.2/24 2001:db8:0:1::2/64 fe80::68e3:bdff:feb0:6e85/64 fe80::e823:d1ff:fe8c:3a15/64
Note: that previous automatic IPv6 link-local ( scope link ) address was also saved, and is thus restored, leading to an additional (and wrong) IPv6 link-local address, because the link/ether address (here in orig 6a:e3:bd:b0:6e:85 ) on which is based the IPv6 link-local address is not saved and thus not restored (leaving here the in copy the other random MAC ea:23:d1:8c:3a:15 on dummy0 ). So care should actually be done to separately save and copy the MAC address of such virtual interfaces if it really matters, or prune after some addresses for physical interfaces. You should probably flush all addresses before restoring them to avoid leaving old ones if the environment wasn't a "clean slate". Contrary to routes below, I couldn't find a simple way to flush all of them in one command without having to state an interface. Using those two should be good enough:
ip address flush permanent ip address flush temporary
On the same principle, routes and rules can be saved and restored:
ip route save / ip route restore There's a trick. ip route save will save only the main table, which is good for common use cases, but not with policy routing's additional routing tables. You can state a specific table (eg ip rule save table 220 ) if needed. But the special table 0 represents all tables, using ip route save table 0 will save all of them (including for each route the table it belongs to, like would be displayed with ip route show table 0 ) at once. Before restoring routes, it should be preferable to flush all existing routes:
ip route flush table 0 all
# ip route add table 220 unreachable 10.0.0.0/8 metric 9999 # ip route show table 220 unreachable 10.0.0.0/8 metric 9999 # ip route save table 0 > /tmp/route # ip route flush table 0 all # ip route show table 220 # # ip route restore table 0 < /tmp/route # ip route show table 220 unreachable 10.0.0.0/8 metric 9999
ip rule flush ip rule delete priority 0
ip rule flush ip rule delete priority 0 ip rule restore < /tmp/rule
I hope you can find some usage of this, for example for automatization with multiple network namespaces.
Как настроить статический IP-адрес в Ubuntu Server 20.04
Настройка сети в Ubuntu Server 20.04 LTS осуществляется через утилиту Netplan.
NetPlan — это инструмент для управления настройками сети, представленный в Ubuntu начиная с версии 17.10 и выше.
Этот инструмент заменяет файл статических интерфейсов /etc/network/interfaces , который ранее использовался для настройки сетевых интерфейсов в Ubuntu. Теперь нужно использовать /etc/netplan/*.yaml для ваших изменений в настройках сетевых интерфейсов.
Определение сетевых интерфейсов
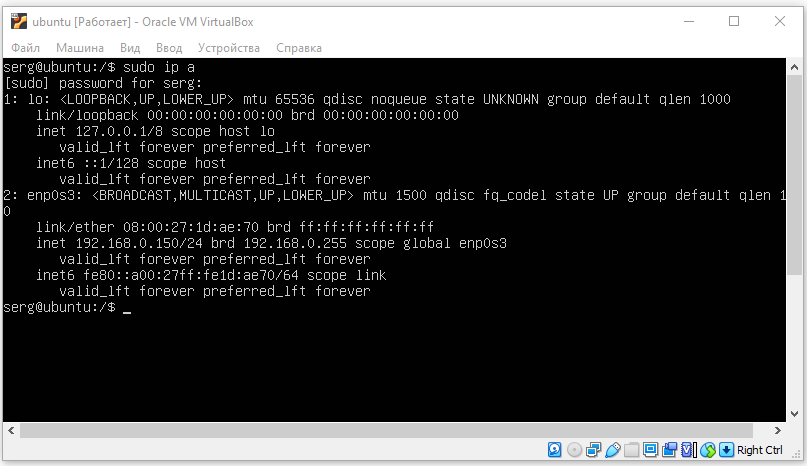
Определите все доступные сетевые интерфейсы используя команду ip или lshw :
sudo ip a // Или sudo lshw -class network

У меня уже настроен IP адрес: 192.169.0.150. Я изменю его.
Настройки локальной сети
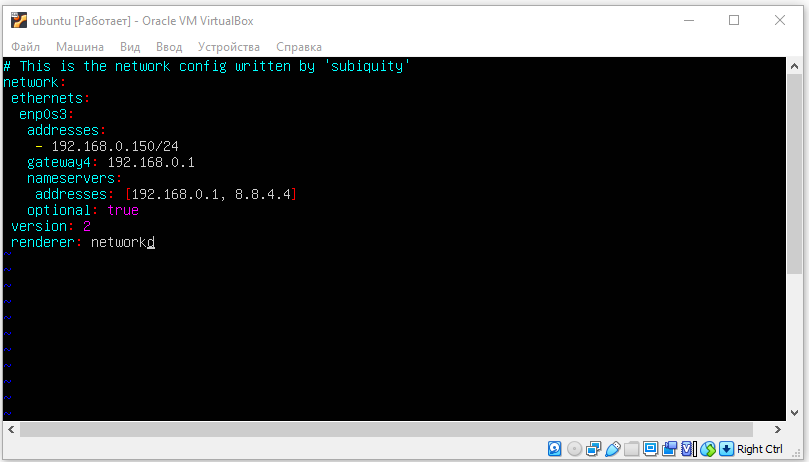
Отредактируйте файл конфигурации netplan который находится в директории /etc/netplan/ :
sudo vim /etc/netplan/00-installer-config.yaml
Здесь придётся прописать всё ручками, если у вас ещё нет доступа по SSH. У меня этот файл уже редактировался, мне необходимо изменить только IP адрес.
Основные настройки:
- addresses — ip адрес который будет назначен вашей сетевой карте.
- gateway4 — ip адрес вашего роутера.
- nameservers — DNS сервера. Первый - наш роутер.
- search — домен в котором будет произведен поиск. Домен можно настроить при помощи DNS сервера
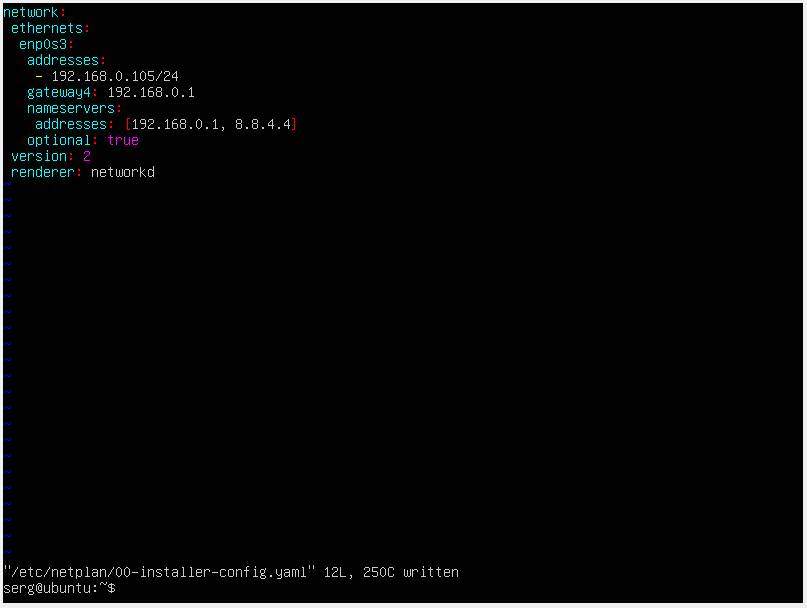
Мои настройки:
network: ethernets: enp0s3: addresses: - 192.168.0.105/24 gateway4: 192.168.0.1 nameservers: addresses: [192.168.0.1, 8.8.4.4] optional: true version: 2 renderer: networkd
ВАЖНО!
Обратите внимание на пробелы! Именно пробелы должны быть, а не табуляция. Если у вас после сохранения файла не появилась ошибка типа: Error while loading /etc/netplan/00-installer-config.yaml, то файл отредактирован правильно с точки зрения его синтаксиса.
После редактирования файла: Esc -> Shift + : -> wq! -> Enter .
Если есть необходимость передать управление сетевыми устройствами утилите NetworkManager:
network: version: 2 renderer: NetworkManager
Настройки беспроводной сети
Для корректной работы беспроводного интерфейса вам потребуется установить утилиту WPA supplicant , которая позволяет подключиться к точкам доступа с WPA. WPA и WPA2:
sudo apt install wpasupplicant
Добавьте новый файл конфигурации в каталог /etc/netplan/ :
sudo vim /etc/netplan/01-config.yaml
Отредактируйте файл конфигурации беспроводной сети с динамическим ip-адресом (DHCP):
network: version: 2 renderer: networkd wifis: wlp3s0: dhcp4: yes dhcp6: no access-points: "network_ssid_name": password: "**********"
Для беспроводной сети в которой используются статические ip-адреса подойдет следующая конфигурация:
network: version: 2 renderer: networkd wifis: wlp3s0: dhcp4: no dhcp6: no addresses: [192.168.0.21/24] gateway4: 192.168.0.1 nameservers: addresses: [192.168.0.1, 8.8.8.8] access-points: "network_ssid_name": password: "**********"
Применение конфигурации
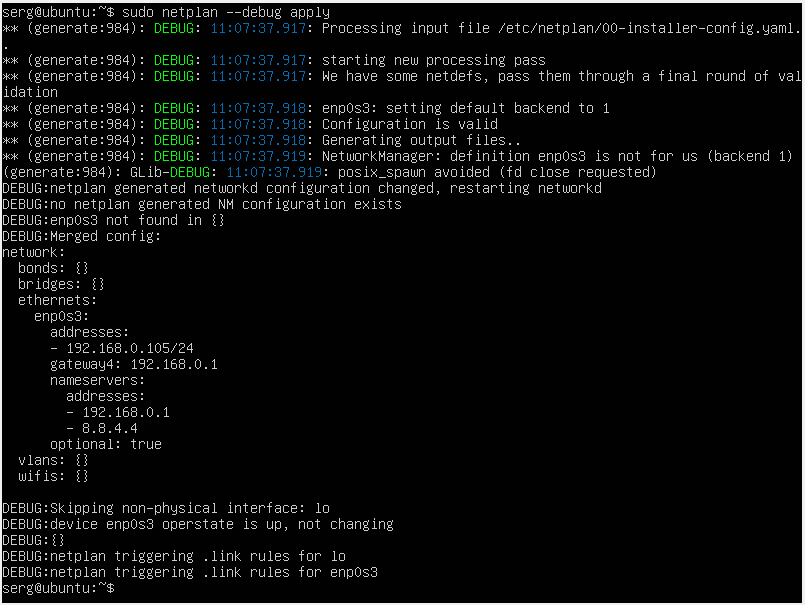
Использование netplan для генерации необходимой конфигурации:
Для подробного вывода информации при генерации, используйте опцию --debug :
sudo netplan --debug generate
Применение конфигурации netplan:
Для подробного вывода информации при применении, используйте опцию --debug :
Далее рекомендуется перезапустить интерфейсы или перезагрузить сервер:
Подключение по SSH
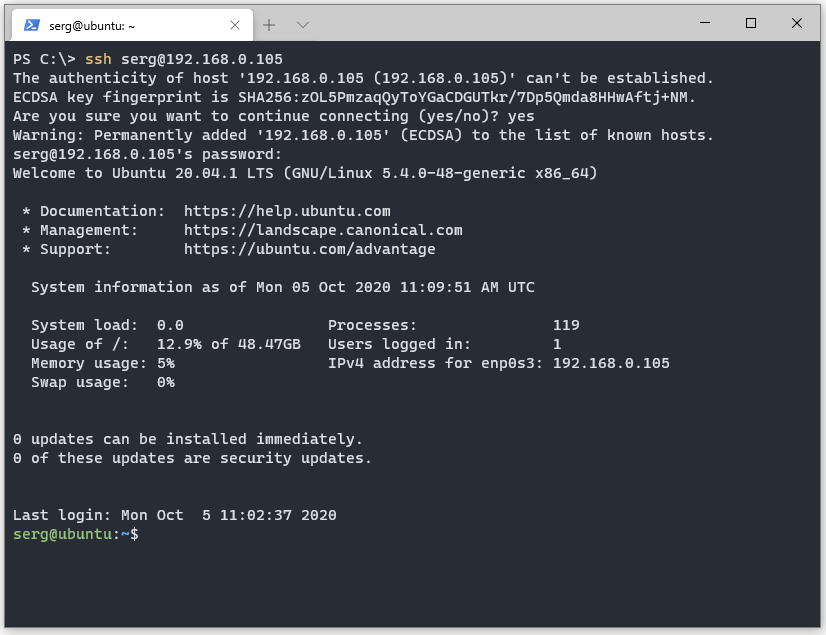
В Windows PowerShell:
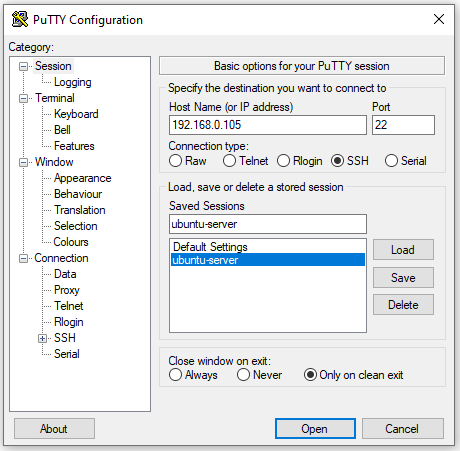
Используем Putty. Указываем IP адрес и задаем имя сессии, жмём Open:
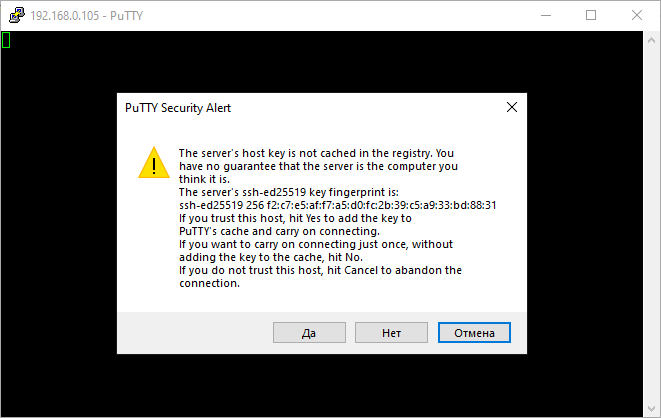
При первом подключении к серверу мы увидим сообщение. Жмём ДА.
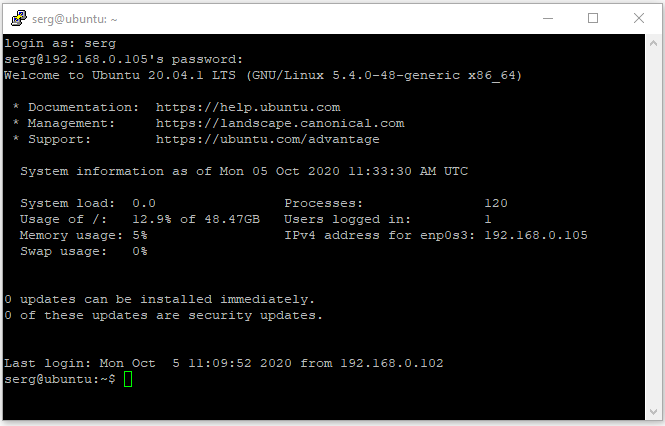
Вводим имя пользователя и пароль. Если всё прошло успешно, увидим:
На этом настройка статического IP-адреса в Ubuntu Server 20.04 LTS закончена.
Пример конфигурации
Пример, который показывает большинство доступных функций:
network: version: 2 # if specified, can only realistically have that value, as networkd cannot # render wifi/3G. renderer: NetworkManager ethernets: # opaque ID for physical interfaces, only referred to by other stanzas wlp3s0: match: macaddress: 00:11:22:33:44:55 wakeonlan: true dhcp4: true addresses: - 192.168.14.2/24 - 192.168.14.3/24 - "2001:1::1/64" gateway4: 192.168.14.1 gateway6: "2001:1::2" nameservers: search: [foo.local, bar.local] addresses: [8.8.8.8] routes: - to: 0.0.0.0/0 via: 11.0.0.1 table: 70 on-link: true metric: 3 routing-policy: - to: 10.0.0.0/8 from: 192.168.14.2/24 table: 70 priority: 100 - to: 20.0.0.0/8 from: 192.168.14.3/24 table: 70 priority: 50 # only networkd can render on-link routes and routing policies renderer: networkd lom: match: driver: ixgbe # you are responsible for setting tight enough match rules # that only match one device if you use set-name set-name: lom1 dhcp6: true switchports: # all cards on second PCI bus unconfigured by # themselves, will be added to br0 below # note: globbing is not supported by NetworkManager match: name: enp2* mtu: 1280 wifis: all-wlans: # useful on a system where you know there is # only ever going to be one device match: <> access-points: "Joe's home": # mode defaults to "infrastructure" (client) password: "s3kr1t" # this creates an AP on wlp1s0 using hostapd # no match rules, thus the ID is the interface name wlp1s0: access-points: "guest": mode: ap # no WPA config implies default of open bridges: # the key name is the name for virtual (created) interfaces # no match: and set-name: allowed br0: # IDs of the components; switchports expands into multiple interfaces interfaces: [wlp1s0, switchports] dhcp4: true
Подробнее об использовании Netplan здесь.
How to Set Static IP Address and Configure Network in Linux
If you are a Linux system administrator, time will come when you will need to configure networking on your system. Unlike desktop machines where you can use dynamic IP addresses, on a server infrastructure, you will need to setup a static IP address (at least in most cases).
This article is meant to show you how to configure static IP address on most frequently used Linux distributions.
For the purpose of this tutorial, we will use the following Internet Protocol version 4 (IPv4) details:
IP address: 192.168.0.100 Netmask: 255.255.255.0 Hostname: node01.tecmint.com Domain name: tecmint.com Gateway: 192.168.0.1 DNS Server 1: 8.8.8.8 DNS Server 2: 4.4.4.4
Configure Static IP Address in RHEL/CentOS/Fedora:
To configure static IP address in RHEL / CentOS / Fedora, you will need to edit:
/etc/sysconfig/network /etc/sysconfig/network-scripts/ifcfg-eth0
Where in the above "ifcfg-eth0" answers to your network interface eth0 . If your interface is named “ eth1" then the file that you will need to edit is "ifcfg-eth1" .
Let’s start with the first file:
NETWORKING=yes HOSTNAME=node01.tecmint.com GATEWAY=192.168.0.1 NETWORKING_IPV6=no IPV6INIT=no
# vi /etc/sysconfig/network-scripts/ifcfg-eth0
Note: Make sure to open the file corresponding to your network interface. You can find your network interface name with ifconfig -a command.
In that file make the following changes:
DEVICE="eth0" BOOTPROTO="static" DNS1="8.8.8.8" DNS2="4.4.4.4" GATEWAY="192.168.0.1" HOSTNAME="node01.tecmint.com" HWADDR="00:19:99:A4:46:AB" IPADDR="192.68.0.100" NETMASK="255.255.255.0" NM_CONTROLLED="yes" ONBOOT="yes" TYPE="Ethernet" UUID="8105c095-799b-4f5a-a445-c6d7c3681f07"
You will only need to edit the settings for:
Other settings should have already been predefined.
Next edit resolve.conf file by opening it with a text editor such as nano or vi:
nameserver 8.8.8.8 # Replace with your nameserver ip nameserver 4.4.4.4 # Replace with your nameserver ip
Once you have made your changes restart the networking with:
# /etc/init.d/network restart [On SysVinit] # systemctl restart network [On SystemD]
Set Static IP Address in Debian / Ubuntu
To setup static IP address in Debian/ Ubuntu, open the following file:
# nano /etc/network/interfaces
You may see a line looking like this:
auto eth0 iface eth0 inet dhcp
Change it so it looks like this:
auto eth0 iface eth0 inet static address 192.168.0.100 netmask 255.255.255.0 gateway 192.168.0.1 dns-nameservers 4.4.4.4 dns-nameservers 8.8.8.8
Save the file and then edit /etc/resolv.conf like this:
nameserver 8.8.8.8 # Replace with your nameserver ip nameserver 4.4.4.4 # Replace with your nameserver ip
Restart the networking on your system with:
# /etc/init.d/network restart [On SysVinit] # systemctl restart network [On SystemD]
Your static IP address has been configured.
Conclusion:
You now know how to configure a static IP address on a Linux distro. If you have any questions or comments, please do not hesitate to submit them in the comment section below.