- Manual:Reset
- Reset from RouterOS
- Using reset button
- How to reset configuration
- Jumper hole reset
- Jumper reset for older models
- Introduction
- Reset From RouterOS
- Using Reset Button
- How to reset configuration
- Jumper hole reset
- Jumper reset for older models
- MikroTik: Cброс настроек на заводские
- Сбрасываем настройки MikroTik
- Виды стандартных конфигураций
- Режимы кнопки RESET
- Сброс через Winbox
- Сброс через консоль
- 89 вопросов по настройке MikroTik
Manual:Reset
Note: RouterOS password can only be reset by reinstalling the router or using the reset button (or jumper hole) in case the hardware is RouterBOARD. For X86 devices, only complete reinstall will clear the password, along with other configuration. For RouterBOARD devices, several methods exist, depending on our model.
Reset from RouterOS
If you still have access to your router and want to recover its default configuration, then you can:
- ) run the command «/system reset-configuration» from command line interface
- ) do it from System -> Reset Configuration menu in the graphical user interface.
Using reset button
RouterBOARD devices are fitted with a reset button which has several functions:
- Loading the backup RouterBOOT loader
Hold this button before applying power, release after three seconds since powering, to load backup boot loader. This might be necessary if the device is not operating because of a failed RouterBOOT upgrade. When you have started the device with the backup loader, you can either set RouterOS to force backup loader in the RouterBOARD settings or have a chance to reinstall the failed RouterBOOT from a «.fwf» file (total 3 seconds)
- Resetting the RouterOS configuration
Hold this button until LED light starts flashing, release the button to reset RouterOS configuration to default.
- Enabling CAPs mode
To connect this device to a wireless network managed by CAPsMAN, keep holding the button for 5 more seconds, LED turns solid, release now to turn on CAPs mode.
- Starting the RouterBOARD in Netinstall mode
Or keep holding the button for 5 more seconds until LED turns off, then release it to make the RouterBOARD look for Netinstall servers. You can also simply keep the button pressed until the device shows up in the Netinstall program on Windows.
Note: You can also do the previous three functions without loading the backup loader, simply push the button immediately after you apply power. You might need the assistance of another person to push the button and also plug the power supply at the same time
How to reset configuration
1) unplug the device from power
2) press and hold the button right after applying power
Note: hold the button until LED will start flashing
3) release the button to clear configuration.
Note: If you wait until LED stops flashing, and only then release the button — this will instead launch Netinstall mode, to reinstall RouterOS.
Jumper hole reset
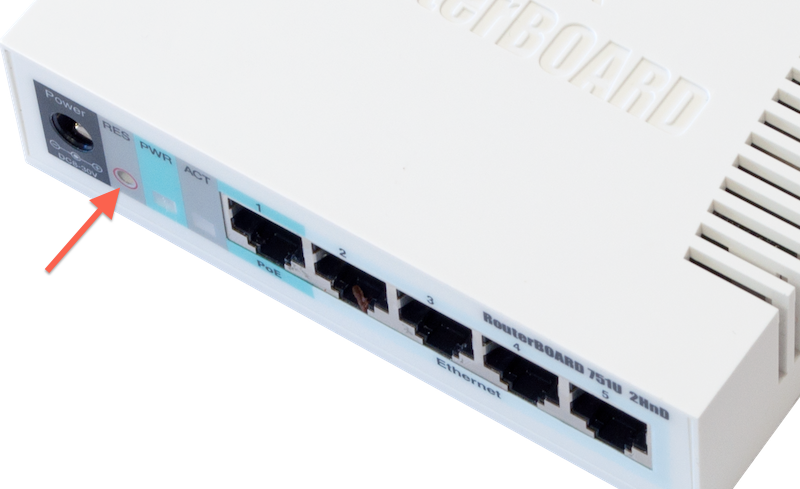
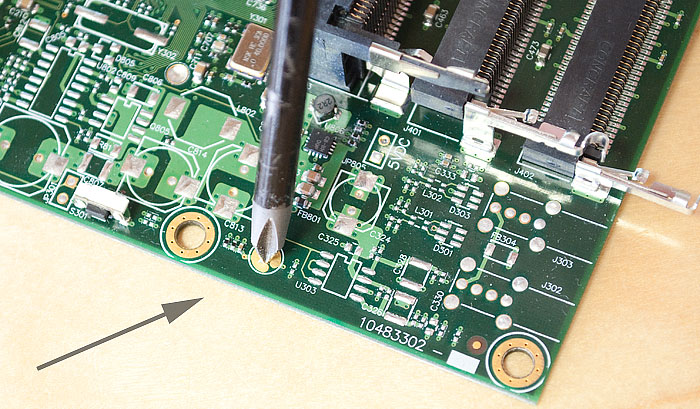
Some devices might need opening of the enclosure, RB750/RB951/RB751 have the jumper hole under one of the rubber feet of the enclosure.
Using: Close the jumper with a metal screwdriver, and boot the board until the configuration is cleared.
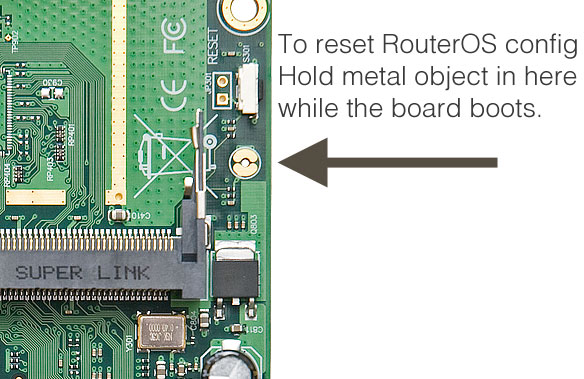
Jumper reset for older models
The below image shows the location of the Reset Jumper on older RouterBOARDs like RB133C:
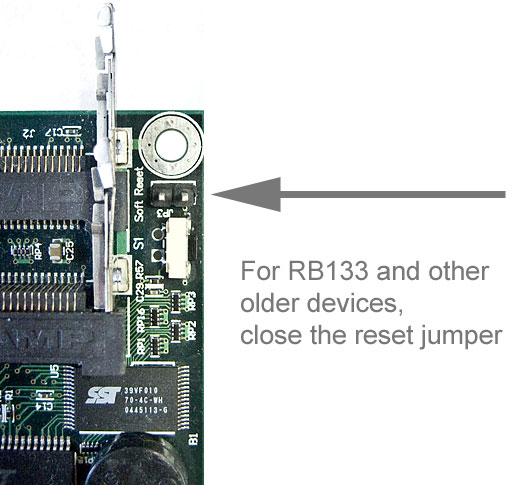
Note: Don’t forget to remove the jumper after the configuration has been reset, or it will be reset every time you reboot.
Introduction
RouterOS password can only be reset by reinstalling the router OS or using the reset button (or jumper hole) in case the hardware is RouterBOARD. For X86(CHR) devices, an only complete reinstall will clear the password, along with other configurations. For RouterBOARD devices, several methods exist, depending on our model.
Reset From RouterOS
If you still have access to your router and want to recover its default configuration, then you can:
- Run the command «/system reset-configuration» from a command-line interface;
- Do it from the System -> Reset Configuration menu in the graphical user interface;
Using Reset Button
RouterBOARD devices are fitted with a reset button which has several functions:
- Loading the backup RouterBOOT loader
Hold this button before applying power, release after three seconds since powering, to load backup boot loader. This might be necessary if the device is not operating because of a failed RouterBOOT upgrade. When you have started the device with the backup loader, you can either set RouterOS to force backup loader in the RouterBOARD settings or have a chance to reinstall the failed RouterBOOT from a «.fwf» file (total 3 seconds)
- Resetting the RouterOS configuration
Hold this button until LED light starts flashing, release the button to reset RouterOS configuration to default.
- Enabling CAPs mode
To connect this device to a wireless network managed by CAPsMAN, keep holding the button for 5 more seconds, LED turns solid, release now to turn on CAPs mode. It is also possible to enable CAPs mode via the command line, to do so run the command «/system reset-configuration caps-mode=yes» ;
- Starting the RouterBOARD in Netinstall mode
Or keep holding the button for 5 more seconds until LED turns off, then release it to make the RouterBOARD look for Netinstall servers. You can also simply keep the button pressed until the device shows up in the Netinstall program on Windows.
You can also do the previous three functions without loading the backup loader, simply push the button immediately after you apply power. You might need the assistance of another person to push the button and also plug the power supply at the same time!
How to reset configuration
1) Unplug the device from power;
2) Press and hold the button right after applying power;
Note: hold the button until LED will start flashing;
3) Release the button to clear configuration;
If you wait until LED stops flashing, and only then release the button — this will instead launch Netinstall mode, to reinstall RouterOS.
Jumper hole reset
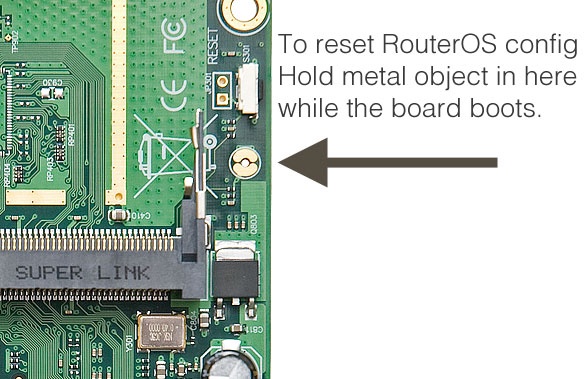
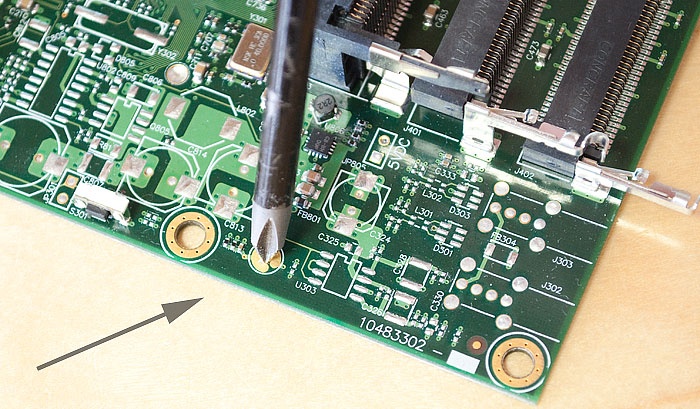
Older RouterBOARD models are also fitted with a reset jumper hole. Some devices might need an opening of the enclosure, RB750/RB951/RB751 have the jumper hole under one of the rubber feet of the enclosure.
Close the jumper with a metal screwdriver, and boot the board until the configuration is cleared:
Jumper reset for older models
The below image shows the location of the Reset Jumper on older RouterBOARDs like RB133C:
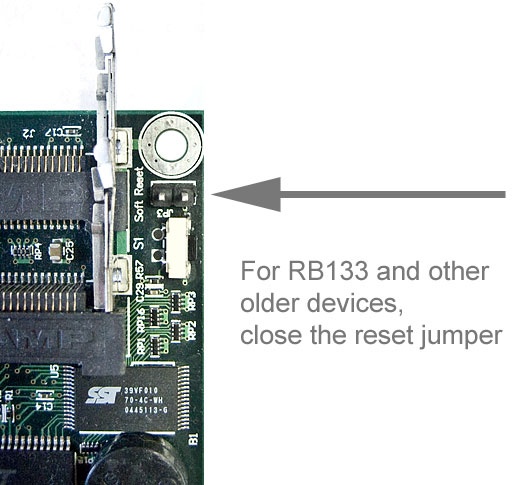
Don’t forget to remove the jumper after the configuration has been reset, or it will be reset every time you reboot!
MikroTik: Cброс настроек на заводские
Сегодня поговорим о том как сбросить роутер Микротик на заводские настройки, то есть сделать его таким как будто вы только что его купили. Данная инструкция подойдёт для всех моделей MikroTik так что сохраняйте ее в закладки чтоб не потерять. А мы начинаем.
Бывают ситуации, когда, настраивая удалённо девайс «выстрелил себе в ногу» и отключился от него, да ещё так, что не можешь подключиться к нему на прямую. Или нужен дефолтный конфиг девайса. Или в результате настройки, конечная конфигурация не устраивает. Здесь нам на помощь приходит чудо кнопка – Reset. Кнопка одна, а режимов много, но обо всем по порядку.
Сбрасываем настройки MikroTik
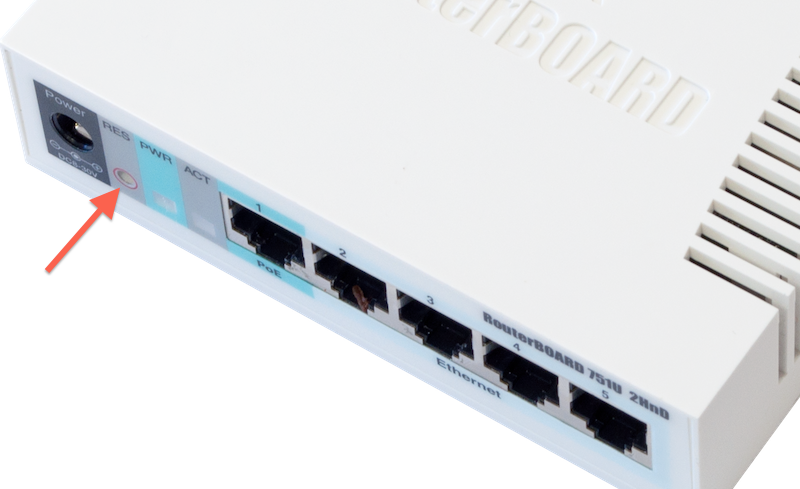
Если вы привыкли зажимать Reset на включённом роутере и это приводило к полному сбросу, то спешу вас огорчить, у Mikrotik сброс настроек так не работает. Для начала нужно найти заветную кнопку на самом девайсе. Месторасположение ее у всех разное, в моем случае, на RB951 она выглядит так.
Иногда доходит до того, что Reset находится на плате, и лезть придётся далеко. Но с тем же RB951 все продумано.
Если вы хотите углубить свои знания по работе с роутерами MikroTik, то наша команда рекомендует пройти курсы которые сделаны на основе MikroTik Certified Network Associate и расширены автором на основе опыта . Подробно читайте ниже.
Если заглянуть внутрь, то надпись нам это подтверждает о наличии резервной кнопки.
Как осветил ранее, простым ее зажатием на включённом роутере ничего не произойдёт. Алгоритм действий, следующий:
- Отключаете питание;
- Зажимаете кнопку reset (не резервной, а той, что на первом фото) и держите;
- Не отпуская ее, вставляете питание;
- Ждем примерно 10 сек и отпускаем (когда заморгает лампочка под ACT, жду пару секунд и отпускаю).
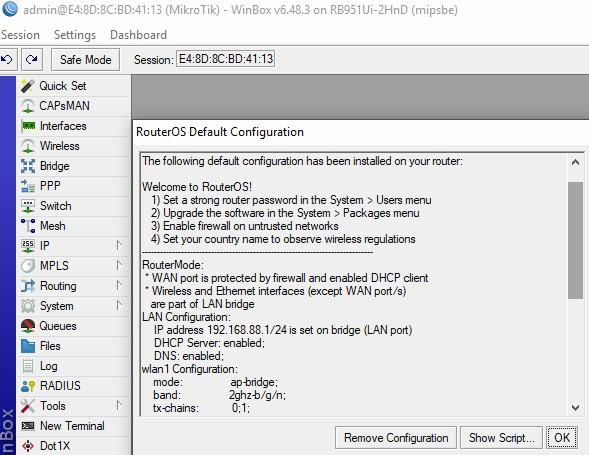
После данных действий роутер сбросится на default config. Об этом свидетельствует окно приветствия при первом подключении.
- Удалить данную конфигурацию – Remove Configuration;
- Просмотреть скрипт настройки – Show Script;
- Оставить без изменений – OK.
Виды стандартных конфигураций
Напомню, что у микротик есть 2 вида «стандартных» конфига:
- Default config – конфигурация которая идёт по умолчанию, с завода. Она позволяет в Quick Set быстро настроить девайс. Проще говоря преднастроенный WiFi, Firewall, NAT, FastTrack, Interface List и так далее. Т.е. производитель сделал так, чтобы вам осталось настроить доступ в интернет. Если внимательно прочитать окно приветствия, то можно увидеть, что настроено.
- Blank config – абсолютно чистый конфиг, без преднастроек. Считайте, что взяли Mikrotik и завайпили его.
Режимы кнопки RESET
Прошу заметить, что у разных девайсов, пункт 4 может отличаться. Чтобы это понять, предлагаю углубиться в режимы, в которые вы попадаете, в зависимости от времени зажатия кнопки:
- Зажатие в 3 сек – загрузка резервного загрузчика Routerboard. Бывают ситуации, когда загрузчик слетел (RouterBOOT) и нужно загрузиться чтобы это пофиксить.
- Зажатие 5 сек – продолжаем жать ещё 5 сек пока светодиодный индикатор не начнёт моргать. Отпускаем кнопку и на выходе получаем дефолтную конфигурацию.
- Держим ещё 5 сек – попадаем в режим CAPsMAN Client. Если вы не хотите настраивать его в RouterOS, то вам сюда. Отпускаем кнопку, как только загорится индикатор.
- Продолжаем жать ещё 5 сек – тут мы попадаем в последний режим – NetInstall.Отпускаем, когда лампочка перестанет гореть.
Сброс через Winbox
Выше я описал ситуации, когда программный сброс невозможен. Но такие случаи довольно редки. В основном можно обойтись сбросом через WEB или Winbox интерфейс, откроем ее и перейдем в System – Reset Configuration.
- Keep User Configuration – если мы хотим сохранить пользовательскую конфигурацию (пользователи, пароли и ssh ключи);
- CAPS Mode – после перезагрузки сразу переводит Mikrotik в данный режим;
- No Default Configuration – не применять конфиг по умолчанию (default config). На выходе получаем чистый девайс;
- Do Not Backup – резервная копия не создастся если установить галочку;
- Run After Reset – указываем rsc файл, который должен лежать в директории flash (если будет лежать в корне, то после ребута файл удалиться, корень – это RAM), и он запустится после ребута.
Если вы установили скрипт загрузки одновременно с No Default Configuration, то последний параметр будет проигнорирован.
Важный момент. Если в процессе заливки RouterOS через NetInstall вы указали начальный конфиг, то он будет применяться всякий раз, когда вы будите сбрасывать девайс. Чтобы этого не произошло, ставим галку No Default Configuration.
Сброс через консоль
Ну и напоследок, все вышеперечисленные графические способы можно реализовать в терминале.
На этом все, надеюсь тема сброса настроек на роутере микротик и принципа работы кнопки RESET стала более понятней.
89 вопросов по настройке MikroTik
Вы хорошо разбираетесь в Микротиках? Или впервые недавно столкнулись с этим оборудованием и не знаете, с какой стороны к нему подступиться? В обоих случаях вы найдете для себя полезную информацию в курсе «Настройка оборудования MikroTik». 162 видеоурока, большая лабораторная работа и 89 вопросов, на каждый из которых вы будете знать ответ. Подробности и доступ к началу курса бесплатно тут.
