- Basic System Recovery
- Common Problems
- Unable to Boot into CentOS
- Hardware and Software Problems
- Resetting the Root Password
- Anaconda Rescue Mode
- Reinstalling the Boot Loader
- Using RPM to Add, Remove, or Replace a Driver
- Сброс пароля root в различных системах UNIX
- Astra Linux / Ubuntu
- Rocky Linux / CentOS 7 / CentOS 8
- FreeBSD
- Как восстановить пароль от root в CentOS 7
- Процесс восстановления
- How to Reset Forgotten Root Password in CentOS 8
- Reset Forgotten root Password in CentOS 8
Basic System Recovery
When things go wrong, there are ways to fix problems. However, these methods require that you understand the system well. This chapter contains information on common problems you might face and it also describes installation program rescue mode, which can be used to fix these problems.
Common Problems
You might need to boot into installation program rescue mode for any of the following reasons:
- You are unable to boot into CentOS normally.
- You are having hardware or software problems, and you want to recover data from your system’s hard drive.
- You forgot the root password.
Unable to Boot into CentOS
This problem is often caused by the installation of another operating system after you have installed CentOS. Some other operating systems assume that you have no other operating system(s) on your computer. They overwrite the Master Boot Record (MBR) that originally contained the GRUB2 boot loader. If the boot loader is overwritten in this manner, you cannot boot CentOS unless you can boot into installation program rescue mode and reconfigure the boot loader.
Another common problem occurs when using a partitioning tool to resize a partition or create a new partition from free space after installation, and it changes the order of your partitions. If the partition number of your / partition changes, the boot loader might not be able to find it to mount the partition. To fix this problem, you will need to reinstall the boot loader. See Reinstalling the Boot Loader for instructions on how to do this.
Hardware and Software Problems
This category includes a wide variety of different situations. Two examples include failing hard drives and specifying an invalid root device or kernel in the boot loader configuration file. If either of these occur, you might not be able to reboot into CentOS. However, if you boot into installation program rescue mode, you might be able to resolve the problem or at least get copies of your most important files.
Resetting the Root Password
Anaconda Rescue Mode
The Anaconda installation program’s rescue mode is a minimal Linux environment that can be booted from the CentOS 7 DVD or other boot media. It contains command-line utilities for repairing a wide variety of issues. This rescue mode can be accessed from the Troubleshooting submenu of the boot menu. In this mode, you can mount file systems as read-only or even to not mount them at all, blacklist or add a driver provided on a driver disc, install or upgrade system packages, or manage partitions.
Anaconda rescue mode is different from rescue mode (an equivalent to single-user mode) and emergency mode, which are provided as parts of the systemd system and service manager. For more information about these modes, see Red Hat Enterprise Linux 7 System Administrator’s Guide.
To boot into Anaconda rescue mode, you must be able to boot the system using one CentOS boot media, such as a minimal boot disc or USB drive, or a full installation DVD.
For detailed information about booting the system using media provided by CentOS, see the appropriate chapters:
Advanced storage, such as iSCSI or zFCP devices, must be configured using dracut boot options such as rd.zfcp= or root=iscsi:options . It is not possible to configure these storage devices interactively after booting into rescue mode.
For information about dracut boot options, see the dracut.cmdline(7) man page.
- Boot the system from either minimal boot media, or a full installation DVD or USB drive, and wait for the boot menu to appear.
- From the boot menu, either select the Rescue a CentOS system option from the Troubleshooting submenu, or append the inst.rescue option to the boot command line. To enter the boot command line, press the Tab key on BIOS-based systems or the e key on the UEFI-based systems.
- If your system requires a third-party driver provided on a driver disc to boot, append the inst.dd=driver_name to the boot command line:
inst.rescue inst.dd=driver_name
For more information on using a driver disc at boot time, see Manual Driver Update (x86) for AMD64 and Intel 64 systems or Manual Driver Update (ppc) for IBM Power Systems servers.
inst.rescue modprobe.blacklist=driver_name
The rescue environment will now attempt to find your Linux installation and mount it under the /mnt/sysimage/ directory. You can then make any changes required to your system. If you want to proceed with this step choose 'Continue'. You can also choose to mount your file systems read-only instead of read-write by choosing 'Read-only'. If for some reason this process fails you can choose 'Skip' and this step will be skipped and you will go directly to a command line. If you select Continue, it attempts to mount your file system under the directory /mnt/sysimage/ . If it fails to mount a partition, you will be notified. If you select Read-Only, it attempts to mount your file system under the directory /mnt/sysimage/ , but in read-only mode. If you select Skip, your file system is not mounted. Choose Skip if you think your file system is corrupted.
Even if your file system is mounted, the default root partition while in Anaconda rescue mode is a temporary root partition, not the root partition of the file system used during normal user mode ( multi-user.target or graphical.target ). If you selected to mount your file system and it mounted successfully, you can change the root partition of the Anaconda rescue mode environment to the root partition of your file system by executing the following command:
This is useful if you need to run commands, such as rpm , that require your root partition to be mounted as / . To exit the chroot environment, type exit to return to the prompt.
If you selected Skip, you can still try to mount a partition or LVM2 logical volume manually inside Anaconda rescue mode by creating a directory, such as /directory/ , and typing the following command:
sh-4.2# mount -t xfs /dev/mapper/VolGroup00-LogVol02 /directoryIn the above command, /directory/ is a directory that you have created and /dev/mapper/VolGroup00-LogVol02 is the LVM2 logical volume you want to mount. If the partition is a different type than XFS, replace the xfs string with the correct type (such as ext4 ).
If you do not know the names of all physical partitions, use the following command to list them:
If you do not know the names of all LVM2 physical volumes, volume groups, or logical volumes, use the pvdisplay , vgdisplay or lvdisplay commands, respectively.
From the prompt, you can run many useful commands, such as:
Reinstalling the Boot Loader
In some cases, the GRUB2 boot loader can mistakenly be deleted, corrupted, or replaced by other operating systems. The following steps detail the process on how GRUB is reinstalled on the master boot record:
- Follow instructions in Booting into Anaconda Rescue Mode to boot into Anaconda rescue mode. Ensure that you mount the installed system’s / (root) partition in read-write mode.
- Change the root partition:
sh-4.2# /sbin/grub2-install install_deviceUsing RPM to Add, Remove, or Replace a Driver
Missing or malfunctioning drivers can cause problems when booting the system. Anaconda rescue mode provides an environment in which you can add, remove, or replace a driver even when the system fails to boot. Wherever possible, we recommend that you use the RPM package manager to remove malfunctioning drivers or to add updated or missing drivers.
When you install a driver from a driver disc, the driver disc updates all initramfs images on the system to use this driver. If a problem with a driver prevents a system from booting, you cannot rely on booting the system from another initramfs image.
- Boot the system into Anaconda rescue mode. Follow the instructions in Booting into Anaconda Rescue Mode. Ensure that you mount the installed system in read-write mode.
- Change the root directory to /mnt/sysimage/ :
sh-4.2# rpm -e xorg-x11-drv-wacomСброс пароля root в различных системах UNIX

Обновлено: 28.02.2023 Опубликовано: 18.12.2022
Для выполнения нижеописанных действий у нас должен быть либо физический доступ к компьютеру, либо возможность подключения к KVM-консоли/IPMI.
Astra Linux / Ubuntu
При старте системы дожидаемся окна выбора варианта загрузки (GNU GRUB):

Если данное окно не появляется и начинает загружаться система, после первого загрузочного окна нажимаем Shift.
Остаемся на пункте Ubuntu и нажимаем клавишу e — откроется редактор со сценарием загрузки. Находим в нем строку, которая начинается с:

Удаляем ro и в конце строки допишем:

Можно запускать загрузку системы. Нажимаем F10 или Ctrl + X. Мы должны увидеть командную строку с возможностью вводит команды.
И дважды пароль, который хотим использовать (при вводе не будут отображаться символы):
New Password:
Retype New Password:
Запускаем системы в обычном режиме:
Rocky Linux / CentOS 7 / CentOS 8
Во время загрузки системы дожидаемся окна с возможностью выбора варианта загрузки:

Наводим на нужную версию ядра, если их несколько (как правило, нужная нам находится в самом верху) и нажимаем клавишу e.
Мы должны увидеть редактор для правки сценария загрузки. Находим строку, которая начинается с:

Редактируем в данной строке ro на rw и в конец дописываем rd.break enforcing=0:

Нажимаем Ctrl + X — система загрузится в режиме восстановления.
Зайдем в оболочку с другим корнем:
Меняем пароль для пользователя root:
Система попросит дважды ввести пароль:
New Password:
Retype New Password:
После выходим из окружения chroot:
И грузим нашу систему в обычном режиме:
Входим в систему с использованием нового пароля.
FreeBSD
Перезагружаем компьютер до окна выбора вариантов загрузки:

* данное окно в разных версиях FreeBSD может различаться.
Нам нужно выбрать Single User Mode. В моем примере я нажимаю 2 .
Система загрузится в однопользовательском режиме. В нем у нас будет смонтированный корневой раздел в режиме только для чтения. Вводим команду, чтобы это исправить:
Вводим команду для смены пароля:
После этого дважды пароль (при вводе не будут отображаться символы):
New Password:
Retype New Password:
Выходим из однопользовательского режима:
Система загрузится в обычном режиме. Можно авторизовываться с новым паролем.
Как восстановить пароль от root в CentOS 7
![]()
Времени на формальности нет! Раз ты читаешь эту статью, значит твой пароль на root утерян/забыт. Не теряя ни минуты приступаем к его восстановлению в операционной системе CentOS 7!
Процесс восстановления
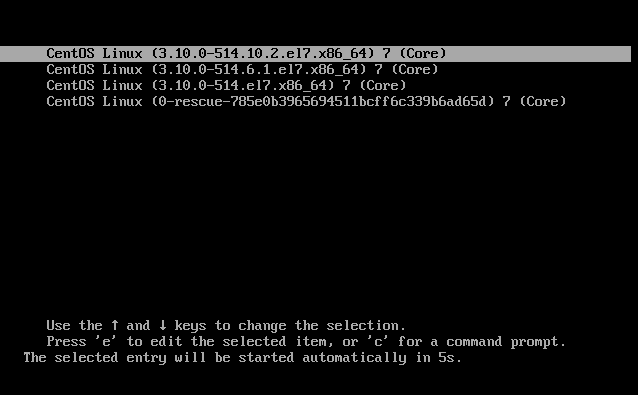
Итак, добежав до серверной комнаты и подключив монитор с мышкой или подключившись к KVM виртуальной машины приступаем сбросу пароля. Перегружаем сервер и в меню загрузки нажимаем «e», как показано ниже:
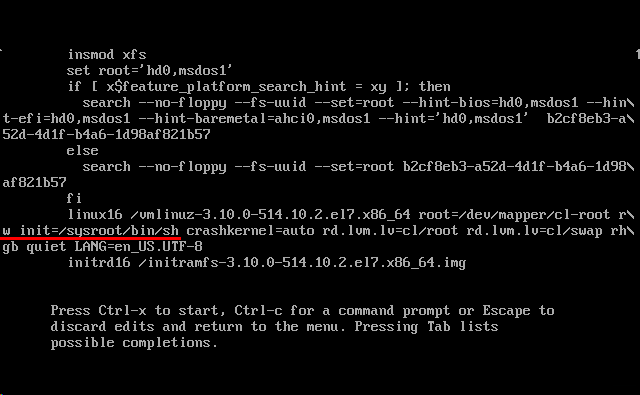
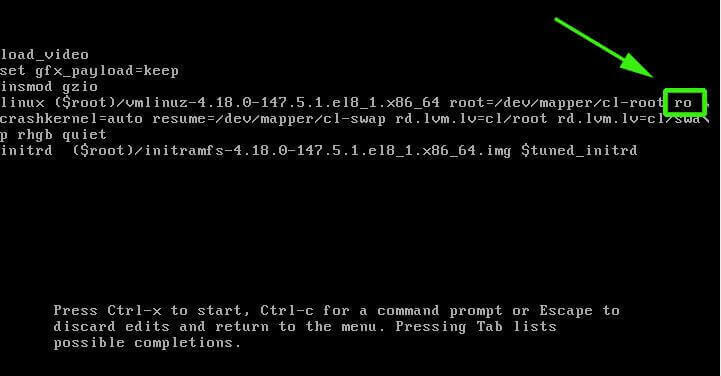
Листаем вниз стрелками на клавиатуре и находим обозначение ro, как указано на скриншоте ниже:

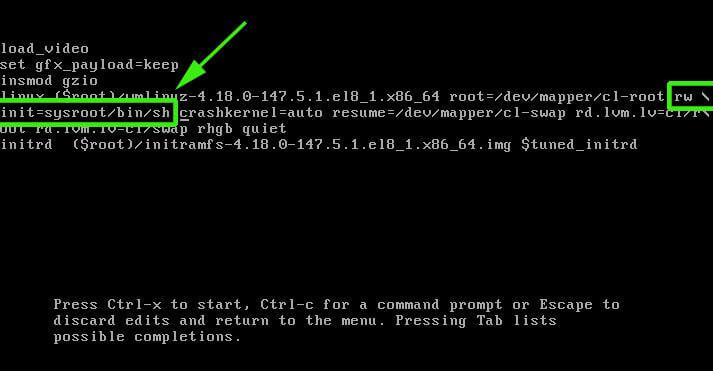
В ro заменяем o → w и добавляем init=/sysroot/bin/sh после rw . То есть вот так:
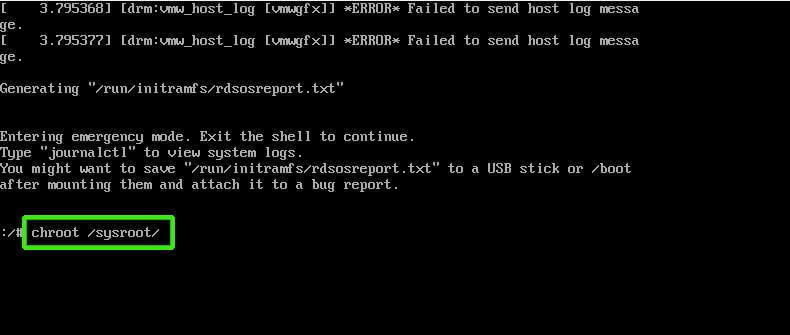
Теперь нажимаем Ctrl + X и входим в аварийный (emergency) режим. Запускаем следующую команду:
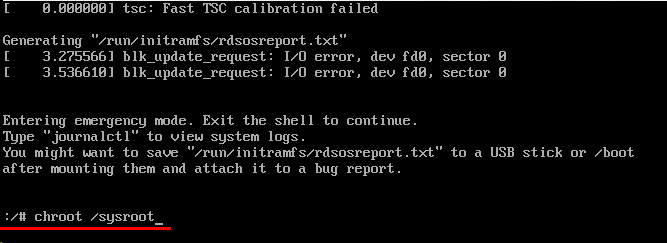
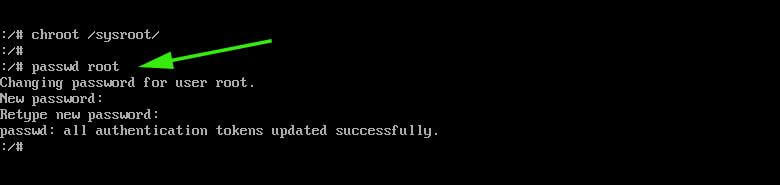
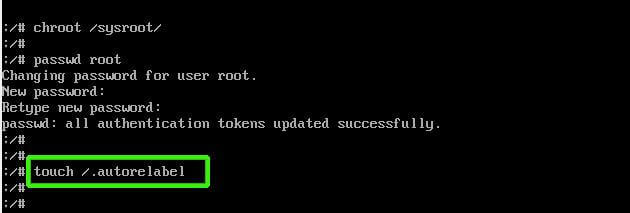
Меняем пароль от root. Для этого, даем в консоль команду passwd root . После этого вводим дважды новый пароль:

После этого, обновляем параметры SELinux командой touch /.autorelabel :

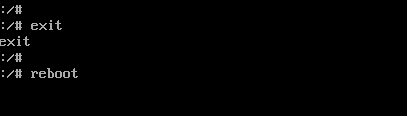
Готово! Дайте в консоль команду reboot и загрузитесь в штатном режиме. Пароль от root будем изменен.
How to Reset Forgotten Root Password in CentOS 8
It’s not uncommon for users to forget their root password. This happens especially if you haven’t logged in as the root user for long periods of time. In this brief guide, we will walk through the steps of resetting a forgotten root password in CentOS 8 Linux.
Reset Forgotten root Password in CentOS 8
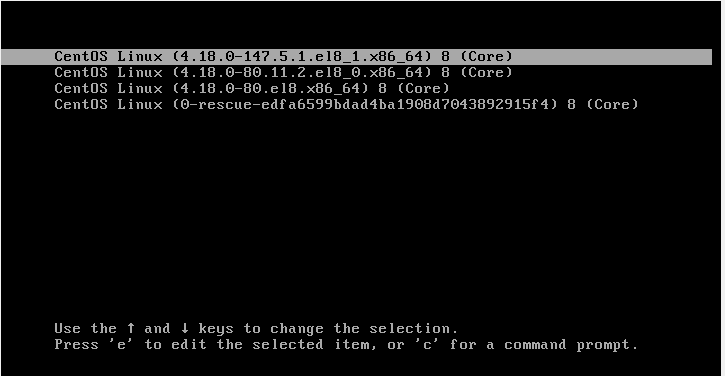
First, reboot or power on your CentOS 8 system. Select the kernel you want to boot into. Next, press ‘e’ on the keyboard to interrupt the boot process and make changes.
On the next screen, locate the ro (read-only) kernel parameter as highlighted below.
Replace the kernel parameter ro with rw and append an extra kernel parameter init=/sysroot/bin/sh . In a nutshell, simply replace the kernel parameter ro with rw init=/sysroot/bin/sh .
Once done with making the changes, hit Ctrl + X combination on the keyboard to enter single-user mode.
Next, run the command below to mount the root file system in read and write mode.
You can now change the root password by executing the command:
Provide a new root password and confirm it. For best practice select a password with a combination of uppercase, lowercase, numerical and special characters to boost password strength.
Next, run the command below to enable SELinux relabelling.
To apply the changes, exit and reboot the CentOS 8 system.
Upon reboot, the SELinux relabelling process will commence. Give it about 3 minutes.
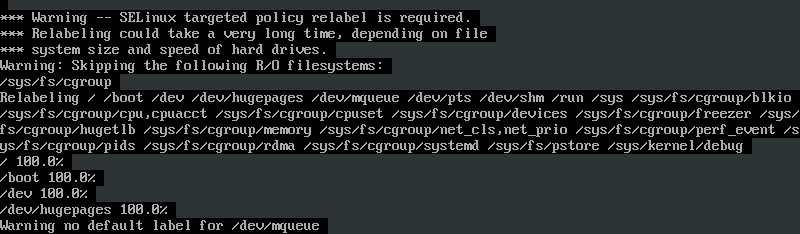
When the relabelling process is done, the system will reboot and thereafter, you will be presented with a logon screen upon which you can now log in as the root user with the new password that you just set.
We hope this tutorial will be beneficial to you. Feel free to weigh in your feedback if you are stuck.