- How do I clear the DNS cache?
- 17 Answers 17
- Ubuntu 17.04 and higher (18.04)
- Ubuntu 22.04 and higher
- For 18.04 and higher
- For 11.10 and below
- 12.04
- By default, DNS is not cached in Ubuntu < 17.04 (but it might be cached in the network or application)
- Как очистить DNS-кэш локально в Windows, MacOS и Linux
- Как очистить кэш DNS в Windows
- Очистить кэш DNS на Mac
- Сброс DNS на MacOS Mojave (версия 10.14)
- Команды для очистки DNS-кэша в старых версиях macOS и Mac OS X
- Как очистить кэш DNS в Linux
- Очистить локальный DNS-кэш NCSD
- Очистить локальный DNS-кэш dnsmasq
- Очистить локальный DNS-кэш BIND
How do I clear the DNS cache?
I just updated the DNS record ( ns1 , ns2 , ns3.myhostingcompany.com ) for a site I’ve got hosted, but I still get the domain registrar parking page. I’d like to see if the problem is Ubuntu’s cached DNS records. Is there a way to clear Ubuntu’s DNS cache? (if such a thing exists?)
Also, check /etc/hosts . I’ve just been sure that the old IP address of my domain was being cached, but only strace ping example.com revealed that I forgot to remove the /etc/hosts record which I added a time ago because of lacking patience for DNS propagation.
a lot of these answers suggest caching is disabled by default, but they also refer older versions. It certainly appears to be on by default in my machine (18.04) and various answers below do show you how to flush it, just scroll down
17 Answers 17
Ubuntu 17.04 and higher (18.04)
From Ubuntu 17.04 and onwards, systemd-resolve is used for DNS. You can flush systemd’s caches like so:
sudo systemd-resolve --flush-caches Ubuntu 22.04 and higher
sudo resolvectl flush-caches This didn’t work for me on 16.04 LTS — but it was useful to see yet another way it might have been cacheing: sudo systemd-resolve —statistics
Any idea why it displays this error on Ubuntu 19.10? Failed to flush caches: Unit dbus-org.freedesktop.resolve1.service not found.
For ubuntu 22.04, we need to use: sudo resolvectl flush-caches . See answer from @codezalot in systemd-resolve-command-not-found-in-ubuntu-22-04-desktop.
For 18.04 and higher
For 11.10 and below
Ubuntu doesn’t cache dns records by default so unless you’ve installed a dns cache there isn’t anything to clear.
DNS records are likely cached by your provider’s DNS servers so if you want to check if the DNS changes you made were successful you can interrogate a DNS server from your domain hosting service with dig:
dig -t a ns1.myhostingcompany.com @domain_registrar_dns_server
It you want Ubuntu to start caching dns I recommend installing pdnsd together with resolvconf . nscd is buggy and not advisable.
Mike Shultz’s answer definitely doesn’t work on Ubuntu 20. You get this error message: sd_bus_open_system: No such file or directory
So, For 10 years later. If I disabled systemd-resolve for ubuntu and debian. Then there is no DNS cache, Each nslookup will request DNS server?
12.04
Ubuntu 12.04 uses dnsmasq which is built into network-manager , but it doesn’t cache dns so there is no need to flush it. Here is a sample line from my syslog to prove that point:
dnsmasq[2980]: started, version 2.59 cache disabled There is also no need for any configuration of dnsmasq . If you are running with stock settings it won’t be caching dns, as for it to do so you have to explicitly set it up as this Ubuntu article describes.
If you wanted to refresh your settings you could disable and then enable networking or run
sudo service network-manager restart This restarts dnsmasq because it is built in to network-manager ; check your syslog for the evidence for this.
If you are using a wired connection with dhcp network manager will be taking the settings direct from your router and your connection will be automatically established when you login to Ubuntu. You could check that the settings are correct in your router if you can access it via the web interface, and perhaps reboot it if necessary. If it is a general problem with dns, you could try using Google dns instead of your isp dns, and more information on that is detailed here.
Note that Ubuntu uses systemd-resolve from 17.04 and onwards so this answer doesn’t apply anymore to recent Ubuntu versions. See «flush DNS cache in Ubuntu 17.04 and higher (18.04)»
By default, DNS is not cached in Ubuntu < 17.04 (but it might be cached in the network or application)
To confirm one way or the other whether dnsmasq is caching, run ps ax | grep dnsmasq and look at the running command. Here’s a breakdown of my default 13.10 machine:
/usr/sbin/dnsmasq \ --no-resolv \ --keep-in-foreground \ --no-hosts \ --bind-interfaces \ --pid-file=/var/run/NetworkManager/dnsmasq.pid \ --listen-address=127.0.1.1 \ --conf-file=/var/run/NetworkManager/dnsmasq.conf \ --cache-size=0 \ --proxy-dnssec \ --enable-dbus=org.freedesktop.NetworkManager.dnsmasq \ --conf-dir=/etc/NetworkManager/dnsmasq.d
/etc/NetworkManager/dnsmasq.d is empty by default. So there aren’t any overrides coming in there and just to check —cache-size=0 means what we think it means (instead of an unlimited cache), man dnsmasq shows:
-c, --cache-size= Set the size of dnsmasq's cache. The default is 150 names. Setting the cache size to zero disables caching. So while dnsmasq can cache DNS, it isn’t caching out the box. You can check your machine and various configuration directories to check you’re on the same page.
If you are seeing cache issues, this is likely happening in one of a few places:
- Upstream from your computer. Some routers cache. Many corporate networks will cache DNS. Many ISP-run DNS servers and will use their own caches. The only way to guarantee against a network cache is to use a cache you can manually refresh. This is why I like OpenDNS.
- In the client application (notably browsers). Applications can do all sorts of their own caching that Ubuntu has no effect on. How Firefox caches DNS. How to clear Chrome’s DNS cache. Other browsers (and applications) might have their own mechanisms.
- I’m scraping the barrel here but perhaps you’ve installed a non-standard DNS server in Ubuntu instead of turning caching on in dnsmasq . There are many: nscd , DJBDNS dnscache (aka TinyDNS), pdns , pdnsd , Bind9 (and its variants), and more I can’t even remember. These will probably be evidenced in /etc/resolv.conf (with config in /etc/resolvconf/` to autogen that file). The following shows an locally intercepted DNS query:
$ nslookup askubuntu.com Server: 127.0.1.1 Address: 127.0.1.1#53 Non-authoritative answer: Name: askubuntu.com Address: 198.252.206.24 If you’re not hitting 8.8.8.8 (or whatever you expect your DNS server to be), check what you are hitting instead. In my case I can see this is just dnsmasq set up to mirror DNS queries back for LXC, but in your case it might be doing bad cachey things. If you have done of the listed caches, the process for clearing each varies:
sudo /etc/init.d/nscd reload # nscd sudo /etc/init.d/named restart # bind9 Как очистить DNS-кэш локально в Windows, MacOS и Linux
![]()
Кэш DNS может быть поврежден по ряду причин, включая сетевые атаки или вирусы. Когда это происходит, сопоставление IP-адресов становится поврежденным для некоторых популярных веб-сайтов.
Например, вместо того, чтобы заходить на сайт www.google.com, ваш браузер может перенаправить вас на IP-адрес вредоносного веб-сайта, который злоумышленник вставил в записи DNS вашего компьютера. Или вы можете получить большое количество ошибок 404.
Очистка кеша DNS удаляет всю сохраненную информацию поиска DNS. Затем ваш компьютер получает обновленные данные с DNS-серверов при следующей отправке запроса на поиск.

Как очистить кэш DNS в Windows
Очистка кеша DNS — это простой и быстрый процесс. Процедура одинакова для почти всех систем Windows. Для примера ниже мы будем использовать Windows 10.
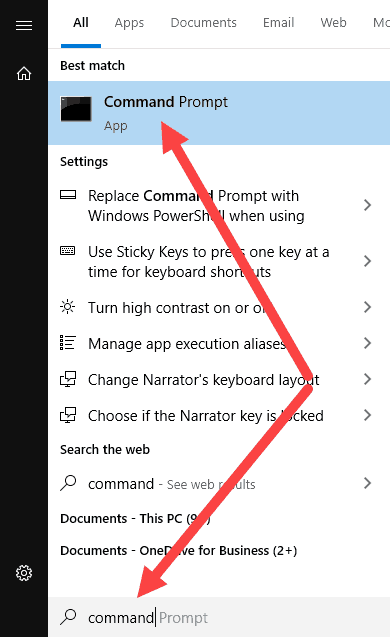
Чтобы очистить DNS на вашем компьютере с Windows:
- Загрузите командную строку от имени администратора. Откройте меню «Пуск» и начните вводить «командная строка» или «cmd», пока не увидите ее в результатах.

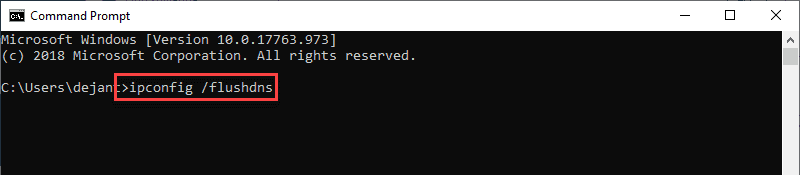
- Введите ipconfig/flushdns , когда командная строка загрузится, и нажмите Enter на клавиатуре.
- Процесс должен занять всего несколько секунд. Вы должны увидеть подтверждающее сообщение DNS Resolver Cache, когда это будет сделано:
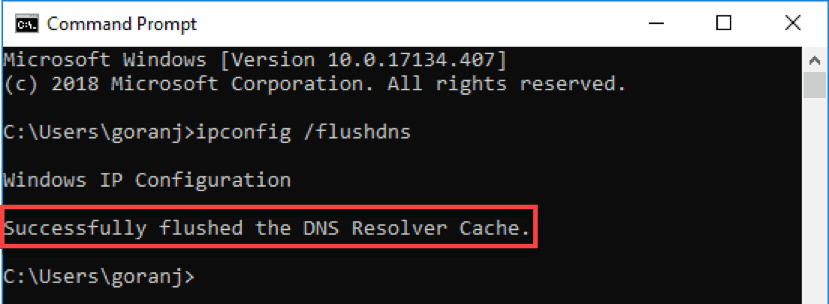
База данных кэша DNS на вашем компьютере теперь очищена. Вы должны получить правильное и обновленное сопоставление IP-адресов с DNS-серверов в следующий раз, когда ваш компьютер отправит DNS-запрос.
Очистить кэш DNS на Mac
Есть несколько разных команд для очистки кеша DNS в OS X и macOS в зависимости от используемой версии.
Поскольку процедура одинакова для всех версий, в этой статье подробно описано, как очистить DNS в macOS Mojave (10.14), а затем перечислены команды для других версий в таблице.
Сброс DNS на MacOS Mojave (версия 10.14)
Чтобы очистить кэш DNS на MacOS Mojave, используйте приложение Terminal:
- Запустите Terminal.app, используя ваш предпочтительный метод. Вы можете запустить приложение из Приложения ->Утилиты или нажать Ctrl + Space , чтобы запустить Spotlight и выполнить поиск терминала.
- Введите sudo killall -HUP mDNSResponder и нажмите Enter на клавиатуре.
- Введите пароль администратора для рассматриваемой учетной записи и нажмите Enter.

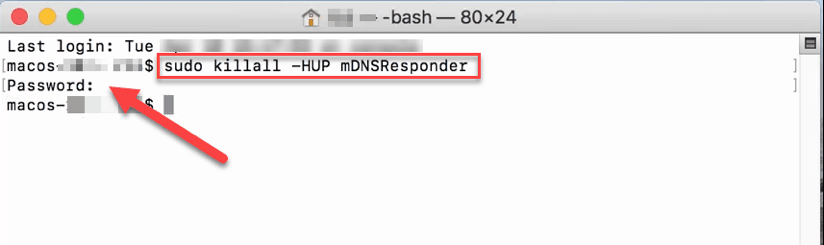
После окончания процесса не будет никаких оповещений
Команды для очистки DNS-кэша в старых версиях macOS и Mac OS X
В таблице ниже перечислены команды для очистки кэша DNS в большинстве версий MacOS и Mac OS X. Вы можете скопировать и вставить их прямо из таблицы в свой терминал.
| Mac OS X или macOS версия | Команда терминала |
|---|---|
| Mojave (version 10.14) High Sierra (version 10.13) Sierra (version 10.12) Mountain Lion (version 10.8) Lion (version 10.7) | sudo killall -HUP mDNSResponde |
| El Capitan (version 10.11) Mavericks (version 10.9) | sudo dscacheutil -flushcache sudo killall -HUP mDNSResponder |
| Yosemite (version 10.10) | sudo discoveryutil mdnsflushcache sudo discoveryutil udnsflushcaches |
| Snow Leopard (version 10.6) Leopard (version 10.5) | sudo dscacheutil -flushcache |
| Tiger (version 10.4) | lookupd -flushcache |
Как очистить кэш DNS в Linux
Дистрибутивы Linux немного отличаются от компьютеров с Windows и Mac. Каждый дистрибутив Linux может использовать свою службу DNS. Некоторые дистрибутивы, такие как Ubuntu, вообще не имеют службы DNS по умолчанию.
Это зависит от того, какая служба используется в вашем дистрибутиве и включена ли она по умолчанию. Некоторые из них — NCSD (Name Service Caching Daemon), dnsmasq и BIND (Berkely Internet Name Domain).
Для каждого дистрибутива вам нужно запустить окно терминала. Нажмите Ctrl + Alt + T на клавиатуре и используйте соответствующую команду, чтобы очистить кэш DNS для службы, работающей в вашей системе Linux.
Очистить локальный DNS-кэш NCSD
Используйте эту команду для очистки DNS-кэша NCSD на вашем Linux-компьютере:
sudo /etc/init.d/nscd restart
Введите свой пароль, если это необходимо. Процесс останавливается, а затем запускает службу NCSD в течение нескольких секунд.
Очистить локальный DNS-кэш dnsmasq
Используйте эту команду для очистки DNS-кэша dnsmasq на вашем Linux-компьютере:
sudo /etc/init.d/dnsmasq restart
Введите пароль еще раз, если терминал попросит вас. Вы увидите ответ, когда служба останавится и запустится снова.
Очистить локальный DNS-кэш BIND
Если вы используете BIND для службы DNS, есть несколько команд, которые вы можете использовать для очистки его кеша DNS. Вам может потребоваться ввести пароль для завершения процесса.
sudo /etc/init.d/named restart sudo rndc restart sudo rndc exec
Примечание: BIND также позволяет указывать конкретные домены при выполнении сброса DNS. Просто добавьте flushname и имя домена в команду sudo rndc. Например:sudo rndc flushname wiki.merionet.ru