- How do I change the screen resolution using Ubuntu command line?
- 4 Answers 4
- Как вернуть прежнее разрешение экрана через терминал и попасть в графическое окружение другого пользователя?
- Iskatel_znaniy
- Как изменить разрешение экрана через терминал Ubuntu
- Изменение разрешения экрана через командную строку
- Похожие записи:
- How to reset monitor settings to default through terminal?
- 5 Answers 5
How do I change the screen resolution using Ubuntu command line?
I installed Ubuntu and the resolution of the desktop is so big that it only shows about 50% of the screen, but is shows up normal while using command line. What should I type in the command line to change the desktop screen resolution?
What do you mean by «while using command line»? That is, when and how to you get to the command line?
4 Answers 4
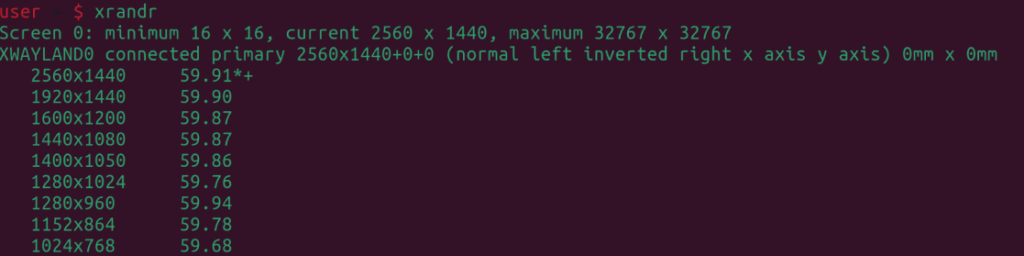
Enumerate the names of all your video outputs, and the possible resolutions for those currently connected to a monitor:
Choose the name of the output you wish to change the resolution of, and:
xrandr --output --mode 1024x768 Note: If running from a text terminal, that is not running in gfx environment, you’ll have to add a -d :0 parameter, i.e:
xrandr -d :0 -q xrandr -d :0 --output --mode 1024x768 xrandr —output `xrandr | grep » connected»|cut -f1 -d» «` —mode 1920×1080 if you want a one-liner that auto-detects output.
Create a new resolution using cvt
$> cvt 1600 900 75 1600x900 74.89 Hz (CVT 1.44M9) hsync: 70.55 kHz; pclk: 151.25 MHz Modeline "1600x900_75.00" 151.25 1600 1704 1872 2144 900 903 908 942 -hsync +vsync Add a new mode to the existing list (newmode is the name and remaining portion is)
$ sudo xrandr --newmode "1600x900_75.00" 151.25 1600 1704 1872 2144 900 903 908 942 -hsync +vsync $ xrandr | grep -e " connected [^(]" | sed -e "s/\([A-Z0-9]\+\) connected.*/\1/" Virtual1 Add new display mode where is the output from the previous command
$ sudo xrandr --addmode 1600x900_75.00 This will add the new resolution to your existing list of supported resolutions. You can then choose the right option from the «display settings» or the following command
$ xrandr --output Virtual1 --mode "1600x900_75.00" To make this change permanent,
$ cat> ~/.xprofile sudo xrandr --newmode "1600x900_75.00" 151.25 1600 1704 1872 2144 900 903 908 942 -hsync +vsync sudo xrandr --addmode Virtual1 1600x900_75.00 xrandr --output Virtual1 --mode "1600x900_75.00" The command to change the resolution works, however the permanent part doesn work for me. The .xprofile has the command but the resolution is not set automatically after the reboot.
The answers here don’t seem to help my situation. The above does not change the size of my cursor or how fuzzy my screen is. Is there a hardware check that someone can suggest?
upvoted for the command for finding the current display. The top answer just says to do xrandr -q , the output of which can be difficult to parse visually when your screen’s resolution is stuck at the wrong size.
I know it is an old question but, for me, the simple stuff was to do:
$ xrandr -q SZ: Pixels Physical Refresh 0 1024 x 768 ( 271mm x 201mm ) 75 70 60 1 800 x 600 ( 271mm x 201mm ) 85 75 72 60 56 2 640 x 480 ( 271mm x 201mm ) 85 75 72 60 *3 832 x 624 ( 271mm x 201mm ) *74 4 720 x 400 ( 271mm x 201mm ) 85 5 640 x 400 ( 271mm x 201mm ) 85 6 640 x 350 ( 271mm x 201mm ) 85 Or something equivalent. The * marks the screen resolution currently used. To change it to one of the supported resolutions from the list above simply run the command:
and the resolution is changed.
Sometimes when there are a lot of refresh rates (the numbers to the right in the above sample results from xrandr -q ), you need to specify the refresh rate. In that case, you should run the command:
If you have multiple outputs on your board, or the device is not reacting, then you can extend the above line with output. The value for the output is still found with xrandr -q , in my case HDMI-0 . The command therefore becomes:
xrandr -s 800x600 -r 85 --output HDMI-0 Как вернуть прежнее разрешение экрана через терминал и попасть в графическое окружение другого пользователя?
Что то нечаянно нажал и экран принял такое состояние как будто не воткнут в системный блок. Перезагрузил компьютер, все нормально но каждый раз когда захожу в графический режим основного пользователя экран принимает такой вид. У меня такое было однажды когда пытался изменить разрешение экрана и пришлось переустанавливать систему. Теперь этого делать не хочу. Сижу сейчас под другим пользователем в этой системе которого в свое время создал. Как из под этого пользователя вернуть прежнее разрешение чтобы все работало нормально? И как можно кстати через консоль вернуть разрешение экрана?
Iskatel_znaniy
New member
Первое что смог сделать это под основным пользователем сделать консольный вход и добавить пользователя под которым могу входить в графическую систему в группу astra-console командой usermod -a -G astra-console имя пользователя. Теперь могу под этим пользователем использовать терминал. Ну а дальше получать права основного пользователя командой su имя пользователя (потом ввод пароля). Пишу все это как инструкцию для начинающих которые могут тоже попасть в такое же положение (у опытных прошу прощения). Но вопрос остается в силе — как в терминале изменить разрешение экрана для другого пользователя? Кстати если вдруг пользователя другого не окажется то можно его создать командой adduser и под ним попробовать войти в систему. (не знаю правда можно ли будет войти под этим пользователем в графику если он не был создан ранее). Хотя можно конечно и попробовать в таких случаях воспользоваться и восстановлением системы https://entnet.ru/client/configuration/client-part/nastrojki-os/god2.html но мне проще так, тем более что все программы установленные основным пользователем есть и здесь. Кстати после того как добавил пользователя в astra-console открывается утилита «Запуск приложения» а это очень важно так как позволяет находить команды нужных приложений (например Панель Управления) и запускать ее с правами root из терминала командой fly-admin-center. И тогда в Панели Управления отображаются все элементы.
Как изменить разрешение экрана через терминал Ubuntu
Разрешение вашего монитора/экрана означает четкость содержимого (текста и изображений), которое вы можете просматривать на экране. Если экран установлен на более высокое разрешение, например 1366×768, содержимое, отображаемое на экране, будет более четким. Вы также можете заметить, что при высоком разрешении элементы на экране выглядят меньше; это происходит для того, чтобы на экране поместилось больше элементов. С другой стороны, низкое разрешение означает менее четкое изображение, при котором элементы выглядят крупнее и, соответственно, меньше. Если у вас монитор большего размера, он поддерживает более высокое разрешение. Ваша видеокарта также играет большую роль в способности вашей системы поддерживать большое разрешение экрана.
Эта статья поможет вам настроить разрешение экрана в системе Ubuntu. Мы будем использовать командную строку для изменения разрешения. Всегда есть способ сделать почти все наши вещи прямо в Терминале. Так почему же изменение разрешения экрана должно быть иным! Использование Терминала делает некоторые задачи более эффективными и даже быстрыми. Инструменты командной строки не используют слишком много ресурсов и поэтому являются отличной альтернативой широко используемым графическим приложениям, особенно если у вас устаревшее оборудование.
Изменение разрешения экрана через командную строку
Чтобы изменить разрешение экрана в системе Ubuntu, выполните следующие действия:
Откройте приложение Терминал либо с помощью сочетания клавиш Ctrl+Alt+T, либо через поиск приложений в пусковой установке следующим образом:
Утилита Xrandr (компонент приложения Xorg) представляет собой интерфейс командной строки для расширения RandR и может быть использована для динамической установки разрешения экрана без каких-либо специальных настроек в xorg.conf.
Мы будем использовать следующий флаг утилиты xrandr для настройки размера экрана:
Это устанавливает размер экрана, либо подбирая его по размеру, либо используя индекс в списке доступных размеров.
Это одна из двух команд, которые вы можете использовать:
Использование команды xrandr
xrandr —size [ШиринаXВысота]
Установка размера экрана с помощью команды xrandr
С помощью этого простого инструмента, который уже установлен в Ubuntu, вы можете настроить разрешение экрана прямо из командной строки. Настроить разрешение экрана через пользовательский интерфейс также возможно. Все, что вам нужно сделать, это использовать вкладку Devices>Displays в утилите Settings, чтобы вручную установить разрешение в соответствии с вашими требованиями.
Похожие записи:
How to reset monitor settings to default through terminal?
I have a tricky problem regarding multiple monitors on KDE (Kubuntu). I have a laptop which, at home, is connected to two monitors — VGA and HDMI. That works only when the built-in laptop display is disabled (at least I was told that). The problem is that now I took the laptop away and booted it up with no external monitors connected. The system remembers that the built-in display was disabled, so it disables it even though it is the only monitor connected. Obviously, that makes the laptop pretty much unusable. Switching to a terminal through Ctrl + Alt + F# works, I can login; even Guest works normally. The question is, how do I (re)set an account’s monitor settings through terminals, since I can’t use the GUI? Thanks
This helped when I could use the console on the second monitor, xrandr was able to set my settings. However, when i can only use the non-gui terminal, xrandr says it can’t open display, so it’s pretty useless.
I don’t know if there’s a relevant difference to KDE, but in standard ubuntu it works just fine for me (with the internal monitor switched off via the GUI, with the laptop lid closed and the laptop sitting comfortably in its docking station).
do you mean that I have to set the settings every time I use the laptop with and without external monitors? If so, that sucks. Anyway, I need to know how to do that through tty
5 Answers 5
The command xrandr -s 0 should reset your displays in terminal. More can be found at the following site or from man xrandr in terminal.
Welcome to Ask Ubuntu! While this answers the question, it would be preferable to include the essential parts of the answer here, and provide the link for reference.
Yes, this works. The other answers are just too bloated, complicated or not efficient. Also might be of some value to note that if you experience a black screen (and cannot see anything), you can open your terminal with shortcut keys and blindly type «xrandr -s 0». That’s what i did 🙂
Note that in two-monitor setups, this command may deactivate the second monitor, rather than setting both monitors to their default resolution.
On my system, the command disables both external monitors, but also resets their configuration to default — which fixes the VGA DCC detection that gets broken from time to time. After which I just need to re-enable the screens and reposition them using the Displays tool. Its not ideal but its is very workable and better than my previous solution, which was to suspend and wake the computer a few times until it resets the VGA port.
Whenever I put my Lubuntu laptop to sleep when it’s exclusively displaying on my TV and wake it up after having unplugged it, I end up with a black screen because the wrong resolution is assigned. So same problem as you, I need to set the resolution from the TTY1 virtual terminal I can reach with Ctrl-alt-F1, but xrandr doesn’t seem to work. I scoured pages of Google search results before coming upon the solution, so I thought I’d share.
The key thing is that xrandr apparently only works on the currently focused display. So you have to chain a sleep command before your xrandr command to give you time to switch back to the X server with Ctlr-alt-F7 so the command is executed there. Otherwise you get an error like xrandr: Configure crtc 0 failed .
To get the names of connected screens (and assuming your X server is running on :0 ):
To modify display settings:
Substitute LVDS1 by the output you want to modify, and —auto by whatever xrandr parameters you wanna use.
- Switch to the X server with Ctrl-alt-F7 before the sleep delay you set in the command above elapses.
There HAS to be a better way to do this. But it works.
Check out this comment for a possible improvement to my solution (not tested myself).