- 11 Cron Command Examples in Linux [Schedule Cron Jobs]
- Crontab in Linux
- 1. List Crontab Entries
- 2. Edit Crontab Entries
- 3. List Scheduled Cron Jobs of User
- 4. Remove Crontab Entry
- 5. Prompt Before Deleting Crontab
- 6. Allowed Special Characters (*, -, /, ?, #)
- 7. System-Wide Cron Schedule
- 8. Schedule a Job for a Specific Time
- 9. Special Strings for Common Schedule
- 10. Multiple Commands with Double ampersand(&&)
- 11. Disable Email Notifications.
- How to Schedule Tasks on Linux
- Using Cron Daemon to Schedule Tasks in Linux
- 1. Launching and Getting Started with Crontab
- 2. Adding New Tasks to the Crontab
- 3. Saving the File in Crontab
- 2. Using At Tool to Schedule Tasks in Linux
- 1. Getting the At Tool Installed
- 2. Enabling the Daemon
- 3. Defining the Interval to Schedule Tasks on Linux
- Some Other Examples of At Codes
11 Cron Command Examples in Linux [Schedule Cron Jobs]
In this article, we are going to review and see how we can schedule and run Linux tasks in the background automatically at regular intervals using the Crontab command.
Dealing with a frequent job manually is a daunting task for system administrators and such tasks can be scheduled and run automatically in the background without human intervention using cron daemon in Linux or Unix-like operating system.
You might also like:
For instance, you can automate Linux system backup, schedule updates, and synchronization of files, and many more using Cron daemon, which is used to run scheduled tasks from the command line or use online tools to generate cron jobs.
Cron wakes up every minute and checks scheduled tasks in countable – Crontab (CRON TABle) is a table where we can schedule such kinds of repeated tasks.
Tips: Each user can have their own crontab to create, modify and delete tasks. By default cron is enabled for users, however, we can restrict users by adding an entry in /etc/cron.deny file.
Crontab in Linux
The Crontab file consists of commands per line and has six fields actually and separated either by space or tab. The beginning five fields represent the time to run tasks and the last field is for command.
- Minute (hold values between 0-59)
- Hour (hold values between 0-23)
- Day of Month (hold values between 1-31)
- The month of the year (hold values between 1-12 or Jan-Dec, you can use the first three letters of each month’s name i.e Jan or Jun.)
- Day of week (hold values between 0-6 or Sun-Sat, Here also you can use the first three letters of each day’s name i.e Sun or Wed. )
- Command – The /path/to/command or script you want to schedule.
1. List Crontab Entries
List or manage the task with the crontab command with -l option for the current user.
# crontab -l 00 10 * * * /bin/ls >/ls.txt
2. Edit Crontab Entries
To edit the crontab entry, use -e the option shown below. The below example will open scheduled jobs in the VI editor. Make necessary changes and quit pressing :wq keys that save the setting automatically.
3. List Scheduled Cron Jobs of User
To list scheduled jobs of a particular user called tecmint using the option as -u (User) and -l (List).
# crontab -u tecmint -l no crontab for tecmint
Note: Only root user have complete privileges to see other users’ crontab entries. Normal users can’t view others.
4. Remove Crontab Entry
Caution: Crontab with -r the parameter will remove complete scheduled jobs without confirmation from Crontab. Use -i option before deleting the user’s crontab.
5. Prompt Before Deleting Crontab
crontab with -i the option will prompt you confirmation from the user before deleting the user’s crontab.
# crontab -i -r crontab: really delete root's crontab?
6. Allowed Special Characters (*, -, /, ?, #)
- Asterisk(*) – Match all values in the field or any possible value.
- Hyphen(-) – To define a range.
- Slash (/) – 1st field /10 meaning every ten minutes or increment of range.
- The Comma (,) – To separate items.
7. System-Wide Cron Schedule
A system administrator can use the predefined cron directory as shown below.
- /etc/cron.d
- /etc/cron.daily
- /etc/cron.hourly
- /etc/cron.monthly
- /etc/cron.weekly
8. Schedule a Job for a Specific Time
The below jobs delete empty files and directories from /tmp at 12:30 am daily. You need to mention the user name to perform the crontab command. In the below example, root user is performing a cron job.
# crontab -e 30 0 * * * root find /tmp -type f -empty -delete
9. Special Strings for Common Schedule
| Strings | Meanings |
|---|---|
| @reboot | The command will run when the system reboots. |
| @daily | Once per day or may use @midnight. |
| @weekly | Once per week. |
| @yearly | Once per year. we can use the @annually keyword also. |
Need to replace five fields of the cron command with keywords if you want to use the same.
10. Multiple Commands with Double ampersand(&&)
In the below example, command1 and command2 run daily.
# crontab -e @daily &&
11. Disable Email Notifications.
By default, cron sends mail to the user account executing cronjob. If you want to disable it add your cron job similar to the below example. Using the >/dev/null 2>&1 option at the end of the file will redirect all the output of the cron results under /dev/null.
[[email protected] ~]# crontab -e * * * * * >/dev/null 2>&1
conclusion: Automation of tasks may help us to perform our tasks in better ways, error-free, and efficient. You may refer to a manual page of crontab for more information by typing the ‘man crontab‘ command in your terminal.
How to Schedule Tasks on Linux

Installing At tool or employing Cron Daemon will let you desirably schedule tasks in Linux. While Cron helps in running any task on a regular basis, the At tool efficiently executes any action once.
Users of UNIX-based operating systems often tend to perform a specific task repeatedly. In such a scenario, taking the manual approach every time is undoubtedly inefficient in every manner. Luckily, there exists a promising way out.
The UNIX OS bags amazing task schedulers. These schedulers act as some sort of timer that makes the system perform any predefined task. When we talk about Linux, there are two basic yet robust tools to schedule tasks in the most user efficient manner, namely Cron Daemon and the At tool.
In this article, we’ll walk you through the methods of using both the tools and schedule a task in Linux.
Using Cron Daemon to Schedule Tasks in Linux
Cron or the Cron Daemon is a great way to schedule and run several tasks at specific times. Pretty similar to the task scheduler in Windows, you can add desired actions on the Crontab and let Cron automatically run those.
1. Launching and Getting Started with Crontab
1. The first thing that you’ll need to do is launch the Terminal. You can either use the Ctrl+Alt+T key combination or look for the Terminal in the Linux application menu.
2. Open your user account’s crontab with system permissions by running the following command:

In case the Linux distribution system you’re working on doesn’t use sudo, run the following command:
3. Once done, you’ll be asked to select an editor. It is recommended to go with Nano as it is an easy one to get started with. Do that by typing the number designated against the option that says Nano. However, there are other advanced editors to choose from, which advanced users generally prefer.
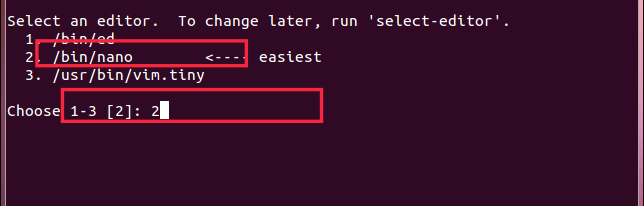
You’ll then notice that you’re inside the Nano text editor, and the same can be identified by the availability of “GNU nano” at the top of the Terminal. In case you don’t see “GNU nano”, the system might have launched crontab in the vi text editor.

Quitting vi text editor is pretty simple. Type “quit” and press “Enter”. After that, run the following command:
Finally, run the following command:

2. Adding New Tasks to the Crontab
Now that you’re done setting up the Crontab, the next thing to do is add and schedule various tasks on it. You can simply use the arrow keys to navigate to the very bottom of the file, where new tasks need to get added.
Usually, in Crontab, the lines are written in a specific sequence. The sequence also bears a set of acceptable values, which ultimately sets the scheduling period. The sequence we’re talking about looks like:
minute(0-59) hour (0-23) day (1-31) month (1-12) weekday (0-6) commandThe asterisk (*) character is used to match the values that we tend to input in the sequence. For instance, using the asterisk character for days will ensure that the command runs every day, and the same goes for months, weekdays, minutes, and hours.
3. Saving the File in Crontab
Saving the Crontab file in Nano is very straightforward. First, press the Ctrl+O key combination, followed by hitting the “Enter” button. The message stating crontab: installing new crontab indicated that the crontab file you intended to run had been successfully installed. Finally, use the Ctrl+X shortcut to close the Nano editor.
2. Using At Tool to Schedule Tasks in Linux
Although Crontab is a promising way to schedule various tasks in Linux, there is no denying the fact that the method is only suitable for running a script at any fixed interval. The At tool, on the other hand, offers a more easy and efficient approach.
1. Getting the At Tool Installed
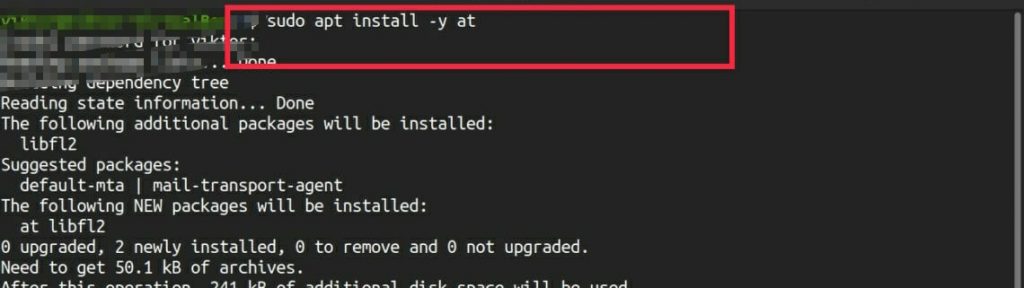
Unlike Crontab, At tool isn’t something that is readily installed on any Linux system. With that being said, you’ll have to run a specific command and get the At tool installed for scheduling tasks thereafter.
a. For any Ubuntu/Debian and derivatives, run the following command:
b. For any RHEL/CentOS and derivatives, run the following command
c. For any Arch Linux and derivatives, run the following command
d. For any Fedora and derivatives, run the following command
2. Enabling the Daemon
Once you’re done installing the At tool on your system, the next thing to do is enable the corresponding daemon. Run the following command:
$ sudo system ctl enable --now atd.service

3. Defining the Interval to Schedule Tasks on Linux
For working with the At tool, you’ll have to define the interval. The interval determines the period for which you wish to run any specific task. To understand the situation better, let’s have a look at an example.
In case you wish to execute any specific command after 6 hours, make use of the following command:
To run any task at 9 P.M., nine days from now, run the following command:
If you wish to list all the pending At jobs, run the following commands:

Talking about the output, it usually lists all the jobs with a particular reference number. It is generally located at the very left column. For deleting any queued job, use the following command together with the associated reference number.

Some Other Examples of At Codes
$ at now will execute Immediately
$ at now + 20 minutes will execute in 20 minutes from the current time
$ at now + 9 hours will execute in 9 hours from the current time
$ at now + 5 days will execute in 5 days from the current time
$ at midnight will execute at midnight (today or tomorrow)
$ at now next hour will execute exactly 60 minutes from now
$ at now next day will execute at the same time next day
$ at 18:00 will execute at 6:00 p.m. tomorrow
$ at 8:45 p.m. will execute 8:45 p.m. (today or tomorrow, if time has passed 8:45 p.m.)
There you’ve it, two easy-to-use and very versatile methods for scheduling tasks and running them desirably in Linux.
If this guide helped you, please share it.
Husain is a staff writer at Distroid and has been writing on all things Linux and cybersecurity for over 10 years. He previously worked as a technical writer for wikiHow. In his past time, he loves taking tech apart and see what makes them tick, without necessarily putting it all back together. LinkedIn
Leave a Reply
You must be logged in to post a comment.