- How to specify port for scp for a remote server?
- Update
- New Update
- Scp linux указание порта
- NAME
- SYNOPSIS
- DESCRIPTION
- EXIT STATUS
- SEE ALSO
- HISTORY
- AUTHORS
- How Do I SCP with a Different Port?
- Downloading Files Using SCP on a Different Port
- Downloading Directories Using SCP on a Different Port
- Uploading Files Using SCP with Different Port
- Uploading Directories Using SCP with Different Port
- Change the Remote Default SSH Port from 22 to Other
- Conclusion
- About the author
- David Adams
How to specify port for scp for a remote server?
I have ~/ssh/config set up in my local machine so, it is using port 2222 by default. But the remote1’s default ssh port is set to 22 in the ssh config instead of port 2222 . So, to make any external connection via ssh, it uses port 22 by default. I tried the following which did not work:
scp -P 2222 remote1:~/testSCP remote2@10.0.1.10:~/ scp remote1:~/testSCP -P 2222 remote2@10.0.1.10:~/ ssh: connect to host 10.0.1.10 port 22: Connection refused lost connection Which is true since 10.0.1.10 is using port 2222 and not port 22 . How can I specify remote1 to use port 2222 when trying to send files to 10.0.1.10 (remote2) from remote1 ?
Update
scp -3 remote1:~/testSCP remote2@10.0.1.10:~/ remote1@10.0.1.9's password: remote2@10.0.1.10's password: Permission denied, please try again. remote1@10.0.1.9's password: Permission denied, please try again. remote1@10.0.1.9's password: New Update
After trying it in several ways, I was able to do it in my scripts by logging in to the remote1 via ssh from my localhost and then scp from remote1 to remote2. However, this does not answer my question. I intended upon doing it directly from my local machine then transfer files between two instances, which I think is not supported if two instances’ ssh daemons are using a different port than the default for ssh connection.
Scp linux указание порта
NAME
scp — OpenSSH secure file copy
SYNOPSIS
scp [-346BCpqrTv] [-c cipher] [-F ssh_config] [-i identity_file] [-J destination] [-l limit] [-o ssh_option] [-P port] [-S program] source . target
DESCRIPTION
scp copies files between hosts on a network. It uses ssh(1) for data transfer, and uses the same authentication and provides the same security as ssh(1). scp will ask for passwords or passphrases if they are needed for authentication. The source and target may be specified as a local pathname, a remote host with optional path in the form [user@]host:[path], or a URI in the form scp://[user@]host[:port][/path]. Local file names can be made explicit using absolute or relative pathnames to avoid scp treating file names containing ‘:’ as host specifiers. When copying between two remote hosts, if the URI format is used, a port may only be specified on the target if the -3 option is used. The options are as follows: -3 Copies between two remote hosts are transferred through the local host. Without this option the data is copied directly between the two remote hosts. Note that this option disables the progress meter. -4 Forces scp to use IPv4 addresses only. -6 Forces scp to use IPv6 addresses only. -B Selects batch mode (prevents asking for passwords or passphrases). -C Compression enable. Passes the -C flag to ssh(1) to enable compression. -c cipher Selects the cipher to use for encrypting the data transfer. This option is directly passed to ssh(1). -F ssh_config Specifies an alternative per-user configuration file for ssh. This option is directly passed to ssh(1). -i identity_file Selects the file from which the identity (private key) for public key authentication is read. This option is directly passed to ssh(1). -J destination Connect to the target host by first making an scp connection to the jump host described by destination and then establishing a TCP forwarding to the ultimate destination from there. Multiple jump hops may be specified separated by comma characters. This is a shortcut to specify a ProxyJump configuration directive. This option is directly passed to ssh(1). -l limit Limits the used bandwidth, specified in Kbit/s. -o ssh_option Can be used to pass options to ssh in the format used in ssh_config(5). This is useful for specifying options for which there is no separate scp command-line flag. For full details of the options listed below, and their possible values, see ssh_config(5). AddressFamily BatchMode BindAddress BindInterface CanonicalDomains CanonicalizeFallbackLocal CanonicalizeHostname CanonicalizeMaxDots CanonicalizePermittedCNAMEs CASignatureAlgorithms CertificateFile ChallengeResponseAuthentication CheckHostIP Ciphers Compression ConnectionAttempts ConnectTimeout ControlMaster ControlPath ControlPersist GlobalKnownHostsFile GSSAPIAuthentication GSSAPIDelegateCredentials HashKnownHosts Host HostbasedAuthentication HostbasedKeyTypes HostKeyAlgorithms HostKeyAlias Hostname IdentitiesOnly IdentityAgent IdentityFile IPQoS KbdInteractiveAuthentication KbdInteractiveDevices KexAlgorithms LogLevel MACs NoHostAuthenticationForLocalhost NumberOfPasswordPrompts PasswordAuthentication PKCS11Provider Port PreferredAuthentications ProxyCommand ProxyJump PubkeyAcceptedKeyTypes PubkeyAuthentication RekeyLimit SendEnv ServerAliveInterval ServerAliveCountMax SetEnv StrictHostKeyChecking TCPKeepAlive UpdateHostKeys User UserKnownHostsFile VerifyHostKeyDNS -P port Specifies the port to connect to on the remote host. Note that this option is written with a capital ‘P’, because -p is already reserved for preserving the times and modes of the file. -p Preserves modification times, access times, and modes from the original file. -q Quiet mode: disables the progress meter as well as warning and diagnostic messages from ssh(1). -r Recursively copy entire directories. Note that scp follows symbolic links encountered in the tree traversal. -S program Name of program to use for the encrypted connection. The program must understand ssh(1) options. -T Disable strict filename checking. By default when copying files from a remote host to a local directory scp checks that the received filenames match those requested on the command-line to prevent the remote end from sending unexpected or unwanted files. Because of differences in how various operating systems and shells interpret filename wildcards, these checks may cause wanted files to be rejected. This option disables these checks at the expense of fully trusting that the server will not send unexpected filenames. -v Verbose mode. Causes scp and ssh(1) to print debugging messages about their progress. This is helpful in debugging connection, authentication, and configuration problems.
EXIT STATUS
The scp utility exits 0 on success, and >0 if an error occurs.
SEE ALSO
sftp(1), ssh(1), ssh-add(1), ssh-agent(1), ssh-keygen(1), ssh_config(5), sshd(8)
HISTORY
scp is based on the rcp program in BSD source code from the Regents of the University of California.
AUTHORS
How Do I SCP with a Different Port?
![]()
This tutorial explains how to transfer files or directories using SCP (Secure Copy Protocol) with a different port than the default 22 (SSH) port.
By default, the SCP command uses the port 22 (SSH). In case the remote system has configured the SSH service to run on a different port, you still can use SCP followed by the -P flag to specify the port you need.
Downloading Files Using SCP on a Different Port
To specify a different port than 22 when using the SCP command, you need to implement the -P flag as shown in the example below, in which the default port was changed to port 3940.
The syntax is pretty simple as shown below.
In the example below, I show how to download the file named linuxint.file from the remote host through port 3940. The file is stored in the home directory of the remote user named kali which I use to authenticate, that’s the default remote location when no other is defined.
At the end of the command, I specify the local directory in which the file will be saved (Downloads).

As you can see, the file transfer was done successfully. The reason explaining 0.0KB/S is that all files for this tutorial are empty.
Downloading Directories Using SCP on a Different Port
Downloading directories requires a very similar syntax except for the -r flag which must be added additionally to the -P flag as shown in the example below. The screenshot below shows how to cpu the remote directory named dir to the local home directory, all through port 3049.
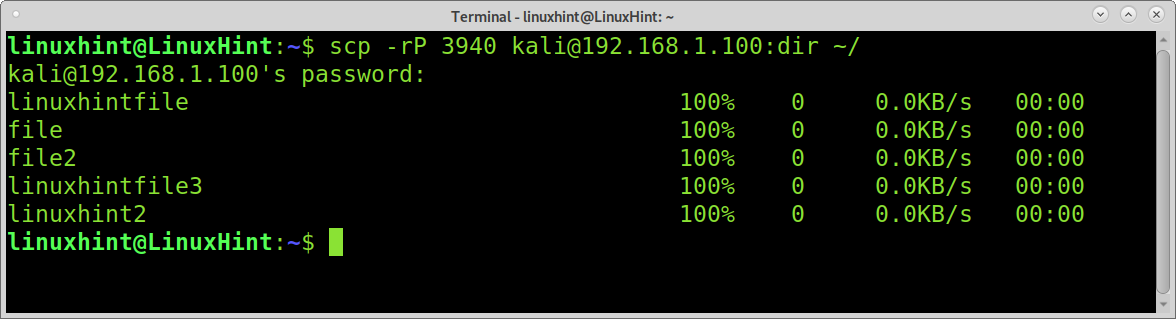
As you can see, the directory was downloaded recursively to the local home.
Uploading Files Using SCP with Different Port
Uploading files with SCP on a different port also requires the -P flag. Remember the SCP command is similar to the cp command. Therefore, when uploading files, the file destination directory must also be placed at the end of the command.
In the example, below I upload the linuxhint.file through port 3940 to the remote subdirectory named linuxhintdir, located in the remote home directory.

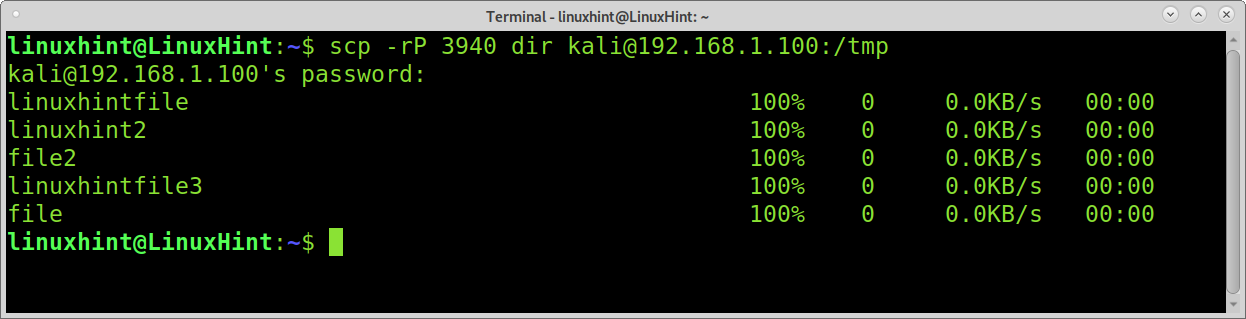
Uploading Directories Using SCP with Different Port
The example below shows how to upload a directory instead of a regular file. For this purpose, just like when uploading files, you only need to add the -r flag.
The following example shows how to upload the directory named dir to the /tmp remote directory through port 3940.
That’s all you need to know to transfer files using SCP from or to a remote device using a different SSH port.
Change the Remote Default SSH Port from 22 to Other
To use SCP through a different port, the other side must have the port you want to use configured.
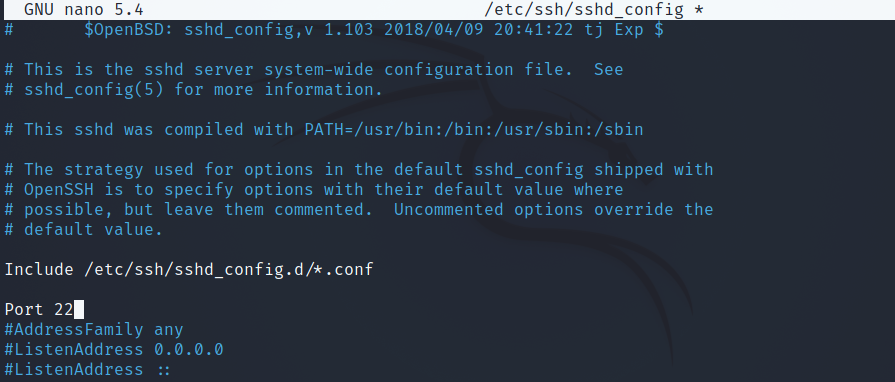
To change the default SSH port, you need to edit the SSH configuration file. On most Linux distributions, you can edit that file by running the command below.
Once opened, find the line containing “Port 22” shown in the image below.
Change the number 22 for the port you want to use with SCP. In the screenshot below, you can see I changed the default port to port 3940.
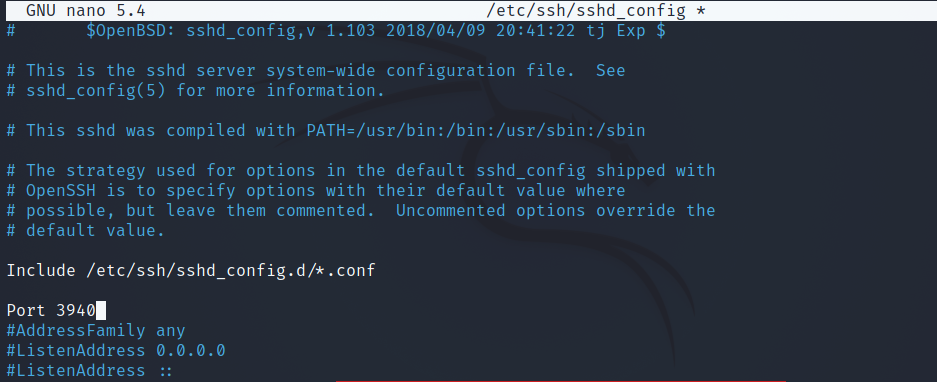
Once edited, press CTRL+X and Y to exit saving changes.
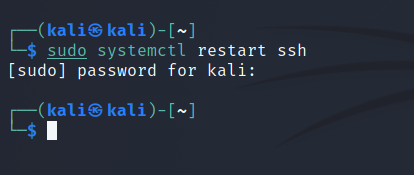
Then, restart the SSH service by running the command below.
Now, you’ll be able to fetch or upload files using SCP on the port you defined.
Conclusion
As you can see, using the SCP command through different ports than 22 is pretty easy to implement. Yet, it is important to remind readers the SCP command is obsolete and replaced by safer alternatives like rsync or sftp. Users must be aware that although the SCP command is based on the SSH protocol, the -P flag must be typed in upper case, contrary to the SSH port specification which is done using a lowercase -p.
Thank you for reading Linux Hint. I hope this tutorial was useful. Keep following us for more Linux tips and tutorials.
About the author
David Adams
David Adams is a System Admin and writer that is focused on open source technologies, security software, and computer systems.