- scp with port number specified
- 14 Answers 14
- How to specify port for scp for a remote server?
- Update
- New Update
- How Do I SCP with a Different Port?
- Prerequisite: Change the Remote Default SSH Port to Different Port
- How Do I SCP With a Different Port?
- General Syntax:
- Example 1: How to Upload Directories Using SCP with Different Port?
- Verify Uploaded Directory
- Example 2: How to Upload Files Using SCP with Different Port?
- Verify the Uploaded File
- Example 3: How to Download Files Using SCP on a Different Port
- Example 4: How to Download Directories Using SCP on a Different Port?
- Conclusion
scp with port number specified
I’m trying to scp a file from a remote server to my local machine. Only port 80 is accessible. I tried:
scp -p 80 username@www.myserver.com:/root/file.txt . but got this error: cp: 80: No such file or directory How do I specify the port number in a scp command?
14 Answers 14
Unlike ssh, scp uses the uppercase P switch to set the port instead of the lowercase p:
scp -P 80 . # Use port 80 to bypass the firewall, instead of the scp default The lowercase p switch is used with scp for the preservation of times and modes.
Here is an excerpt from scp’s man page with all of the details concerning the two switches, as well as an explanation of why uppercase P was chosen for scp:
-P port Specifies the port to connect to on the remote host. Note that this option is written with a capital ‘P’, because -p is already reserved for preserving the times and modes of the file in rcp(1).
-p Preserves modification times, access times, and modes from the original file.
Bonus Tip: How can I determine the port being used by the/an SSH daemon to accept SSH connections?
This question can be answered by using the netstat utility, as follows:
sudo netstat -tnlp | grep sshd Or, using the far more readable word based netstat option names:
sudo netstat --tcp --numeric-ports --listening --program | grep sshd The output you will see, assuming your ssh daemon is configured with default values its listening ports, is shown below (with a little trimming of the whitespace in between columns, in order to get the entire table to be visible without having to scroll):
Active Internet connections (only servers) Proto Recv-Q Send-Q Local Address Foreign Address State ID/Program name tcp 0 0 0.0.0.0:22 0.0.0.0:* LISTEN 888/sshd: /usr/sbin tcp6 0 0 . 22 . * LISTEN 888/sshd: /usr/sbin For the above examples, sudo was used to run netstat with administrator privs, in order to be able to see all of the Program Names. If you run netstat as a regular user (i.e., without sudo and assuming you don’t have admin rights granted to you, via some other method), you will only see program names shown for sockets that have your UID as the owner. The Program Names for sockets belonging to other users will not be shown (i.e., will be hidden and a placeholder hyphen will be displayed, instead):
Proto Recv-Q Send-Q Local Address Foreign Address State ID/Program name tcp 0 0 127.0.0.1:46371 0.0.0.0:* LISTEN 4489/code . tcp 0 0 0.0.0.0:111 0.0.0.0:* LISTEN - tcp 0 0 127.0.0.53:53 0.0.0.0:* LISTEN - tcp 0 0 0.0.0.0:22 0.0.0.0:* LISTEN - . Update and aside to address one of the (heavily upvoted) comments:
With regard to Abdull’s comment about scp option order, what he suggests:
scp -r some_directory -P 80 . . intersperses options and parameters, since the -r switch takes no additional arguments and some_directory is treated as the first parameter to the command, making -P and all subsequent command line arguments look like additional parameters to the command (i.e., hyphen prefixed arguments are no longer considered as switches).
getopt(1) clearly defines that parameters must come after options (i.e., switches) and not be interspersed with them, willy-nilly:
The parameters getopt is called with can be divided into two parts: options which modify the way getopt will do the parsing (the options and the optstring in the SYNOPSIS), and the parameters which are to be parsed (parameters in the SYNOPSIS). The second part will start at the first non-option parameter that is not an option argument, or after the first occurrence of ‘—‘. If no ‘-o’ or ‘—options’ option is found in the first part, the first parameter of the second part is used as the short options string.
Since the -r command line option takes no further arguments, some_directory is «the first non-option parameter that is not an option argument.» Therefore, as clearly spelled out in the getopt(1) man page, all succeeding command line arguments that follow it (i.e., -P 80 . ) are assumed to be non-options (and non-option arguments).
So, in effect, this is how getopt(1) sees the example presented with the end of the options and the beginning of the parameters demarcated by gray text:
scp -r some_directory -P 80 .
This has nothing to do with scp behavior and everything to do with how POSIX standard applications parse command line options using the getopt(3) set of C functions.
For more details with regard to command line ordering and processing, please read the getopt(1) manpage using:
How to specify port for scp for a remote server?
I have ~/ssh/config set up in my local machine so, it is using port 2222 by default. But the remote1’s default ssh port is set to 22 in the ssh config instead of port 2222 . So, to make any external connection via ssh, it uses port 22 by default. I tried the following which did not work:
scp -P 2222 remote1:~/testSCP remote2@10.0.1.10:~/ scp remote1:~/testSCP -P 2222 remote2@10.0.1.10:~/ ssh: connect to host 10.0.1.10 port 22: Connection refused lost connection Which is true since 10.0.1.10 is using port 2222 and not port 22 . How can I specify remote1 to use port 2222 when trying to send files to 10.0.1.10 (remote2) from remote1 ?
Update
scp -3 remote1:~/testSCP remote2@10.0.1.10:~/ remote1@10.0.1.9's password: remote2@10.0.1.10's password: Permission denied, please try again. remote1@10.0.1.9's password: Permission denied, please try again. remote1@10.0.1.9's password: New Update
After trying it in several ways, I was able to do it in my scripts by logging in to the remote1 via ssh from my localhost and then scp from remote1 to remote2. However, this does not answer my question. I intended upon doing it directly from my local machine then transfer files between two instances, which I think is not supported if two instances’ ssh daemons are using a different port than the default for ssh connection.
How Do I SCP with a Different Port?
The SCP (Secure Copying Protocol) transfers files or directories between two systems over the network in a secure way. By default, the SCP uses Port 22 to exchange data in an encrypted form. Can it be used over different ports? The answer is yes.
This post will teach you how to SCP with a different port on a Linux-based machine. The content of this article is given below:
- Prerequisite: Change the Default SSH Port to Different Port
- How Do I SCP with a Different Port?
- General Syntax
- Uploading Directories Using SCP with Different Port
- Uploading File Using SCP with Different PortDownloading Directories
- Downloading File
Let’s start with the prerequisites section.
Prerequisite: Change the Remote Default SSH Port to Different Port
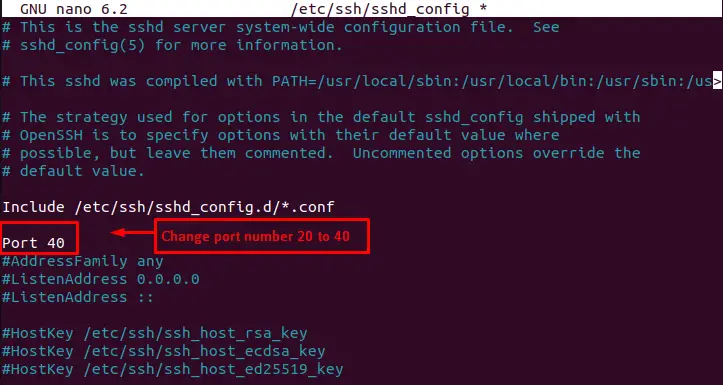
In Linux, users can manually modify the SSH port number by accessing the “sshd_config” file. To do so, execute the below script that navigates the above file:
$ sudo nano /etc/ssh/sshd_config

The port number is changed from “20” to “40” for further implementation.
How Do I SCP With a Different Port?
The administrators utilize the “scp” command to transfer data between the host and server securely. The “scp” command is the variant of the “cp” command. The syntax of the SCP command to use different ports is given below:
General Syntax:
In the above syntax, the arguments are explained as below in the listed format:
- P: It refers to the port through which the transmission is performed.
- User: It specifies the remote user from which the directory or file is sent.
- IP/Host It represents a remote user’s IP address or hostname.
- File/Dir: It specifies the file or directory to transmit between the local and remote servers.
- Dest_Dir: It represents the destination.
To explore the different options of the “scp” command, run the “scp” in the terminal as below:
The output returns the variety of options that users can practice according to requirement.
Example 1: How to Upload Directories Using SCP with Different Port?
To upload a directory through a different port, the “rp” option is utilized with the “scp” command specifying the port number. The below script will upload the “WorkSheet” directory to the “Downloads” directory of the remote user via “Port 40”:
It requires authentication before uploading a directory.
Verify Uploaded Directory
To verify the uploaded directory in the remote system, access the “Downloads” directory of the remote user and display content through the “ls” utility:
The output confirms the uploaded “Worksheet” directory.
Example 2: How to Upload Files Using SCP with Different Port?
To upload a particular file through a different port, specify the port number with the “P” option. After that, specify the particular file name to be uploaded. In our case, the “linux.txt” file is uploaded to the remote user “roger” in the “Downloads” directory:
The output shows that the “linux.txt” file has been successfully uploaded.
Verify the Uploaded File
To verify the uploaded file in the remote system, list down the directory’s content where the file is copied:
The output shows that “linux.txt” has been successfully uploaded.
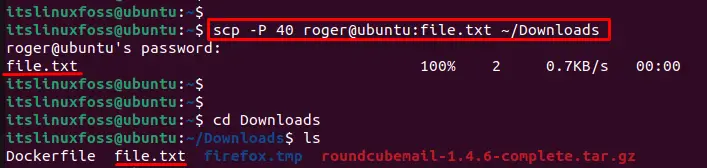
Example 3: How to Download Files Using SCP on a Different Port
To download the “file.txt” from the remote user “roger”, utilize the “P” option with the port number “40” as below:
The output displays the particular “file.txt” has been successfully downloaded.
Additionally, users can verify the specified file by accessing the “Downloads” directory.
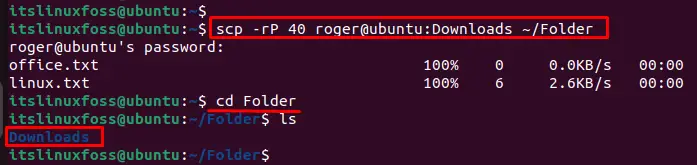
Example 4: How to Download Directories Using SCP on a Different Port?
To download the complete directory from the remote user, the “rp” option work with the “scp” command specifying the port number “40”:
The output returns that downloaded directory “Downloads” with all content in the “Folder” directory.
Additionally, verify the download directory by accessing it via the “cd” command.
That’s all from this SCP detailed guide.
Conclusion
To do SCP over different ports, the users need to change the port number through the “sshd_config” file. After that, the SCP command is used following the syntax “scp -P @: ” to transfer data. This post has briefly explained the method to SCP over a different port (other than 22, which is its default).