- Linux Mint Forums
- Re: Where is desktop sharing?
- Re: Where is desktop sharing?
- Re: Where is desktop sharing?
- Как включить общий доступ к рабочему столу в Ubuntu и Linux Mint
- Включение общего доступа к рабочему столу в Ubuntu и Linux Mint
- Удаленное тестирование общего доступа к рабочему столу в Ubuntu
- How To Enable Desktop Sharing In Ubuntu and Linux Mint
- Enabling Desktop Sharing in Ubuntu and Linux Mint
- Testing Desktop Sharing in Ubuntu Remotely
Linux Mint Forums
I want to use desktop sharing. The vino package aand dependencies are installed. Throughout the web I read references to vino-preferences. Yet no such file exists and looking at the package contents at the Debian web site indicates the file is no longer part of the package.
Thus I have no idea how a user is supposed to allow connections using vino.
When I manually run vino-server I receive the following error:
«The desktop sharing service is not enabled, so it should not be run.»
I looked through the init scripts and services and do not find anything obvious. I do not know what ‘desktop sharing service’ is not enabled.
I installed x11vnc server and connected just fine. Yet x11vnc is ugly and crude looking. I prefer an app or dialogs that match the desktop environment.
Is vino broken or am I missing something obvious?
Last edited by LockBot on Wed Dec 28, 2022 7:16 am, edited 2 times in total.
Reason: Topic automatically closed 6 months after creation. New replies are no longer allowed.
Re: Where is desktop sharing?
Post by AlanWalker » Wed May 21, 2014 11:28 pm
woodsman wrote: I am using LMDE, fully updated.
I want to use desktop sharing. The vino package aand dependencies are installed. Throughout the web I read references to vino-preferences. Yet no such file exists and looking at the package contents at the Debian web site indicates the file is no longer part of the package.
Thus I have no idea how to a user is supposed to allow connections using vino.
When I manually run vino-server I receive the following error:
«The desktop sharing service is not enabled, so it should not be run.»
I looked through the init scripts and services and do not find anything obvious. I do not know what ‘desktop sharing service’ is not enabled.
I installed x11vnc server and connected just fine. Yet x11vnc is ugly and crude looking. I prefer an app or dialogs that match the desktop environment.
Is vino broken or am I missing something obvious?
Re: Where is desktop sharing?
Post by altair4 » Thu May 22, 2014 7:51 am
I no longer support LMDE but there is a Debian bug report that matches your symptoms: https://bugs.debian.org/cgi-bin/bugrepo . bug=729468
If you don’t speak Spanish here is a translation:
siguendo you indicate the link:
# Sudo apt-get install gnome-user-share
After installing the package the option «Screen Sharing» it adds in
«Share» in «gnome-control-center»
After gnome-user-share is installed you should be able to go to Menu > Preferences > Sharing and see something that resembles what vino-preferences looked like:
That package also installs a whole mess of other stuff you might never use and seems to violate the prime directive of UNIX which back in the before time was «Do one thing and do it well» but .
Please add a [SOLVED] at the end of your original subject header if your question has been answered and solved.
Re: Where is desktop sharing?
Post by woodsman » Thu May 22, 2014 1:41 pm
Thank you both for replying. I fiddled with this only for about 20 minutes. My observations and thoughts:
* There no longer is a graphical interface to configure desktop sharing. The vino-preferences tool no longer exists. I suspect the reason is the vino developers now expect upstream gnome packages to provide the respective dialogs. This decision affects all Mint users using a GTK based desktop.
* The gnome-user-share package did not provide me the missing graphical interface. I checked everywhere in the menus, in both Cinnamon and Mate, checked the respective control centers. I don’t know why the Sharing dialog is not readily available anywhere.
* Installing gnome-user-share created three instances of «Personal File Sharing» in the Cinnamon Startup Applications.
* Using dconf or gsettings does indeed enable desktop sharing to avoid the vino-server error I reported. A different message now appears.
* I haven’t yet been able to actually connect but I will pursue this later.
* Even if I got the package to work, rather than installing gnome-user-share I suspect a well-written python script would suffice to replace the now missing vino-preferences dialog. Since Cinnamon now no longer is fully dependent upon gnome, nor Mate or Xfce, looks like a Mint-specific solution is needed.
* The Debian bug report was closed but the original problem is not truly resolved. The problem is a missing dialog. That the problem can be worked around with gsettings does not fix the now missing dialog.
In short, the Mint dev team needs to know that there is no graphical interface to support desktop sharing. Something is needed to replace the now missing vino-preferences dialog. This affects all Mint gtk desktop users. The vino-preferences dialog is the method that provided users the direct one-click toggling of the dconf setting to enable/disable desktop sharing.
The problem now is not that dconf or gsettings can’t be used, which experienced users can overcome, but that there is no direct graphical interface to do this. Thus for a majority of Mint users, sharing the desktop is broken.
Как включить общий доступ к рабочему столу в Ubuntu и Linux Mint
Общий доступ к рабочему столу относится к технологиям, которые обеспечивают удаленный доступ и удаленную совместную работу на рабочем столе компьютера через эмулятор графического терминала. Общий доступ к рабочему столу позволяет двум или более пользователям компьютеров с доступом в Интернет работать с одними и теми же файлами из разных мест.
В этой статье мы покажем вам, как включить общий доступ к рабочему столу в Ubuntu и Linux Mint с несколькими важными функциями безопасности.
Включение общего доступа к рабочему столу в Ubuntu и Linux Mint
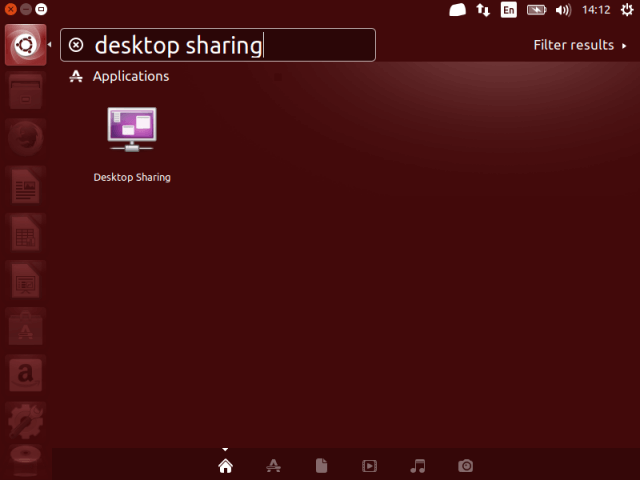
1. В меню Ubuntu Dash или Linux Mint найдите \совместный доступ к рабочему столу, как показано на следующем снимке экрана. Как только вы его получите, запустите его.

2. После запуска общего доступа к рабочему столу доступны три категории параметров общего доступа к рабочему столу: общий доступ, безопасность и уведомления. настройки.
В разделе Общий доступ установите флажок \Разрешить другим пользователям просматривать ваш рабочий стол, чтобы включить общий доступ к рабочему столу. При желании вы также можете разрешить другим пользователям удаленно управлять вашими рабочими столами, установив флажок параметр \Разрешить другим пользователям управлять вашим рабочим столом.

3. Далее в разделе безопасность вы можете вручную подтверждать каждое удаленное подключение, установив флажок \Вы должны подтверждать каждый доступ к этому компьютеру . ».
Опять же, еще одна полезная функция безопасности — создание определенного общего пароля с помощью параметра \Требовать пользователя ввести этот пароль, который удаленные пользователи должны знать и вводить каждый раз, когда они хотят получить доступ к вашему рабочему столу.
4. Что касается уведомлений, вы можете следить за удаленными подключениями, выбрав отображение значка в области уведомлений каждый раз при удаленном подключении к вашим рабочим столам, выбрав \Только когда кто-то подключен».

Когда вы настроите все параметры общего доступа к рабочему столу, нажмите Закрыть. Теперь вы успешно разрешили совместное использование рабочего стола на рабочем столе Ubuntu или Linux Mint.
Удаленное тестирование общего доступа к рабочему столу в Ubuntu
Вы можете проверить, работает ли он, используя приложение для удаленного подключения. В этом примере я покажу вам, как работают некоторые параметры, которые мы установили выше.
5. Я буду подключаться к своему ПК с Ubuntu, используя протокол VNC (Virtual Network Computing) через приложение для удаленного подключения remmina.

6. После нажатия элемента Ubuntu PC я получаю показанный ниже интерфейс для настройки параметров подключения.

7. После выполнения всех настроек я нажму Подключить. Затем укажите пароль SSH для имени пользователя и нажмите ОК.

У меня появился этот черный экран после нажатия кнопки «ОК», потому что на удаленной машине соединение еще не подтверждено.

8. Теперь на удаленном компьютере я должен принять запрос на удаленный доступ, нажав \Разрешить, как показано на следующем снимке экрана.

9. Приняв запрос, я успешно удаленно подключился к своему настольному компьютеру с Ubuntu.

Вот и все! В этой статье мы описали, как включить общий доступ к рабочему столу в Ubuntu и Linux Mint. Используйте раздел комментариев ниже, чтобы написать нам.
How To Enable Desktop Sharing In Ubuntu and Linux Mint
Desktop sharing refers to technologies that enable remote access and remote collaboration on a computer desktop via a graphical terminal emulator. Desktop sharing allows two or more Internet-enabled computer users to work on the same files from different locations.
In this article, we will show you how to enable desktop sharing in Ubuntu and Linux Mint, with a few vital security features.
Enabling Desktop Sharing in Ubuntu and Linux Mint
1. In the Ubuntu Dash or Linux Mint Menu, search for “desktop sharing” as shown in the following screenshot, once you get it, launch it.
2. Once you launch Desktop sharing, there are three categories of desktop sharing settings: sharing, security and notification settings.
Under sharing, check the option “Allow others users to view your desktop” to enable desktop sharing. Optionally, you can also permit other users to remotely control your desktops by checking the option “Allow others users to control your desktop”.

3. Next in security section, you can choose to manually confirm each remote connection by checking the option “You must confirm each access to this computer”.
Again, another useful security feature is creating a certain shared password using the option “Require user to enter this password”, that remote users must know and enter each time they want to access your desktop.
4. Concerning notifications, you can keep an eye on remote connections by choosing to show the notification area icon each time there is a remote connection to your desktops by selecting “Only when someone is connected”.

When you have set all the desktop sharing options, click Close. Now you have successfully permitted desktop sharing on your Ubuntu or Linux Mint desktop.
Testing Desktop Sharing in Ubuntu Remotely
You can test to ensure that it’s working using a remote connection application. In this example, I will show you how some of the options we set above work.
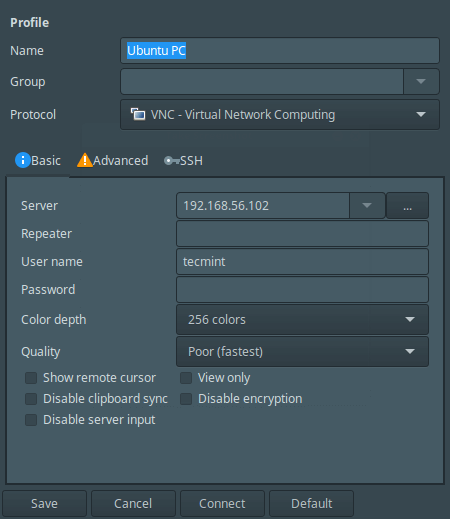
5. I will connect to my Ubuntu PC using VNC (Virtual Network Computing) protocol via remmina remote connection application.

6. After clicking on Ubuntu PC item, I get the interface below to configure my connection settings.
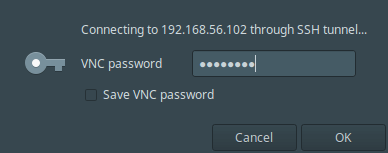
7. After performing all the settings, I will click Connect. Then provide the SSH password for the username and click OK.
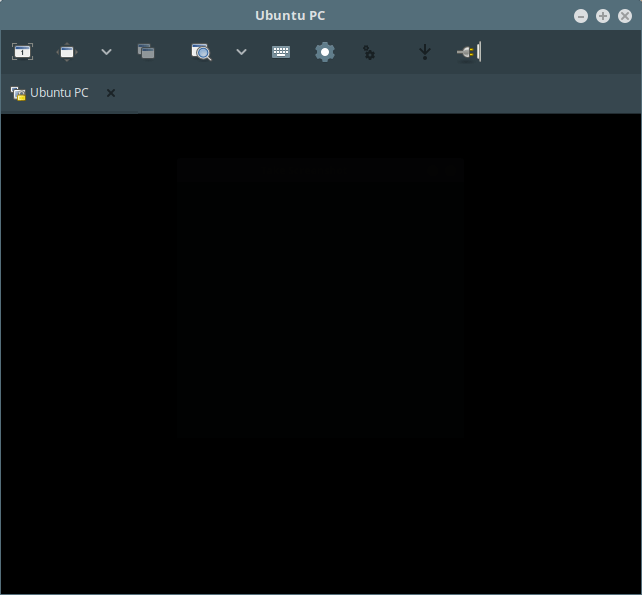
I have got this black screen after clicking OK because, on the remote machine, the connection has not been confirmed yet.
8. Now on the remote machine, I have to accept the remote access request by clicking on “Allow” as shown in the next screenshot.

9. After accepting the request, I have successfully connected, remotely to my Ubuntu desktop machine.

That’s it! In this article, we described how to enable desktop sharing in Ubuntu and Linux Mint. Use the comment section below to write back to us.