- Which WIFI card for SD connect C4?
- How to choose & set up WiFi wireless card for SDconnect C4
- Qui ont consulté cet article ont également consulté:
- TehCenter
- Настройка WiFi соединения SD Connect-Windows 10, 8.
- Настройка WiFi соединения SDConnect “СТОА” / “WORKSHOP” для Windows 8, 10.
- How to Instal the Mercedes SD Connect 4 Battery And WIFI Card
Which WIFI card for SD connect C4?
I have replace the wifi card on my clone sd connect c4, old card is very bad and i have bought an D-LINK CARD BUS ADAPTER AIR PLUS XTREME G+ DWL650… but when I insert the sd card, it does not recognize… and I can not configure the SD connect …
Try different wifi cards and have some suggestion from fellow…
So, summing up we can conclude the following:
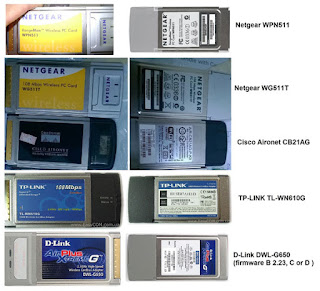
GOOD cards that should work Plug&Play without any problems on SD Connect C4:
- Netgear WG511T
- Netgear WPN511 (several reports)
- TP-LINK TL-WN610G
- D-Link DWL-G650 (firmware B 2.23 or greater like C series or D series)
- Cisco Aironet CB21AG
- There are possibly other based on Atheros 5212 that will work but you’re doing this at your own risk If you make it work please report here!
- D-link DWL-645
NEC Aterm wl54ag
BAD cards that will likely not work; do not buy to avoid disappointment:
To avoid issues of wifi cards, i advise you all to get one as my friend’s. it’s a good clone with a tested wifi card. I would buy this if i have sd connect for the second time.
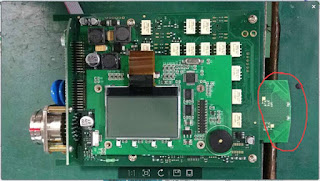
The part marked in red is the wifi card
it’s a part of the sdconnect board, the designers work for MBStarTool.com make it together, which make the wifi card works well and wifi connection in a better condition.
Different from those with separate wifi cards as below:
How to choose & set up WiFi wireless card for SDconnect C4
If I replace or upgrade the PCMCIA wireless card in my SDconnect, do I need to change the driver? If so, does anyone know how?
No, you dont have to, just atheros compatible wifi card is fine.
Netgear WG511T
Netgear WPN511 (several reports)
TP-LINK TL-WN610G
D-Link DWL-G650 (firmware B 2.23 or greater like C series or D series)
Cisco Aironet CB21AG
There are possibly other based on Atheros 5212 that will work but you’re doing this at your own risk If you make it work please report here!
D-link DWL-645
NEC Aterm wl54ag
Well, I can tell you what doesn’t work: Netgear WN511B. This is a RangeMax Wireless-N 2.4GHz 802.11n card that “works with Windows Vista”. Woohoo! (But it doesn’t work with SDconnect C4.)
The card fits, but the C4 mux thinks it’s connected by a LAN cable. The “S” shape for the connection appears, but not the broadcast symbol.
Oh, well, it was on $5 USD from Amazon. Too bad
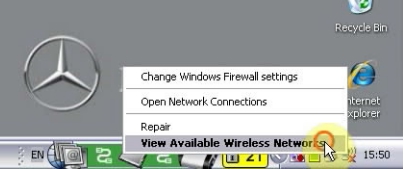
Part 2: How to setup SDconnect WIFI connection
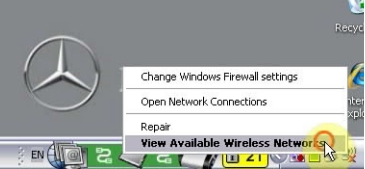
Click wireless network icon to select “View Available Wireless Network”.
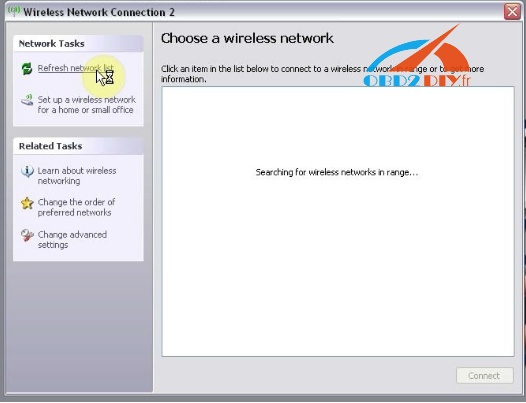
Click “Refresh network list”.
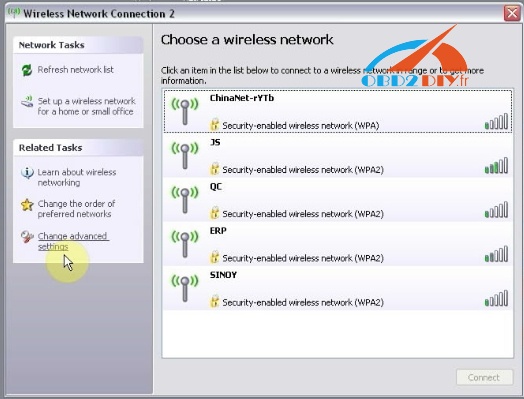
Click “Change advanced settings”.
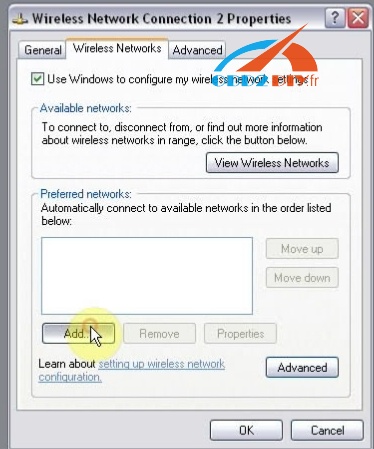
Tick on “Use Windows to configure my wireless network setting”.
Tick on “Connection even if this network is not broadcasting”.
Cancel tick on “The key is provided for me automatically”.
Tick on “This is a computer-to-computer (ad hoc) network; wireless access points are not used”
Enter network key and confirm it. (network key: 26 a)
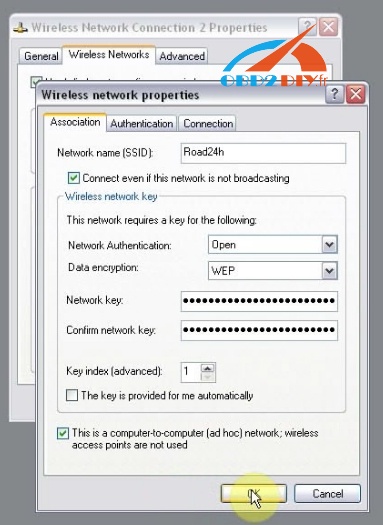
Go to Connection and tick on “correct when this internet is in range”, then click OK.

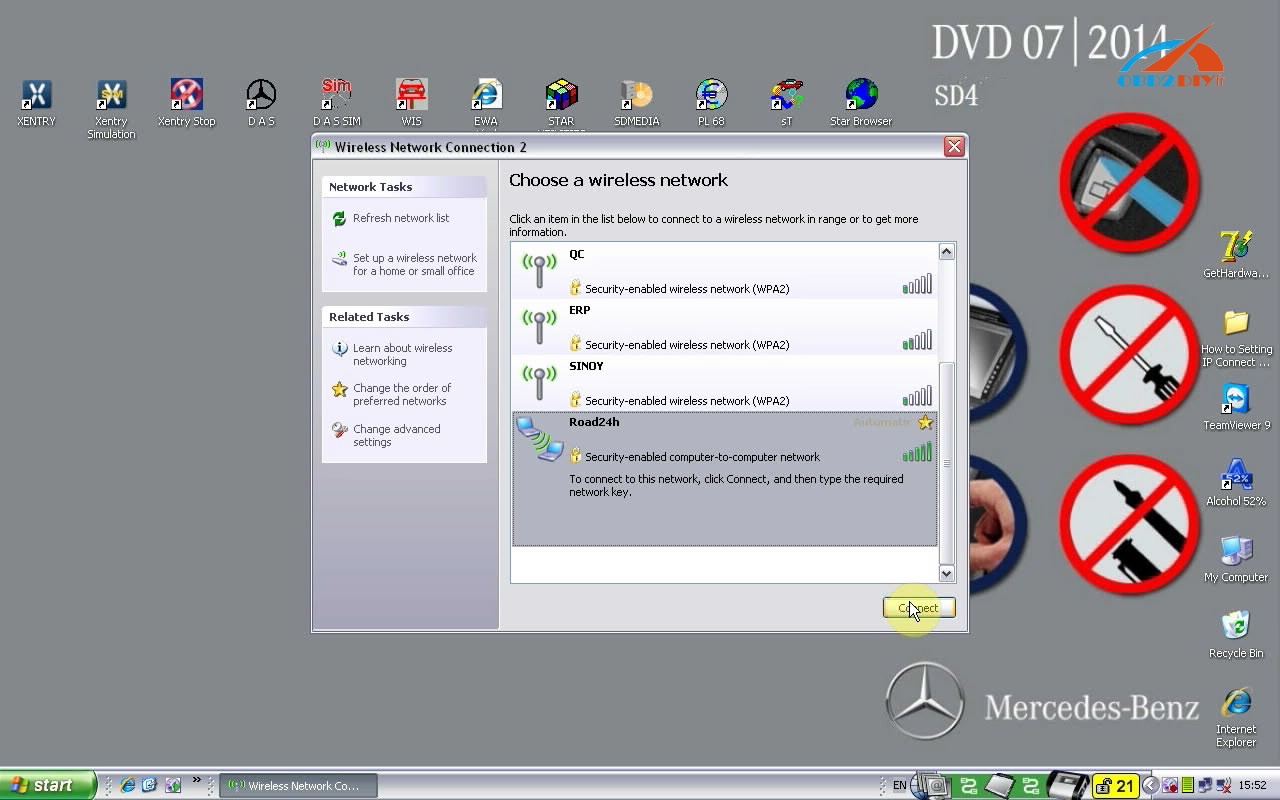
Enter the network key and click Connect.
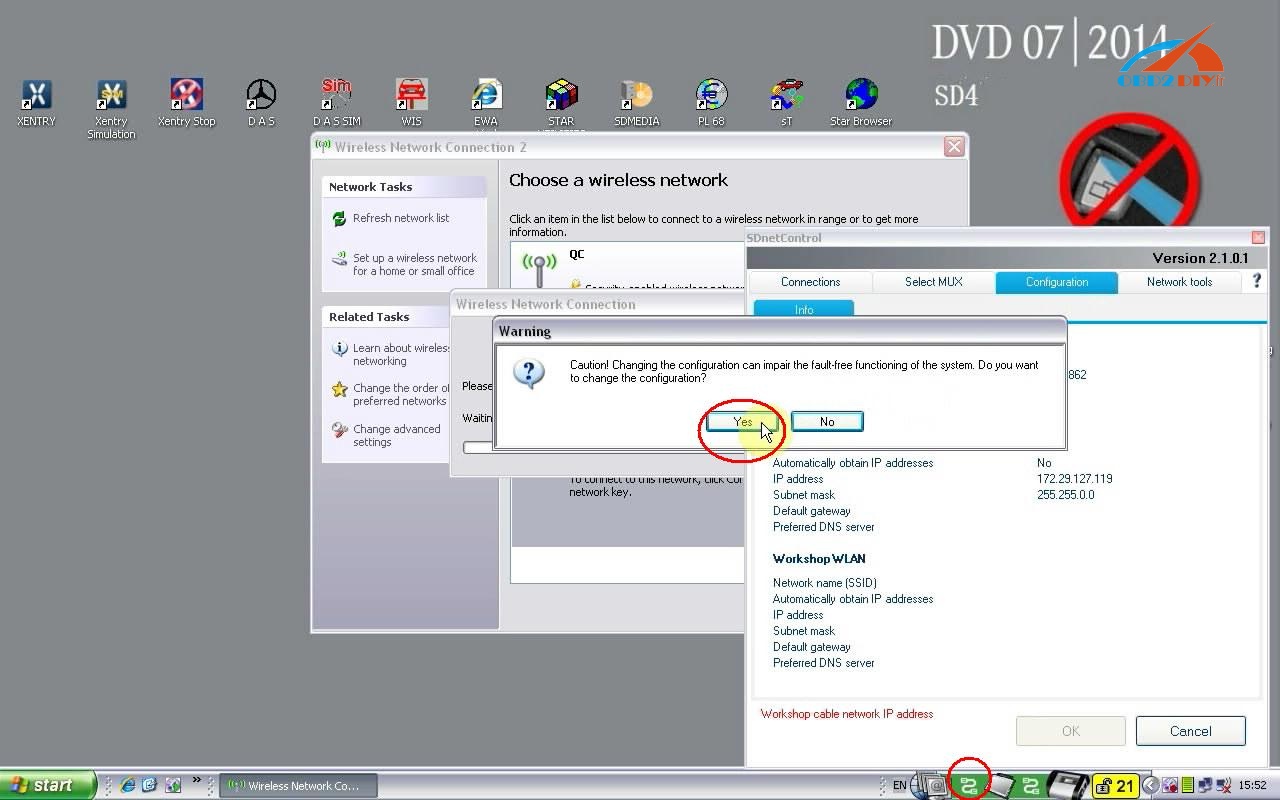
Click the red circle in the menu bar.
Select Configuration and then click Yes.
Select MUX>> Register/Configure.

Select Encryption: WEP/Hex and enter the key (26 “a”s), then click Start.
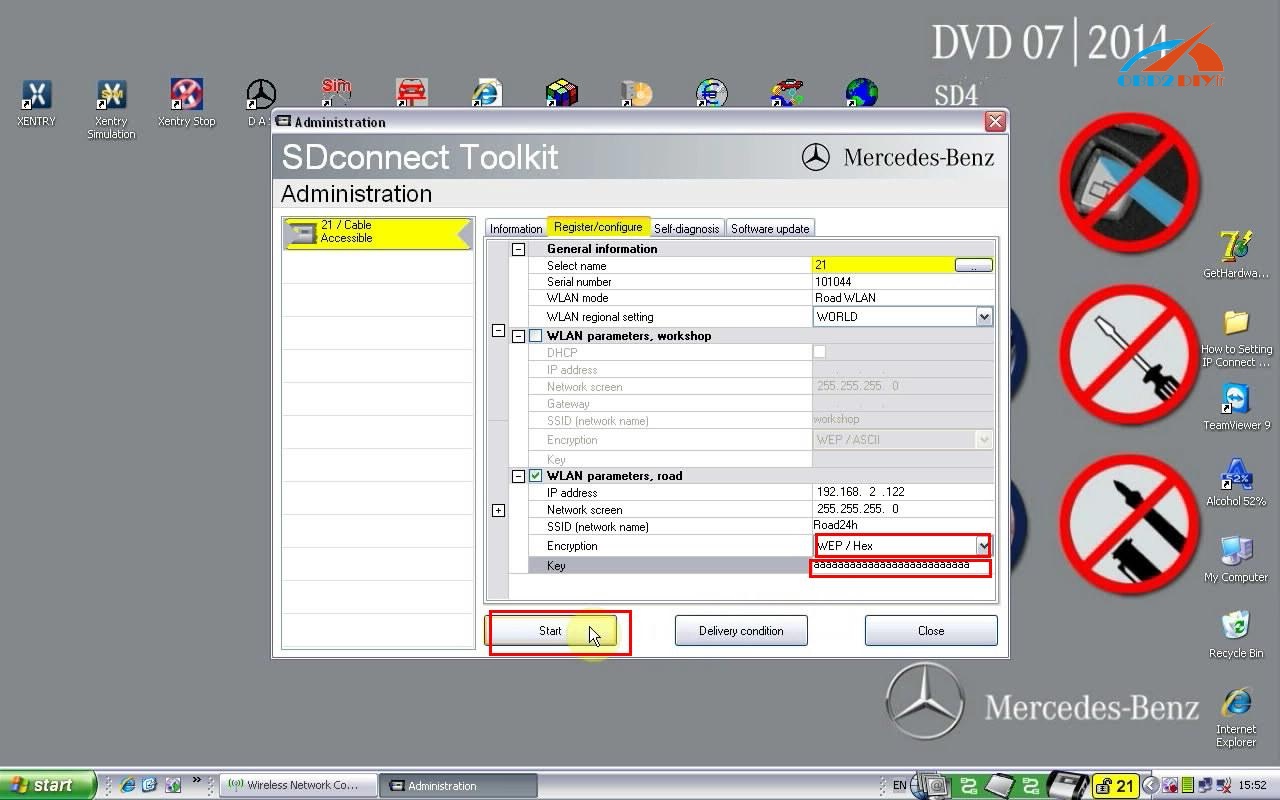
Close Administration interface.
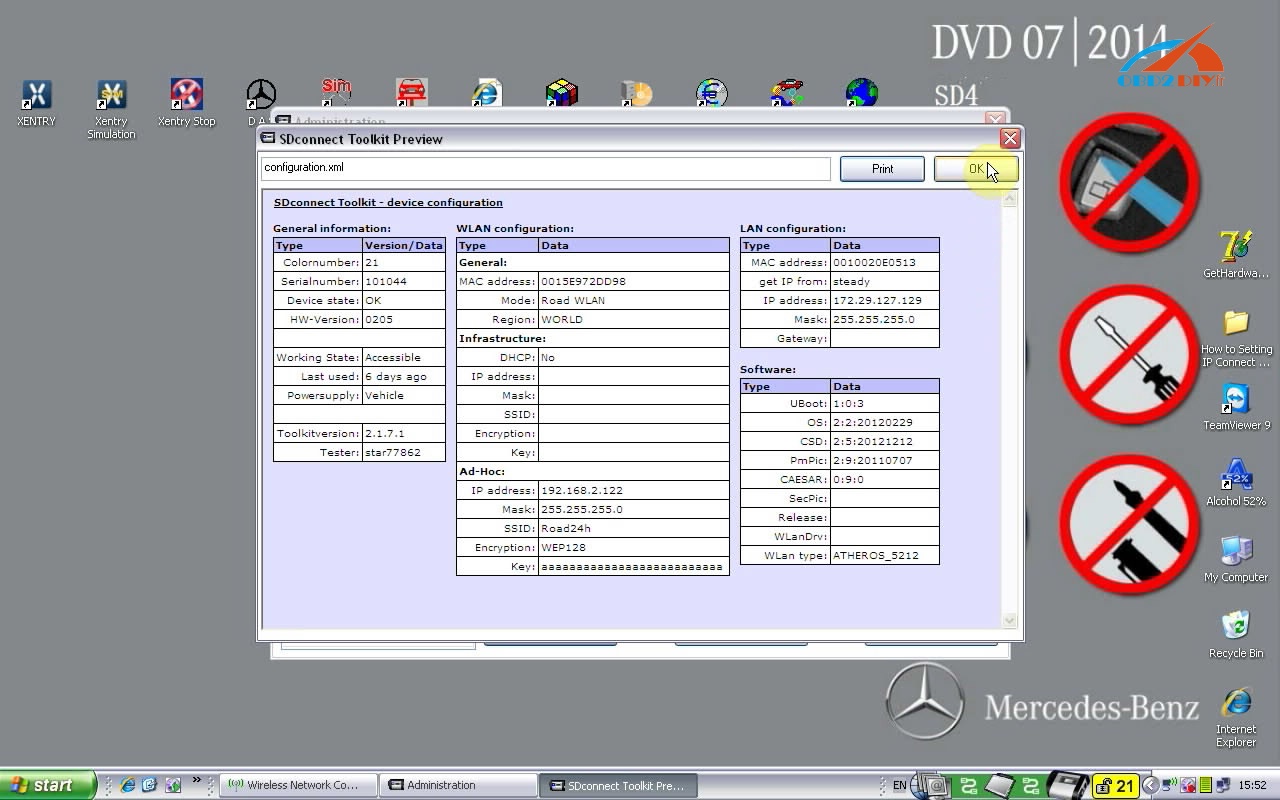
And you will see the network set just now is connected.
Part 3: MB SDconnect C4 WLAN/ WIFI connection failed (solved)
MB Star diagnostic C4 can only be used by wire connection for the WLAN cannot work normally and there is no WLAN option on SD C4 device.
This is not China SD C4 software;
Some files are lost when update yourself;
Other causes make SD C4 mux cannot work normally.
Just Update your sd connect c4 firmware to the newest version 2.30:
Please prepare 6 AA5 batteries according to Step-by-Step Instruction for how to install MB SD C4 Batteries.
Note: Please do use brand new batteries with sufficient electricity; otherwise, you will fail to update the firmware.
Select the green cable to connect to your laptop and MB SD Connect Compact 4 diagnostic multiplexer, and use OBD cable to connect to MB SD C4 multiplexer and your vehicle. (If the vehicle cannot be connected, select OBD 12V power instead.)
Open the software “2012.09 DAS”.
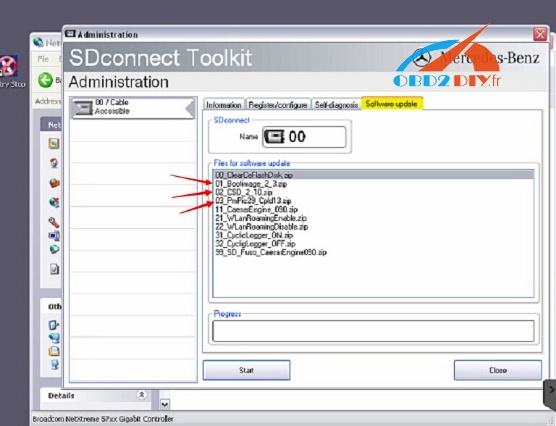
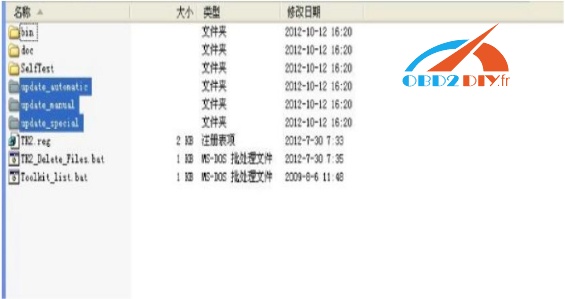
Go to C:\ program files \ SDconnect Toolkit to check whether there are the three following files as the pic below shows.
If the files’ names are different from the pic shows, please correct the names the same as the pic shows.
Update firmware to the latest version
For update, the three files above need to be upgraded.
02_CSD_2_10.zip> 01_Boolimage_2_3.zip> PmPic29_Cpld13.zip
NOTE: When update, please do use brand new batteries. Also, you need OBD cable to connect to your vehicle for power supply. (If you cannot succeed in connecting to the vehicle, choose OBD 12V power instead; otherwise, 622 error report would appear to tell you that the upgrade is unsuccessful.)

In general, this 00 error means that it is set poorly.
Another important tip: SDconnect C4 firmware update, please go to
WLAN option shows on MB SD C4 multiplexer. SD C4 can be connected via wire or WIFI.
Qui ont consulté cet article ont également consulté:
TehCenter
Настройка WiFi соединения SD Connect-Windows 10, 8.
Настройка WiFi соединения SDConnect “СТОА” / “WORKSHOP” для Windows 8, 10.
Windows 8 и Windows 10, в отличии от Windows 7, не позволяют создавать прямое соединение «компьютер – компьютер» (Road24). Однако есть возможность создать сеть SD Connect-Windows 10 (“СТОА” / “WORKSHOP” ) в режиме командной строки. Не все WiFi адаптеры поддерживают такой тип соединения. Потому в первую очередь нужно убедиться, что адаптер ноутбука позволяет создавать сеть Ad-hoc (SD Connect-Windows 10). Открываем окно командной строки с правами администратора: клавиши Win+X, командная строка (администратор)/ Command prompt(Admin).
Вводим команду netsh wlan show drivers и жмем enter. В открывшемся списке ищем пункт «Поддержка размещенной сети/Hosted network supported», который должен иметь параметр «Да/Yes».
Если данная функция имеет параметр «нет», то либо установлен не соответствующий драйвер WiFi адаптера, либо данный адаптер не поддерживает такой тип соединения. Далее создаем сеть “workshop” командой: netsh wlan set hostednetwork mode=allow ssid=»workshop» key=»aaaaaaaa». Где workshop – имя сети, aaaaaaaa – пароль. Сеть создана.
Сеть создается один раз. Больше команда создания сети не потребуется. В дальнейшем используются только команды запуска и остановки сети.
Запускаем сеть «workshop» командой: netsh wlan start hostednetwork. Сеть запущена.
Открываем папку «Сетевые подключения». Видим, что появился виртуальный адаптер Local area connection **.
Для удобства виртуальный адаптер желательно переименовать его в “workshop”.
Далее нужно виртуальному адаптеру присвоить статический IPадрес и маску подсети. Это делается командой: netsh interface ip set address name=»workshop» static 192.168.2.1 255.255.255.0
Жмем enter, сообщения об ошибке быть не должно. Проверить, сохранились ли настройки адаптера в свойствах адаптера.
На этом этапе настройка виртуального сетевого адаптера завершена, и ноутбук ожидает подключения мультиплексора SD Connect.
Остановка сети выполняется командой: netsh wlan stop hostednetwork. При этом в папке «Сетевые подключения» виртуальный адаптер исчезает .
Для удобства, чтоб не вводить команды вручную, можно создать исполнительные файлы с соответствующими командами. Файлы создаются в любом текстовом редакторе с произвольным названием. После чего им присваивается расширение bat. Файл создания сети имеет следующее содержание:
netsh wlan set hostednetwork mode=allow ssid=»workshop» key=»aaaaaaaa» Файл запуска сети и присвоения IP адреса:
netsh wlan start hostednetwork
netsh interface ip set address name=»workshop» static 192.168.2.1 255.255.255.0 Файл остановки сети:
netsh wlan stop hostednetwork Файл создания сети используется только один раз. Файлы запуска и остановки сети можно, для удобства, расположить на рабочем столе. Далее необходимо выполнить настройку (конфигурацию) мультиплексора SD Connect. Подключаем мультиплексор к ноутбуку по кабелю. Настройки lan адаптера должны быть уже прописаны.
Запускаем” SDConnect Administration”.
Переходим во вкладку «Регистрация/конфигурация». Вводим данные согласно скриншота и жмем Старт
Настройка мультиплексора завершена.
Если до этого мультиплексор уже имел настроенный режим Road24h, то теперь добавился второй режим «workshop” и появилась возможность переключения режимов беспроводного соединения. На мультиплексоре переключение режимов беспроводного соединения выполняется кнопками дисплейной панели.
В режиме “workshop” , постоянно мигающий, красный светодиод означает, что прибор ожидает соединения с ноутбуком. Как только вы на ноутбуке запустите исполнительный файл «запуск сети», соединение установится автоматически и светодиод перестанет мигать. Очередность запуска сети в ноутбуке и включения мультиплексора в режиме “workshop” не имеет значения. Остановка сети выполняется так же исполнительным файлом. При этом мультиплексор снова переходит в режим ожидания сети.
How to Instal the Mercedes SD Connect 4 Battery And WIFI Card
Before C4 hardware update we need to install batteries and MB SD C4 WIFI card , customers maybe do the wrong operating during instal battery and C4 WIFI card progress. Today, eobdtool.com share how to to instal the Star diagnosis C4’s batteries and WIFI card step by step.
Steps for Installing Rechargeable batteries and WIFI Card


3.2 Take out the fixation of Batteries Space. Pay attention to the Battery polarity marked in the Batteries Space.


3.4 Button on the Fixation of Batteries Space after inputting the Rechargeable batteries.
3.5 Use the T20 Plum screwdriver to fix the screws of Batteries Space fixation as below. Inserting the batteries is finished.