- Как установить Google Cloud SDK на Linux Mint 20
- Install Google Cloud SDK on Linux Mint 20 Ulyana
- Шаг 1. Перед запуском приведенного ниже руководства важно убедиться, что ваша система обновлена, выполнив следующие apt команды в терминале:
- Шаг 2. Установка Google Cloud SDK на Linux Mint 20.
- How to Install Android SDK 4.0.3 and Eclipse ADT on Linux Mint 12 / Ubuntu 11.10
Как установить Google Cloud SDK на Linux Mint 20

В этом руководстве мы покажем вам, как установить Google Cloud SDK на Linux Mint 20. Для тех из вас, кто не знал, Google Cloud SDK (Software Development Kit) предоставляет набор инструментов, которые используются для управления ресурсами, размещенными на Облачная платформа Google (GCP). Хорошее Облако SDK представляет собой ряд важных инструментов командной строки , такие как gcloud , gsutil и bq что обеспечивает эффективное управление приложениями и другими ресурсами в Google Cloud
В этой статье предполагается, что у вас есть хотя бы базовые знания Linux, вы знаете, как использовать оболочку, и, что наиболее важно, вы размещаете свой сайт на собственном VPS. Установка довольно проста и предполагает, что вы работаете с учетной записью root, в противном случае вам может потребоваться добавить ‘ sudo ‘ к командам для получения привилегий root. Я покажу вам пошаговую установку Google Cloud SDK на Linux Mint 20 (Ульяна).
Install Google Cloud SDK on Linux Mint 20 Ulyana
Шаг 1. Перед запуском приведенного ниже руководства важно убедиться, что ваша система обновлена, выполнив следующие apt команды в терминале:
sudo apt updatesudo aptinstall apt-transport-https ca-certificates gnupg
Шаг 2. Установка Google Cloud SDK на Linux Mint 20.
По умолчанию Google Cloud SDK недоступен в базовом репозитории Linux Mint. Теперь мы добавляем репозиторий Google Cloud в вашу систему, используя следующую команду:
echo"deb [signed-by=/usr/share/keyrings/cloud.google.gpg] https://packages.cloud.google.com/apt cloud-sdk main" |sudo tee-a/etc/apt/sources.list.d/google-cloud-sdk.list
Затем импортируйте открытый ключ Google Cloud:
curl https://packages.cloud.google.com/apt/doc/apt-key.gpg|sudo apt-key--keyring/usr/share/keyrings/cloud.google.gpg add-
Наконец, установите Google SDK с помощью следующей команды:
sudo aptupdatesudo aptinstall google-cloud-sdk
При желании установите любой из следующих дополнительных компонентов :
google-cloud-sdk-app-engine-python
google-cloud-sdk-app-engine-python-extras
google-cloud-sdk-app-engine-java
google-cloud-sdk-app-engine-go
google-cloud-sdk-bigtable-emulator
google-cloud-sdk-cloud-build-local
google-cloud-sdk-datastore-emulator
google-cloud-sdk-firestore-emulator
google-cloud-sdk-pubsub-emulator
Например, компонент можно установить следующим образом: google — cloud — sdk — datastore — emulator
sudo aptinstallgoogle-cloud-sdk-datastore-emulator После успешной установки Google Cloud SDK в вашей системе Linux Mint инициализируйте его, выполнив следующую команду:
$ gcloud init Welcome! This command will take you through the configuration of gcloud. Your current configuration has been set to: [default] You can skip diagnostics next time by using the following flag: gcloud init --skip-diagnostics Network diagnostic detects and fixes local network connection issues. Checking network connection. done. Reachability Check passed. Network diagnostic passed (1/1 checks passed). You must log in to continue. Would you like to log in (Y/n)?
Следуйте инструкциям на экране, чтобы инициализировать вашу систему. Дополнительные сведения см. В официальных инструкциях по инициализации среды Cloud SDK .
Поздравляю! Вы успешно установили Google Cloud SDK . Благодарим за использование этого руководства для установки последней версии Google Cloud SDK в системе Linux Mint. Для получения дополнительной помощи или полезной информации мы рекомендуем вам посетить официальный веб-сайт Google Cloud .
How to Install Android SDK 4.0.3 and Eclipse ADT on Linux Mint 12 / Ubuntu 11.10
![]()
Ubuntu and Linux Mint are sharing desktop space with significant percentage, both are doing great job for the java developer with Eclipse IDE. Android is one of the famous operating system for mobile devices, which is open source, and is easy for developers to build powerful applications for Android-powered mobile devices. Eclipse most widely used IDE for developing the apps for Android with the help of extension. Here is is the how to guide for installing Android SDK and Eclipse ADT (Android development kit) on Linux Mint 12 / Ubuntu 11.10.
Before installing Android SDK, you must have the following packages installed on your machine.
Install Java development kit:
Issue the following command to install JDK.
[email protected]~/$ sudo apt-get install openjdk-7-jdk
Install Eclipse IDE:
Download Android SDK 4.0.3:
Android 4.0 delivers a refined, unified UI for phones and tablets and introduces innovative features for users and developers. If you are developing the apps for the Android download the latest version of SDK. Assume that downloaded file is in ~/Downloads directory.
Go to the downloads directory.
Extract the downloaded file.
[email protected]~/$ tar -zxvf android-sdk_r16-linux.tgz
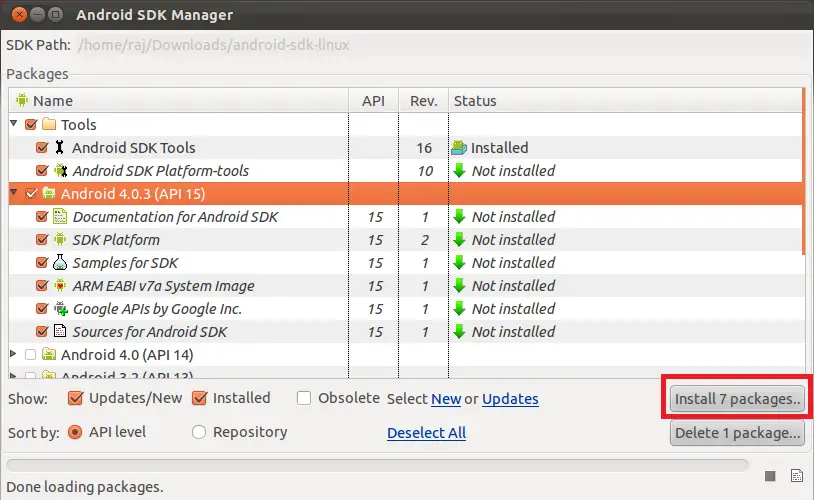
Run the Android SDK manager.
[email protected]~/$ sudo ./android-sdk-linux/tools/android
Select the version of your choice and then click on the install packages in the right side (for demonstration purpose i am installing the Android 4.0.3).
Install ADT Plugin:
To install ADT plugin, go to Help —> Install New Software .
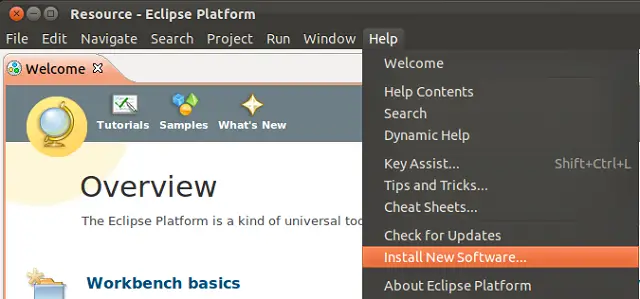
Name: ADT Plugin and Location: https://dl-ssl.google.com/android/eclipse and click on OK.

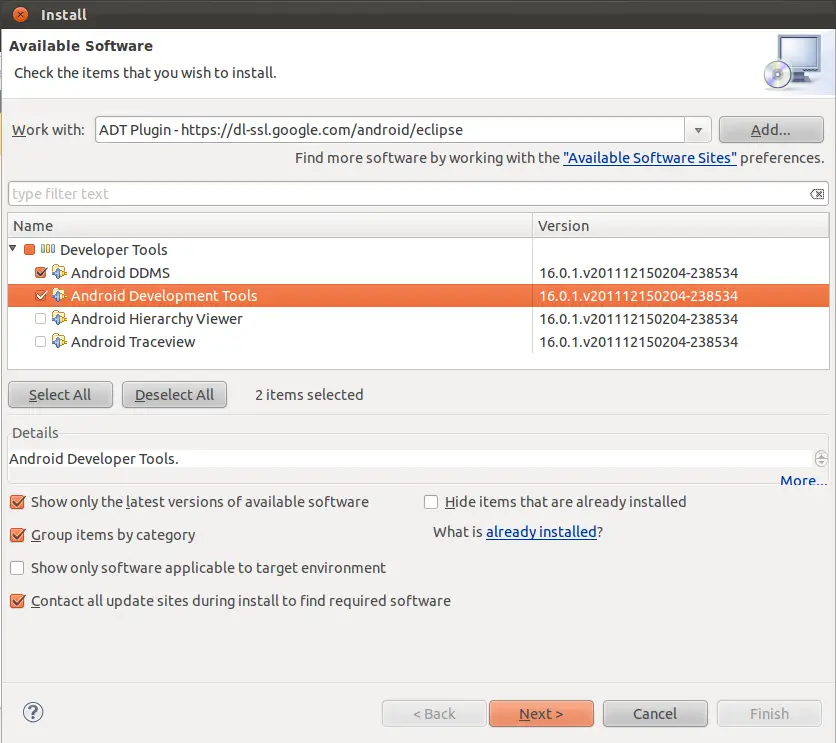
Select Android DDMS and Android Development Tools then click next.
If you got any type of error message like below,
Cannot complete the install because one or more required items could not be found. Software being installed: Android Development Tools 16.0.1.v201112150204-238534 (com.android.ide.eclipse.adt.feature.group 16.0.1.v201112150204-238534) Missing requirement: Android Development Tools 16.0.1.v201112150204-238534 (com.android.ide.eclipse.adt.feature.group 16.0.1.v201112150204-238534) requires ‘org.eclipse.wst.sse.core 0.0.0′ but it could not be found
Add Indigo repository:
Name: Indigo Location: http://download.eclipse.org/releases/indigo
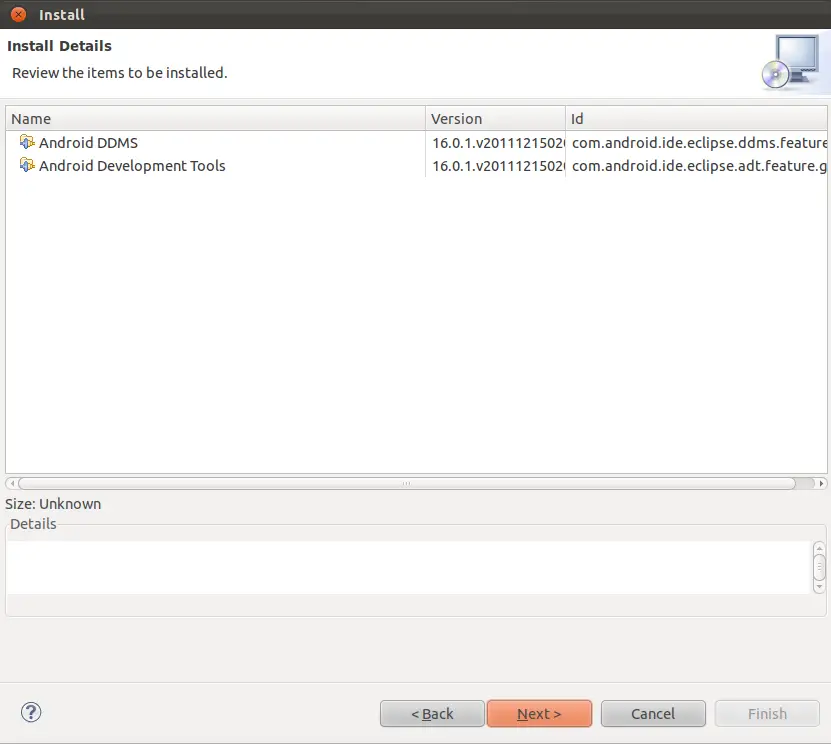
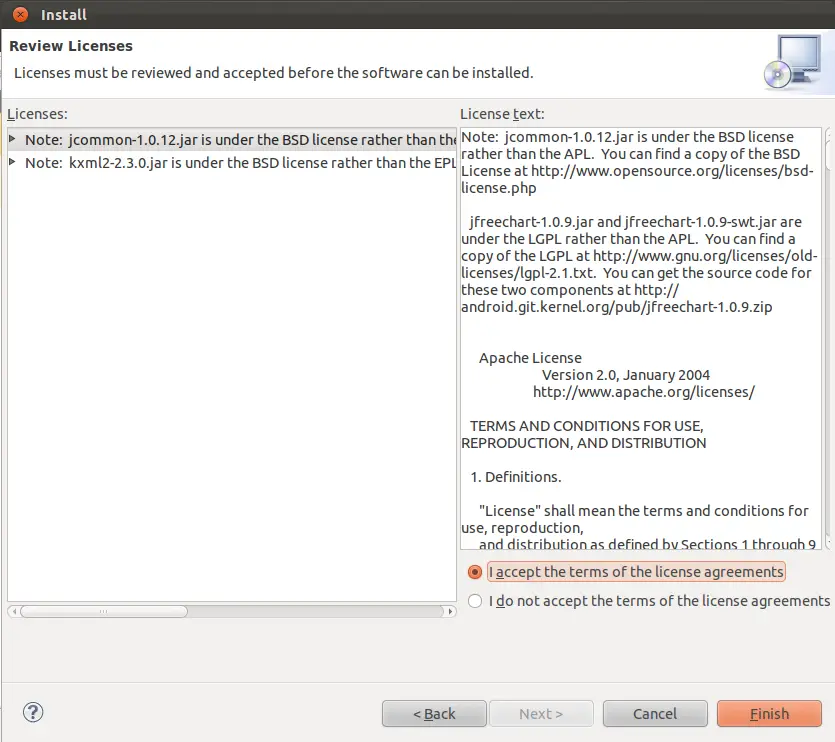
Then try to install the above Android DDMS and Android Development Tools . Click on next in the review details.
Accept the License agreement and click on Finish.
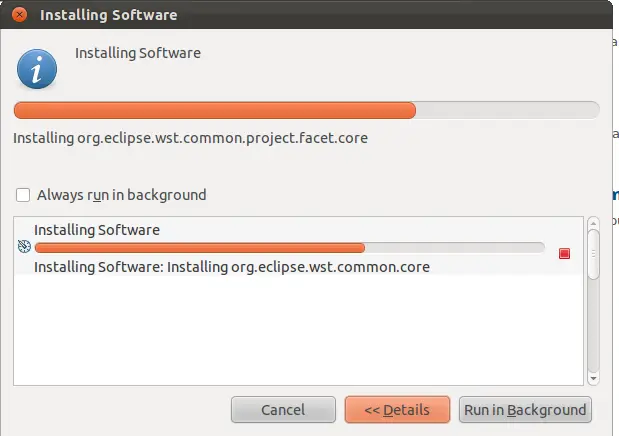
Once you have clicked, it will start to install the ADT plugin for Eclipse.
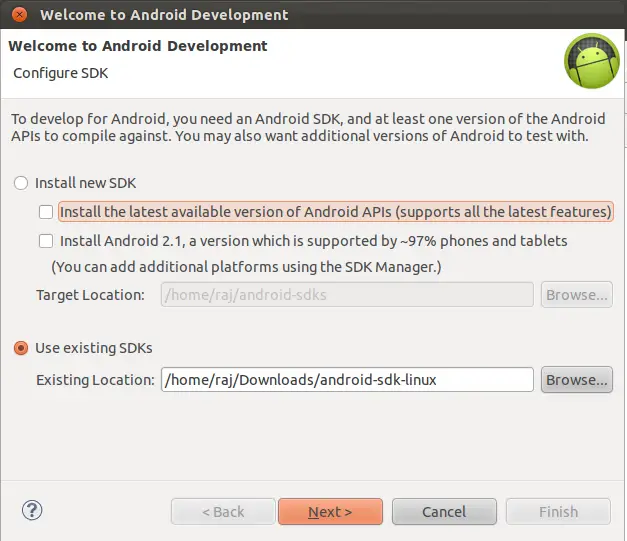
After the restart of Eclipse IDE, you should get the following Welcome to Android Development window which is asking you to configure the Android SDK for the development. Browse for the existing SDK manager that we have downloaded before.
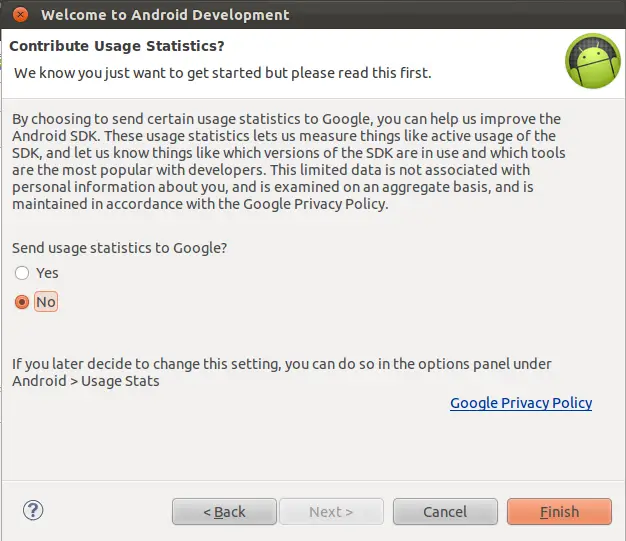
Choose option to send statistics to Google.
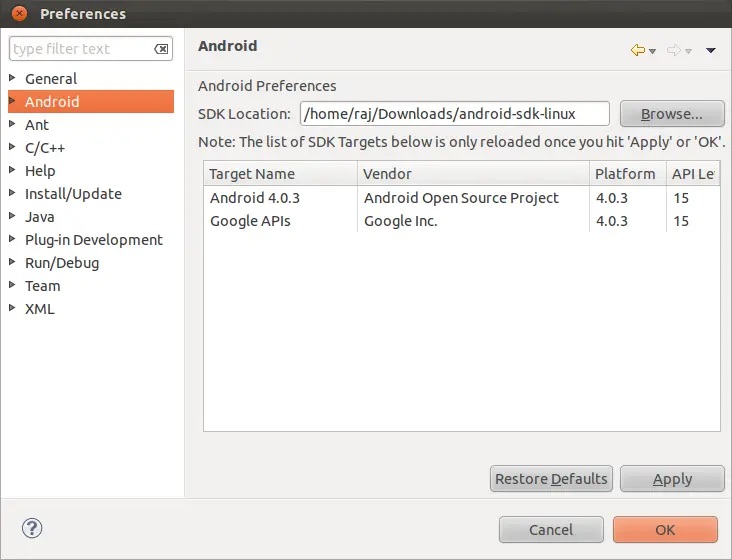
If you haven’t got the above Android development window; you can manually add SDK manager by going to Window —> Preference .
Android Virtual Device:
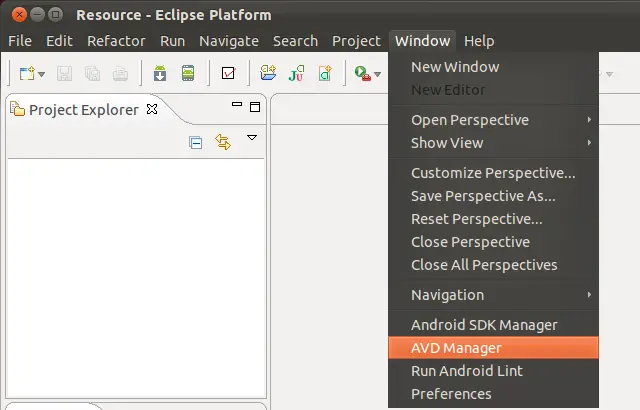
You can start to test the android apps by creating the virtual device by going to Window —> AVD Manager .
Click on New; fill up the details about the virtual device in the pop up window and then click on create AVD.
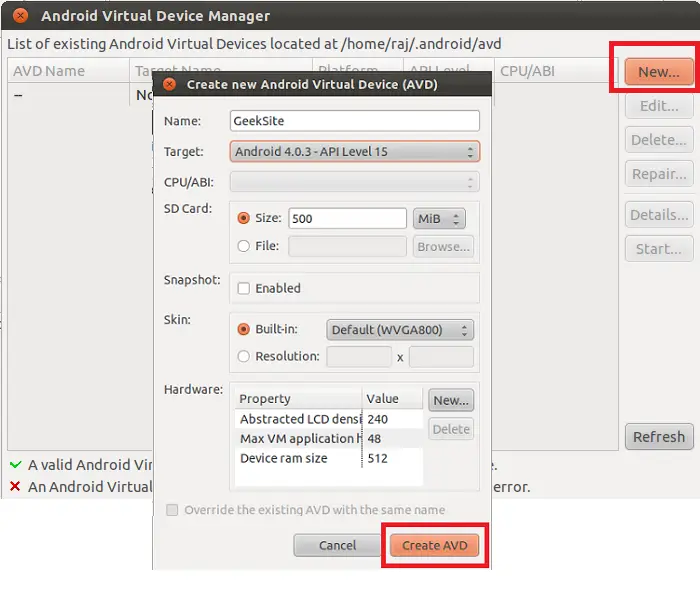
Once created; click on Start (This might take some minutes).
Screen Shot of Android 4.0.3:

Now you create the new project for Android from File —> New —> Project .