- Macbook self-assigning IP address, can’t connect to wifi
- neonbliss
- satcomer
- neonbliss
- satcomer
- r0k
- hiddenmarkov
- Tarrier
- GEA78
- Self-Assigned IP Address Error on Mac: How to Fix?
- Self-Assigned IP Address on Mac
- 1. Power Cycle Modem/Router
- 2. Renew DHCP Lease
- 3. Delete PLIST Files
- 4. Set Service Order
- 5. Create New Network Location
- 6. Switch to Google DNS
Macbook self-assigning IP address, can’t connect to wifi
You are using an out of date browser. It may not display this or other websites correctly.
You should upgrade or use an alternative browser.
neonbliss
macrumors newbie
I did an extensive search for this question and I saw that some people had it resolved but I tried most of the suggestions and didn’t have any luck.
Last night i was using my macbook on the internet with no problems, went to bed and when I woke up in the morning I tried to check my email and the exclamation point showed up in the top bar. Someone else has a macbook pro in our house and they can get online with no problem, but for whatever reason I’ve been booted off and can’t get back on.
I read some comments that said sometimes another computer can «steal» the IP address of your computer and maybe that’s what happened to me? When I go into my network preferences it says Status: On but it has a self-assigned IP address 169.254.18.44 and will not be able to connect to the internet.
I’ve tried rebooting the system, rebooting my computer, deleting the wifi passwords off my keychain access, removing the network names and readding them. nothing seems to work.
satcomer
Suspended
1. Turn off your wireless in your troubled Mac.
2. Open System Preferences->Network tab and highlight your Airport card.
3. In the right hand pane click on the ‘Advanced’ button.
4. In the main ‘Wi-Fi’ mini-tab delete all ‘Previous Networks’ connections.
5. The save out and then go to the application /Applications/Utilities/
Keychain Access.app and in that application find the entries for your wireless router.
6. Then go back into your System Preferences->Network pane and highlight your Wi-Fi card again and use the pane to turn on your wireless again and use that to rejoin your wireless network.
7. Put in your username/password again and rejoin and save the password again.
neonbliss
macrumors newbie
Tried all of that and still nothing.
highlight your Wi-Fi card again and use the jane to turn on your wireless again and use that to rejoin your wireless network.
what did you mean by «jane»? Other that I did everything exactly how you said it and still jumped back to self-assigned IP.
satcomer
Suspended
Tried all of that and still nothing.
what did you mean by «jane»? Other that I did everything exactly how you said it and still jumped back to self-assigned IP.
r0k
macrumors 68040
Tried all of that and still nothing.
what did you mean by «jane»? Other that I did everything exactly how you said it and still jumped back to self-assigned IP.
hiddenmarkov
macrumors 6502a
The 169.x.x.x is what is called an APIPA address. Long story short you are not pulling an ip address from a dhcp server (built into the home router in your case). When you don’t do this the computer will give you a 169.x.x.x address.
have you tried to connect using a wired connection? You may want to isolate maybe the wireless nic having issues.
If wired works, console/gui into your router and check its settings.
Tarrier
macrumors newbie
Just seen this post. I appreciate it’s a few months’ old now, and I hope the OP’s solved his issue by now! The reason for my post is that I have just recovered from a very similar, if not identical, problem. It was an extension conflict that caused my issue. I’ve written up my solution here, in case it’s of use to anyone:
GEA78
macrumors newbie
This is a post for dummies, like myself, so apologize my non-tech language
I had the self-assigned IP problem for a week and tried all possible easy fixes:
-Reboot modem and devices (twice, sounds like voodoo to me)
-Opened system preferences/network/advanced/TCP/IP clicked renew DHCP license —>this would allow sometime one device to connect, but not all devices at once
-Opened system preferences/network/advanced/TCP/IP and under configure IPv6 clicked link-local only (same results as above)
-Even ruled out «interferences» setting up a 5.2 Ghz network (sorry if I’m using the wrong words, like I said, I’m quite ignorant about this)
My set up was a modem, three powerline extenders that connected via ethernet to 1) an airport express, 2) an i-mac, 3) an apple TV (if you have no idea what a powerline is read side note below on powerlines)
I finally understood what the problem was: I could only connect one device at the time, meaning that if I restarted the modem with only one device connected that device would work. If I had two or more connected the remaining devices had a self-assigned IPs.
Now for you dummies-like-me out there (I apologize to all techies out there for using wrong words, concepts etc. the modem receives internet from provider and gives it to your home. Internet works in numbers (IP addresses) that tell your modem what devices are connected to it. Now, modems tpically, can connect to one thing at the time. To connect multiple devices you need a router. The router looks exactly like a modem to me (ha ha) it’s another little black box, but it will have multiple ethernet ports on its back. Airport express can work as routers (theoretically, as it turned out mine wasn’t). The router generates a range of IP addresses, for example, if you are using your airport express as a router you can see the range under system preferences/network/advanced/TCP/IP it could be 10.10.00.01 to 10.10.00.200 (probably not, maybe this is an impossible range, like I said, dummy here, but it will look something like this to other dummies out there). Now, if that is your range and your devices have an IP address of 169.225.xxx.xxx you have a problem. Your device has an IP address not in the range determined by your router= you have no internet. To find the IP address of your device: on a mac system preferences/network/advanced/TCP/IP (I think it’s the IPv4 address. maybe and it should have the first bunch of numbers identical to your router or within the range determined by your airport express) on my apple TV it was under settings/general/connection
The problem: I finally determined that the problem was that my airport express, for some reason, could only assign one IP address at the time. If all 3 devices were connected, only one would get a valid IP address. Basically, it was not doing its router job. Apple support were sweet as pie but useless and told me it was a problem due to my provider (which wasn’t).
The fix: I plugged my modem into an old router I had lying around in the house from my pre-airport express days, restarted the modem and everything went back to normal I almost cried for joy.
My current set up:
1-cable from provider into modem
2-ethernet cable from modem into router (into the internet port, not one of the numbered ethernet ports)
3-ethernet cable from one of the numbered ports of the router into ethernet port of powerline extender, plugged into a wall
4a-2nd powerline extender plugged into a wall on a different floor. Ethernet cable out of that into my airport express to generate wi-fi
4b-3rd powerline into a different wall plug. Ethernet from that to i-mac
4c-4th powerline into different plug connected through ethernet to my apple TV
Side note on powerline extenders: I live in a big old house with thick walls and wi-fi won’t reach everywhere. Powerline extenders are magic portals that allow your internet to travel through walls (ha ha). I have TP-LINK (TP-link TL-PA511 KIT AV500 Powerline Gigabit Adapter Starter Kit, up to 500Mbps). They’re $60 a pair on amazon. The way they work: plug an ethernet cable from your router into the powerline, plugged into the wall (they have to be plugged into the wall to work!). Plug another powerline anywhere into your house (within a ridiculous distance, maybe 300 meters/yards or so) and internet will come out of that precious little thing at the same speed it came out of your modem=magic.
Side note on airport express: I think my airport express is glitchy but that said, I used airport utility to set it up. How? On a mac just look for airport utility (apple key+ space to open the search tab). From there click on wi-fi. If the utility does not see your airport express reset it with a pen, clicking that little spot that can only be pushed with a pen till the yellow light pulses fast a few times. For me, sometimes, it takes a couple of clickings to get there. Then wait. On the utility after a while if you click on «other wi-fi devices» on the up-left corner you’ll see a number in the scrolldown menu: that’s your reset airport express. Select it. Set it to create a wi-fi network (if that’s what you need) name the network, assign a password and you should be all set.
Self-Assigned IP Address Error on Mac: How to Fix?
If Wi-Fi or Ethernet is not working on your MacBook due to “Self-Assigned IP Address” error, you can find below the steps to restore network connectivity on your Mac.
Self-Assigned IP Address on Mac
In a typical case of this nature, the MacBook appears to be connected to the Network (WiFi or Ethernet), but it fails to load webpages and comes up with “Self-Assigned IP” error.
As indicated by the wordings (Self-Assigned IP Address), the reason for this problem is due to your Mac Assigning itself an IP Address that is not valid or not recognized on the network.
Luckily, in most cases the problem of No Internet connectivity due to “Self-Assigned IP Address” can be fixed by rebooting the modem.
1. Power Cycle Modem/Router
Before going ahead with other methods, simply disconnect the Modem/Router from its power supply source > wait for 60 seconds and reconnect the Modem/Router back to its power supply.
After this, you should find internet working properly on your Mac, as it starts using a valid IP Address on both WiFi and Ethernet to connect to the network.
2. Renew DHCP Lease
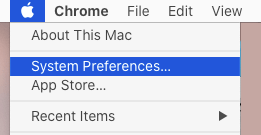
1. Click on Apple Logo in the top menu-bar and select System Preferences… in the drop-down menu.
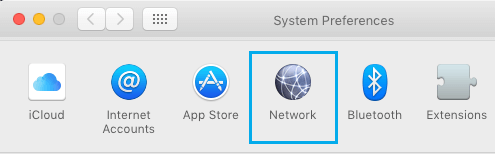
2. On System Preferences screen, click on the Network Icon.
3. On Network screen, select your Network ( Ethernet or WiFi ) in the side-menu and click on Advanced .
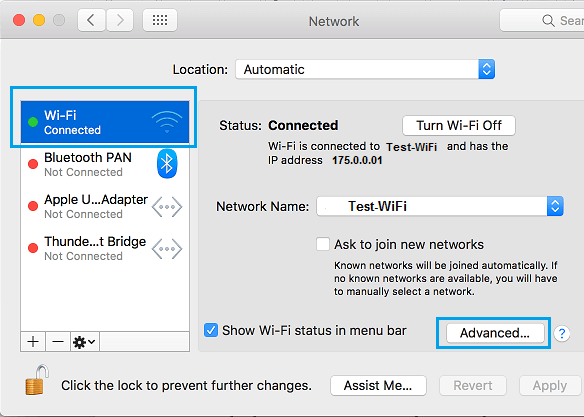
4. On the next screen, switch to TCP/IP tab and click on Renew DHCP Lease button.
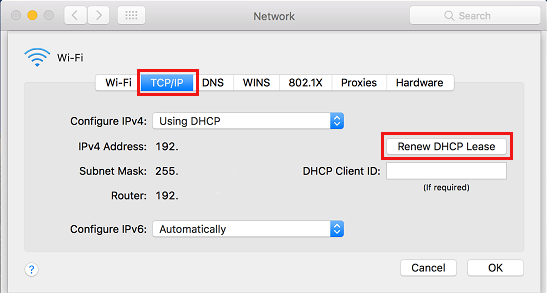
5. Click on OK to save the revised settings.
After the DHCP lease is renewed, you should be able to connect to internet
3. Delete PLIST Files
The problem of No Internet on Mac due to Self-assigned IP Address can be fixed by removing certain files related to network connectivity on your computer.
1. Click on the Finder Icon in taskbar > click on the Go tab in top-menu bar and select Go to Folder option in the drop-down menu.

2. In Go-to window, Type /Library/Preferences/SystemConfiguration/ and click on the Go button.
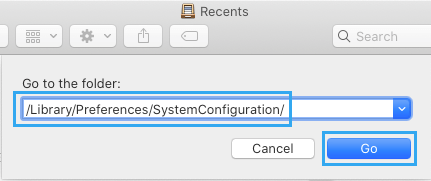
4. In System Configuration folder, delete the following folders (right-click on the Folders and move them to trash).
- com.apple.airport.preferences.plist
- com.apple.network.identification.plist
- NetworkInterfaces.plist
- Preferences.plist
Note: Your Mac will automatically recreate above Folders when it restarts.
5. Shutdown the MacBook > Wait for 30 seconds and Restart the Mac again and see if you can now connect to the internet.
4. Set Service Order
Make sure that your MacBook is always connecting to your preferred network type (WiFi or Ethernet).
1. Click on Apple Logo > System Preferences > Network > On the Network screen, click on the Gear icon and select Set Service Order option in the drop-down menu.
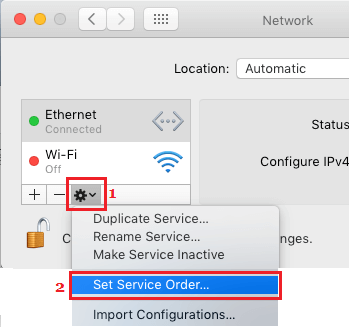
2. On Service Order window, drag your preferred Network (WiFi or Ethermet) to the top position.
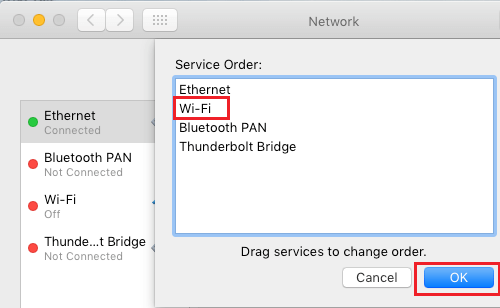
3. Once you are done, click on OK to save the changes.
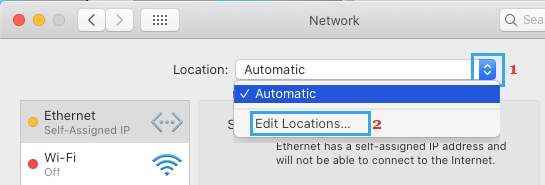
5. Create New Network Location
If you are still unable to connect to Internet, create a New Network Location on your Mac and renew its DCHP lease.
1. Click on Apple Logo > System Preferences > Network > On the Network screen, open the Location menu and select Edit Locations option.
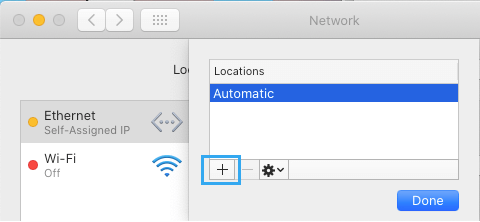
2. On the next screen, click on the Plus icon to Add New Location.
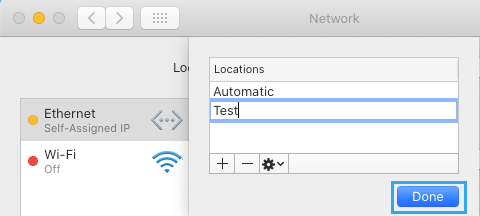
3. On the next screen, type a Name for the New Network Location and click on Done .
4. After creating new location, select either WiFi or Ethernet in the side menu and click on Advanced .
5. On the next screen, switch to TCP/IP tab and click on Renew DHCP Lease .
6. Click on OK to save the new settings.
This should certainly fix “Self-Assigned IP Address problem and restore network connectivity on your Mac.
6. Switch to Google DNS
If your Mac is frequently struggling from Network connectivity issues, the problem might be due to the DNS Servers of your Internet Service provider being busy and clogged up.
To fix this issue, you can consider switching the DNS servers on your Mac to Google DNS or Open DNS.