how to send texts over wifi android?
Send Messege by WiFi ! Kisi ko Bhi SMS Bheje FREE Main | Without Any Application ||🔥🔥
How To Install RCS Messaging – Works On Any Android & Any Carrier
Yes, you can send MMS without data. You will need to have an active cellular data connection to send or receive MMS messages.
SMS is a text-only communication method, while MMS can send text, images, and other media. MMS is generally used for sending larger files or photos.
On an iPhone, go to Settings > Cellular > and toggle the MMS Messaging switch to on.
To enable MMS on Android, you need to make sure that your phone is set up to send and receive MMS messages. You also need to have a data plan that includes MMS messaging. Once you have those things set up, you can open the Messaging app and tap the Menu icon. Select Settings, then tap the Multimedia Messaging Service (MMS) option. Make sure that the slider next to MMS is turned on.
There are a few ways that you can text without a phone number. One way is to use an app like WhatsApp or Facebook Messenger. These apps allow you to send messages to other people who have the app installed on their phone. Another way to text without a phone number is to use a web-based messaging service like Google Hangouts or Skype. These services allow you to send messages to other people who have accounts with them.
There are a few ways to do this. One way is to use an app like Skype or WhatsApp which allow you to send and receive messages without a SIM card. Another way is to use a service like Google Voice, which will give you a phone number that you can use to send and receive SMS messages.
A text message is a message that is sent between two mobile devices, while a SMS message is a message that is sent between a mobile device and a landline phone.
Open the Settings app on your Android device.
Scroll down and tap on Messages.
Toggle the SMS switch to the On position.
There are a few reasons why your phone might be sending MMS instead of SMS. One possibility is that you have a data plan that includes MMS, and your phone is using that plan instead of your SMS plan. Another possibility is that your phone is having trouble connecting to the SMS network, and is defaulting to the MMS network instead.
There are a few ways to send MMS messages through Wi-Fi. One way is to use an app like WhatsApp or Facebook Messenger. These apps allow you to send messages to other people who are also using the app. Another way is to use a website called MMS Gateway. This website allows you to send messages to any phone number, even if the person doesn’t have the app installed.
There are a few ways to text without data on Android. One way is to use an app like WhatsApp or Facebook Messenger, which allow you to send messages over Wi-Fi. Another way is to use an SMS app like Textra or GoSMS, which allow you to send and receive text messages without using data.
There are a few reasons why your MMS might not be working on Android. One possibility is that your phone’s APN settings are not configured correctly. Another possibility is that there is a problem with your phone’s SIM card. You can try resetting your phone’s network settings to see if that fixes the problem. If it doesn’t, you might need to contact your carrier for help.
There are a few ways to fix this issue. One way is to make sure that your server is configured to send messages as MMS instead of SMS. Another way is to make sure that the recipient’s phone is configured to receive messages as MMS.
There could be a number of reasons why your text messages are not being delivered. One possibility is that the recipient’s phone is turned off or out of range. Another possibility is that there is a problem with the recipient’s service provider. You can also try sending the text message to a different number to see if it gets delivered.
How to send data through wifi in android programmatically?
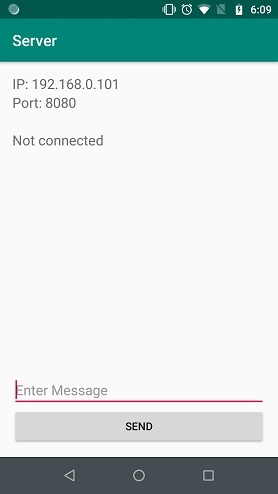
Step 1 − Create a new project in Android Studio, go to File ⇒ New Project and fill all required details to create a new project.
Step 2 − Add the following code to res/layout/activity_main.xml.
Step 3 − Add the following code to src/MainActivity.java
package com.server.myapplication.server; import android.annotation.SuppressLint; import android.net.wifi.WifiInfo; import android.net.wifi.WifiManager; import android.os.Bundle; import android.support.v7.app.AppCompatActivity; import android.view.View; import android.widget.Button; import android.widget.EditText; import android.widget.TextView; import java.io.BufferedReader; import java.io.IOException; import java.io.InputStreamReader; import java.io.PrintWriter; import java.net.InetAddress; import java.net.ServerSocket; import java.net.Socket; import java.net.UnknownHostException; import java.nio.ByteBuffer; import java.nio.ByteOrder; @SuppressLint("SetTextI18n") public class MainActivity extends AppCompatActivity < ServerSocket serverSocket; Thread Thread1 = null; TextView tvIP, tvPort; TextView tvMessages; EditText etMessage; Button btnSend; public static String SERVER_IP = ""; public static final int SERVER_PORT = 8080; String message; @Override protected void onCreate(Bundle savedInstanceState) < super.onCreate(savedInstanceState); setContentView(R.layout.activity_main); tvIP = findViewById(R.id.tvIP); tvPort = findViewById(R.id.tvPort); tvMessages = findViewById(R.id.tvMessages); etMessage = findViewById(R.id.etMessage); btnSend = findViewById(R.id.btnSend); try < SERVER_IP = getLocalIpAddress(); >catch (UnknownHostException e) < e.printStackTrace(); >Thread1 = new Thread(new Thread1()); Thread1.start(); btnSend.setOnClickListener(new View.OnClickListener() < @Override public void onClick(View v) < message = etMessage.getText().toString().trim(); if (!message.isEmpty()) < new Thread(new Thread3(message)).start(); >> >); > private String getLocalIpAddress() throws UnknownHostException < WifiManager wifiManager = (WifiManager) getApplicationContext().getSystemService(WIFI_SERVICE); assert wifiManager ! = null; WifiInfo wifiInfo = wifiManager.getConnectionInfo(); int ipInt = wifiInfo.getIpAddress(); return InetAddress.getByAddress(ByteBuffer.allocate(4).order(ByteOrder.LITTLE_ENDIAN).putInt(ipInt).array()).getHostAddress(); >private PrintWriter output; private BufferedReader input; class Thread1 implements Runnable < @Override public void run() < Socket socket; try < serverSocket = new ServerSocket(SERVER_PORT); runOnUiThread(new Runnable() < @Override public void run() < tvMessages.setText("Not connected"); tvIP.setText("IP: " + SERVER_IP); tvPort.setText("Port: " + String.valueOf(SERVER_PORT)); >>); try < socket = serverSocket.accept(); output = new PrintWriter(socket.getOutputStream()); input = new BufferedReader(new InputStreamReader(socket.getInputStream())); runOnUiThread(new Runnable() < @Override public void run() < tvMessages.setText("Connected
"); > >); new Thread(new Thread2()).start(); > catch (IOException e) < e.printStackTrace(); >> catch (IOException e) < e.printStackTrace(); >> > private class Thread2 implements Runnable < @Override public void run() < while (true) < try < final String message = input.readLine(); if (message ! = null) < runOnUiThread(new Runnable() < @Override public void run() < tvMessages.append("client:" + message + "
"); > >); > else < Thread1 = new Thread(new Thread1()); Thread1.start(); return; >> catch (IOException e) < e.printStackTrace(); >> > > class Thread3 implements Runnable < private String message; Thread3(String message) < this.message = message; >@Override public void run() < output.write(message); output.flush(); runOnUiThread(new Runnable() < @Override public void run() < tvMessages.append("server: " + message + "
"); etMessage.setText(""); > >); > > >
Step 4 − Add the following code to androidManifest.xml
Client
Step 1 − Create a new project in Android Studio, go to File ⇒ New Project and fill all required details to create a new project.
Step 2 − Add the following code to res/layout/activity_main.xml.
Step 3 − Add the following code to res/layout/MainActivity.java.
package com.client.myapplication.client; import android.annotation.SuppressLint; import android.os.Bundle; import android.support.v7.app.AppCompatActivity; import android.view.View; import android.widget.Button; import android.widget.EditText; import android.widget.TextView; import java.io.BufferedReader; import java.io.IOException; import java.io.InputStreamReader; import java.io.PrintWriter; import java.net.Socket; @SuppressLint("SetTextI18n") public class MainActivity extends AppCompatActivity < Thread Thread1 = null; EditText etIP, etPort; TextView tvMessages; EditText etMessage; Button btnSend; String SERVER_IP; int SERVER_PORT; @Override protected void onCreate(Bundle savedInstanceState) < super.onCreate(savedInstanceState); setContentView(R.layout.activity_main); etIP = findViewById(R.id.etIP); etPort = findViewById(R.id.etPort); tvMessages = findViewById(R.id.tvMessages); etMessage = findViewById(R.id.etMessage); btnSend = findViewById(R.id.btnSend); Button btnConnect = findViewById(R.id.btnConnect); btnConnect.setOnClickListener(new View.OnClickListener() < @Override public void onClick(View v) < tvMessages.setText(""); SERVER_IP = etIP.getText().toString().trim(); SERVER_PORT = Integer.parseInt(etPort.getText().toString().trim()); Thread1 = new Thread(new Thread1()); Thread1.start(); >>); btnSend.setOnClickListener(new View.OnClickListener() < @Override public void onClick(View v) < String message = etMessage.getText().toString().trim(); if (!message.isEmpty()) < new Thread(new Thread3(message)).start(); >> >); > private PrintWriter output; private BufferedReader input; class Thread1 implements Runnable < @Override public void run() < Socket socket; try < socket = new Socket(SERVER_IP, SERVER_PORT); output = new PrintWriter(socket.getOutputStream()); input = new BufferedReader(new InputStreamReader(socket.getInputStream())); runOnUiThread(new Runnable() < @Override public void run() < tvMessages.setText("Connected
"); > >); new Thread(new Thread2()).start(); > catch (IOException e) < e.printStackTrace(); >> > class Thread2 implements Runnable < @Override public void run() < while (true) < try < final String message = input.readLine(); if (message ! = null) < runOnUiThread(new Runnable() < @Override public void run() < tvMessages.append("server: " + message + "
"); > >); > else < Thread1 = new Thread(new Thread1()); Thread1.start(); return; >> catch (IOException e) < e.printStackTrace(); >> > > class Thread3 implements Runnable < private String message; Thread3(String message) < this.message = message; >@Override public void run() < output.write(message); output.flush(); runOnUiThread(new Runnable() < @Override public void run() < tvMessages.append("client: " + message + "
"); etMessage.setText(""); > >); > > >
Step 4 − Add the following code to androidManifest.xml

Let’s try to run your both server and client application. I assume you have connected your actual Android Mobile device with your computer. To run the app from android studio, open one of your project’s activity files and click Run icon from the toolbar. Select your mobile device as an option and then check your mobile device which will display your default screen –
Server:-
Client:-
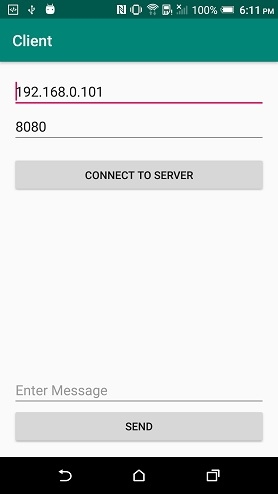
Server:-

Click here to download the project code