- Talking to a Bluetooth Serial Module with a Raspberry Pi
- Required Materials
- Preparing the Arduino/Seeeduino for Connection
- Setting up the USB Bluetooth Dongle and Pairing it with the Bluetooth Serial Module
- Taking Things Further
- Raspberry Pi Resources
- Our resources for other geeks, designers and engineers.
- Serial over Bluetooth
- Setting The RPi to create a serial connection to a Bluetooth device at startup
- Creating A Serial Link Via Bluetooth To A PC Running Windows
- Send serial from the RPi command line
- Adding a Bluetooth serial terminal to Raspberry Pi
- To reconfigure the Bluetooth module to run at 115,200 baud
- To reconfigure the Raspberry Pi’s serial terminal to run at 9600 baud
Talking to a Bluetooth Serial Module with a Raspberry Pi
Bluetooth is a very low cost and flexible way to add wireless communication to your projects. However, it can also be a bit tricky to set up. In this post we show you how to set up a Raspberry Pi with a USB Bluetooth dongle so that it can communicate with an Arduino using a Bluetooth serial module.
Once the set up is complete, we’ll have a new serial port on the Raspberry Pi that can be used to communicate with the serial Bluetooth module, either using a program such as Cutecom, or using one of the many serial programming libraries such as pySerial.
This tutorial is aimed at a Raspberry Pi running Raspbian, but it should work on other popular Linux distributions such as Ubuntu. To get a USB serial port set up on Windows, a good tutorial can be found here.
Required Materials
- Raspberry Pi with Raspbian installed (this tutorial may also work with other distributions)
- USB Bluetooth dongle
- Arduino, or an Arduino compatible device such as a Seeeduino
- A serial Bluetooth module
Preparing the Arduino/Seeeduino for Connection
To test out the Bluetooth serial connection we’ll use a Seeeduino attached to a Bluetooth serial module. First upload the following sketch to the Seeeduino. This program listens on the serial connection for 2 numbers, and then adds them together before sending them back over the serial connection.
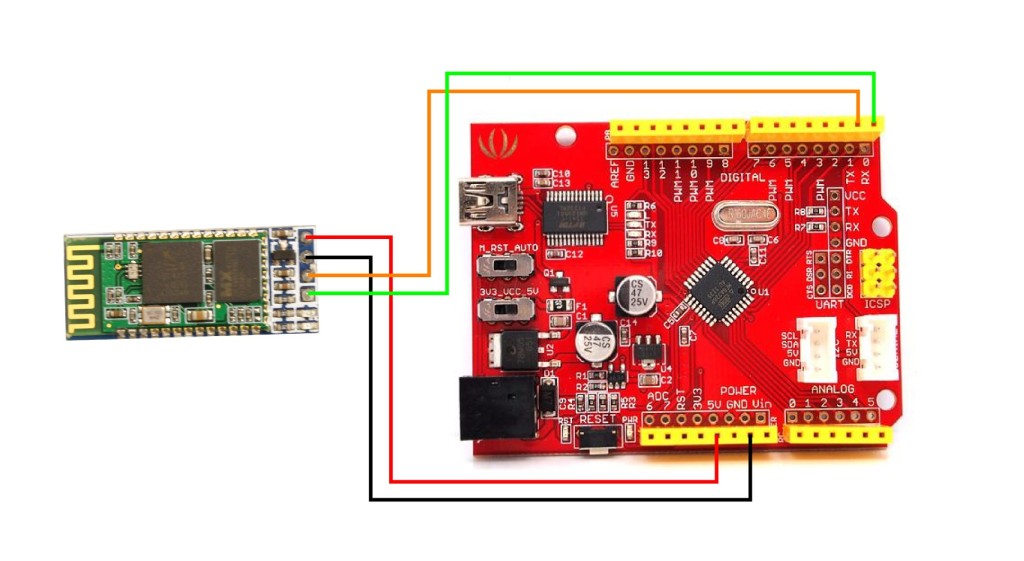
Connect the two devices up as shown in the diagram below. These connections will power the Bluetooth serial module from the 5V line of the Seeeduino, and connect RX => TX and TX => RX. Whilst the Bluetooth serial module is connected to the UART lines of the Seeeduino, you won’t be able to program the Seeeduino, but you can still power it with a USB cable.
Setting up the USB Bluetooth Dongle and Pairing it with the Bluetooth Serial Module
Plug the USB Bluetooth dongle into the Raspberry Pi. Then open up a command line terminal and run the following commands
sudo apt-get update sudo apt-get install bluetooth bluez-utils blueman
Get the name of your USB Bluetooth dongle by running
It should be something like ‘hci0′
Now, ensuring that the Seeeduino is powered on, run the following command to find out the address of the serial Bluetooth module.
After a short delay, this should return the addresses of nearby Bluetooth devices. The Bluetooth serial module that we sell should be called something like ‘linvor’.
Before Bluetooth devices can communicate, they need to be paired. This can be done by running the following command
sudo bluez-simple-agent hci# xx:xx:xx:xx:xx:xx
where # is the number of your device (probably hci0) and xx:xx:xx:xx:xx:xx is the address of the serial Bluetooth module. After a pause, this program should ask you for the pin code of the Bluetooth module. By default, the pin for the module we sell is 1234.
At this point, we have 2 Bluetooth devices that can communicate with each other, but we need to set up a protocol called RFCOMM so that they can communicate over a serial connection. Run
sudo nano /etc/bluetooth/rfcomm.conf
to edit rfcomm.conf, and add the following lines
Where again, xx:xx:xx:xx:xx:xx is the address of the Bluetooth serial module. Once that is done, save the file and un the following command in order to get the serial port /dev/rfcomm1.
To test that your connection works, you could use a serial terminal such as minicom or cutecom (you may need to install these first). However, we’re going to use a Python script and the pySerial library.
Install pySerial if you don’t already have it using
sudo apt-get install python-serial
Then save the following Python script on your Raspberry Pi as bluetooth_serial_example.py
#! /usr/bin/python import serial bluetoothSerial = serial.Serial( "/dev/rfcomm1", baudrate=9600 ) a = None while a == None: try: a = float( raw_input( "Please enter the first number: " ) ) except: pass # Ignore any errors that may occur and try again b = None while b == None: try: b = float( raw_input( "Please enter the second number: " ) ) except: pass # Ignore any errors that may occur and try again bluetoothSerial.write( " ".format( a, b ) ) print bluetoothSerial.readline()
Navigate to the script and run it using
python bluetooth_serial_example.py
If all goes well, then you should be asked for 2 numbers which are then added together for you. All very trivial, but the cool thing is that the calculation was done on the Seeeduino, with communication over thin air via a Bluetooth serial connection.
Taking Things Further
You now have a wireless serial connection which you can use for a whole host of applications. You could set up your Raspberry Pi to communicate with remote sensors, or use it to control a swarm of robots!
If you need a baud rate higher than 9600, then the Bluetooth serial module can be reconfigured by sending it AT commands from the Seeeduino. The command set supported by the Bluetooth serial module is given here.
Raspberry Pi Resources
Our resources for other geeks, designers and engineers.
Serial over Bluetooth
Once you have your RPi paired with another device you have a Bluetooth link, but you still need to set up another protocol over the Bluetooth called «RFCOMM» to provide an emulated serial connection between the two devices.
Setting The RPi to create a serial connection to a Bluetooth device at startup
sudo nano /etc/bluetooth/rfcomm.conf Add the connection details:
Creating A Serial Link Via Bluetooth To A PC Running Windows
Follow the RPI steps to setup the rfcom link at its end.
Open the Windows Control Panel. In search box, type «Bluetooth», and then click «Change Bluetooth settings».
In the Bluetooth Settings dialog box, click the COM Ports tab, select a port, and then click OK. If no COM port is listed, then setup Windows to accept a connection by pressing «Add», and then select «Incoming». OK and exit. Windows should then see the RPi serial connection after a few seconds and create a serial port automatically for it (you see a taskbar message its happened and the new COM port appears in device manager).
Adding The RPi From Windows
In Devices and printers use ‘Add Device’ and if the RPi is in pairing mode it should find the RPi.
Once the device is added and windows has finished adding drivers (can take quite a a while – wait for the taskbar device added message), right click the RPi in device and select properties. In the ‘Services’ tab there should be a servicee for serial, e.g. ‘serial port SSP’. Ensure it is enabled. If there isn’t then there is likely a problem.
Send serial from the RPi command line
We benefit hugely from resources on the web so we decided we should try and give back some of our knowledge and resources to the community by opening up many of our company’s internal notes and libraries through mini sites like this. We hope you find the site helpful.
Please feel free to comment if you can add help to this page or point out issues and solutions you have found, but please note that we do not provide support on this site. If you need help with a problem please use one of the many online forums.
Adding a Bluetooth serial terminal to Raspberry Pi
Sometimes you find a computer component that’s so cheap, that works so well, that you’re amazed you managed to live without it for so long. The JY-MCU Arduino Bluetooth Wireless Serial Port Module is that component for me right now.

This little board is a cheap ($8.50!) Bluetooth serial port. It’s happy with the Raspberry Pi’s 3.3 V logic levels, and will communicate at standard rates between 1200 and 1,382,400 baud. It even comes with a nifty little cable which is just the right polarity for the Raspberry Pi’s GPIO pins. It’s really meant to do serial comms on an Arduino, but it’s not limited to that.
What this board allows you to do is connect to your Raspberry Pi’s serial console via Bluetooth. That way, you can have your Raspberry Pi hidden away somewhere, and yet still log in as if you were talking to it directly through a serial cable. Combine this with a USB wireless adaptor (like the Belkin N150 that I use) and you’ve got a wireless device you can always connect to, even if your network goes down.
In order to use this device with your Raspberry Pi, you’re going to have to do some reconfiguration. Exactly what reconfiguration you do depends on some additional hardware:
- If you have a USB-TTL Serial converter (like an FTDI Friend, FTDI Basic Breakout – 3.3V, or the one I use, the OSEPP FTDI), you can reconfigure the Bluetooth module to run at 115,200 baud, the default speed of the Raspberry Pi’s serial port.
- If you don’t have the serial converter, you’ll need to reconfigure the Raspberry Pi’s serial terminal to run at the JY-MCU Bluetooth adapter’s default 9600 baud.
To reconfigure the Bluetooth module to run at 115,200 baud
(I chose this option, as it allows me to use the Bluetooth module with Firmata on an Arduino, too.)
The JY-MCU board comes with no instructions, but all the reconfiguration commands you’ll need are explained here: hc06_linvor_1.5_at_command_set [[hc06_linvor_1.5_at_command_set]] (cached copy; original has gone) While you’re setting the communications speed, you’ll probably also want to change the device name (so you can more easily recognize your own board, as the default is something like “Linvor”) and PIN (for that warm feeling of security that only a four digit code can provide). The device is configured using AT commands (or as we eldsters call them, Hayes commands) by plugging it directly into a USB-TTL Serial device attached to your computer. Here’s how you wire it:
USB-TTL Serial Bluetooth Serial ================= ================= GND GND VCC VCC TXD RXD RXD TXD
Note that TXD and RXD are crossed. The Bluetooth unit runs on a 3.6-6V supply, but 3.3V logic. To enter the AT commands, start a serial terminal (Hyperterm, minicom, screen …) at 9600 baud talking to the USB-Serial adapter, and copy and paste these commands in:
AT+NAMEBluey AT+PIN4321 AT+BAUD8
You’ll have to disconnect the terminal and reconnect at 115,200 baud, as that last command just reset the Bluetooth device’s speed. You might want to use other settings than Bluey for the name and 4321 for the PIN, too.
Update : check that your Raspberry Pi’s /boot/cmdline.txt contains:
You will not get a login prompt otherwise.
Now go to Using the Device.
To reconfigure the Raspberry Pi’s serial terminal to run at 9600 baud
Serial terminals traditionally ran at 9600 baud, and that seems a bit slow these days. But, if you don’t have a way of setting up the Bluetooth device differently, 9600 is what you’re stuck with. You’ll need to edit your Raspberry Pi’s /boot/cmdline.txt so that the part that previously read:
console=ttyAMA0,115200 kgdboc=ttyAMA0,115200
console=ttyAMA0,9600 kgdboc=ttyAMA0,9600
Note that this file should only contain one line, so be careful you don’t add extra line breaks or your Raspberry Pi won’t boot. Save the file, reboot your Raspberry Pi, and go to the next section.
Using the Device
On your Raspberry Pi, connect the Bluetooth Wireless Serial Port Module as follows:
Raspberry Pi Bluetooth Serial ================= ================= 5V (GPIO Pin 2) VCC GND (GPIO Pin 6) GND TXD (GPIO Pin 8) RXD RXD (GPIO Pin 10) TXD
(Despite the minimum 3.6V rating, I’m happily running mine from the 3V3 power, GPIO Pin 1. YMMV.)
When the board gets power, but isn’t paired, the LEDs on the Bluetooth module flash quickly. Now you need to pair the device with your computer (use 0000 as the PIN, or whatever you chose if you changed it), and it will appear as a serial port on your machine. On my Mac, that’s a device called /dev/tty.Bluey-DevB . The LEDs stop flashing when the port goes into use. Open up a serial terminal, set the device and speed correctly, and if all goes well, you should see:
Debian GNU/Linux wheezy/sid raspberrypi ttyAMA0 raspberrypi login: