- How to connect to a serial port on Linux
- Install screen on Linux
- For Ubuntu, Debian or Linux Mint:
- For CentOS, Fedora or RHEL:
- Connect to a Serial Port with screen utility
- Support Xmodulo
- How to Connect to a Serial Console in Linux
- Setting Up the USB to Serial Converter
- Access Authorization on Serial Devices
- How to Connect to Serial Consoles on Linux
- Using Minicom
- How to Use Serial Ports on Linux Without Root
- 1. Overview
- 2. Risks of Using Root Account
- 3. Device Files Ownership and Permissions
- 4. Non-root Serial Port Access
- 5. Conclusion
How to connect to a serial port on Linux
Question: I need to access the management terminal of a hardware switch/router (e.g., Cisco Catalyst or HP ProCurve) via its console port. The switch console port is connected to the serial port of my Linux box. How can I connect to the serial port from a Linux terminal?
First of all, let’s assume that you have already connected the serial port of your Linux box to a switch console port via a serial cable.
To connect a Linux terminal to the serial port of your Linux system, you can use a command-line screen manager tool called screen .
Install screen on Linux
For Ubuntu, Debian or Linux Mint:
To install screen on Ubuntu, Debian or Linux Mint:
$ sudo apt-get install screen
For CentOS, Fedora or RHEL:
To install screen on CentOS, Fedora, or RHEL:
Connect to a Serial Port with screen utility
Traditionally in Linux, the first serial port (COM1) is assigned a name /dev/ttyS0 , the second serial port (COM2) assigned /dev/ttyS1 , etc. If you specify a serial port name as the first argument of the screen command, the current terminal window where you run screen will be directly connected to the serial port.
Thus, to connect to a serial port, simply run the following command from a terminal:
Optionally, you can specify baud rate (e.g., 1200, 9600, 19200) as the second parameter as follows.
Once connected to a serial port, you will then be able to access the switch console port from the terminal.
To terminate the current screen session, type Ctrl-A + k . If you want to temporarily detach from the screen session, type Ctrl-A + d . After detached, you can re-attached to the session later by running:
Support Xmodulo
This website is made possible by minimal ads and your gracious donation via PayPal or credit card
Please note that this article is published by Xmodulo.com under a Creative Commons Attribution-ShareAlike 3.0 Unported License. If you would like to use the whole or any part of this article, you need to cite this web page at Xmodulo.com as the original source.
How to Connect to a Serial Console in Linux
A serial port connection allows a user to control systems without a display. Here’s how you can access and use serial consoles in Linux.
Readers like you help support MUO. When you make a purchase using links on our site, we may earn an affiliate commission. Read More.
One of the indispensable elements when working on embedded Linux projects is accessing your device via the serial console interface. For this, the computer on which you are developing an embedded system must have a serial port. However, very few computers today have a serial port, and that’s why we use USB to serial converters instead.
By the end, you’ll have a detailed understanding of what serial consoles are and how they work on Linux.
Setting Up the USB to Serial Converter
Almost any USB serial converter you can find on the market is automatically recognized by Linux. Plug any USB converter into your computer and use the dmesg command to find out the file name of the device.
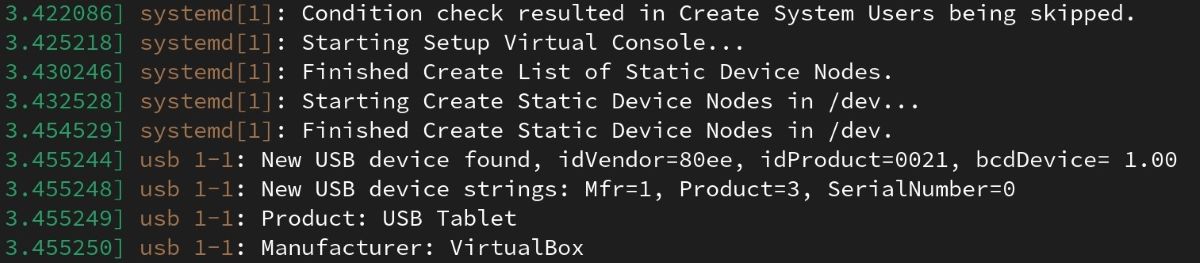
In the example above, you see VirtualBox in the manufacturer section, as the host is a Linux distribution running on VirtualBox. Here, the manufacturer name will change depending on the converter you are using. You can also see that the serial converter you are using is attached to the system with a name, such as ttyUSB0.
You can use the serial converter recognized by your system via the device file /dev/ttyUSB0. Depending on the distribution you use, the device file is automatically created under the /dev directory, showing major, minor, and device types. For USB serial converters, the naming scheme is usually ttyUSB0, ttyUSB1, and ttyUSBX for each simultaneous translation.
If you remove and reinsert the USB serial converter while it is in use by an application, the system issues a new number to the device.
Access Authorization on Serial Devices
The default access privileges of mounted USB converter device files are usually as follows:
ls -l /dev/ttyUSB0


# Output
crw-rw---- 1 root dialout 188, 46 Jul 17 15:34 /dev/ttyUSB0
On examining the above output, you can tell:
- The letter c at the beginning of the line denotes that this is a character-based device
- The file owner is the root user and the user has read and write privileges
- The group owner of the file is the dialout group and users included in this group also have read and write permissions
- The rest of the users do not have any read and write rights on the file
If you’re currently logged in as a regular user, who isn’t a member of the dialout group, you cannot read and write to the USB serial converter. To solve this problem, you must either make the current user a member of the dialout group or edit the udev rule files on your system.
You can utilize the first technique for convenience. To begin, use the id command to determine which groups your user belongs to:
Add your user to the group using the adduser or usermod command:
# For Fedora
sudo usermod -aG dialout USERNAME


# For Debian
sudo adduser USERNAME dialout


# For Arch
sudo usermod -a -G uucp USERNAME
The group membership procedure is now complete. However, the system checks group membership information during the first login step in graphical sessions and then provides it to all running processes.
As a result, you must log out of the current graphical session and then log back in or restart your machine for the modifications to take effect. You will have read/write access to the serial converter device after finishing this operation.
How to Connect to Serial Consoles on Linux
When you need access to a computer or network console, you can refer to serial console applications. Usually, you require access over SSH to do so. However, from a software and hardware point of view, in some cases, it is also possible to access the console using only serial ports.
You’ll find these types of examples most often on older computers. Below are some of the best serial console applications that will work for you.
Using Minicom
You can install Minicom, an old but still working application on your system as follows:
How to Use Serial Ports on Linux Without Root
![]()
The Kubernetes ecosystem is huge and quite complex, so it’s easy to forget about costs when trying out all of the exciting tools.
To avoid overspending on your Kubernetes cluster, definitely have a look at the free K8s cost monitoring tool from the automation platform CAST AI. You can view your costs in real time, allocate them, calculate burn rates for projects, spot anomalies or spikes, and get insightful reports you can share with your team.
Connect your cluster and start monitoring your K8s costs right away:
1. Overview
As a rule, we must never use the root user in Linux to do tasks that are not inherently administrative. This sounds great, but sometimes, it doesn’t seem very easy. In this tutorial, we’ll discuss how to configure non-root serial port access.
2. Risks of Using Root Account
The fact is that when impersonating the root account, we have almost no permission constraints. This leads us to believe that it is alright to use root accounts regularly. However, by doing so, we expose our systems to a higher downtime risk. It can take just a single wrong command to bring a host down or even destroy its most important asset: data. That is exactly why, whenever we see a situation that seems to require root access to do anything unrelated to any administration task, we’re probably doing it the wrong way. One of these situations is using serial ports. A myriad of applications uses serial ports, from controlling external equipment to getting access to special-purpose or cellular data networks. Even some Bluetooth-connected devices expose access by the use of virtual serial ports. Needless to say, to safely use those serial ports, we must ensure that their application uses non-root users so that vulnerabilities on them shall not compromise the entire system.
3. Device Files Ownership and Permissions
Linux and all Unix-like systems use POSIX permissions for file systems. All device accesses, including serial ports, happen through device files in the /dev folder. Any file or directory on the file system has an owner user and a group association. Also, it has there flags that determine the access permissions to the owner, the group, and other users:
- r: right to read content
- w: right to write (for files), right to add files (for folders)
- x: right to execute (for files), right to dive into (for folders)
- s or t: setuid/setgid or sticky (also executable)
- S or T: setuid/setgid or sticky (not executable)
The s/S/t/T flags have no meaning on device files. Let us see how to figure out ownership and permissions for device files:
$ ls -l /dev total 0 crw-r--r-- 1 root root 10, 235 Feb 19 22:27 autofs drwxr-xr-x 2 root root 460 Feb 19 22:27 block drwxr-xr-x 2 root root 80 Feb 19 22:27 bsg crw-rw---- 1 root disk 10, 234 Feb 19 22:27 btrfs-control drwxr-xr-x 3 root root 60 Feb 19 22:27 bus crw-rw---- 1 root video 250, 0 Feb 19 22:27 cec0 drwxr-xr-x 2 root root 3120 Feb 19 22:34 char crw--w---- 1 root tty 5, 1 Feb 19 22:34 console drwxr-xr-x 7 root root 140 Feb 19 22:26 disk drwxr-xr-x 3 root root 120 Feb 19 22:27 dri crw------- 1 root root 10, 127 Feb 19 22:27 ecryptfs crw-rw---- 1 root i2c 89, 0 Feb 19 22:27 i2c-0 crw--w---- 1 root tty 4, 9 Feb 19 22:27 tty1 crw--w---- 1 root tty 4, 64 Feb 19 22:35 ttyS0 crw-rw---- 1 root dialout 4, 65 Feb 19 22:27 ttyS1On that listing, the first column is the file entry metadata and permissions:
- The first character is the filesystem entry type: c stands for character devices, like serial ports, b for block devices, like hard drives, l for links, and d for folders
- Then each following set of three characters is the access permission flags for the owner, the group, and all other users. Each permission set is shown in the following order: read flag, write flag, and execute flag (plain or with setuid/setgid/sticky access)
By default, the root is the device owner, with both read and write permissions. That is why it seems easier to just use root credentials to use any device, serial ports included. Needless to say that writing to the wrong device can be quite dangerous. For instance, writing to a device like /dev/sda (first Sata device) might lead directly to data corruption. That’s exactly why we don’t mess with devices while on root capacity unless necessary.
4. Non-root Serial Port Access
The best way of gaining access to a serial port is by adding a non-privileged user to its associated group. For instance, in the above example, to use the ttyS1 device (2nd serial port on the host), we must add the user to the dialout group. This group name is used by default in all major Linux distributions to assign serial port permissions:
However, if we’re unsure about what is the correct group to use, we can do the following command to give the appropriate group membership to the user:
# sudo usermod -a -G $(stat -c "%G" )
The group permissions are applied to the user session during login, so the target user must log in again to gain the group’s access.
5. Conclusion
In this tutorial, we discussed how to give non-privileged users access to serial ports. This method works for many other device types since the major distributions already have default groups assigned for several device classes. By using this technique, we avoid most of the root access needs for everyday tasks, thus reducing the risk exposure.