- Nginx
- Configuration
- Sample page
- Controlling nginx
- Start Nginx
- Test configuration
- Reload and Restart Nginx
- Stop Nginx
- Runlevel
- Testing Nginx
- Troubleshooting
- How to install NGINX on Alpine Linux?
- Basic features
- Install
- Check available modules
- Configuration files
- Web dir
- Manage the service
- Check the status
- Start
- Start with the Operating System
- Reload the configuration
- Restart
- Stop
- Virtual Hosts
- Create the configuration file
- Generic proxy
- FastCGI Proxy
- How to Install Nginx Web Server on Alpine Linux
- Install Nginx Webserver in Alpine Linux
- Configure Nginx Server Block to Host Website
- Success! The Nginx server block is running!
Nginx
Nginx package is available in the Alpine Linux repositories. To install it run:
Creating new user and group ‘www’ for nginx
Create a directory for html files
mkdir /www chown -R www:www /var/lib/nginx chown -R www:www /www
Configuration
You may want to make backup of original nginx.conf file before writting your own
mv /etc/nginx/nginx.conf /etc/nginx/nginx.conf.orig
Configuring Nginx to listen to port 80 and process .html or .htm files
user www; worker_processes auto; # it will be determinate automatically by the number of core error_log /var/log/nginx/error.log warn; #pid /var/run/nginx/nginx.pid; # it permit you to use /etc/init.d/nginx reload|restart|stop|start events < worker_connections 1024; >http < include /etc/nginx/mime.types; default_type application/octet-stream; sendfile on; access_log /var/log/nginx/access.log; keepalive_timeout 3000; server < listen 80; root /www; index index.html index.htm; server_name localhost; client_max_body_size 32m; error_page 500 502 503 504 /50x.html; location = /50x.html < root /var/lib/nginx/html; >> >
Sample page
Controlling nginx
Start Nginx
After the installation Nginx is not running. To start Nginx, use start.
You will get a feedback about the status.
* Caching service dependencies . [ ok ] * /run/nginx: creating directory * /run/nginx: correcting owner * Starting nginx . [ ok ]
Test configuration
When you’ve made any changes to your nginx configuration files, you should check it for errors before restarting/reloading nginx.
This will check for any duplicate configuration, syntax errors etc. To do this, run:
You will get a feedback if it failed or not. If everything is fine, you’ll see the following and can then move ahead to reload the nginx server.
nginx: the configuration file /etc/nginx/nginx.conf syntax is ok nginx: configuration file /etc/nginx/nginx.conf test is successful
Reload and Restart Nginx
Changes made in the configuration file will not be applied until the command to reload configuration is sent to nginx or it is restarted.
Reloading will do a «hot reload» of the configuration without server downtime. It will start the new worker processes with a new configuration and gracefully shutdown the old worker processes. If you have pending requests, then these will be handled by the old worker processes before it dies, so it’s an extremely graceful way to reload configs. If you want to reload the web server, use reload.
If you want to restart the web server, use restart.
Stop Nginx
If you want to stop the web server, use stop.
Runlevel
Normally you want to start the web server when the system is launching. This is done by adding Nginx to the needed runlevel.
rc-update add nginx default
Now Nginx should start automatically when you boot your machine next time. To test that run:
To make sure that Nginx is started run:
You should get something like this:
263 root 0:00 nginx: master process /usr/sbin/nginx -c /etc/nginx/nginx.conf 264 www 0:00 nginx: worker process 310 root 0:00 grep nginx
Testing Nginx
This section is assuming that nginx is running and sample html page «/www/index.html» is created. Launch a web browser and point it to your web server. You should get:
Troubleshooting
If Nginx is not started check Nginx log file
Make sure that configuration file does not contain errors. Edit the file in case there are any errors.
nginx -t vi /etc/nginx/nginx.conf
How to install NGINX on Alpine Linux?
Nginx is a lightweight and high performance web server/reverse/email(IMAP/POP3) proxy.
Basic features
- Static file server, indexes and auto-indexing.
- Reverse proxy with caching options.
- Load balancing.
- Fault tolerance.
- Support of HTTP and HTTP2 over SSL.
- Support for FastCGI with caching options.
- Virtual hosts based on name and/or IP address.
- Support for authentication.
- IPv6 compatible
- gzip compression.
You can see all NGINX features at:
Install
# apk add nginx fetch https://ams.edge.kernel.org/alpine/v3.14/main/x86_64/APKINDEX.tar.gz (1/4) Installing pcre (8.44-r0) (2/4) Installing nginx (1.20.1-r3) Executing nginx-1.20.1-r3.pre-install Executing nginx-1.20.1-r3.post-install (3/4) Installing nginx-openrc (1.20.1-r3) (4/4) Installing nginx-vim (1.20.1-r3) Executing busybox-1.33.1-r3.trigger OK: 264 MiB in 72 packages Check available modules
# nginx -V nginx version: nginx/1.20.1 built with OpenSSL 1.1.1k 25 Mar 2021 TLS SNI support enabled . Configuration files
Where the configuration files are located.
# tree /etc/nginx/ /etc/nginx/ ├── fastcgi.conf ├── fastcgi_params ├── http.d │ └── default.conf ├── mime.types ├── modules ├── nginx.conf ├── scgi_params └── uwsgi_params 2 directories, 7 files Web dir
Where our websites will be hosted, as you can see we only have the files for localhost.
# tree /var/www/ /var/www/ └── localhost └── htdocs 2 directories, 0 files Manage the service
In this part we will learn how to start, stop or restart the nginx service, for this we will use the OpenRC initialization system. OpenRC is the default boot system in distributions like Gentoo and Alpine Linux.
Check the status
# rc-service nginx status * status: stopped Start
# rc-service nginx start * Caching service dependencies . [ ok ] * Starting nginx . [ ok ] # rc-service nginx status * status: started Start with the Operating System
Start automatically after a system reboot by exec:
# rc-update add nginx default * service nginx added to runlevel default Reload the configuration
Verify any configuration file change with:
# nginx -t nginx: the configuration file /etc/nginx/nginx.conf syntax is ok nginx: configuration file /etc/nginx/nginx.conf test is successful # rc-service nginx reload * Reloading nginx configuration . [ ok ] Restart
# rc-service nginx restart * Stopping nginx . [ ok ] * Starting nginx . [ ok ] Stop
# rc-service nginx stop * Stopping nginx . [ ok ] Virtual Hosts
Virtual hosting allows multiple domains to be hosted on the same server, sharing server resources such as memory and processor cycles.
Create the configuration file
Replace librebyte by your project name
# touch /etc/nginx/http.d/librebyte.conf Generic proxy
This configuration is suitable for generic proxy.
server < listen 80; # Put here you domain # server_name midominio.com; # Max file size useful for file uploading # client_max_body_size 8M; location / < # NGINX acting as reverse proxy # proxy_set_header X-Forwarded-For $proxy_add_x_forwarded_for; proxy_set_header X-Forwarded-Proto $scheme; proxy_set_header X-Real-IP $remote_addr; proxy_set_header Host $http_host; # # Set the backend url and port, port is optional for standard services # when there is a variable as a part of proxy_pass URL a resolver is needed. # proxy_pass http://miurl.internal:port; > > Set the listen , server_name and proxy_pass directives according to your needs, see: How to install and configure NGINX as reverse proxy
FastCGI Proxy
This configuration is suitable for FastCGI proxy, example: PHP-FPM.
server < listen 80; server_name midominio.com; # Set the document root root /var/www/librebyte/htdocs; index index.php; location = /favicon.ico < log_not_found off; access_log off; > location = /robots.txt < allow all; log_not_found off; access_log off; > location / < # This is cool because no php is touched for static content. # include the "?$args" part so non-default permalinks doesn't break when # using query string try_files $uri $uri/ /index.php?$args; > location ~ \.php$ < fastcgi_pass 127.0.0.1:9000; fastcgi_index index.php; fastcgi_param SCRIPT_FILENAME $document_root$fastcgi_script_name; include /etc/nginx/fastcgi_params; > location ~* \.(js|css|png|jpg|jpeg|gif|ico)$ < expires max; log_not_found off; > > Set the listen , server_name , root and fastcgi_pass directives according to your needs. See: How to install NGINX on NetBSD? y How to install PHP 7.4 in Ubuntu 20.04? for more information.
# mkdir -p /etc/nginx/http.d/librebyte/htdocs In the htdocs DIR we put the public files (css, javascripts, html) and outside of htdocs the PHP files.
How to Install Nginx Web Server on Alpine Linux
Nginx is an open-source web server that, apart from being a web server, can also serve as a load balancer, reverse proxy, and HTTP cache. It provides a wealth of features and modules that make it better than its counterpart, Apache.
In this article, we will walk you through the installation of the Nginx web server on Alpine Linux.
Install Nginx Webserver in Alpine Linux
The first step is to update the repository indexes. To do so, proceed and run the following apk command.
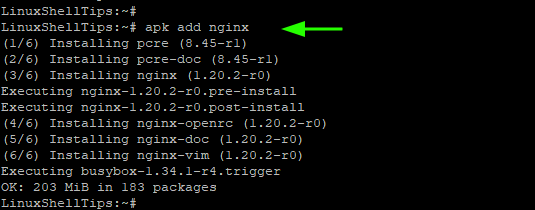
With repositories up to date, install Nginx as shown.
The command installs Nginx and associated Nginx packages as listed in the output below.
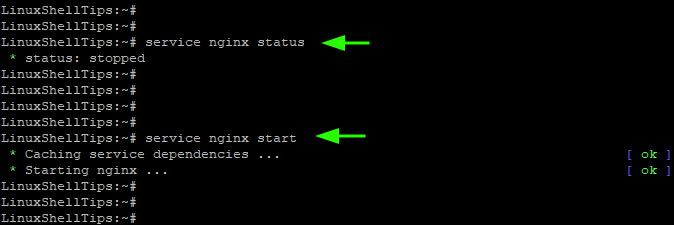
By default, Nginx does not start automatically when installed and you can confirm this using the command:
To start Nginx, run the command:
As mentioned, you can check if Nginx is running as shown.
# service nginx status * status: started
From the output, Nginx has already started.
You can further run the netstat command to confirm that Nginx is listening on port 80.
Configure Nginx Server Block to Host Website
So far, Nginx has successfully been installed. However, if you wish to host multiple domains or websites, you need to configure an Nginx server block.
Server blocks allow you to host multiple sites on a single server, which is particularly convenient if you are working on a tight budget.
For this to work, ensure that you have a registered domain that is pointed to the public IP address of your Alpine instance. For demonstration, we will use the domain name, mytestsite.com.
The first step is to create the website directory in which the website documents will reside. We will create it in the document root /var/www/ directory as follows.
# mkdir -p /var/www/mytestsite.com/html
Inside the website directory, we will create a sample index.html file for testing purposes.
# nano /var/www/mytestsite.com/html/index.html
Copy and paste the code block shown.
Success! The Nginx server block is running!
To steer clear of getting permission errors, we will set the ownership of the document root to the nginx user as shown.
# chown -R nginx: /var/www/mytestsite.com
The next step is to create a server block. For modern Alpine Linux releases, the default Nginx server block configuration file is located in the /etc/nginx/http.d/ directory. This is the default.conf configuration file and you can verify this using the command
Now, we will create our own server block file “www.mytestsite.com.conf” as follows.
# nano /etc/nginx/http.d/www.mytestsite.com.conf
Add the following server block configuration to it.
Save the changes and exit.
To verify that the configurations are okay and without any errors, run the command:
If everything went well, you should get what we have here.
To apply or enforce all the changes, restart Nginx:
$ sudo service nginx restart
Now head back to your browser and browse your domain name:
And this wraps up our guide. We have installed Nginx on Alpine Linux and went further and configure a Server block.


