How to patch linux servers using ansible
Ansible is opensource automation tool and will see how to patch linux servers using ansible in this post.
We are going to use RedHat Linux 7.3 Operating System in this practical.
Requirements:
1. Linux Host Installed with Ansible and Yum repository configured with httpd.
2. Linux Host Installed with RHEL 7.4 -> Node machine
3. Since Ansible requires SSH enabled between ansible master and node and don’t have node package, Make sure SSH connection established between Master and node.
Configuring yum repository for patching:
- browse https://access.redhat.com/ and login with valid credentials.
- Click on Security -> Security Advisories and downlod the necessary packages.
- Copy those packages to yum repository where all existing packages are available in Linux host. I downloaded and copied kernel update in my repository.
# yum list all | grep 3.10.0-1062.el7
kernel.x86_64 3.10.0-1062.el7 @yum_repo
kernel-headers.x86_64 3.10.0-1062.el7 yum_repo
kernel-devel.x86_64 3.10.0-1062.el7 yum_repo
kernel-tools.x86_64 3.10.0-1062.el7 yum_repo
kernel-tools-libs.x86_64 3.10.0-1062.el7 yum_repo
4. Run createrepo, “yum clean all” & “yum makecache” commands to update the repository along with new RPM’s.
Now the repository is ready for patching.
Ansible playbook for Linux patching:
2. create playbook called “patching.yml” with below content
# vi patching.yml
—
— name: Patch Linux system
hosts: Linux_Servers
become: true
ignore_errors: yes
tasks:
— name: Copy the Kernel Patch Repo File
copy:
src: /etc/yum.repos.d/yum.repo
dest: /etc/yum.repos.d/
— name: Apply patches
yum:
name: kernel
state: latest
3. Edit /etc/ansible/hosts file and provide Linux hosts which needs to be patched and mention group as “Linux_Servers” for those hosts. Host group name has been mentioned in playbook in “hosts: Linux_Servers” portion.
# cat /etc/ansible/hosts
[Linux_Servers]
client.lbc.com
4. Now run the playbook from Ansible host and make SSH connection established between master and client.
# ansible-playbook patching.yml
Before kernel patching:
# uname -a
Linux client.lbc.com 3.10.0-862.el7.x86_64 #1 SMP Wed Mar 21 18:14:51 EDT 2018 x86_64 x86_64 x86_64 GNU/Linux
After kernel Patching:
# uname -a
Linux client.lbc.com 3.10.0-1062.el7.x86_64 #1 SMP Thu Jul 18 20:25:13 UTC 2019 x86_64 x86_64 x86_64 GNU/Linux
We successfuly completed kernel patching. Reference:
Live Patching Ubuntu Server so That You Don’t Have to Reboot it
Tired of rebooting your Ubuntu server after every security upgrade? You may enable live kernel patching and forget about reboots altogether.
Managing Linux servers can feel like a chore specially if you have to perform repeated tasks.
Updating the server is one of those tasks. While you can opt to automatically install security updates on your server, it doesn’t make you completely free from the maintenance task.
Why? Because the security updates to the kernel require restarting Ubuntu server.
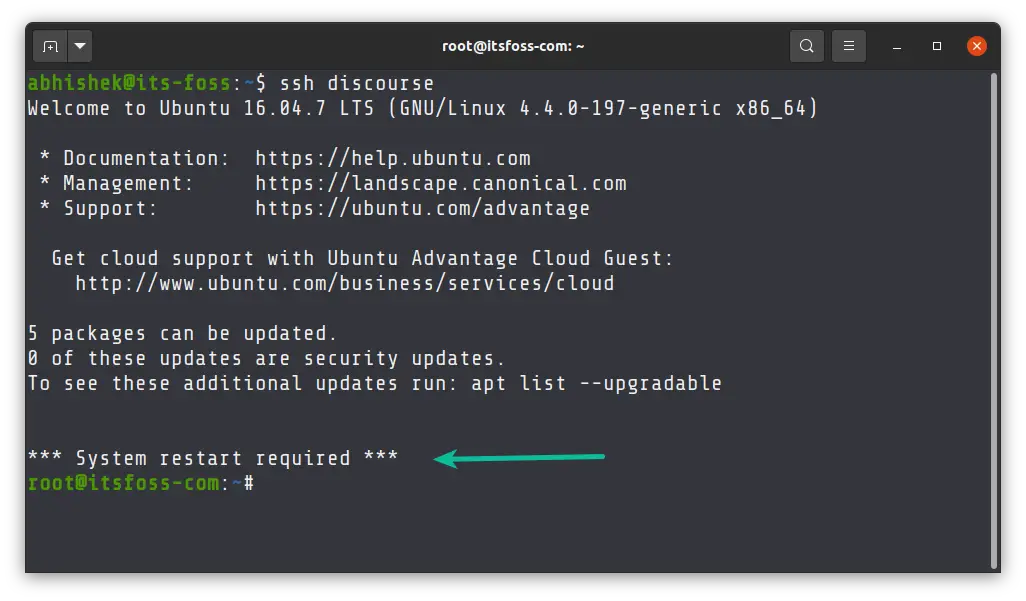
If you use Ubuntu server on one of the cloud services like Linode, you’ll notice that it notifies you that your system requires restart.
*** System restart required ***
What if I tell you there is a way to install all updates including the kernel updates without rebooting your server. It’s called live kernel patching or live patching.
What is live patching?
Live patching is the process of applying security fixes to a running Linux kernel without rebooting the system.
The process is quite complex and risky and this is why it is not something that is available by default in Linux distributions.
Earlier Linux sysadmins had to do a lot of manual work to make a hot patch to kernel. Live patching support was added in Linux kernel itself from version 4.0. Which means your Ubuntu system should be supporting live patching.
However, you can always make sure that it is supported by using the following command in Ubuntu:
cat /boot/config-$(uname -r) | grep LIVEPATCHIf you see Y , it means that your kernel supports livepatching.

Now let’s consider live kernel patching. You’ll need a live patching service. There are a few tools that allow live patching of the Linux kernel. Like ksplice from Oracle or kGraft from SUSE and Livepatch by Ubuntu.
Keep in mind that live patching is sold as a service by companies like KernelCare. Ubuntu allows it for free for up to 3 servers per Ubuntu account (explained later).
Since the discussion here is about Ubuntu, it would be better to use the live patching service by Ubuntu itself.
Enabling Live Patching on Ubuntu server
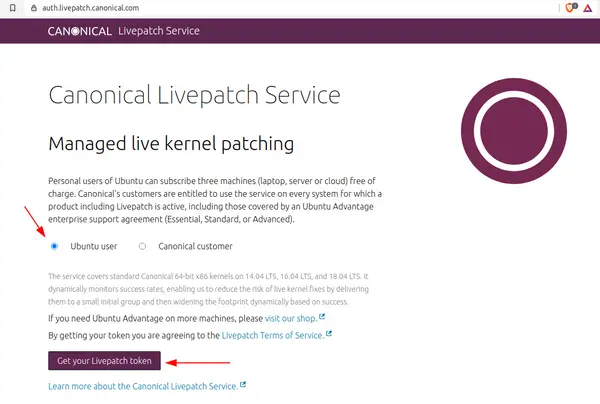
You’ll have to create an account with Ubuntu One, if you don’t have one already.

Once you are logged in, you can see the token for your account and a couple of commands that you’ll have to use on the server for which you want to activate the live patching.
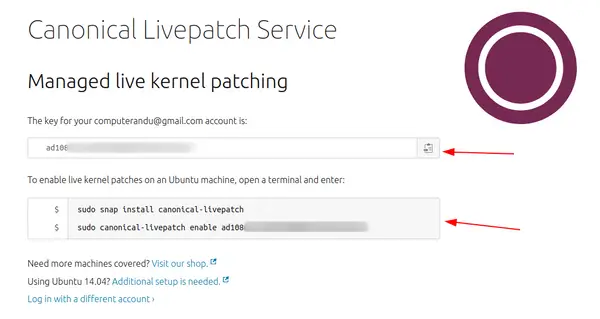
Once you have this token, log into your Ubuntu server.
Install the live patching tool first:
sudo snap install canonical-livepatch And next, enable the live kernel patching with the token you have copied from your Ubuntu One account.
sudo canonical-livepatch enable ad108xxxxxxxxxxxxxxxxxxxxxxxxx
That’s it. Now that you have live patching enabled, you don’t need to worry about rebooting your server. Imagine the uptime your server will have.
Speaking of uptime, let me share the sysadmin anthem Uptime Funk. It’s so relatable and funny parody video from SUSE Linux.

Don’t reboot it, just patch 🙂