- Create linux service user
- Создание пользователя в Linux
- Команда useradd
- Создание нового пользователя linux в GUI
- Выводы
- How to run systemd service as specific user and group in Linux
- Step 1: Overview on systemd
- Step 2: Create user and Group
- Step 3: Create Sample Script
- Step 4: Create unit file to run systemd service as specific user and group
- Step 5: Verify the systemd unit file configuration
- 11 thoughts on “How to run systemd service as specific user and group in Linux”
Create linux service user
Основу управления правами доступа в Linux и уровнем привилегий в Linux составляют именно пользователи. Изначально, еще при проектировании системы существовал пользователь root, которому позволено выполнять любые действия и другие пользователи, права которых настраиваются с помощью вступления их в группы Linux и установки прав на каталоги.
Многопользовательская архитектура, одна из первых особенностей Linux, которая существует еще с зарождения системы. В системе могут работать одновременно множество пользователей благодаря удаленному входу, а также пользователи используются для запуска определенных сервисов. В этой статье мы рассмотрим как создать пользователя linux, рассмотрим способ через терминал и в графическом интерфейсе.
Создание пользователя в Linux
Вся информация о пользователях находится в файле /etc/passwd. Мы могли бы создать пользователя linux просто добавив его туда, но так делать не следует, поскольку для этой задачи существуют специальные утилиты. Одна из таких утилит, это useradd. Рассмотрим ее подробнее.
Команда useradd
Это довольно простая команда, которая есть во всех дистрибутивах Linux. Она позволяет зарегистрировать нового пользователя или изменить информацию об уже имеющемся. Во время создания можно даже создать домашний каталог пользователя и скопировать в него системные файлы. Рассмотрим синтаксис команды: $ useradd опции имя_пользователя
- -b — базовый каталог для размещения домашнего каталога пользователя, по умолчанию /home;
- -c — комментарий к учетной записи;
- -d — домашний каталог, в котором будут размещаться файлы пользователя;
- -e — дата, когда учетная запись пользователя будет заблокирована, в формате ГГГГ-ММ-ДД;
- -f — заблокировать учетную запись сразу после создания;
- -g — основная группа пользователя;
- -G — список дополнительных групп;
- -k — каталог с шаблонами конфигурационных файлов;
- -l — не сохранять информацию о входах пользователя в lastlog и faillog;
- -m — создавать домашний каталог пользователя, если он не существует;
- -M — не создавать домашнюю папку;
- -N — не создавать группу с именем пользователя;
- -o — разрешить создание пользователя linux с неуникальным идентификатором UID;
- -p — задать пароль пользователя;
- -r — создать системного пользователя, не имеет оболочки входа, без домашней директории и с идентификатором до SYS_UID_MAX;
- -s — командная оболочка для пользователя;
- -u — идентификатор для пользователя;
- -D — отобразить параметры, которые используются по умолчанию для создания пользователя. Если вместе с этой опцией задать еще какой-либо параметр, то его значение по умолчанию будет переопределено.
Теперь, когда вы знаете основные необходимые нам параметры утилиты мы можем перейти к разбору того, как выполняется создание нового пользователя linux. Сначала давайте посмотрим какие параметры будут применены для пользователя по умолчанию:
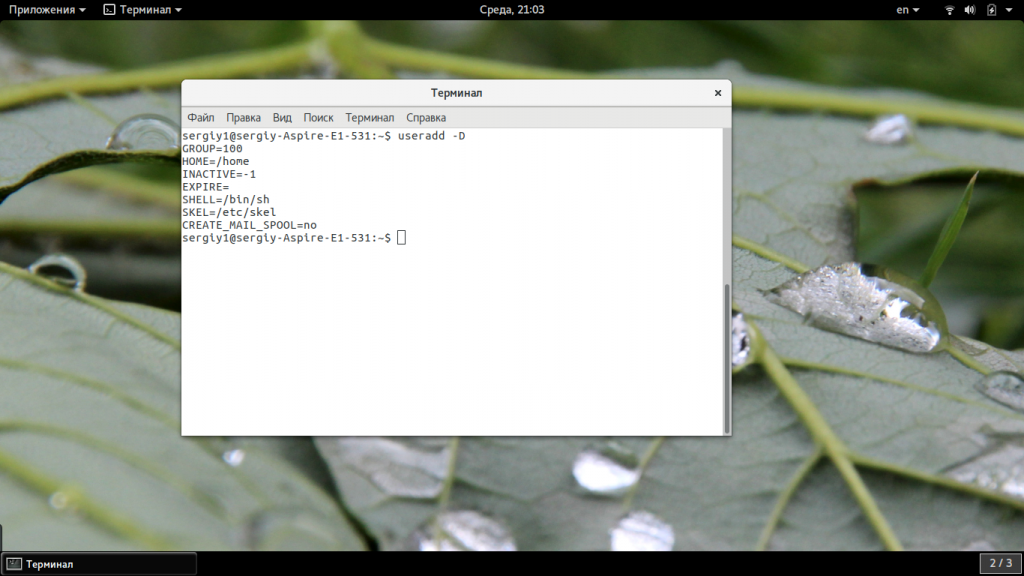
Как видите, по умолчанию домашний каталог пользователя будет создан в /home и будет использоваться оболочка /bin/sh. Теперь создадим минимального пользователя с минимальными настройками:
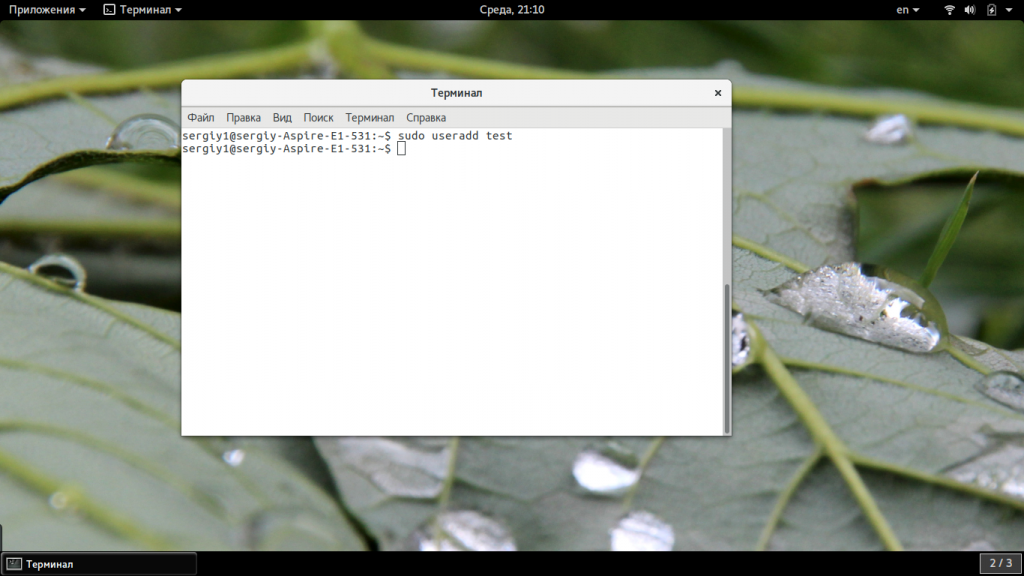
Был создан самый простой пользователь, без оболочки и пароля, а также без групп. Теперь немного усложним задачу и создадим пользователя с паролем и оболочкой /bin/bash:
sudo useradd -p password -s /bin/bash test1
Для того чтобы получать доступ к системным ресурсам пользователю нужно быть участником групп, у которых есть доступ к этим ресурсам. Дополнительные группы пользователя задаются с помощью параметра -G. Например, разрешим пользователю читать логи, использовать cdrom и пользоваться sudo:
sudo useradd -G adm,cdrom,wheel -p password -s /bin/bash test2
Также, можно установить дату, когда аккаунт пользователя будет отключен автоматически, это может быть полезно для пользователей, которые будут работать временно:
sudo useradd -G adm,cdrom,wheel -p password -s /bin/bash -e 01:01:2018 test2
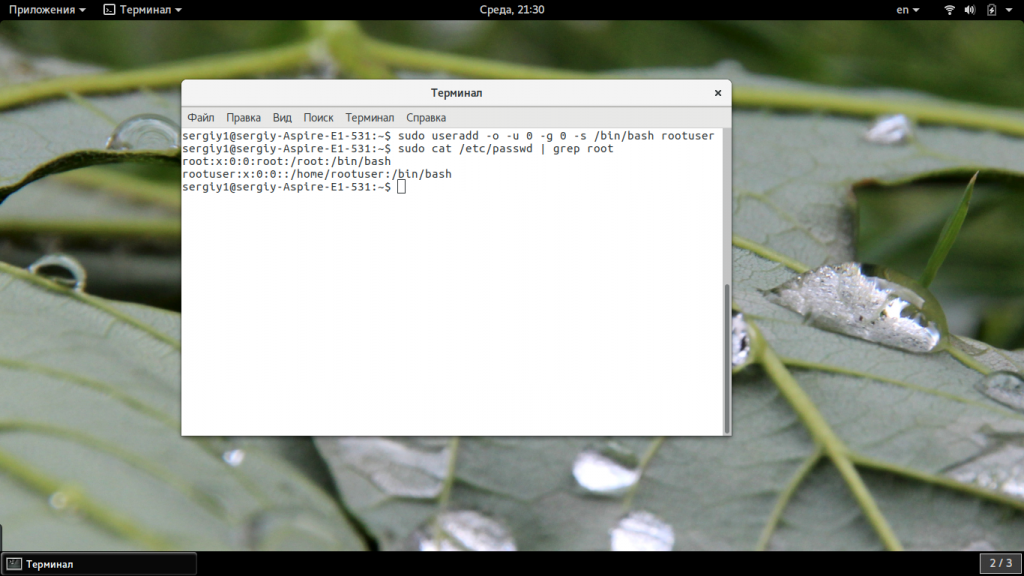
Некоторых пользователей интересует создание пользователя с правами root linux, это очень просто делается с помощью useradd, если комбинировать правильные опции. Нам всего лишь нужно разрешить создавать пользователя с неуникальным uid, установить идентификатор в 0 и идентификатор основной группы тоже в 0. Команда будет выглядеть вот так:
sudo useradd -o -u 0 -g 0 -s /bin/bash newroot
Пожалуй, это все основные примеры как добавить пользователя linux. Дальше нам осталось взглянуть только на работу в графическом интерфейсе.
Создание нового пользователя linux в GUI
В графическом интерфейсе системы создать нового пользователя linux еще проще. Рассмотрим окружение Gnome, хотя и в KDE тоже есть аналогичная функция. Войдите в главное меню и откройте параметры системы:
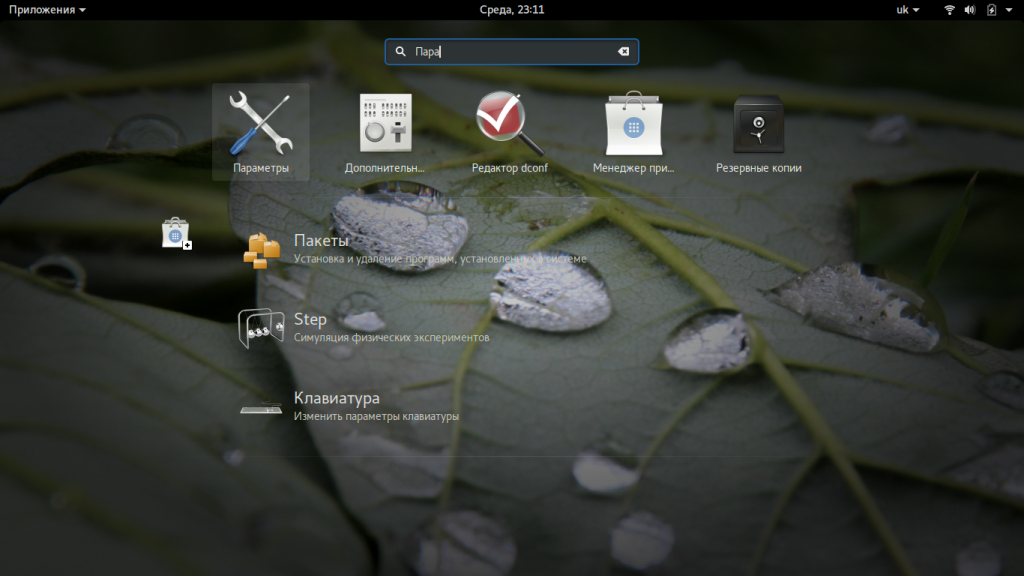
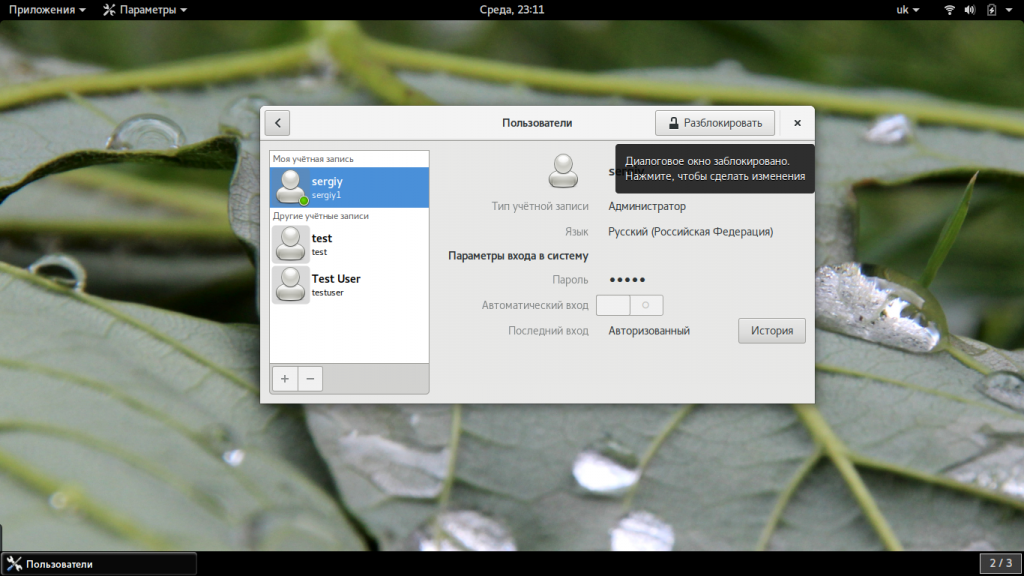
Затем откройте «Пользователи»:

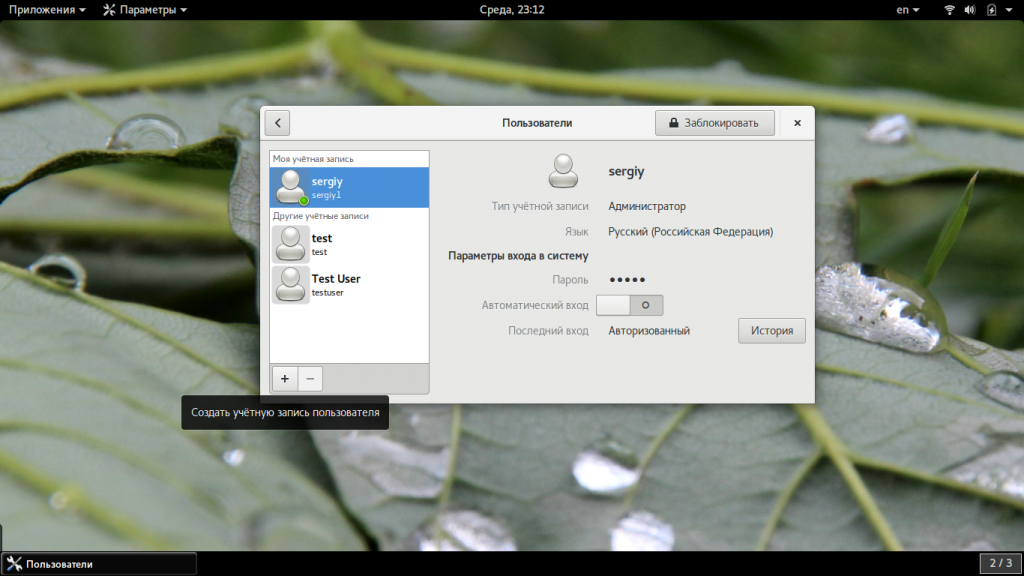
Поскольку утилита запущена от имени обычного пользователя вы ничего не можете сделать. Поэтому нажмите кнопку «Разблокировать»:
Только после этого используйте кнопку со знаком плюс для создания нового пользователя Linux:
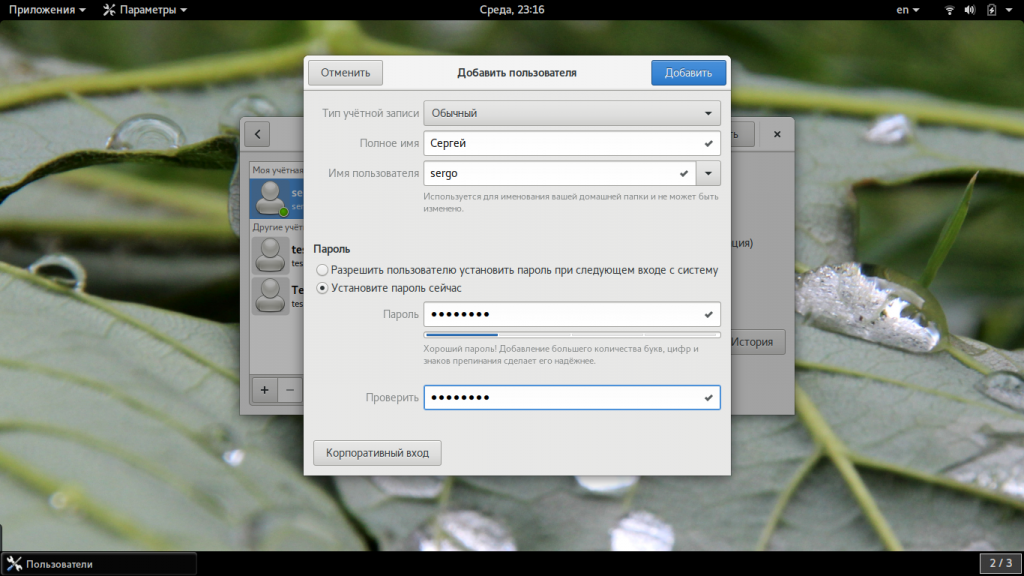
В открывшемся окне нужно заполнить все поля. Но тут намного больше ограничений, чем в методе через терминал. Вы не можете задать слишком простой пароль, а также нельзя настроить группы. Можно только указать будет ли пользователь включен в группу wheel с помощью выбора типа пользователя — администратор или обычный:
После этого создание пользователя linux завершено, новый пользователь появится в списке.
Выводы
В этой статье мы рассмотрели как создать пользователя linux с помощью терминала или в графическом интерфейсе системы. Оба способа имеют свои преимущества. Например, способ в терминале намного гибче, но в то же время графический способ дает больше контроля над процессом. Если у вас остались вопросы, спрашивайте в комментариях!
How to run systemd service as specific user and group in Linux
By default most of the systemd services are configured to run by root user but there is also an option to create a custom systemd service unit file and run it as a speciic user or group or both. So in this article we will check and verify the steps to run systemd service as specific user and group using CentOS/RHEL 7/8 Linux environment.
I have installed Oracle VirtualBox on a Linux server, where I will use a Virtual Machine with RHEL/CentOS 7/8 to verify the steps from this article.
Some more articles on similar topic:
Step 1: Overview on systemd
I hope you are already familiar with below topics
Step 2: Create user and Group
Now this is an optional steps assuming you already have your user and group ready for next steps. But if you do not then you can follow this article to create a new user and assign a custom group (primary or secondary) to the respective user.
Here I have already created a user deepak who is part of deepak and admin group
To verify the groups of any user
So we wish to create a systemd service unit file and run systemd service as specific user and group which for us will be deepak user part of admin group
Step 3: Create Sample Script
We will use our startup script from old articles with some tweaks to check and run systemd service as specific user and group in Linux
So in this script we have added an explicit check for user, so unless the user executing the script is » deepak «, the script will fail to execute. If successful the script will continue to write in /tmp/file for 3 minutes with 1 minute interval. This will also help us make sure that the script does not exits before completing it’s defined task
Change the ownership of the script file to deepak
Provide executable permission to the script
We will execute the script manually to make sure it works as expected
Step 4: Create unit file to run systemd service as specific user and group
Now as highlighted under step 1, I have already written another article with the steps to create a new systemd unit file. Here we will name our systemd unit file as run-as-user.service under /etc/systemd/system . Below is the content of run-as-user.service
Here we have defined User=deepak and Group=admin to make sure the script will be executed only as user deepak which is part of admin group.
You can also use many other directives if required in your environment such as WorkingDirectory , EnvironmentFile etc. For more information check man page of systemd.exec
Refresh the systemd configuration files
Next enable the service (if required) to start automatically at boot
Step 5: Verify the systemd unit file configuration
Now since we are done with the setting up of systemd. Let us verify our configuration. Before starting I have cleared the content of /tmp/file which is where our script /tmp/startup_script.sh will place dummy content every minutes for 3 minutes.
We will only start the run-as-user.service runtime as a reboot is not required to validate the configuration here:
Next check the status of the service
Well looks like everything was good as we were able to run systemd service as specific user and group, you can check the ps status to make sure our script is running using below command:
Now you can monitor the content of /tmp/file for couple of minutes as configured in the script
Lastly I hope the steps from the article to run systemd service as specific user and group in CentOS/RHEL 7/8 Linux was helpful. So, let me know your suggestions and feedback using the comment section.
Related Searches: run service as user linux. systemd allow user to start service. systemd start service as user on boot. linux systemd service run as root. Restarting systemd service only as a specific user? systemd services fail with User= in service file. Start process as a specific user. how to run a service a non-root user completely?
11 thoughts on “How to run systemd service as specific user and group in Linux”
what is the «admin» group? I have a «root» group, but not an admin group.
admin group used here is an example
Shouldn’t systemd’s «—user» feature be used to allow non-root accounts run their own services — without bothering the root-wielding admin every time they want to change something?
I’d love an actual example of that.
Any application level service is executed by normal user such as apache
Man you really helped me thanks a lot dude!
Loved! Very well explained!
This is really helpful, thank you. It is also rather timely as I’m trying to get a service to work with a little twist and maybe you have some insight to this.
I’m running VirtualBox with a Ubuntu 20.04 guest and a Windows 10 host. The VM is defined with a shared folder on the host.
I need to run the service as my user and it has to create some files and directories in the shared folder.
There are some really weird things happening.
— I am unable to write anything to the shared folder when I run the script as a service. I always get «Permission Denied» errors.
No problem if I run the service as «sudo service xxx start», only when it is started on system init. I specifically have an
«After=.mount» in the Init section.
— If I run using «+» before the script name on ExecStart, it runs as root and creates files, but then they just disappear. Actually,
they show up only in the script (e.g. if I issue an «ls» command) but by the time I get to log in, they are gone.
Anyway, I’m tearing what little hair I have out on this and can’t get anywhere. Any insight would be greatly appreciated.
Sorry, I didn’t realize I couldn’t use angle brackets. My «After=.mount» should have been «After=shared-folder-dir.mount», copied from the systemctl list-units list.
Hi Alan,
If there is a requirement for a certain file system then instead of After= you should use RequiresMountsFor=/path/to/fs .
Few questions:
If you just run the script as the user, is the script able to perform write operations in the shared folder? — I assume yes?
Because if this works, there is no reason it will fail as systemctl service.
Or do you see problems writing at reboot stage?
If I have more information, I may try to replicate the behaviour in my environment.
I see there are lot of comments. Can you please consolidate and send me a mail
Thanks for the response and for taking a look at this, to answer your questions:
— Just running the service after I log in, everything works, I can write to the shared folder with the service.
— the really weird thing is that I have echo statements showing that when I run as root:
— I can write to the shared folder
— the script sees the files and directories via ls right after creation
— they go away at some point. there is no delete for these files anywhere, but some of them are accessed
by a java program that the script is calling. some are not. but they all disappear by the time I can log in
and look.