- Как установить и настроить Samba в Debian 11
- Установка Samba в Debian 11
- Проверка установки SAMBA
- Конфигурирование Samba
- Настройка учетной записи пользователя
- Перезапустите службу Samba
- Подключение общего ресурса Samba
- Использование командной строки Linux
- Доступ к ресурсу Samba с помощью графического интерфейса Linux
- Подключение к общему ресурсу Samba с машины Windows
- Похожие записи:
- How to Install and Configure Samba on Debian 11
- Installation of Samba on Debian 11
- Verifying SAMBA installation
- Configuring Samba
- Setting up User Account
- Restart Samba Service
- Connecting Samba share from Linux machine
- Using command line
- Access Samba share using the GUI
- Connecting to a Samba share from a Windows machine
- Search
- About This Site
- Latest Tutorials
Как установить и настроить Samba в Debian 11
Samba — это мощный инструмент с открытым исходным кодом, который обеспечивает общий доступ к файлам и принтерам в сети на Linux системах, подобно Windows. Он позволяет компьютерам Linux и Windows сосуществовать и взаимодействовать в одной сети. Он устанавливается на Linux-сервер, на котором находятся файлы, подлежащие обмену. Затем доступ к этим общим файлам может получить любой авторизованный клиент Linux или Windows в той же сети.
В этой статье мы расскажем, как установить и настроить сервер Samba на системе Debian. Мы также узнаем, как получить доступ к этим общим файлам с машин Linux или Windows.
Мы использовали Debian 11 для выполнения команд и процедур, упомянутых в этой статье. Однако команды и процедуры работают почти так же и в других дистрибутивах Linux.
Установка Samba в Debian 11
Запустите Терминал в вашей ОС Debian. Перейдите на вкладку Деятельность в левом верхнем углу рабочего стола. Затем в строке поиска введите ключевое слово terminal. Когда появится результат поиска, нажмите на значок Терминала, чтобы открыть его.
В Терминале введите следующую команду для установки сервера Samba.
Может появиться запрос на подтверждение, в котором будет предложено выбрать Y/n. Нажмите y, чтобы продолжить процесс установки, и Samba будет установлена на вашу систему.
Во время установки может возникнуть вопрос, хотите ли вы использовать настройки WINS из DHCP. Если ваш сервер использует статический IP-адрес, выберите НЕТ.
Проверка установки SAMBA
Чтобы проверить установку, проверьте состояние службы samba «nmbd». Эта служба запускается автоматически после установки Samba.
sudo systemctl status nmbdЕсли сервер samba успешно установлен и работает, вы увидите статус Active(running).

Если служба не запускается автоматически, выполните эту команду, чтобы запустить ее вручную:
sudo systemctl start nmbdКонфигурирование Samba
После завершения установки сервера Samba настало время его конфигурирования. Конфигурационный файл samba smb.conf находится в каталоге /etc/samba. В этом файле мы указываем папку и принтеры, к которым хотим предоставить общий доступ, а также их разрешения и рабочие параметры. Samba просматривает свой конфигурационный файл через определенное время и обновляет любые изменения.
Для выполнения конфигурации выполните следующие шаги:
Шаг 1: Создайте каталог для совместного использования файлов через Samba. В этом каталоге будут храниться файлы, к которым необходимо предоставить общий доступ. Выполните следующую команду для создания нового каталога в корневом каталоге.
Шаг 2: Теперь нам нужно отредактировать конфигурационный файл smb.conf. Перед редактированием конфигурационного файла убедитесь, что создали резервную копию этого файла в том же или другом каталоге. Выполните следующую команду для создания резервной копии файла smb.conf.
sudo cp /etc/samba/smb.conf ~/Documents smb_backup.confЭта команда создаст резервную копию в каталоге ~/Documents.
Шаг 3: Теперь отредактируйте исходный файл конфигурации с помощью любого текстового редактора, например Vim, Nano или Gedit. Мы используем здесь редактор Nano:
sudo nano /etc/samba/smb.confПрокрутите вниз до нижней части smb.conf и добавьте следующие строки:
[samba-share] comment = Samba on Debian path = /samba read-only = no browsable = yes[samba-share] — имя ресурса samba
comment — краткое описание общего ресурса
Path — путь к общему каталогу.
Read-only — установить общий каталог как доступный для чтения
Browsable — включать или не включать общий ресурс в список общих ресурсов.
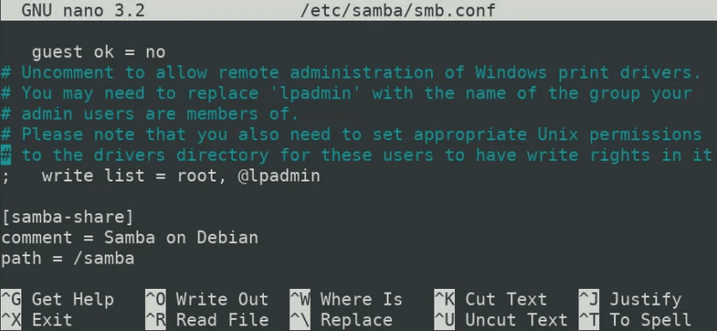
После завершения работы нажмите одновременно Ctrl+O и Ctrl+X для сохранения и выхода из файла.
Настройка учетной записи пользователя
Теперь нам понадобится настроить учетную запись пользователя для samba. Пользователь Samba должен быть системным пользователем и поэтому должен существовать в файле /etc/password. Если пользователь еще не существует, сначала его нужно создать. В противном случае просто выполните команду в Терминале, используя следующий синтаксис, чтобы установить новый пароль для пользователя.
Перезапустите службу Samba
После того как вы закончили со всеми конфигурациями и настройкой пользователей, перезапустите службу Samba, выполнив следующую команду в Терминале:
sudo systemctl restart smbd.serviceПодключение общего ресурса Samba
Использование командной строки Linux
Чтобы подключить общий ресурс samba из командной строки Linux, необходимо установить клиент Samba. Он поможет подключить общий ресурс samba из командной строки.
Выполните следующую команду в терминале для установки клиента Samba:
sudo apt install smbclientПосле установки подключитесь к ресурсу Samba, используя следующий синтаксис:
sudo smbclient //[IP_адрес или имя_хоста]/имя_хоста -U samba_user- [IP_адрес или имя_хоста] — это IP-адрес или имя хоста сервера Samba
- [имя_хоста] — это имя общего каталога Samba
- [samba_user] — имя пользователя, имеющего доступ к общему ресурсу.
После ввода команды в терминале появится запрос на ввод пароля. Введите пароль и нажмите Enter, после чего вы увидите samba CLI. Чтобы просмотреть поддерживаемые команды в CLI, введите help и нажмите enter.
Доступ к ресурсу Samba с помощью графического интерфейса Linux
Чтобы получить доступ к ресурсу Samba через графический интерфейс пользователя, откройте Диспетчер файлов. В нижней части окна Диспетчера файлов вы увидите опцию Подключиться к серверу. В адресной строке введите адрес сервера Samba в следующем формате и нажмите кнопку Подключиться.
//[IP_адрес или имя_хоста]/имя_общего_ресурса

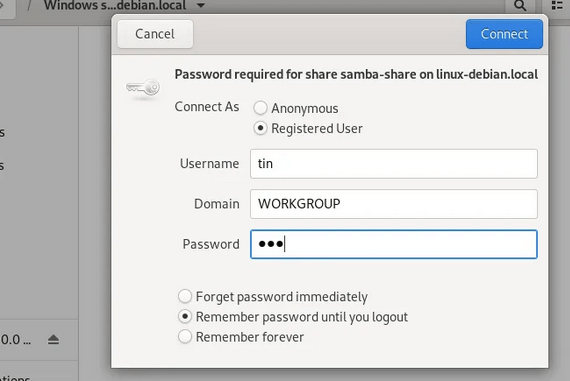
Когда появится следующее окно, выберите радиокнопку Зарегистрированный пользователь и Введите имя пользователя и пароль в соответствующих файлах. Если вы находитесь в среде WORKGROUP, оставьте поле Domain по умолчанию и нажмите Connect.
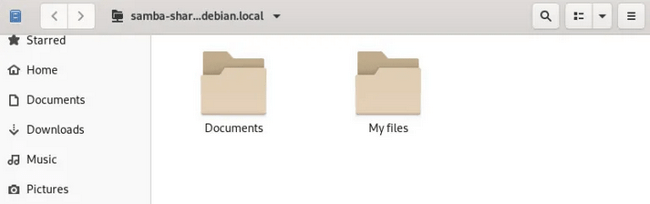
Теперь вы сможете получить доступ к общим файлам на сервере Samba.
Подключение к общему ресурсу Samba с машины Windows
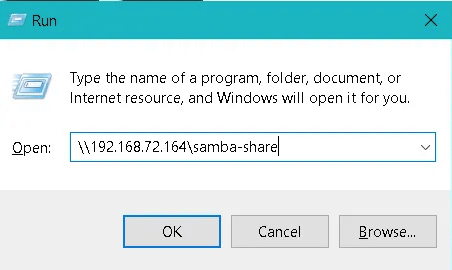
В операционной системе Windows для доступа к общим файлам по сети чаще всего используется утилита Run. Чтобы открыть утилиту Run, воспользуйтесь сочетанием клавиш Windows + R. Когда утилита откроется, введите адрес общего ресурса Samba в следующем формате и нажмите OK.
Вам будет предложено ввести пароль пользователя Samba. Введите пароль и нажмите OK.
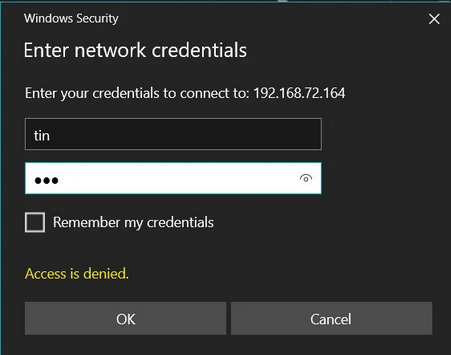
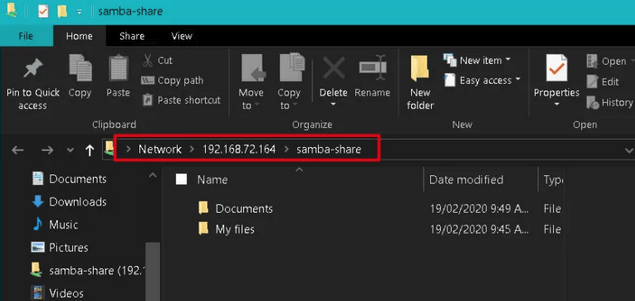
Теперь вы сможете получить доступ к общим файлам Samba на вашей машине Windows.
В этой статье мы узнали, как установить Samba на систему Debian 11. Мы также узнали, как подключаться к серверу Samba с машин Linux и Windows для доступа к общим каталогам.
Похожие записи:
How to Install and Configure Samba on Debian 11

Samba is a powerful open-source tool that enables Windows-like sharing of files and printers on a network on Linux systems. It allows Linux and Windows computers to coexist and interact on the same network. It is installed on the Linux server where the files to be shared are located. These shared files can then be accessed by any authorized Linux or Windows client on the same network.
In this article, we will explain how to install and configure the Samba server on a Debian system. We will also learn how to access these shared files from Linux or Windows machines.
We used Debian 11 to run the commands and procedures mentioned in this article. However, the commands and procedures work almost the same in other Linux distributions.
Installation of Samba on Debian 11
Launch the Terminal in your Debian OS. Go to the Activities tab in the top left corner of your desktop. Then in the search bar, type the keyword terminal. When the search result appears, click on the Terminal icon to open it.
In the Terminal, enter the following command to install the Samba server.

It might ask for confirmation by providing you with a Y/n option. Hit y to continue the installation process and Samba will be installed on your system.
During installation, it might ask if you want to use WINS settings from DHCP. If your server is using a static IP address, select NO.
Verifying SAMBA installation
To verify the installation, check the status of the samba service “nmbd”. This service starts automatically upon the installation of Samba.
$ sudo systemctl status nmbd
If the samba server is installed and running successfully, you will see the Active(running) status.

If the service does not start automatically, run this command to start it manually:
$ sudo systemctl start nmbd
Configuring Samba
Once the installation of the Samba server is completed, it’s time now to configure it. The samba configuration file smb.conf is located at the /etc/samba directory. In this file, we specify the folder and printers that we want to share along with their permissions and operational parameters. Samba reviews its configuration file after a certain amount of time and updates any changes.
Follow the below steps to perform configurations:
Step 1: Create a directory for sharing files through Samba. This directory will keep the files that need to be shared. Run the following command to create a new directory under the root directory.
Step 2: Now we will need to edit the configuration file smb.conf. Before editing the configuration file, make sure to create a backup of this file in the same or another directory. Execute the following command to create a backup of smb.conf file.
$ sudo cp /etc/samba/smb.conf ~/Documents smb_backup.conf
This command will create a backup at the ~/Documents directory
Step 3: Now edit the original configuration file using any text editor like Vim, Nano, or Gedit. We are using here Nano editor:
$ sudo nano /etc/samba/smb.conf
Scroll down to the bottom of the smb.conf and add the following lines:
[samba-share] comment = Samba on Debian path = /samba read-only = no browsable = yes
- [samba-share] = name of the samba share
- comment= brief description of the share
- Path= Path of the shared directory.
- Read-only = Set shared directory as readable
- Browsable = to include the share in the share list or not

Once done, press Ctrl+O and Ctrl+X simultaneously to save and quit the file.
Setting up User Account
Now we will need the setup user account for samba. The Samba user must have to be the system user and therefore should exist in the /etc/password file. If a user does not already exist, you will first need to create it. Otherwise, just execute the command in the Terminal using the following syntax to set up a new password for the user.
$ sudo smbpasswd -a username
Restart Samba Service
Once you are done with all configurations and user setup, restart the Samba service by running the following command in Terminal:
$ sudo systemctl restart smbd.service
Connecting Samba share from Linux machine
Using command line
To connect samba share from the Linux command line, you will need to install the Samba client. It will help to connect samba shares from the command line.
Run the following command in the Terminal to install the Samba client:
$ sudo apt install smbclient
Once installed, connect to Samba share using the following syntax:
$ sudo smbclient //[IP_address or Host_name]/share_name –U samba_user
- [IP_address or Host_name] is the IP address or the hostname of the Samba server
- [share_name] is the name of the Samba shared directory
- [samba_user] is the name of the user who has access to the share
Once you enter the command in the terminal, it will ask you for the password. Type the password and hit enter after which you will see samba CLI. To view the supported commands on CLI, type help and hit enter.
Access Samba share using the GUI
To access Samba share via a graphical user interface, open File Manager. On the bottom of the File Manager window, you will see the Connect to server option. In the address bar, type the address of the Samba server in the following format and click Connect.
//[IP_address or Host_name]/share_name

When the following window appears, select the radio button Registered user and Enter username and password in their respective fileds. If you are in the WORKGROUP environment, leave the Domain field as default and click Connect.

Now you will be able to access shared files on the Samba server.

Connecting to a Samba share from a Windows machine
In Windows OS, Run utility is mostly used to access shared files over the network. To open the Run utility, use Windows key+R shortcut. When the utility opens, enter the Samba share address in the following format and click OK.

You will be prompted to provide the Samba user password. Type the password and click OK.

Now you will be able to access Samba shared files on your Windows machine.

In this article, we have learned how to install Samba on a Debian 11 system. We have also learned how to connect to the Samba server from Linux and Windows machines for accessing shared directories.
Search
About This Site
Vitux.com aims to become a Linux compendium with lots of unique and up to date tutorials.