- How To Use DHCP Server in Linux?
- Choosing the DHCP Server
- Configuring the DHCP Server
- Starting and Enabling the DHCP Server
- Configuring the Client Devices
- How Does DHCP Work?
- Allocation Methods for DHCP
- Manual Allocation
- Automatic Allocation
- Fixed Lease Time
- Infinite Lease Time
- Steps to Set Up DHCP Server on Ubuntu
- Troubleshooting
- Conclusion
- Установка и базовая настройка DHCP сервера на Ubuntu
- Установка и настройка
- Возможные проблемы
- Not configured to listen on any interfaces!
- Читайте также
How To Use DHCP Server in Linux?
DHCP (Dynamic Host Configuration Protocol) is a network protocol widely used in Linux and other operating systems to automatically assign IP addresses and network configuration settings to devices on a network. It plays a crucial role in simplifying network administration and management by eliminating the need for manual IP address configuration.
Let’s learn how to use DHCP (Dynamic Host Configuration Protocol) server in Linux in predefined steps for a better understanding.
Choosing the DHCP Server
There are several DHCP server software options available for Linux, such as ISC DHCP Server (dhcpd) , Dnsmasq , and Kea DHCP . You can choose the one that suits your needs and install it using your Linux distribution package manager.
Configuring the DHCP Server
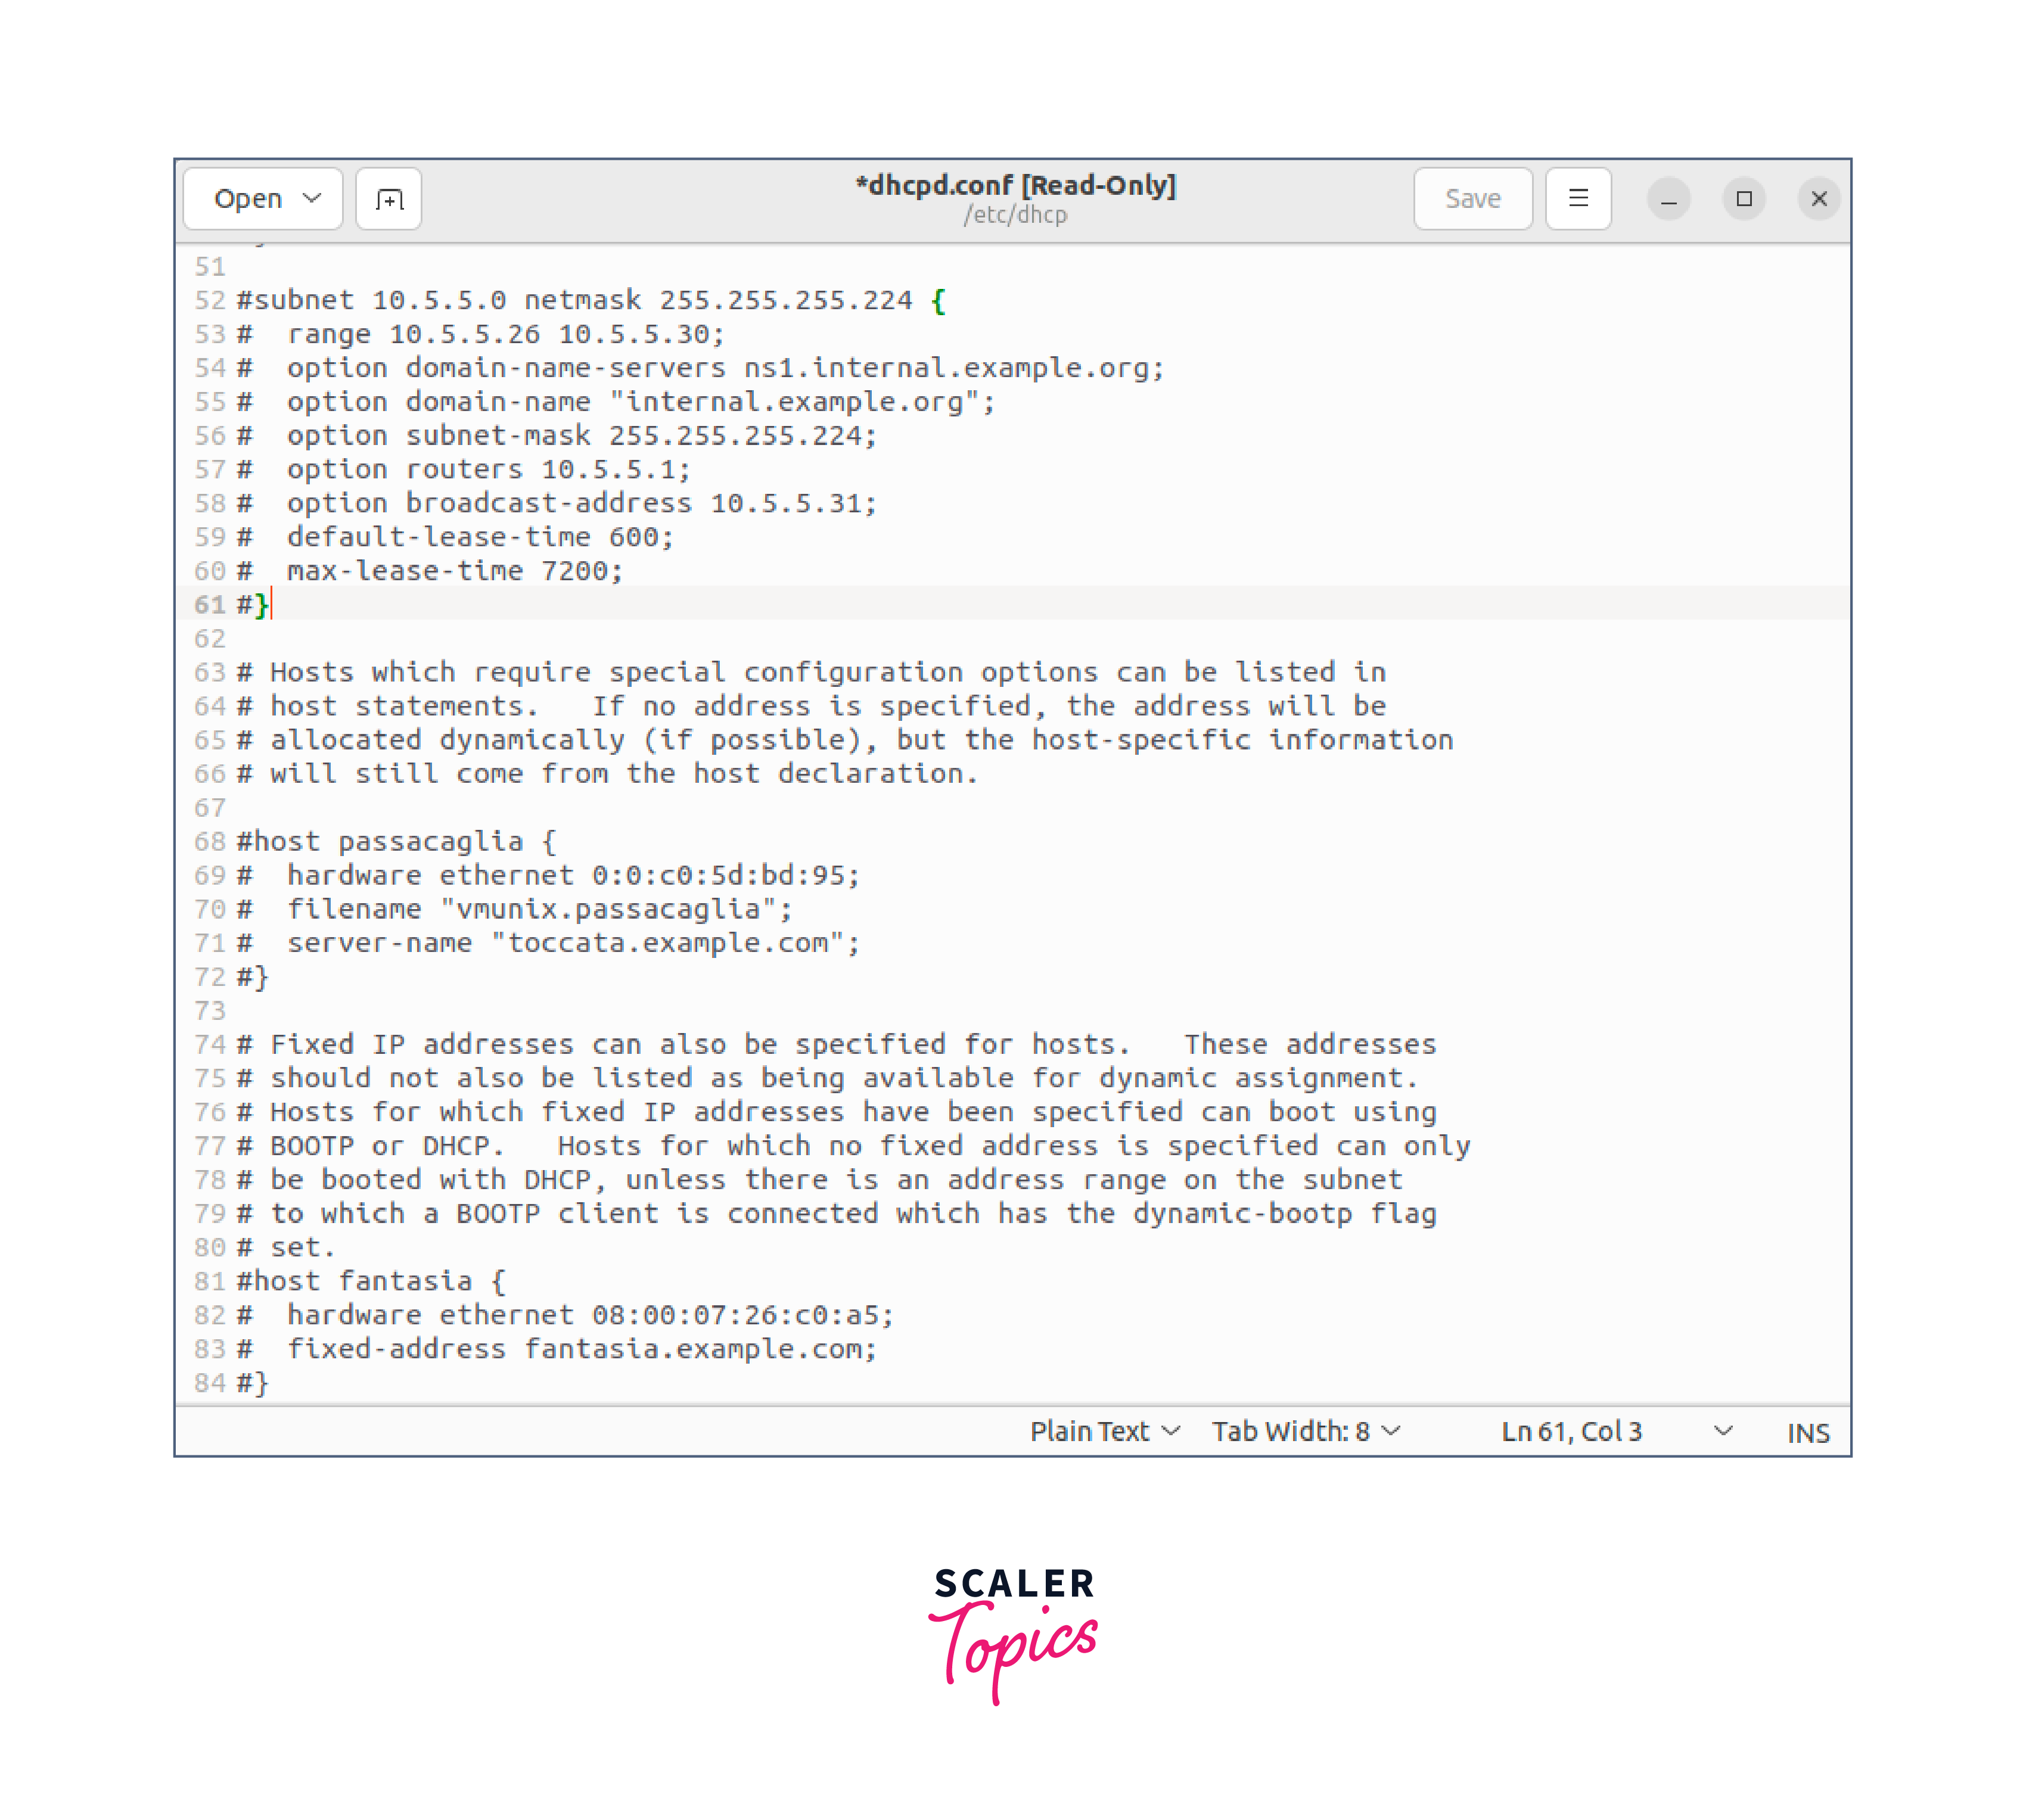
The configuration file for the DHCP server is typically located in the /etc directory. The specific file and its location may vary depending on the DHCP server software you installed. For example, if you are using ISC DHCP Server, the configuration file is usually /etc/dhcp/dhcpd.conf.
Open the configuration file using a text editor and modify it according to your network requirements. The configuration file contains various options to specify network settings, IP address ranges, lease durations, and other DHCP parameters. It also allows you to define static IP assignments for specific hosts.
Here’s a simple example of a DHCP server configuration using ISC DHCP Server:
In this example, the DHCP server is configured to assign IP addresses from the range 10.5.5.26 to 10.5.5.26 . The default gateway (router) is set to 10.5.5.1 , and the DNS server is set as ns1.internal.example.org .
Starting and Enabling the DHCP Server
Once you have configured the DHCP server, save the configuration file and start the DHCP server service. The commands to start and enable the service may vary depending on your Linux distribution and the DHCP server software you are using. We have portrayed some common commands here.
For ISC DHCP Server:
For Dnsmasq:
For Kea DHCP:
Configuring the Client Devices
On the client devices (computers, smartphones, etc.) connected to the network, ensure that they are set to obtain IP addresses automatically via DHCP. This is typically the default configuration on most devices.
The client devices will send DHCP discovery requests to the DHCP server, and the server will respond with the appropriate IP address, subnet mask, gateway, DNS server, and other network configuration information.
That’s it; You should now have a functioning DHCP server in Linux. The server will dynamically assign IP addresses to devices on your network, making network configuration easier and more automated.
How Does DHCP Work?
The Linux DHCP server facilitates the automatic assignment of IP addresses and network configuration to client devices. When a client connects to the network, it sends a DHCP Discover message, and the Linux DHCP server responds with a DHCP Offer, providing an available IP address and configuration details.
The client then sends a DHCP Request, and upon verification, the server sends a DHCP Acknowledgment, confirming the IP address allocation. The server manages IP address leases, allowing clients to renew or release them. Linux DHCP servers streamline network administration and simplify IP address management in Linux-based networks.
Allocation Methods for DHCP
Allocation methods for DHCP specify how IP addresses are assigned to client devices. Let’s understand the four common allocation methods.
Manual Allocation
In this method, IP addresses are manually assigned to specific client devices based on their MAC addresses. This allows for precise control over IP assignments but requires manual configuration for each device.
Automatic Allocation
With automatic allocation, the DHCP server dynamically assigns available IP addresses to client devices when they connect to the network. The assignment is done on a first-come, first-served basis from a defined IP address pool.
Fixed Lease Time
In this method, the DHCP server assigns IP addresses to clients for a specific duration or lease time. Once the lease expires, the client must renew the lease or request a new IP address. Fixed lease times allow for better IP address management and control over address reassignment.
Infinite Lease Time
With infinite lease time, also known as static allocation or reservation, the DHCP server assigns a specific IP address to a client device permanently. The client retains the same IP address across network connections, even after rebooting or reconnecting. This method is useful for devices that require consistent IP addresses, such as servers or network printers.
By offering different allocation methods, DHCP provides flexibility to accommodate various network scenarios and requirements in Linux and other operating systems.
Steps to Set Up DHCP Server on Ubuntu
The following are the process instructions for configuring a DHCP server on Ubuntu, utilizing the Linux DHCP server (ISC DHCP Server). Let’s follow.
Step 1:
Open a terminal on your Ubuntu system and run the following commands to install the Linux DHCP server:

Step 2:
The main configuration file for the Linux DHCP server is located at /etc/dhcp/dhcpd.conf . Open the file with a text editor and configure it according to your network requirements. You can specify IP address ranges, lease durations, and other DHCP parameters. An example of the same has been shown below.
This configuration assigns IP addresses from the range 10.5.5.26 to 10.5.5.30 , with the default gateway (router) set to 10.5.5.1 and the DNS server also set as ns1.internal.example.org .
Step 3:
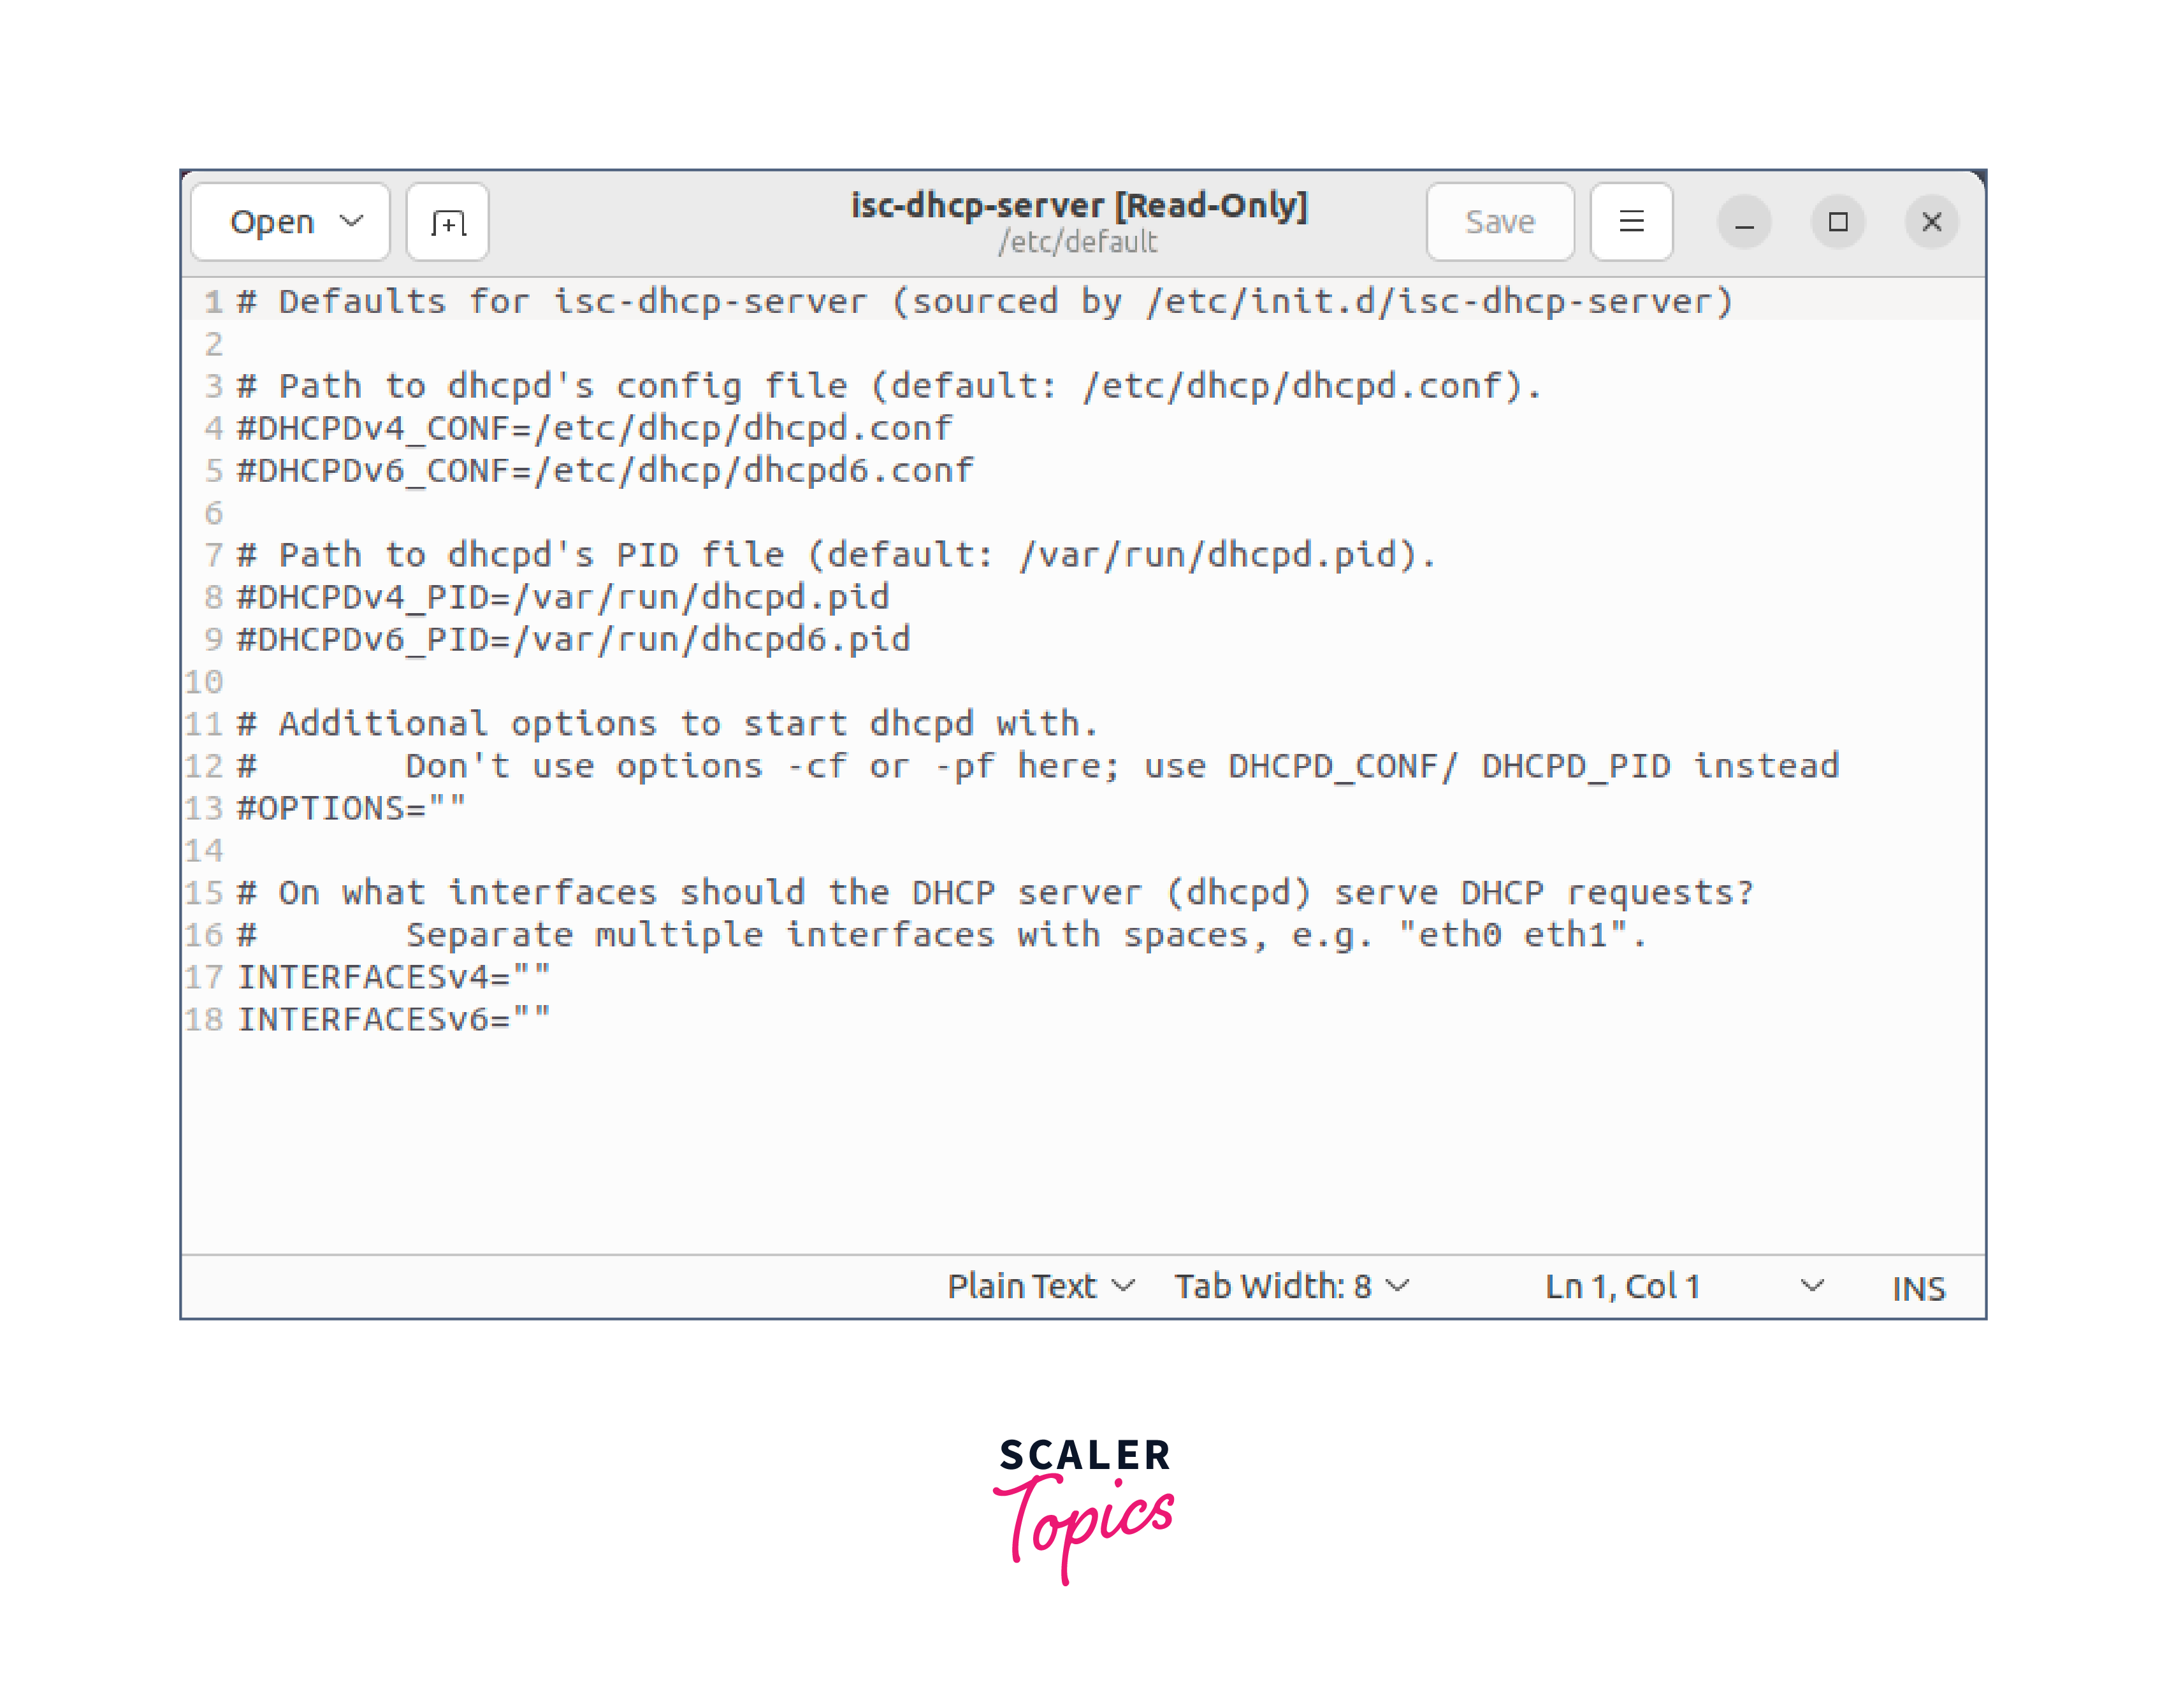
Then open the /etc/default/isc-dhcp-server file in a text editor and specify the network interface to listen on. Set the INTERFACESv4 variable to the appropriate interface, such as eth0 or enp0s3 .
Step 4:
Now, start and enable the Linux DHCP server service using the below-mentioned command.
To ensure that the DHCP server starts automatically on system boot, enable the service with the below-mention command.
Step 5:
Then verify the Linux DHCP server status by running the below-mentioned command.
If the service is running without errors, you should see an «active (running)» status.
That’s it; You have successfully set up the Linux DHCP server on Ubuntu. It will now dynamically assign IP addresses and provide network configuration to client devices on your network.
Troubleshooting
If you encounter any issues with the Linux DHCP server setup on Ubuntu, you can try the below-mentioned troubleshooting steps.
Check the DHCP server status
Run the command sudo systemctl status isc-dhcp-server to check the status of the Linux DHCP server. Look for any error messages or warnings that might indicate the cause of the issue.
Verify the DHCP configuration
Ensure that the DHCP configuration file /etc/dhcp/dhcpd.conf is correctly set up. Check for any syntax errors or misconfigurations that could cause issues. Pay attention to IP address ranges, options, and subnet configurations.
Check the network interface
Verify that the DHCP server is configured to listen on the correct network interface. Open the /etc/default/isc-dhcp-server file and ensure that the INTERFACESv4 variable is set to the appropriate interface, such as eth0 or enp0s3 .
Restart the DHCP server
Sometimes, restarting the DHCP server can resolve temporary issues. Use the command sudo systemctl restart isc-dhcp-server to restart the Linux DHCP server.
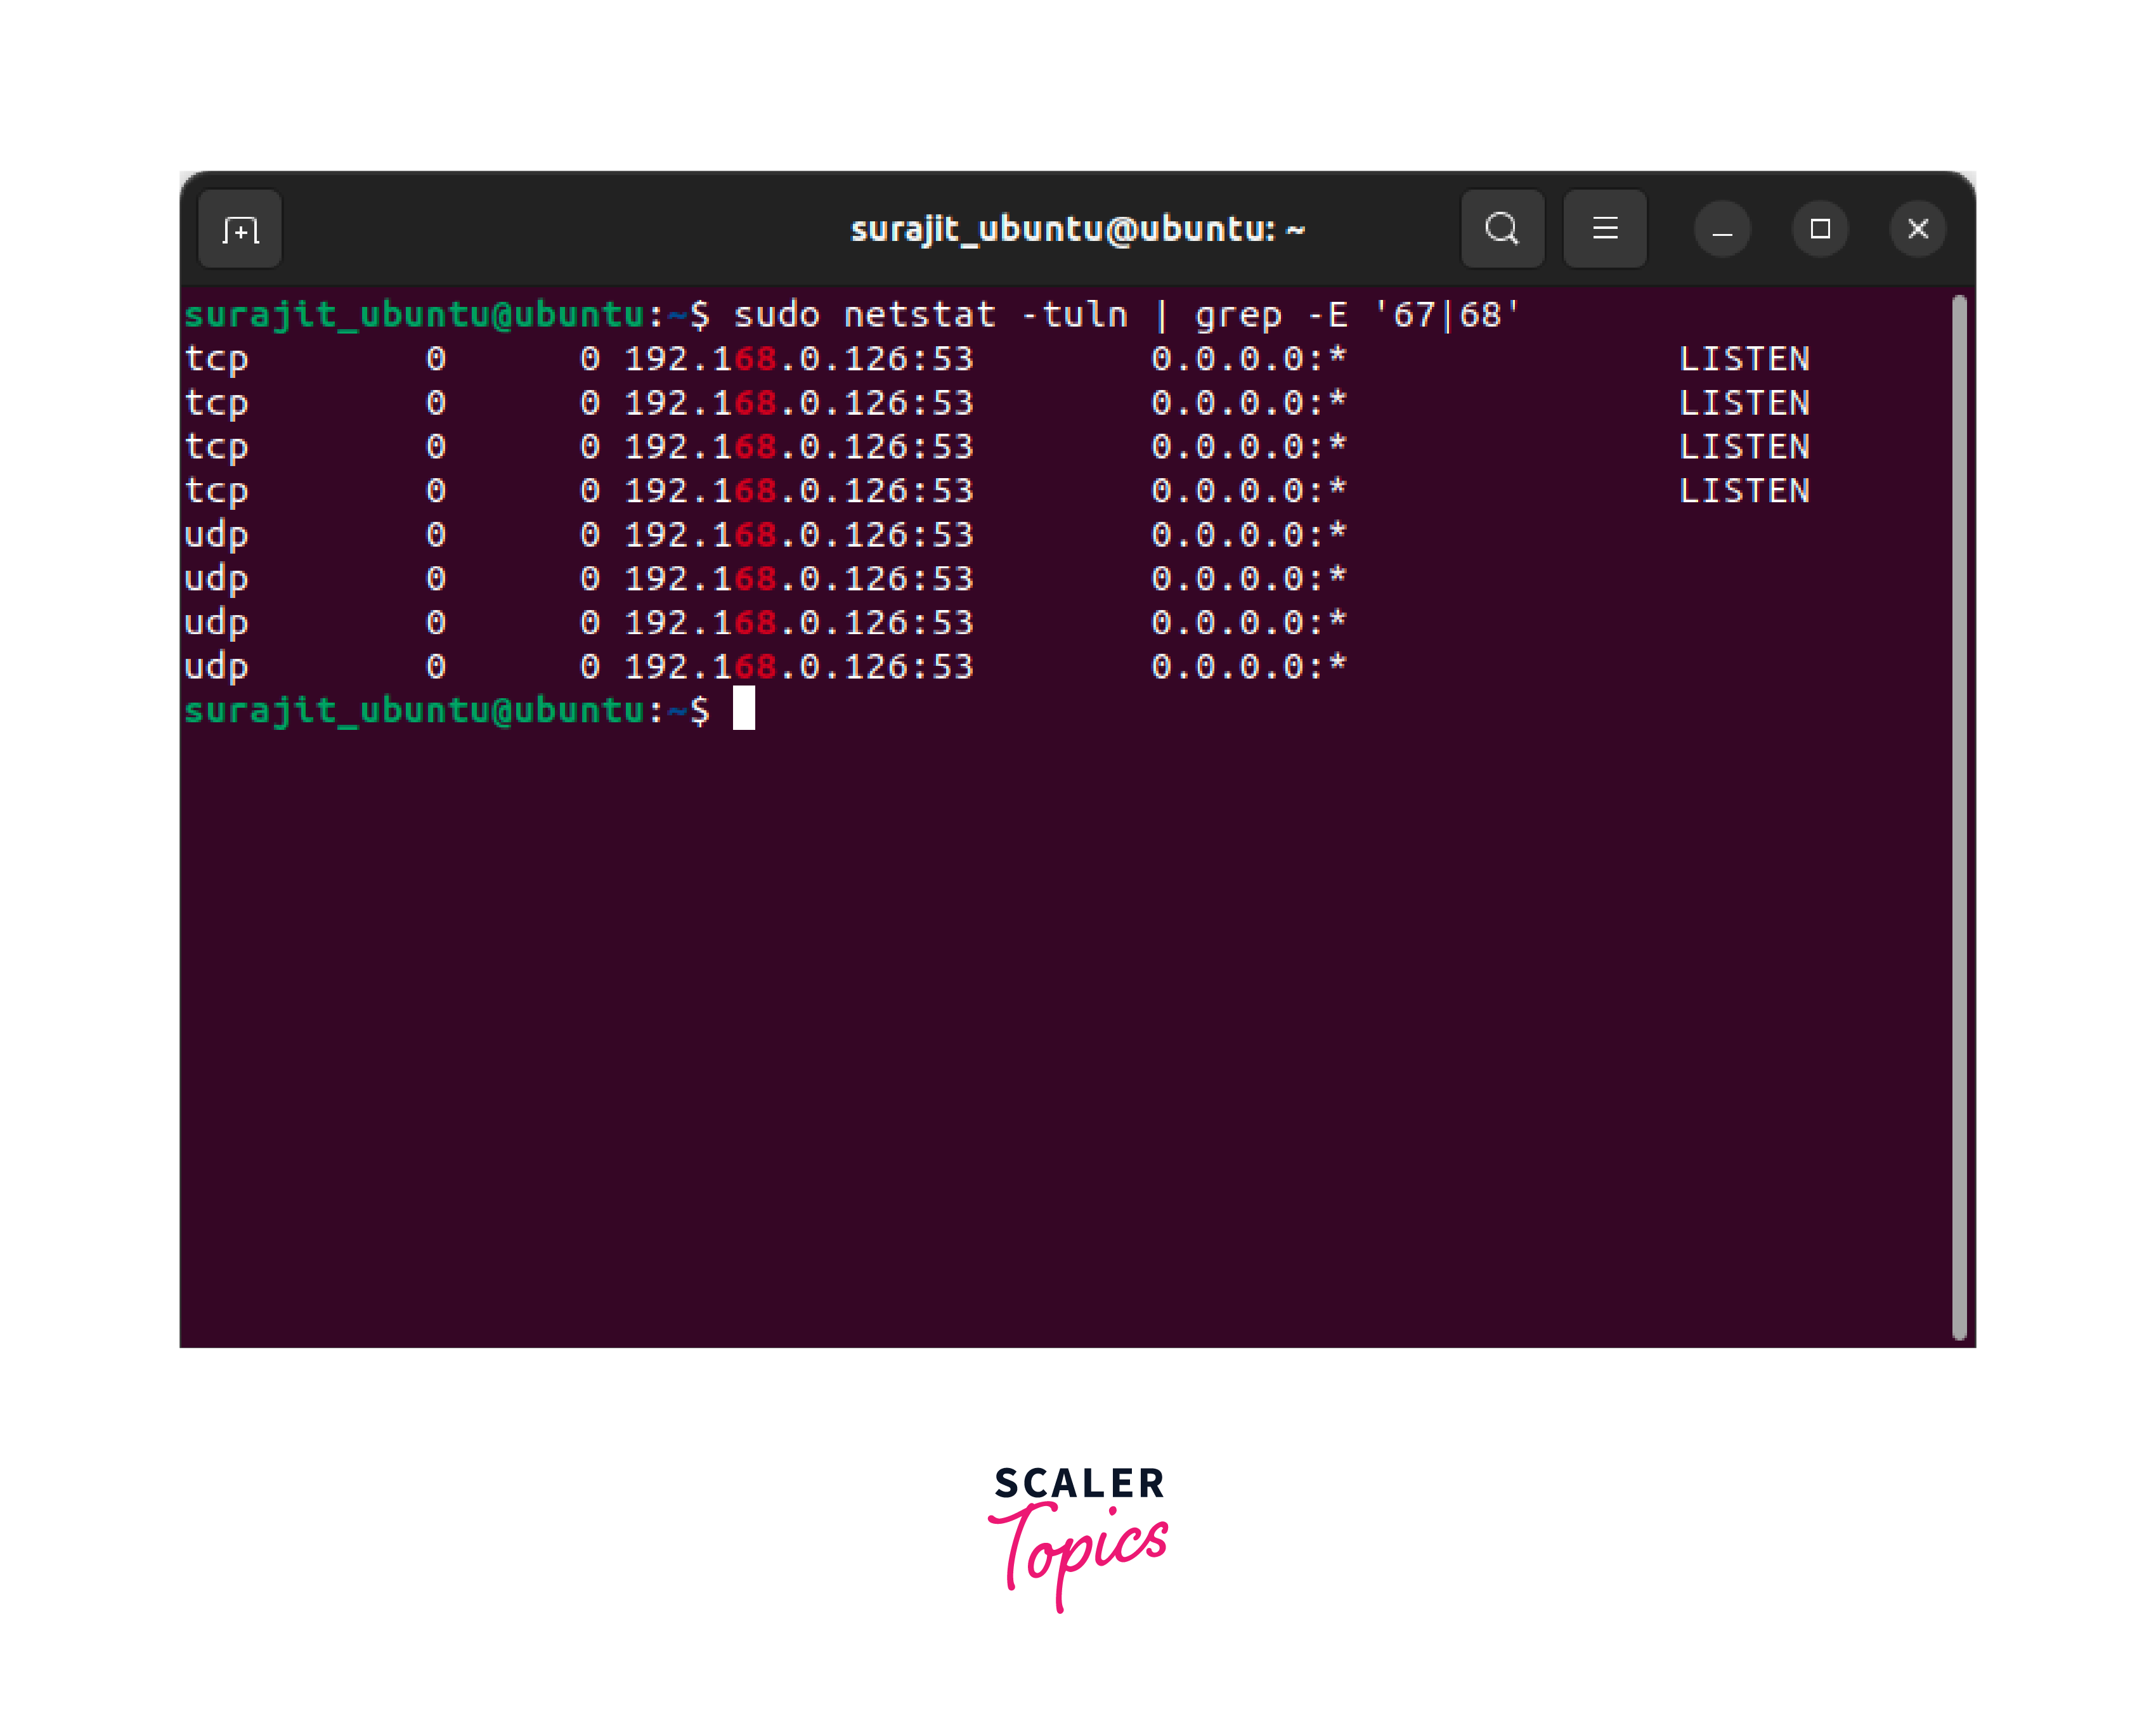
Check for port conflicts
Ensure that no other services or applications are using the same ports required by the DHCP server. The DHCP server uses UDP ports 67 and 68. Use the command sudo netstat -tuln | grep -E ’67|68′ to check for port conflicts.
Verify network connectivity
Ensure that the DHCP server has network connectivity and can communicate with client devices. Check the network connection, firewall settings, and any network devices (routers, switches) that might be blocking DHCP traffic.
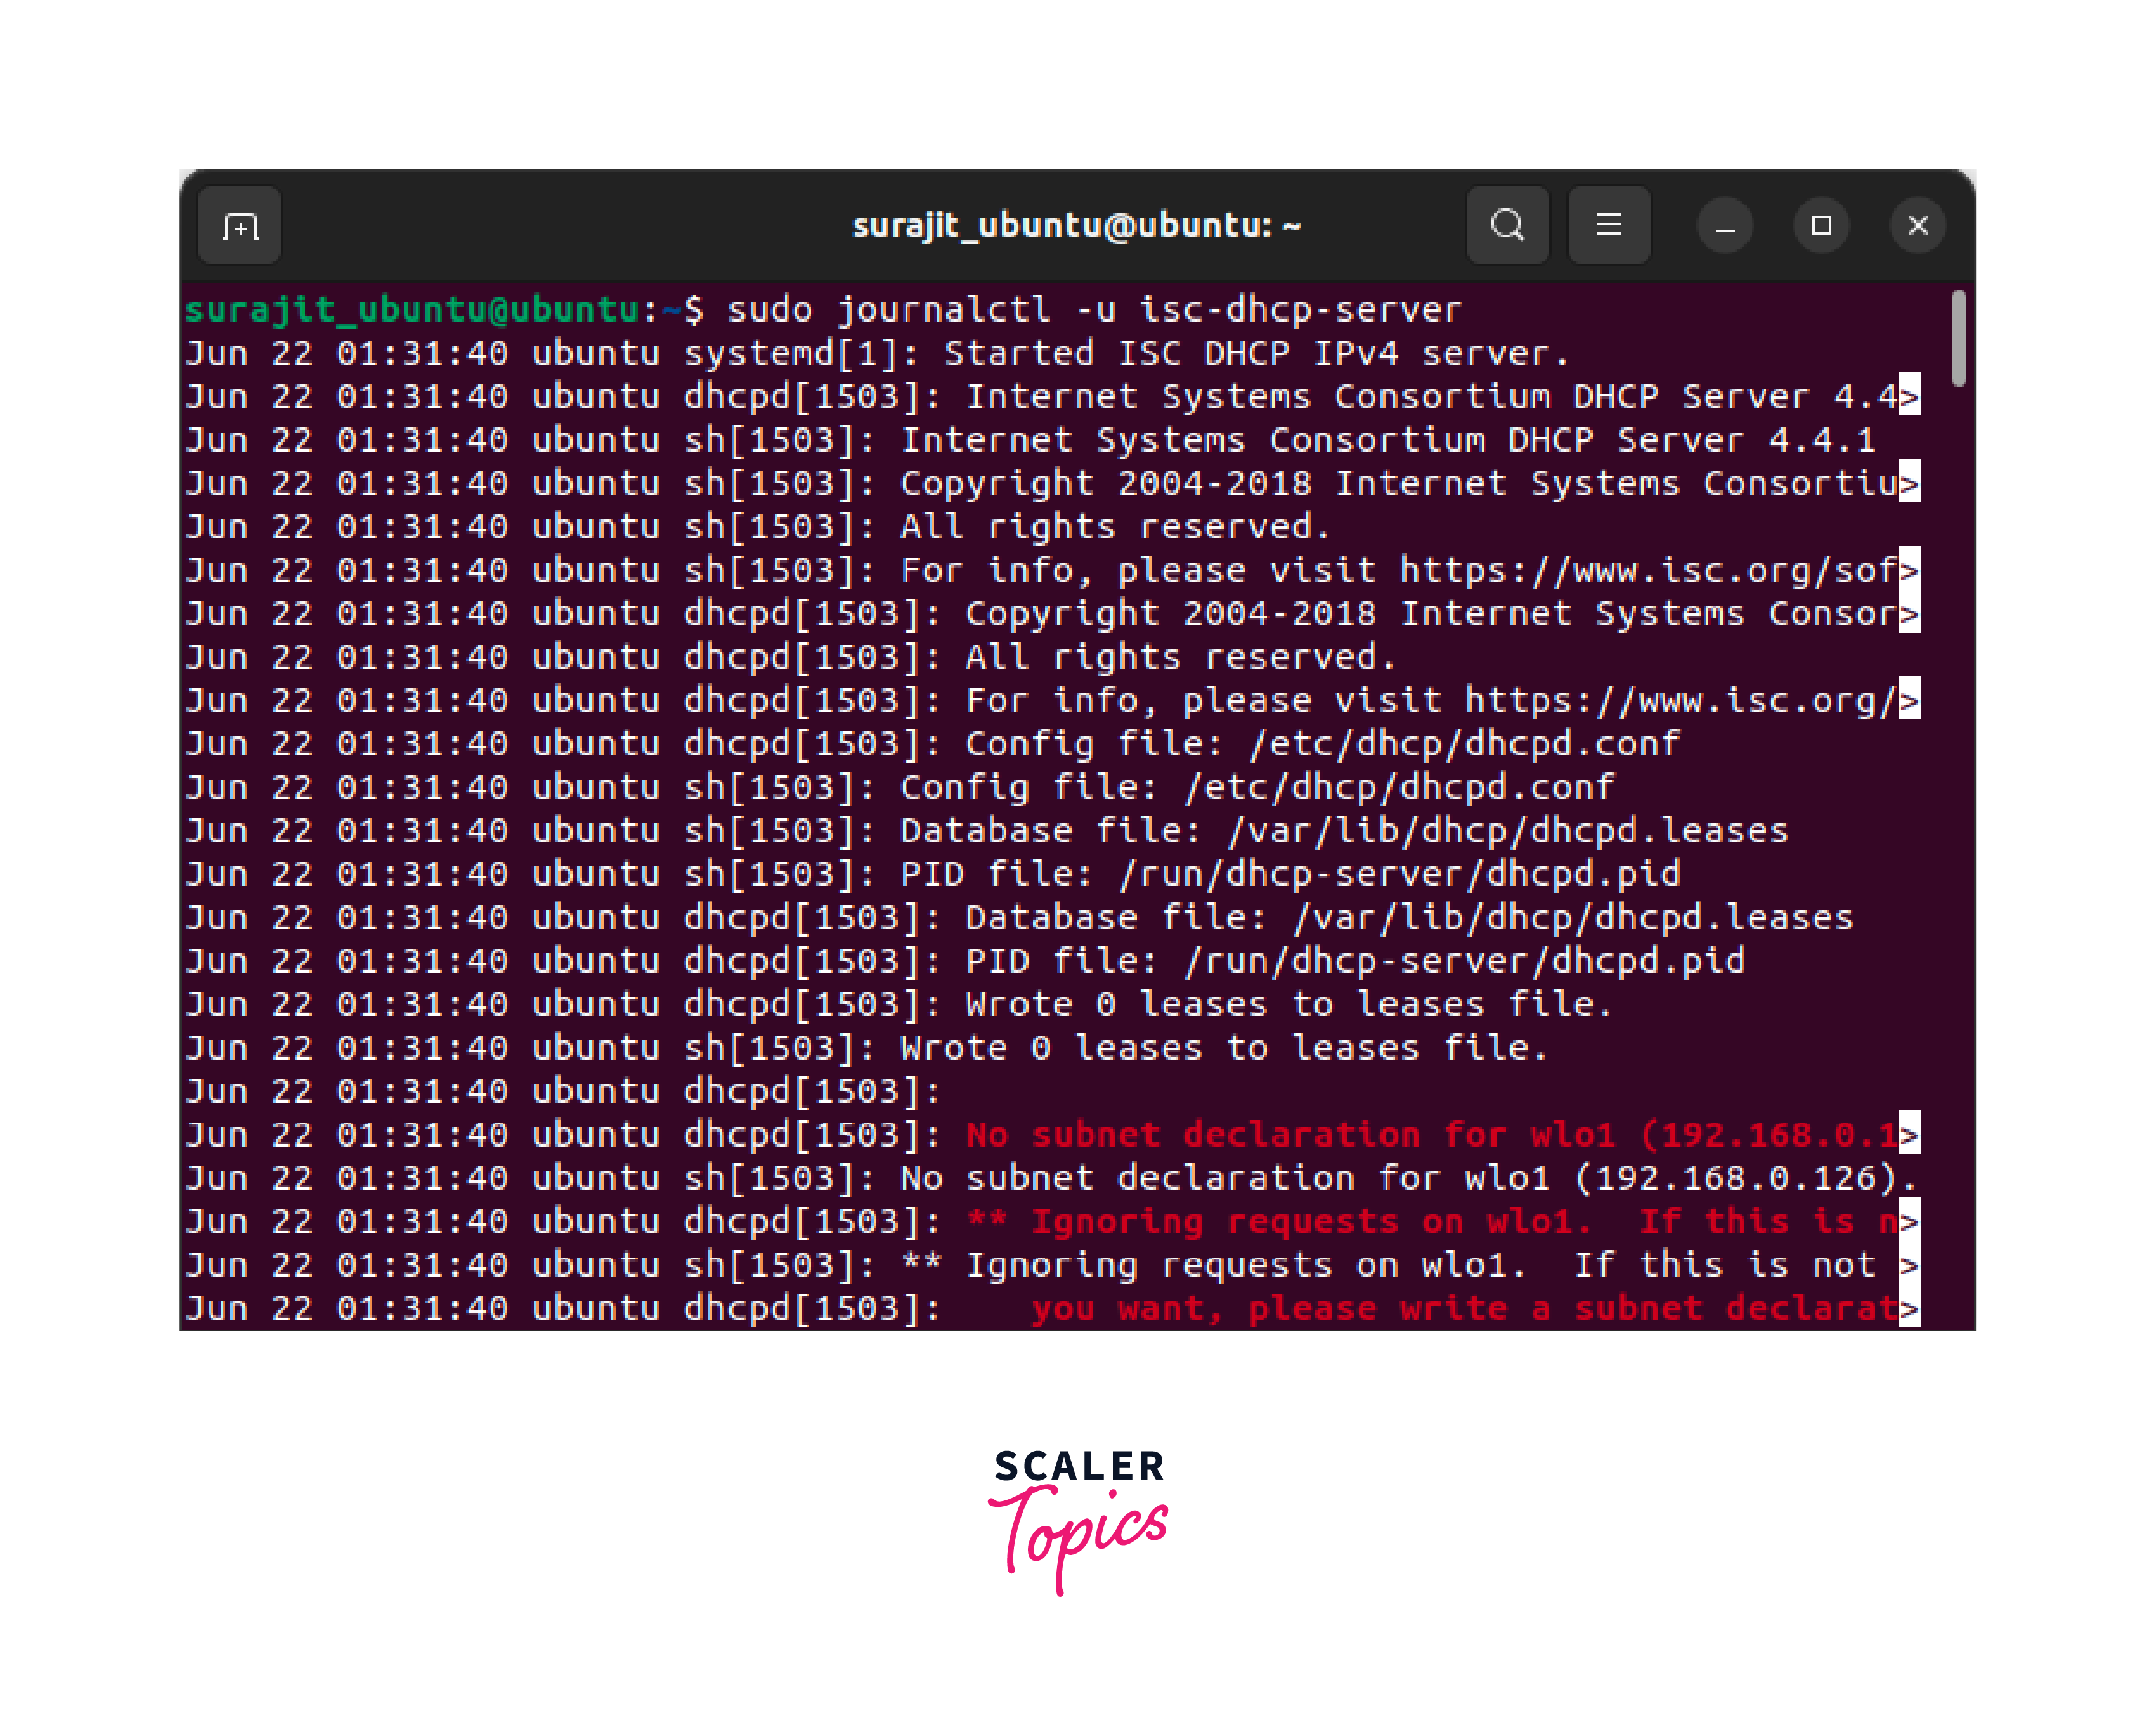
Check system logs
Examine the system logs for any DHCP-related errors or warnings. The logs can provide additional information about the issue. You can view the logs using the journalctl command, such as sudo journalctl -u isc-dhcp-server .
By following these troubleshooting steps you can diagnose and resolve issues to ensure the smooth operation of the Linux DHCP server on your Ubuntu system.
Conclusion
- Linux DHCP server is a powerful tool for automated IP address assignment and network configuration in Ubuntu and other Linux-based systems.
- With the Linux DHCP server, client devices can dynamically obtain IP addresses, facilitating seamless connectivity and adaptability in rapidly changing network environments.
- The Linux DHCP server supports various allocation methods, including manual, automatic, fixed lease time, and infinite lease time.
- Ultimately it eliminates the need for manual IP address assignment, making network administration more efficient and reducing the chances of configuration errors.
Установка и базовая настройка DHCP сервера на Ubuntu

Опубликовано: 12.03.2023
Установка и настройка
Сервер DHCP в Ubuntu может быть реализован с помощью пакета isc-dhcp-server. Его можно установить из стандартных репозиториев системы. Выполняем обновления кэша пакетов и установку:
subnet 192.168.0.0 netmask 255.255.255.0 <
range 192.168.0.100 192.168.0.200;
option domain-name-servers 192.168.0.10, 192.168.0.11;
option domain-name «dmosk.local»;
option routers 192.168.0.1;
option broadcast-address 192.168.0.255;
default-lease-time 600;
max-lease-time 7200;
>
- subnet — сеть, для которой будет работать данная группа настроек.
- range — диапазон, из которого будут браться IP-адреса.
- option domain-name-servers — через запятую перечисленные DNS-сервера.
- option domain-name — суффикс доменного имени.
- option routers — шлюз по умолчанию.
- option broadcast-address — адрес сети для широковещательных запросов.
- default-lease-time и max-lease-time — время и максимальное время в секундах, на которое клиент получит адрес, по его истечению будет выполнено продление срока.
Проверить корректность конфигурационного файла можно командой:
dhcpd -t -cf /etc/dhcp/dhcpd.conf
Разрешаем автозапуск сервиса:
systemctl enable isc-dhcp-server
systemctl restart isc-dhcp-server
Добавляем правило в firewall:
iptables -I INPUT -p udp —dport 67 -j ACCEPT
Возможные проблемы
Not configured to listen on any interfaces!
Сервис dhcp не запускается, а в логе можно увидеть ошибки, на подобие:
No subnet declaration for ens18 (192.168.1.10).
.
** Ignoring requests on ens18. If this is not what
you want, please write a subnet declaration
in your dhcpd.conf file for the network segment
to which interface ens18 is attached. **
.
Not configured to listen on any interfaces
Причина: в конфигурационном файле описана подсеть, которая не настроена ни на одном из сетевых интерфейсов сервера.
Решение: конфигурация subnet должна включать только те подсети, в которых настроен сам сервер DHCP. Посмотреть сетевые настройки можно командой:
После чего необходимо проверить настройки в конфигурационном файле сервера dhcp.
Читайте также
Другие инструкции, связанные с DHCP: