- How do I configure my DNS settings in Ubuntu server?
- How to Set DNS Nameservers on Ubuntu 18.04
- Setting DNS Nameservers on Ubuntu Desktop #
- Setting DNS Nameservers on Ubuntu Server #
- Conclusion #
- How to set DNS name servers on Ubuntu Linux?
- Method 1: Set the DNS NameServer from Ubuntu Desktop Using the Network Manager
- Method 2: Set the DNS NameServer Using Netplan with Network Manager and Static IP
- Set Custom DNS NameServer from Command-line Using Netplan with Networkd
- Conclusion:
- About the author
- Samreena Aslam
How do I configure my DNS settings in Ubuntu server?
According to this page it appears to be simple. However, /etc/bind does not exist on the default installation of Ubuntu 12.04.3 LTS server. So, without installing any further software, how can configure DNS and remove dnsmasq on ubuntu server? I am quite familiar with sudo & nano .
Also take a look at help.ubuntu.com/community/Dnsmasq. bind IS a nameserver. If you need nameserver functionality on your server, you must install a nameserver. It would help if you could describe what it is you are trying to achieve.
You were reading a manual to configure a DNS Server, not how to configure the DNS entries in the server. The manual you should have read are this
I don’t have the rep to post a comment on another answer, but in reply to Nullet’s answer on September 17th 2013, this worked for me. I was thinking that there was a problem with my router (a cheap, ISP provided one). I also think it worth mentioning that on the dns-nameservers line, you should use the IP of the public DNS. Don’t use the local address of the DNS, which is most likely on your router. I was connecting to the DNS on my router, which for some unknown reason wasn’t working with my server. Instead, I found out where the DNS on my router was getting its information from, and set dn
I think there is a better answer here unix.stackexchange.com/a/154538/82018 — basically you can override your dhcp settings to «prepend» a server in front of the ones you currently use. This is nice as you don’t have to rely solely on the new server, you just give it precedence for lookups.
How to Set DNS Nameservers on Ubuntu 18.04
The Domain Name System (DNS) is a central part of the web’s infrastructure, providing a way to translate domain names into IP addresses. You can think of the DNS as the Internet’s phone book.
Each device connected to the Internet is uniquely identified by its IP Address. When you type in the web site you want to visit in your browser, its domain name must be translated into its corresponding IP Address. The operating system first checks its hosts file for the corresponding domain and if there is no entry for the domain, it will query the configured DNS nameservers to resolve the specified domain name.
Once the domain is resolved the system will cache the request and keep a record for the domain and the corresponding IP address.
The DNS nameservers (resolvers) are servers which are used by other devices to perform DNS lookup for a requested domain.
Usually, the DNS resolvers are assigned by your ISP. However, these resolvers may be slow or not regularly updated which can cause a lag when querying for a domain, resolving to a wrong IP address or sometimes you may not be able to resolve the desired domain at all.
There are plenty of free public DNS resolvers which are fast, private and are regularly updated.
Below are some of the most popular public DNS resolvers:
- Google (8.8.8.8, 8.8.4.4)
- Cloudflare (1.1.1.1 and 1.0.0.1)
- OpenDNS (208.67.222.222, 208.67.220.220)
- Level3 (209.244.0.3, 209.244.0.4)
In this guide, we’ll explain how to configure the DNS nameservers (resolvers) on Ubuntu 18.04.
If you want to set the DNS nameservers for all devices connected to your local network then the easiest and the recommended way is to make the change on your home router.
Setting DNS Nameservers on Ubuntu Desktop #
Setting up DNS nameservers on Ubuntu 18.04 Desktop computers is super easy and requires no technical knowledge.
- Launch the Settings window.
- If you are connected to a WiFi network click on the “Wi-FI” tab. Otherwise, if you have a wired connection click on the “Network” tab.
- Select the connection for which you want to set the DNS nameservers and click on the cog icon to open the Network Manager.
- Select the IPv4 Settings tab.
- Disable the “Automatic” toggle switch and enter the DNS resolvers IP addresses, separated by a comma. We’ll use the Google DNS nameservers:
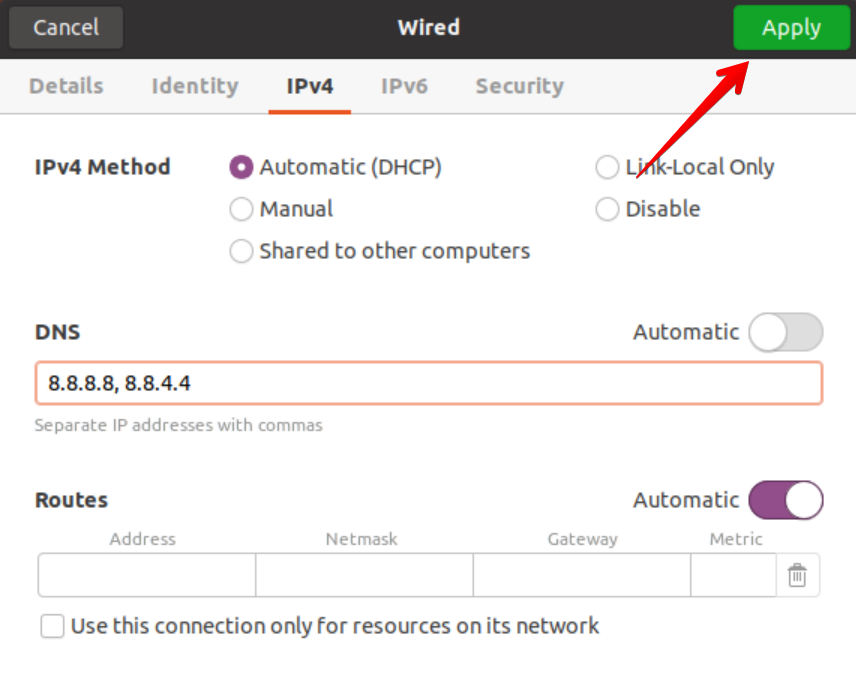
- Click on the “Apply” button to save the changes.
The changes take effect immediately except in cases where the DNS entries are cached by your system or application.
If you want to switch back to your old settings, open the Network Manager, go to IPv4 Settings and enable the “Automatic” toggle switch.
Setting DNS Nameservers on Ubuntu Server #
Back in the days, whenever you wanted to configure DNS resolvers in Linux you would simply open the /etc/resolv.conf file, edit the entries, save the file and you are good to go. This file still exists but it is a symlink controlled by the systemd-resolved service and should not be edited manually.
systemd-resolved is a service that provides DNS name resolution to local services and applications and it can be configured with Netplan , the default network management tool on Ubuntu 18.04.
Netplan configuration files are stored in the /etc/netplan directory. You’ll probably find one or two YAML files in this directory. The file name may differ from setup to setup. Usually, the file is named either 01-netcfg.yaml or 50-cloud-init.yaml but in your system, it may be different.
These files allow you to configure the network interface, including the IP address, gateway, DNS nameservers, and so on.
To configure the DNS nameservers open the interface configuration file with your text editor :
sudo nano /etc/netplan/01-netcfg.yamlThe file’s contents will look something like the following:
network: version: 2 renderer: networkd ethernets: ens3: dhcp4: no addresses: - 192.168.121.199/24 gateway4: 192.168.121.1 nameservers: addresses: [8.8.8.8, 8.8.4.4]To configure the interface’s DNS nameservers change the current IP addresses with your preferred DNS servers. For example, if you want to use Cloudflare’s DNS servers, you would change the addresses line to:
nameservers: addresses: [1.1.1.1, 1.0.0.1]DNS servers must be comma-separated. You can also add more than two nameservers.
If the entry doesn’t exist add it under the interface name block. When editing Yaml files make sure you follow the YAML code indent standards . If there is a syntax error in the configuration, Netplan will not be able to parse the file.
Once done save the file and apply the changes with:
Netplan will generate the configuration files for the systemd-resolved service.
To verify that the new DNS resolvers are set, run the following command:
systemd-resolve --status | grep 'DNS Servers' -A2systemd-resolve -status prints a lot of information. We are using grep to filter the “DNS Servers” string. The output will look something like this:
Conclusion #
Netplan is the default network management tool on Ubuntu 18.04, replacing the /etc/resolv.conf and /etc/network/interfaces configuration files that have been used to configure the network in the previous Ubuntu versions.
How to set DNS name servers on Ubuntu Linux?
![]()
DNS nameservers (resolvers) provide a method to translate the domain name into the IP addresses. It is provided by the ISP (internet service providers) and is used by various other devices to do the DNS lookup for a requested domain.
We will show you in this tutorial how to set or configure the DNS nameserver using different methods on the Ubuntu system. All configurations have been performed on Ubuntu 20.04 system.
Two different approaches that can be used to set the DNS NameServer on Ubuntu 20.04 Linux system:
- Set the DNS NameServer from Ubuntu Desktop using the Network Manager
- Set the DNS NameServer from command-line using netplan
Method 1: Set the DNS NameServer from Ubuntu Desktop Using the Network Manager
Setting up the DNS NameServer from the Ubuntu desktop using the Network Manager is quite simple and requires no technical knowledge. Just simply follow the below-mentioned steps:
1. Open the system “Settings” window on your system.
2. If you are connected with Wi-Fi then, click on the “wifi” tab. Otherwise, click on the “Network” tab, if you have a “wired” connection.
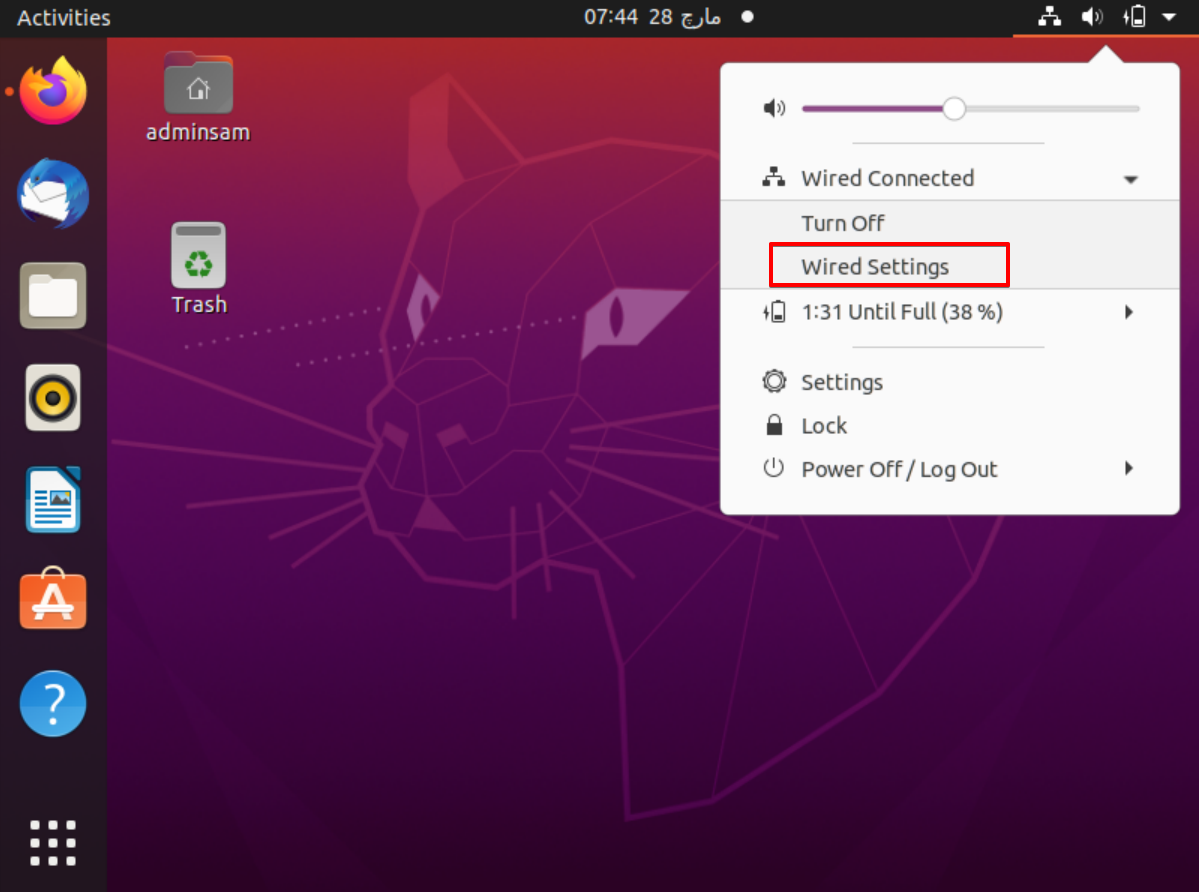
3. The Settings window can also launch from the top-right menu. Click on the drop-down icon and select the “wired settings” option from the displaying list, which is also shown in the following screenshot:
4. Click on the cog icon that is displayed under the “wired” heading to access the Network Manager configurations.

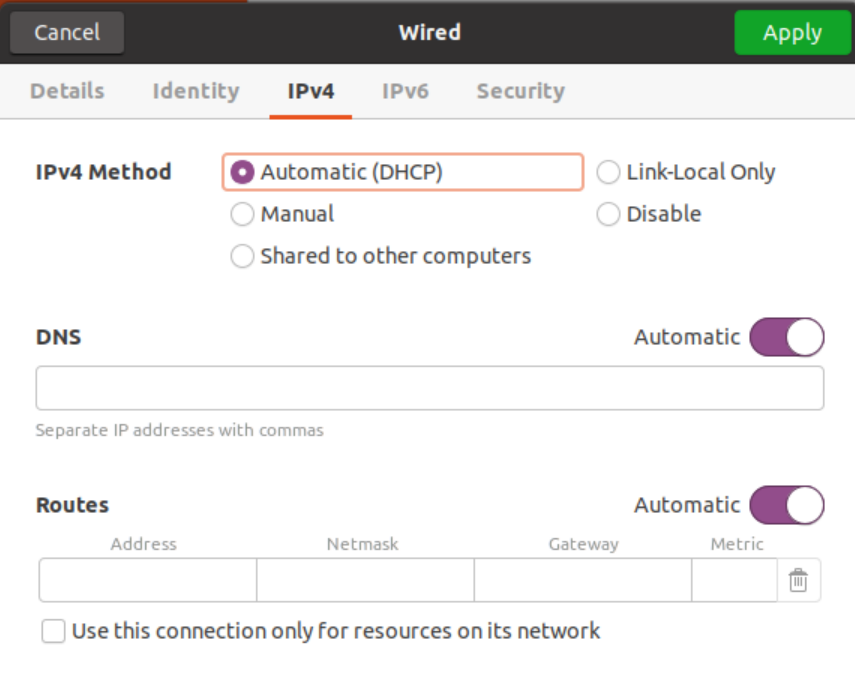
5. Now, go into the “IPV4” settings tab and select the IPV4 method where the default “Automatic (DHCP)” is selected.
Toggle the automatic button to disable this option and enter the DNS resolver IP address separated by a comma to set the DNS nameserver, which is shown in the following screenshot:
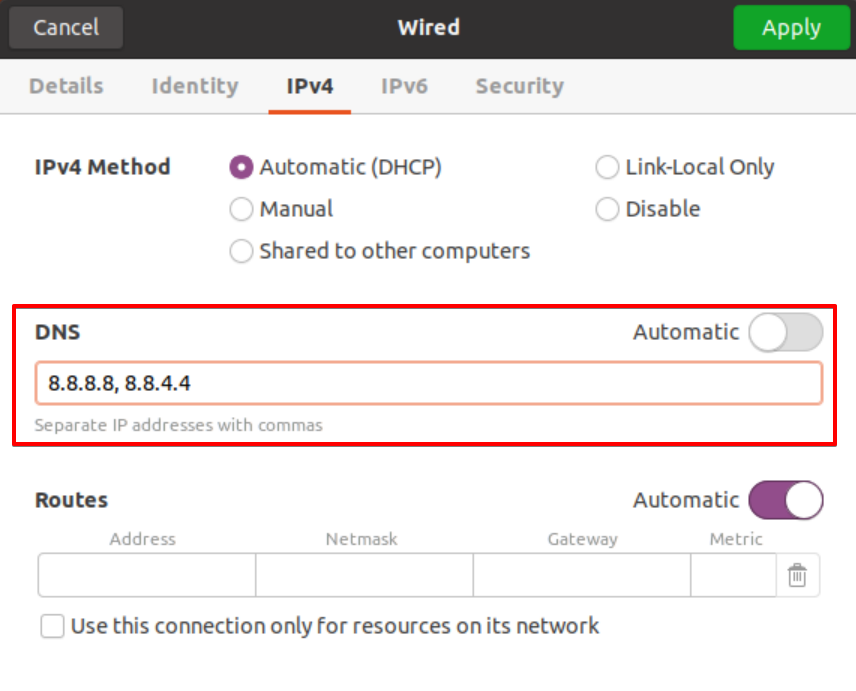
We have used the Google DNS server resolver IP address.
Method 2: Set the DNS NameServer Using Netplan with Network Manager and Static IP
In previous Ubuntu distributions, the DNS resolvers were easily configured using the ‘/etc/resolv.conf’ file, just editing the values and saving the file for use. The systemd-resolved service provides DNS name resolution to local applications or services and this can be simply configured with Netplan, which is the default network management tool on Ubuntu 20.04.
To set the DNS resolvers with the netplan, follow the below-mentioned steps:
1. Open the terminal by running the “ip a” command list with your Wi-Fi/ethernet details. Carefully, note your IP address, netmask, and default gateway from the following screenshot that displays on executing the IP command.
2. Open the netplan configuration file. All netplan configuration files are stored in the /etc/netplan directory. So, open the “/etc/netplan/01-network-manager-all.yaml” file. The file name may vary from one setup to another. Type the below-mentioned command to open this configuration file using the nano text editor.
In this file, you can configure the IP address, gateway, network interfaces, DNS nameservers, and so on.
The general syntax of this configuration file is given below, and it can be modified by a system administrator.
network:
version: 2
renderer: NetworkManager
ethernets:
[device-name]:
dhcp4: false
addresses: [ip-address/netmask]
gateway4: default-gateway
nameservers:
addresses: [DNS_nameserver-1, DNS_nameserver-2]
Here, the following lines of code need to change in this configuration file.
version: 2
renderer: NetworkManager
ethernets:
enp0s3:
dhcp4: false
addresses: [10.0.2.15/24]
gateway4: 192.168.1.1
nameservers:
addresses: [8.8.8.8, 8.8.4.4]

The “192.168.1.1” is the default gateway and the IP address is “10.0.2.15”. Replace your own gateway, netmask, and IP in the above configuration file. More than two DNS nameservers can be defined in a configuration and these nameservers should be separated with a comma. In the above file, “8.8.8.8, 8.8.4.4” are the DNS resolvers for Google. Save the configuration file and exit from this file by pressing “Ctrl+x”.
3. Now, use the following command to apply changes on this file with netplan:

The above command will generate the configuration systemd resolved service.
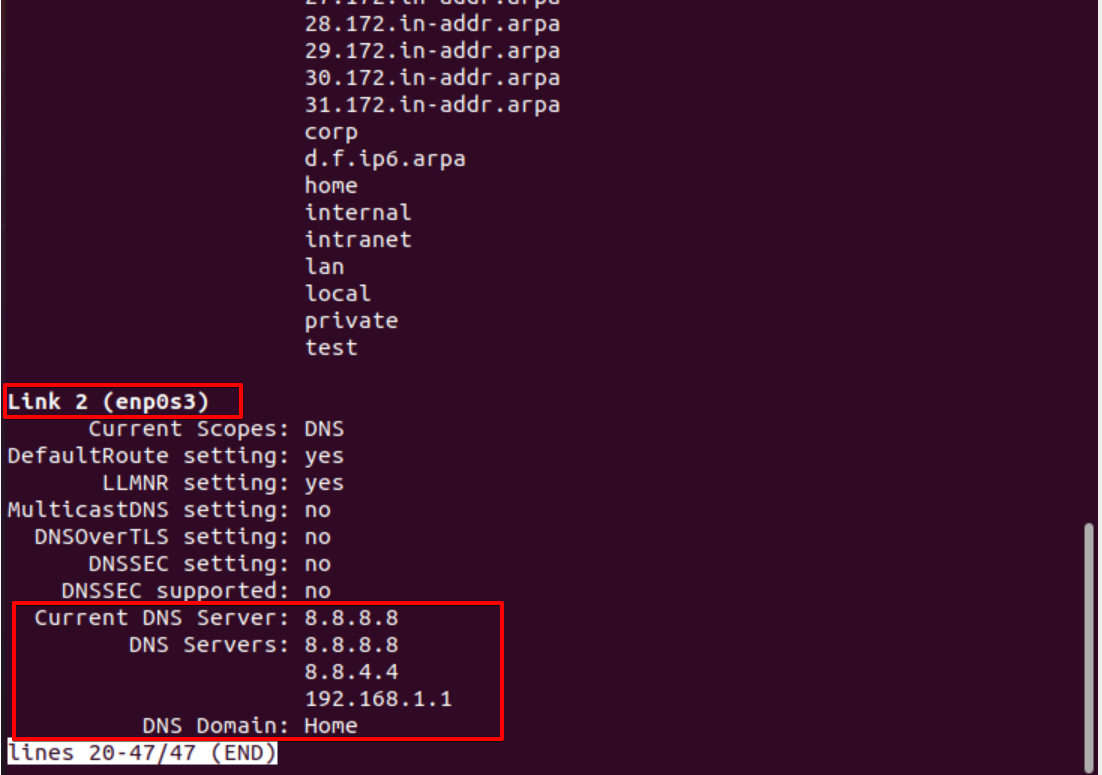
4. To verify the DNS resolver configuration, use the following command:
The systemd-resolve -status command shows a bundle of information. This is the reason for using the “grep” command to filter the “DNS Servers” string from all details.
The following output shows on the terminal; it means that it verifies the DNS nameserver and is set now.

Set Custom DNS NameServer from Command-line Using Netplan with Networkd
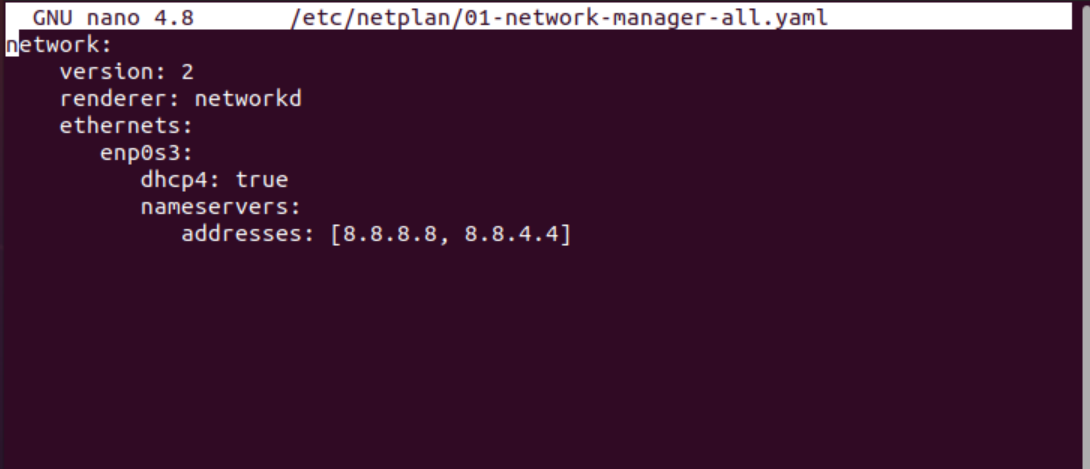
To set the DNS Name Server using the netplan and network, copy the following code in the netplan configuration file:

Enter the below-given configurations in this file:
network:
version: 2
renderer: networkd
ethernets:
enp0s3:
dhcp4: true
nameservers:
addresses: [8.8.8.8, 8.8.4.4]
Type the command given below to apply changes with netplan:

Now, verify the Current DNS nameserver using the following command:
The following output prints on the terminal window:
To again the default DNS configurations or remove the netplan configurations, remove all data and paste the following code in the configuration file:
network:
version: 2
renderer: NetworkManager
Now, apply changes using the following command:
Check the current DNS Nameserver by using the following command:
From the following displayed output, you will notice the default DNS nameserver to be set on your system:

Conclusion:
We have discussed in this article, how to configure the DNS nameserver using the desktop interface and command line. We have also seen how to configure the netplan changes on the Ubuntu system to change the DNS nameserver. You can set the custom DNS nameserver by using the netplan and networkd services as well.
About the author
Samreena Aslam
Samreena Aslam holds a master’s degree in Software Engineering. Currently, she’s working as a Freelancer & Technical writer. She’s a Linux enthusiast and has written various articles on Computer programming, different Linux flavors including Ubuntu, Debian, CentOS, and Mint.