- Linux Mint Forums
- [SOLVED] How to set up a default screen resolution?
- [SOLVED] How to set up a default screen resolution?
- Re: How to set up a default screen resolution?
- Re: How to set up a default screen resolution?
- Re: How to set up a default screen resolution?
- Re: How to set up a default screen resolution?
- Re: How to set up a default screen resolution?
- Re: How to set up a default screen resolution?
- Re: How to set up a default screen resolution?
- Re: How to set up a default screen resolution?
- PROBLEM SOLVED
- Как изменить разрешение экрана в Linux Mint 20.1 MATE
- Как поменять разрешение Linux Mint 20.1
- Linux Mint: How to Configure Your Output Resolution?
- How to set Linux Display Resolution- How to fix unsupported screen resolution in Linux
Linux Mint Forums
[SOLVED] How to set up a default screen resolution?
Forum rules
Before you post please read how to get help. Topics in this forum are automatically closed 6 months after creation.
[SOLVED] How to set up a default screen resolution?
Post by manuel.dossantos » Wed May 30, 2012 5:18 pm
Straight to the point: every time i start my Linux Mint LXDE computer, the screen resolution is set to 1360 x 864, which is not the optimal for my monitor. So, i have to change it to 1360 x 768 every time i start my pc. its a little annoying. For some reason, even though i set the screen resolution, my linux doesn`t «remember» my choice
How can i set 1360 x 768 as the default resolution?
PS: i set my screen resolution through MENU PREFERENCES MONITOR SETTINGS.
Last edited by LockBot on Wed Dec 28, 2022 7:16 am, edited 4 times in total.
Reason: Topic automatically closed 6 months after creation. New replies are no longer allowed.
Re: How to set up a default screen resolution?
Post by jp734 » Thu May 31, 2012 7:22 am
Re: How to set up a default screen resolution?
Post by manuel.dossantos » Fri Jun 01, 2012 12:04 pm
jp734 wrote: Check if you have the file «/etc/X11/xorg.conf» and see what resolution is your monitor set to
Re: How to set up a default screen resolution?
Post by jjaythomas » Fri Jun 01, 2012 1:25 pm
xorg config file is depreciated in current Ubuntu (and drivatives), but can create one.
But in LXDE.
make sure you save monitor setting (then have to either restart or re-apply setting in setting>monitor settings) I think its a bug that saving and apply won’t work together.
Re: How to set up a default screen resolution?
Post by manuel.dossantos » Fri Jun 01, 2012 2:17 pm
jjaythomas wrote: xorg config file is depreciated in current Ubuntu (and drivatives), but can create one.
But in LXDE.
make sure you save monitor setting (then have to either restart or re-apply setting in setting>monitor settings) I think its a bug that saving and apply won’t work together.
In Mint LXDE, there is no «save» option. The tool that manages monitor settings is called LXRandR 0.1.1.
Re: How to set up a default screen resolution?
Post by jjaythomas » Fri Jun 01, 2012 4:34 pm
What version of LXDE using?
I currently only have it installed on LMDE (technically Swift).
BUT tried on current Live disk Version 12. They do, it uses lxrandr .1.2.
Re: How to set up a default screen resolution?
Post by manuel.dossantos » Sun Jun 03, 2012 4:57 pm
Re: How to set up a default screen resolution?
Post by jjaythomas » Sun Jun 03, 2012 7:59 pm
You usually are told/know what ISO your using. The version of the CD/USB pen you used to install.
if not the artwork (check default wallpaper/login screen) usually has version in the picture somewhere.
You can also use ‘system>system profiler and benchmarks’ program, under summary or operating system (check version, listed as LinuxMint # (version) LXDE.
You can also find it in the ‘system tools>update manager’ program.
you can also find with a CLI (terminal) command.
P.S. LXDE installed on LMDE is a rolling (sort of) where you can update to the new version (snapshot).
But
LXDE based on Ubuntu you can’t (easily), you re-install with a new ISO on CD/DVD/USB pen-drive ect.
Re: How to set up a default screen resolution?
Post by seppalta » Mon Jun 04, 2012 1:21 am
Use Arandr to set your resolution. Save it. It should be saved in .screenlayout in your home directory. Add that saved file to Autostart. See http://douwil7.100webspace.net/linux/Tuning.html#16 for more details, albeit for setting up dual monitors but the same procedure should work for a single monitor.
PROBLEM SOLVED
Post by manuel.dossantos » Mon Jun 04, 2012 12:48 pm
Ok guys, problem solved!! Thanks to all of you for helping! This is how i solved the problem:
1) With Synaptic, install the package named ARANDR.
2) Then, open ARANDR and set the resolution to the one you want as «default» (1360 x 768 in my case), and press the «apply» button.
3) After the new resolution is applied, press the «save as» button.
4) By default, ARANDR will ask you to save this monitor settings in this folder: /home/YOURNAME/.screenlayout. do it (lets say you name the file «defaultresolution»).
5) With the File Manager, go to the location of the newly created file (/home/YOURNAME/.screenlayout), right click on the file defaultresolution.sh and make the file executable (by checking the box).
6) Then, go to this location: /etc/xdg/lxsession/Mint. Inside this folder you will find a file named autostart. Edit the file, by inserting the following line: @/home/YOURNAME/.screenlayout/defaultresolution.sh. (what you just did, is order your lxde to «autorun» this command at startup).
7) Save the changes, and restart your computer. If everything went well, your lxde mint will show the desired resolution as default.
PS: special thanks to user seppalta
- Important Notices
- ↳ Rules & Notices
- ↳ Releases & Announcements
- ↳ Main Edition Support
- ↳ Beginner Questions
- ↳ Installation & Boot
- ↳ Software & Applications
- ↳ Hardware Support
- ↳ Graphics Cards & Monitors
- ↳ Printers & Scanners
- ↳ Storage
- ↳ Sound
- ↳ Networking
- ↳ Virtual Machines
- ↳ Desktop & Window Managers
- ↳ Cinnamon
- ↳ MATE
- ↳ Xfce
- ↳ Other topics
- ↳ Non-technical Questions
- ↳ Tutorials
- Debian Edition Support
- ↳ LMDE Forums
- ↳ Beginner Questions
- ↳ Installation & Boot
- ↳ Software & Applications
- ↳ Hardware Support
- ↳ Networking
- ↳ Tutorials
- ↳ Other Topics & Open Discussion
- ↳ LMDE Archive
- Interests
- ↳ Gaming
- ↳ Scripts & Bash
- ↳ Programming & Development
- Customization
- ↳ Themes, Icons & Wallpaper
- ↳ Compiz, Conky, Docks & Widgets
- ↳ Screenshots
- ↳ Your Artwork
- Chat
- ↳ Introduce Yourself
- ↳ Chat about Linux Mint
- ↳ Chat about Linux
- ↳ Open Chat
- ↳ Suggestions & Feedback
- International
- ↳ Translations
- ↳ Deutsch — German
- ↳ Español — Spanish
- ↳ Français — French
- ↳ Italiano — Italian
- ↳ Nederlands — Dutch
- ↳ Português — Portuguese
- ↳ Русский — Russian
- ↳ Suomi — Finnish
- ↳ Other Languages
- ↳ Čeština-Slovenčina — Czech-Slovak
- ↳ Magyar — Hungarian
- ↳ 日本語 — Japanese
- ↳ Polski — Polish
- ↳ Svenska — Swedish
- ↳ Українська — Ukrainian
Powered by phpBB® Forum Software © phpBB Limited
Как изменить разрешение экрана в Linux Mint 20.1 MATE
После установки операционной системы она должна сама установить оптимальное разрешение экрана. Но иногда этого не происходит и пользователю приходиться самостоятельно изменять его. Если взять Windows то там все просто а вот с системами Linux могут возникнуть трудности. Изменить разрешения в них можно двумя способами, используя терминал но с этим справятся только опытные пользователи или используя графический интерфейс. Но даже используя графическую оболочку не опытному пользователю все равно будет сложно это сделать. Так как найти данные настройки будет не просто. Сегодня хочу рассказать и показать как это делается в операционной системе Linux Mint 20.1 MATE. Рассмотрим оба варианта.
Прежде чем продолжить дальше хочу вам порекомендовать ранее написанные мною статьи на тему настройки ОС Linux Mint 20.1.
Как поменять разрешение Linux Mint 20.1
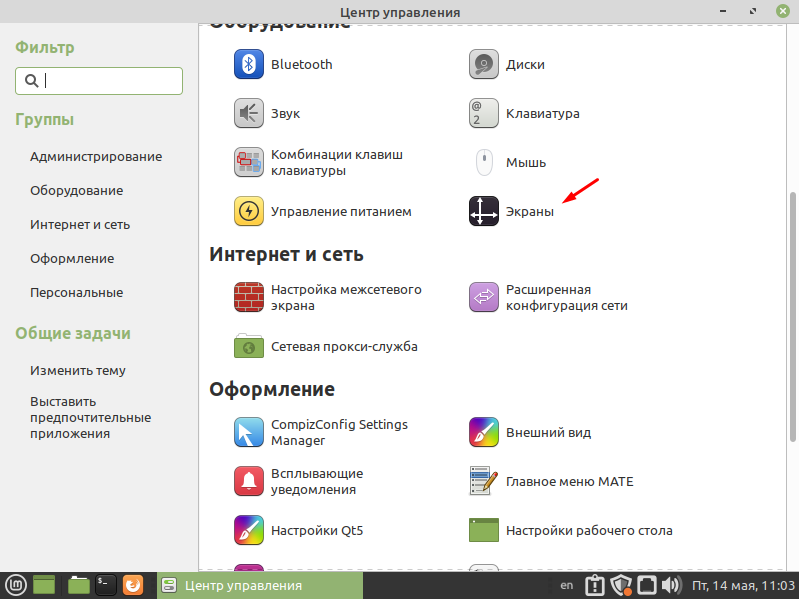
Найти настройки экрана можно в «Центре управления» который в свою очередь находиться в пуске.

В открывшемся окне переходим в раздел «Оборудование» и выбираем пункт «Экраны».
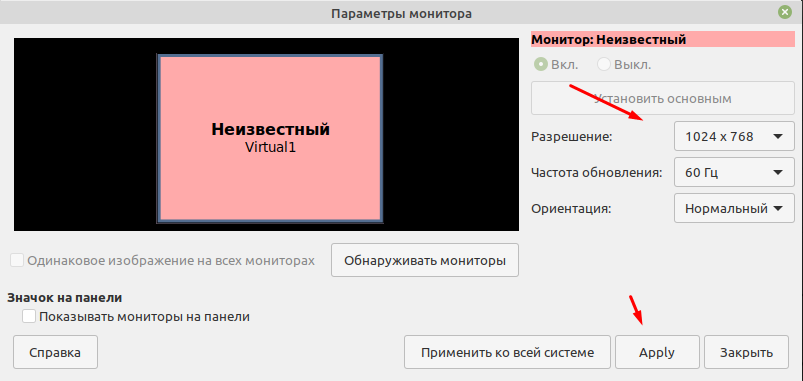
Вот тут и можно изменить разрешение экрана, указать частоту обновления Гц и ориентацию.
Теперь рассмотрим второй вариант изменения разрешения экрана через терминал. Первое что нужно сделать это узнать все доступные разрешения введя команду
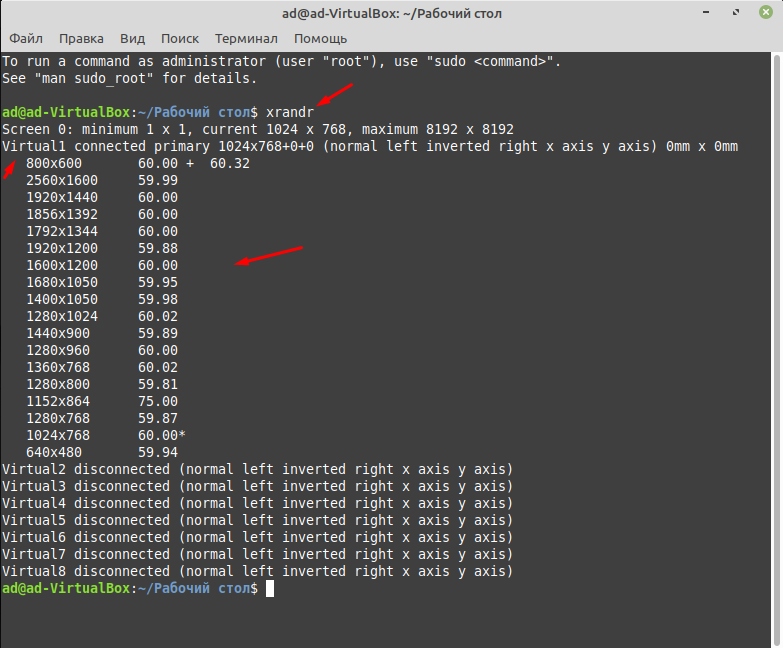
После этого вы должны увидеть количество подключенных мониторов и доступных для разрешений экрана. Так как у меня Linux Mint 20.1 установлена на виртуальную машину, монитор называется Virtual1 и ниже отображен список, из которого я могу выбрать.
Для того чтобы изменить разрешение нужно ввести команду.
xrandr —output Virtual1 —mode 1280×768
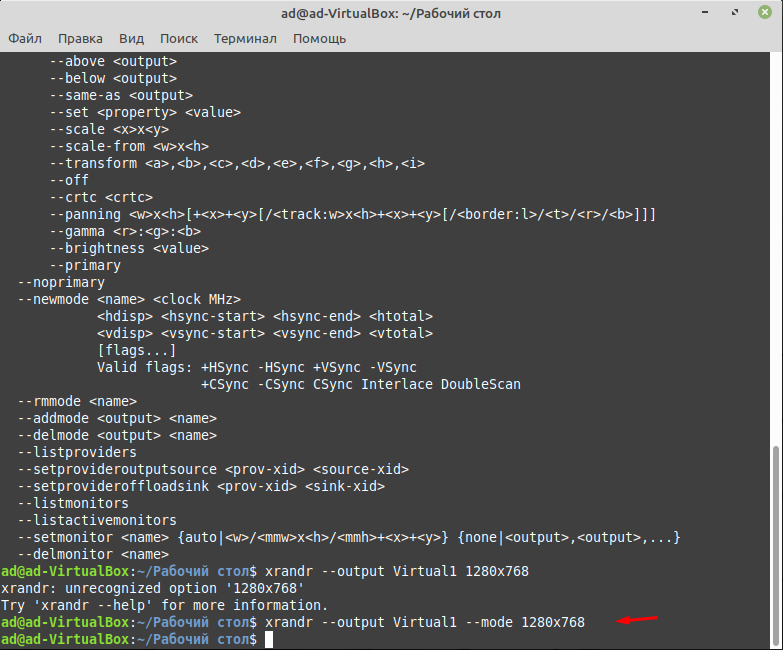
Кстати таким образом можно изменить разрешения экрана практически в любой операционной систем Linux. Так же кода будет вводить команду не ставьте лишних пробелов. Например, если вы напишите так.
xrandr —output Virtual1 — mode 1280×768
Команда не сработает, если кто не заметил то я постав пробел вот тут —_mode.
В общем все достаточно просто, главное нужно быть внимательней.
Linux Mint: How to Configure Your Output Resolution?
How to set Linux Display Resolution- How to fix unsupported screen resolution in Linux
There is no one-size-fits-all answer to this question, as the resolution settings for Linux Mint will vary depending on your hardware and preferences. However, some tips on how to set resolution in Linux Mint include:
Open the “System Settings” application in Linux Mint and click on the “Display” tab.
2.
There are a few ways to get 1920×1080 resolution in Linux. One way is to use a virtual machine. Another way is to install a Windows 10 or 8.1 operating system and use a graphics card that supports that resolution.
There is no one-size-fits-all solution to this question, as the resolution requirements will vary depending on your monitor’s specifications. However, some methods for achieving a 1920×1080 resolution with Xrandr include using the “xrandr –output default –mode 1920×1080” command, setting the “screen” property of the “monitor” X config file to “1920×1080”, or using the “xf86-video-tdfx” driver.
There is no one-size-fits-all answer to this question, as the output resolution (i.e., the number of pixels displayed onscreen) will vary depending on your device and screen resolution settings. However, some methods for changing output resolution include adjusting your device’s display settings or using an app like Display Resolution Fixer.
To change your screen resolution in Linux, open a terminal and type the following:
xrandr –output
Where is the resolution you would like to use.
Xrandr is a command used to configure display properties for an X Window System session.
There are a few ways to force a resolution in Linux, but the most common is to use the command line. To do this, open a terminal window and type the following:
$ cli
This will open a command line interface.
There are a few ways to get 1920×1080 resolution on a 1366×768 screen on Ubuntu. The easiest way is to use an external display. You can purchase a monitor that has a 1920×1080 resolution or you can use an adapter to connect an external display. Another way to get the resolution is to use dual-screen mode on your computer.
There are a few ways to add resolution to xrandr. One is to use the –addressee option, which sets the resolution for the output of a command to match that of the input. Another is to use the –output-mode option, which sets the mode in which output will be written.
The most common way to find the resolution of your screen is by using the “xrandr” command. To display the current resolution, run “xrandr”.
To change the resolution on a virtual machine, open the Settings app on the Mac or Windows host and select System Preferences. Click Display in the General section and select the resolution you want to use.
1080p is the resolution of most HDTVs. It has a resolution of 1920 by 1080 pixels.
To make 1920×1080 virtualbox, you’ll need:
-A computer with a Graphics Processing Unit (GPU) that can support virtualization -VirtualBox 5.
You can create custom resolutions in Linux by using the following command: $ xrandr –output –set-pixmap This will set the resolution of the display to the given pixmap.
There isn’t a one-size-fits-all answer to this question, as the best way to create a custom screen resolution depends on your individual computer and monitor setup. However, some tips on how to create a custom resolution include:
First, determine the native resolution of your monitor. This can be found by opening the “Display” settings in your computer’s operating system or by using a third-party tool like DisplayMate.
2.