- Как вручную прописать IP-адрес в Windows 11 для Wi-Fi и Ethernet подключения?
- Где находятся настройки TCP/IP в Windows 11?
- Как установить статический IP-адрес в Windows 11?
- How to set static IP address for wi-fi connection?
- How to Set a Static IP-Address for Wi-Fi on Android 10, 9, 8
- Set a Static IP-Address on Stock Android
- Android 8
- Android 9 and 10
- Manually Configure a Static IP on Samsung Galaxy
- Static IP on Samsung Galaxy S20 with One UI 2.0
- Samsung Experience (Galaxy S7)
- Static IP-address assignment on Android 4.2.2 (Touchwiz)
- How to Switch Back to Automatic IP Address Obtaining
Как вручную прописать IP-адрес в Windows 11 для Wi-Fi и Ethernet подключения?
Не редко бывают ситуации, когда необходимо установить статический IP-адрес в свойствах беспроводного, или проводного подключения. В этой статье я подробно покажу, как вручную прописать IP-адрес в настройках Windows 11 для Wi-Fi или Ethernet (LAN) подключения.
В большинстве случаев Windows 11 автоматически получает IP-адрес от роутера, модема, или от оборудования интернет-провайдера. На стороне точки доступа включен DHCP-сервер, который автоматически выдает адреса, а на компьютере установлено автоматическое получение IP-адреса. Это очень удобно, не нужно ничего настраивать вручну. Просто подключаем компьютер к роутеру или к провайдеру и интернет сразу работает. Когда может пригодиться установка статического IP-адреса? Например, когда у вас подключение напрямую к провайдеру и он использует статический IP. Тогда вам нужно в настройках сетевого подключения прописать внешний IP-адрес, который выдает провайдер. Если подключение через роутер, то вручную задать адрес нужно тогда, когда по какой-то причине на роутере нужно отключить DHCP-сервер, или вы хотите закрепить конкретный IP-адрес за своим компьютером. Так же это может пригодиться при настройке локальной сети или сетевого принтера. Если вам нужно указать/сменить DNS, то смотрите эту статью: как изменить DNS-серверы в Windows 11.
Где находятся настройки TCP/IP в Windows 11?
Есть несколько способов, которыми можно добраться до настроек TCP/IP. Мы рассмотрим самый простой (по моему мнению) вариант. Покажу, где находятся эти настройки, а дальше разберемся, как изменить параметры IP отдельно для каждого адаптера. Для «Беспроводная сеть» (Wi-Fi) и Ethernet в зависимости от вашего подключения.
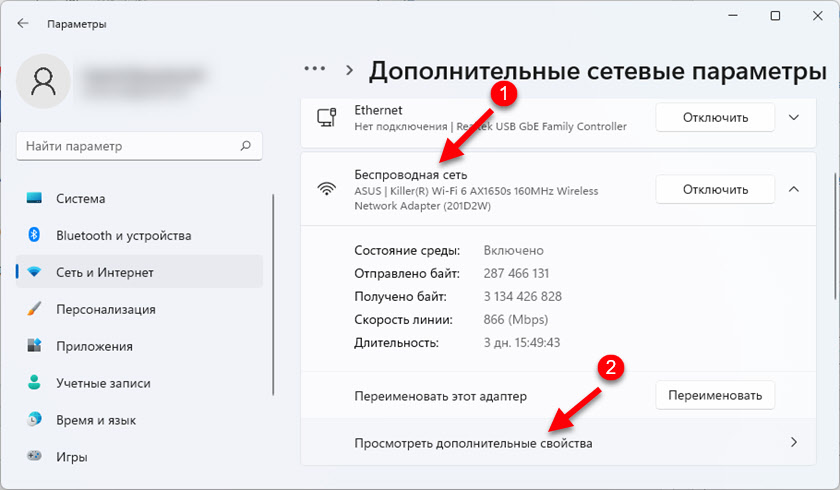
Откройте параметры. Можно нажать на меню Пуск правой кнопкой мыши и выбрать «Параметры», или открыть их другим удобным для вас способом. Перейдите в раздел «Сеть и интернет» и выберите пункт «Дополнительные сетевые параметры».

Там будут отображаться сетевые адаптеры, которые есть на нашем ПК или ноутбуке. Там же можно открыть свойства необходимого адаптера и изменить назначение IP.
Как установить статический IP-адрес в Windows 11?
В основном эти параметры меняют для беспроводного, или проводного подключения.
- Если вам необходимо установить параметры TCP/IP для Wi-Fi подключения, то необходимо нажать на адаптер «Беспроводная сеть» и выбрать «Посмотреть дополнительные свойства».

- Если подключение по сетевому кабелю, то необходимо нажать на адаптер «Ethernet» и выбрать «Посмотреть дополнительные свойства».


После выбора адаптера, напротив пункта «Назначение IP» нажмите на кнопку «Редактировать». Появится еще одно небольшое окно «Изменение параметров IP». Там выбираем «Вручную» и включаем IPv4. Если необходимо, можно так же прописать адреса IPv6. Дальше нужно прописать такие адреса:
- IP-адрес – внешний адрес, который вам выдал провайдер, или локальный адрес вашей сети (роутера). Например 192.168.1.120
- Маска подсети. Здесь прописываем 255.255.255.0
- Шлюз – уточняем у провайдера, а если у вас подключение через роутер, то это IP-адрес роутера (как узнать IP-адрес роутера). Например 192.168.1.1
- И если необходимо, можете еще прописать DNS. Я рекомендую DNS от Google: 8.8.8.8 / 8.8.4.4
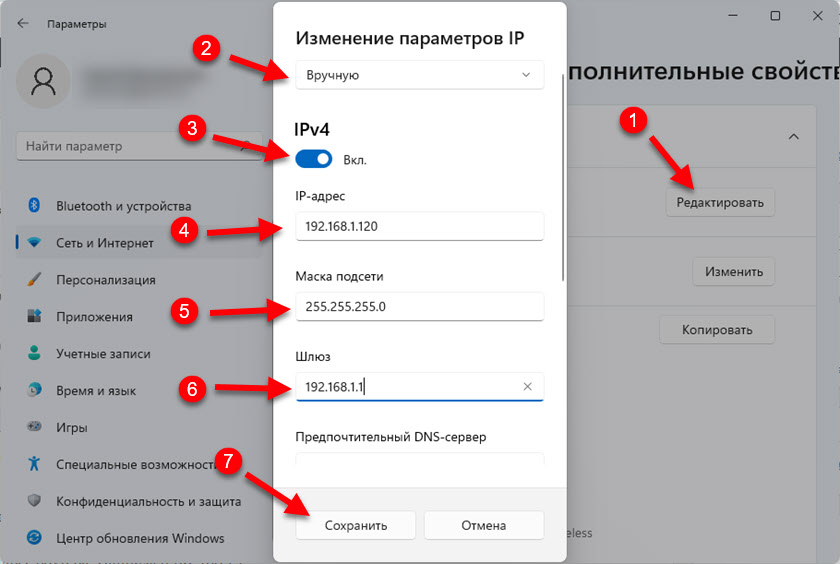
Не забудьте нажать на кнопку «Сохранить» для сохранения параметров.
Если после этих настроек у вас появляться какие-то проблемы с подключением, то верните настройки обратно на «Автоматически (DHCP)». А если это не поможет – сделайте сброс сети.
How to set static IP address for wi-fi connection?
If you’re not sure what your settings are, and assuming you’re using Windows:
- Open a command prompt by clicking Start , then Run
- Type in cmd and hit Enter
- Type the line ipconfig -all and hit Enter , the relevant details should be listed there.
Just make sure you use a different number for IP address on your phone than is shown on your PC!
A great app called WiFi Static that automatically switches between static and dynamic addressing dependent on the wireless network you connect to
If you control the network, you may be able to configure your DHCP server to always assign the same IP for your phone’s MAC address. This has the advantage of working even if you (for example) do a factory reset of the phone, or otherwise revert the wifi settings.
My Linksys E2000 router supports this via a button labelled «DHCP Reservation» on the Basic setup screen, and any host-based DHCP server would allow this as well.
This is what I do, and is a better solution than setting the IP to static on your phone if you plan on connecting to more than one network. If your router doesn’t show connected devices, you can find your phone’s MAC address at Settings->About Phone->Status and then scrolling down to «Wi-Fi MAC address» to enter it manually.
Thanks, this (the MAC address — IP address link on the DHCP server) is also a a solution to my recent question: android.stackexchange.com/questions/232197/…
How to Set a Static IP-Address for Wi-Fi on Android 10, 9, 8
If you encounter problems while using DHCP (auto IP obtaining) on Android you might need to manually set a static IP-address.
You may also decide to assign a static address to your Android phone if you want to use a specific IP on a Wi-Fi network but don’t want to set up the IP reservation on your access point or if you simply don’t have access to the router settings.
You can easily revert the network setting to its default state at any time and continue using DHCP.
Here is how to set a static IP-address on a phone or tablet running Android 10 and older versions.
We illustrated the article using screenshots from Samsung Galaxy One UI 2.0 (Galaxy S20, S10), One UI 1.1 (S9), Samsung Experience (S7), old Touchwiz (Ace 3) and stock Android 8 to 10 version (Google Pixel).
Set a Static IP-Address on Stock Android
Android 8
Android 9 and 10
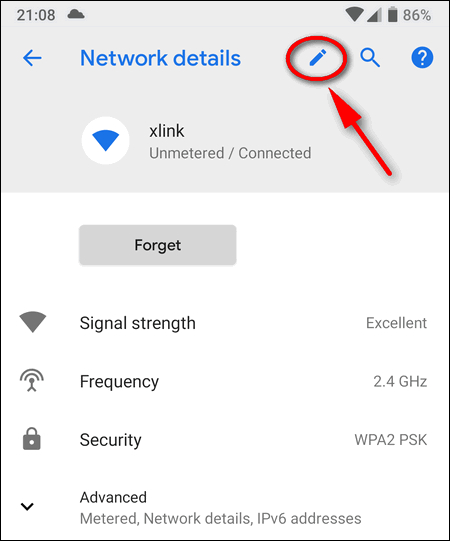
In Android 9 Pie you should tap the network name in the list (no long tap available), then select the pencil icon to modify its profile:
The remaining steps are equal to the steps from Android 8 section.
Manually Configure a Static IP on Samsung Galaxy
Static IP on Samsung Galaxy S20 with One UI 2.0
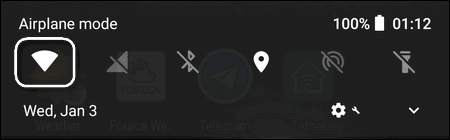
- Pull down the notification shade.
- Hold down the Wi-Fi toggle to open Wi-Fi settings.
- Make sure to connect to the right hotspot, where you are going to use a manually configured IP address.
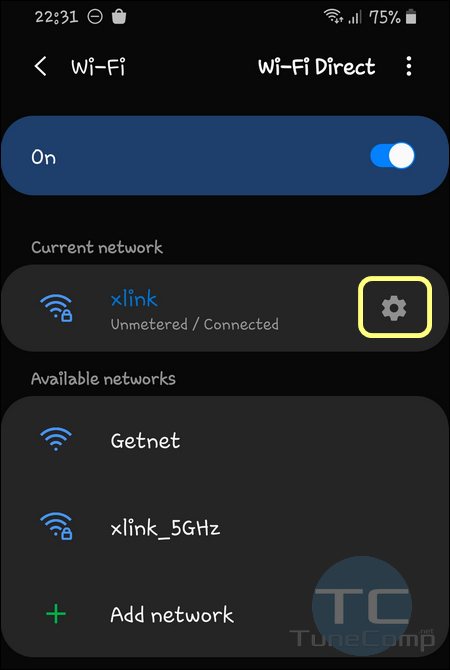
- Tap the gear icon to modify settings of your current network:

- Tap on Advanced at the very bottom:

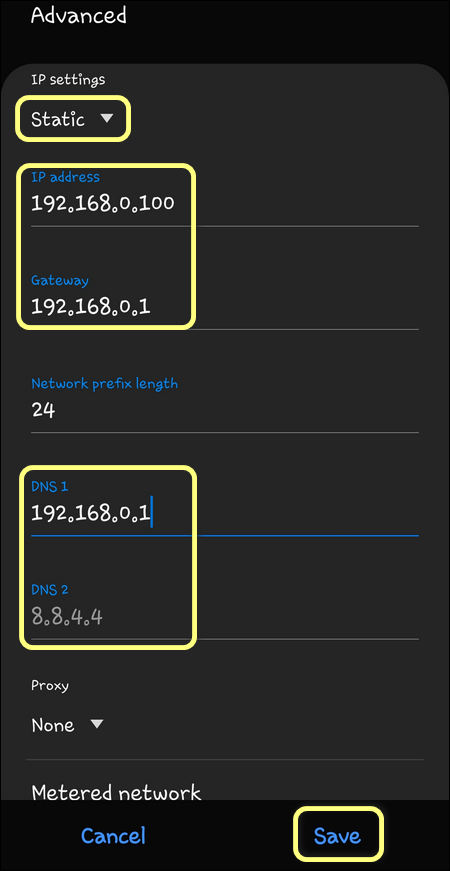
- Switch from DHCP to Static.
- Specify the IP address you want to use on your Galaxy phone.
- Type the Gateway IP and DNS.
- Finally tap Save for changes to take effect:


Samsung Experience (Galaxy S7)
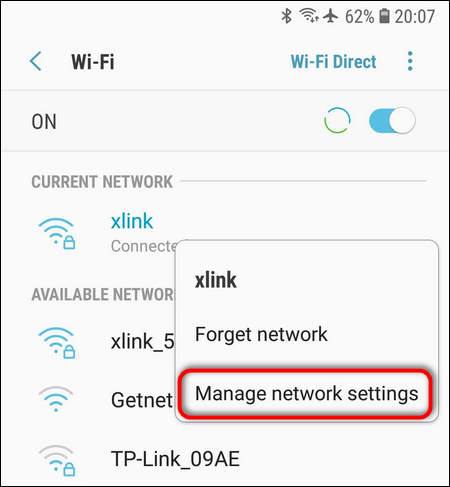
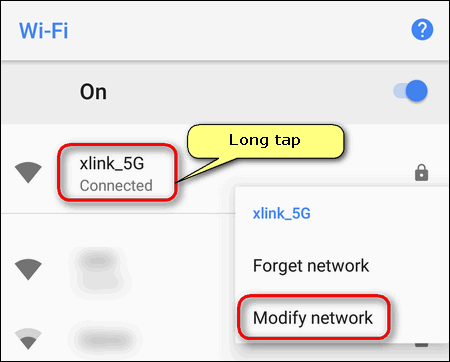
- Hold down the Wi-Fi toggle to dive into network settings.
- Long tap on your current wireless network.
- Select Manage Network Settings:
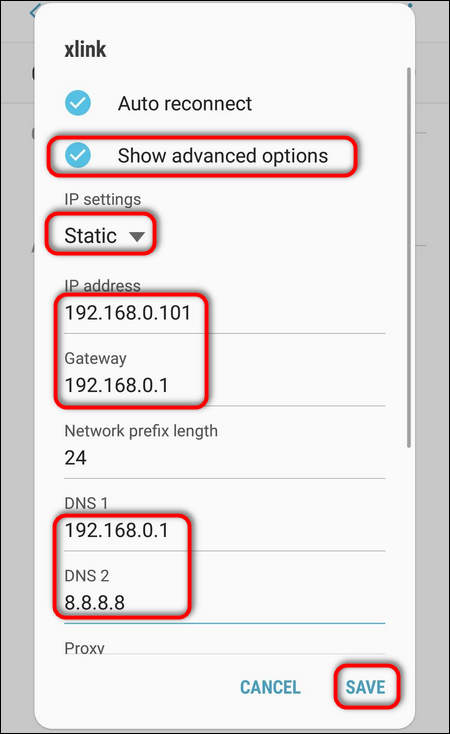
- Set the checkbox Show advanced options.
- In the IP settings switch to the Static option.
- Now manually specify IP address, gateway IP, DNS.
- Don’t forget to tap Save for new static IP address to apply.
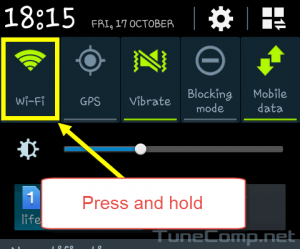
Static IP-address assignment on Android 4.2.2 (Touchwiz)
1. Pull down the status bar.
2. Press and hold the Wi-Fi icon in the quick panel:
3. Perform the long press on your network name:
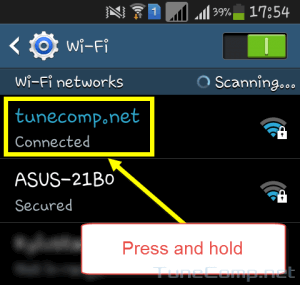
4. Tap on Modify network config:
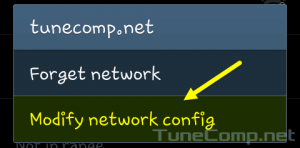
5. Set the checkbox Show advanced options:
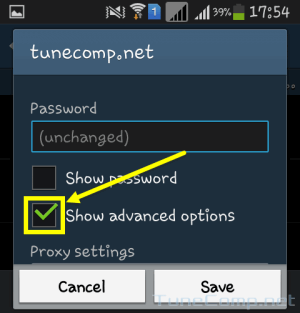
6. In advanced options area:
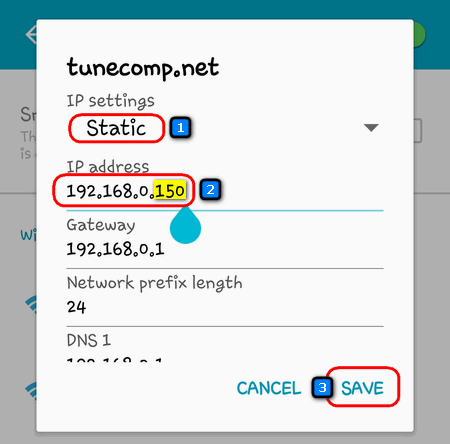
- Select Static in IP settings drop-down menu .
- Specify the desired address in IP address field .
- Tap the Save button to apply new settings:
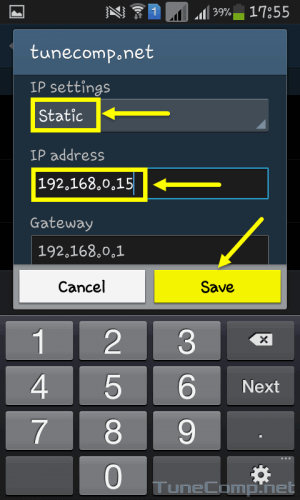
Do not forget to specify the Gateway IP address when using a static IP settings. Otherwise you won’t have the Internet connection on your Android!
How to Switch Back to Automatic IP Address Obtaining
If you wish to obtain an IP-address automatically again perform the following actions:
Go to network config again:
Make sure the checkbox Show advanced options is set.
Select DHCP in IP settings drop down menu.
Press Save:
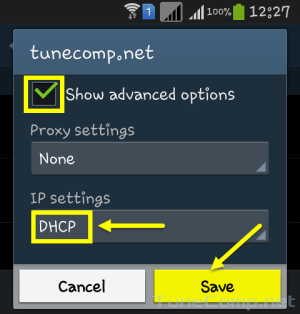
After that your device will reconnect to the network and obtain the IP from DHCP server.