- Как изменить имя компьютера Ubuntu
- Требования к имени компьютера
- Как изменить имя компьютера
- Не меняется имя компьютера
- Выводы
- How to Use the hostname Command in Linux
- hostname Command Syntax
- hostname Command Examples
- Display Hostname
- Display Short Hostname
- Display Alias
- Search for Hostnames
- Force Default Hostname
- Display Domain Name
- Display FQDN
- Display All FQDNs
- Display NIS Domain
- Change NIS Domain Name
- Display Related Network Addresses
- Display All Network Addresses
- Change Hostname Until Reboot
- Change Hostname Permanently
- Additional hostname Options
- Find Hostname from IP Linux
- Method 1: Ping
- Method 2: Host Command
Как изменить имя компьютера Ubuntu
Имя компьютера или по-другому, имя хоста устанавливается во время установки системы. Оно используется для идентификации компьютера в локальной сети, например, передается службой NetBIOS как имя сервера Samba, а также вы будете постоянно видеть его в терминале перед приглашением ввода команды.
Если вы задали не такое имя как хотите во время установки, то изменить имя компьютера Ubuntu не так уж сложно, но графических инструментов для этого в системе придумано не было, поэтому придется делать все через терминал.
Требования к имени компьютера
Вы можете использовать практически любое имя компьютера, но для него есть некоторые ограничения. Не желательно использовать два одинаковых имени компьютера в одной локальной сети, иначе могут возникнуть проблемы с различными интернет-сервисами и самая очевидная — вы не сможете понять где какой компьютер.
Второе ограничение — имя компьютера может содержать только буквы английского алфавита от a до z, цифры от 0 до 9, а также символы дефиса и точки. Начинаться и заканчиваться имя должно только буквой или цифрой, а не символом подчеркивания. Имя хоста регистронезависимо, поэтому COMPUTER и computer будут означать одно и то же. По длине стоит ограничение от 2 до 69 символов, но этого вполне достаточно.
Как изменить имя компьютера
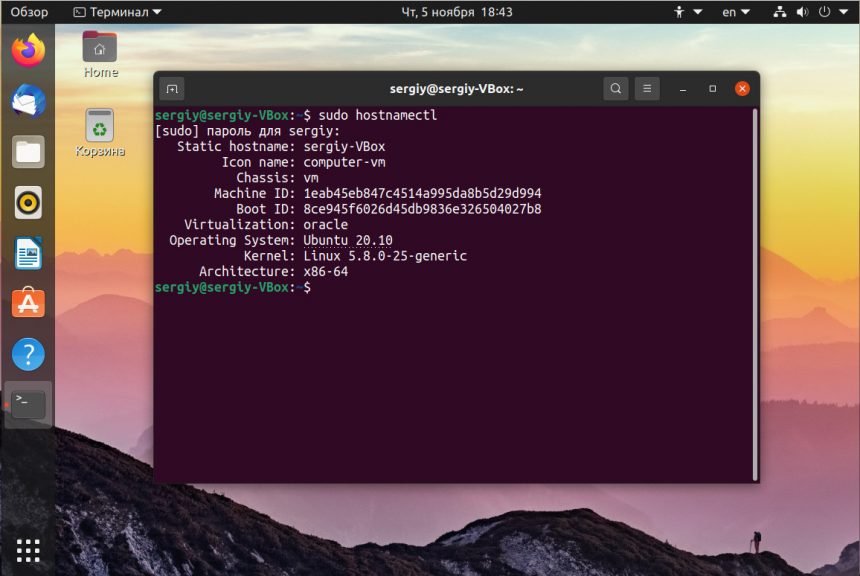
Посмотреть текущее имя компьютера можно выполнив команду hostnamectl без параметров:
Изменить имя хоста Ubuntu можно несколькими способами. Самый простой способ установить имя компьютера, которое сохранится только до перезагрузки можно использовать команду hostname, которой в параметре нужно передать новое имя. Например:
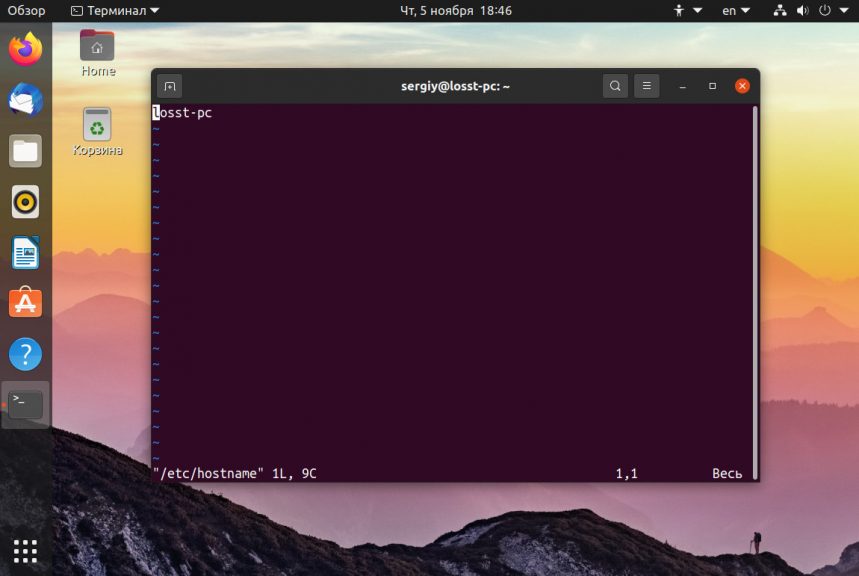
Но после перезагрузки все вернется как было раньше. Чтобы сделать изменения постоянными нужно изменить содержимое двух файлов. /etc/hostname и /etc/hosts:
Удалите старое имя из этого файла и пропишите новое. Затем сохраните изменения.
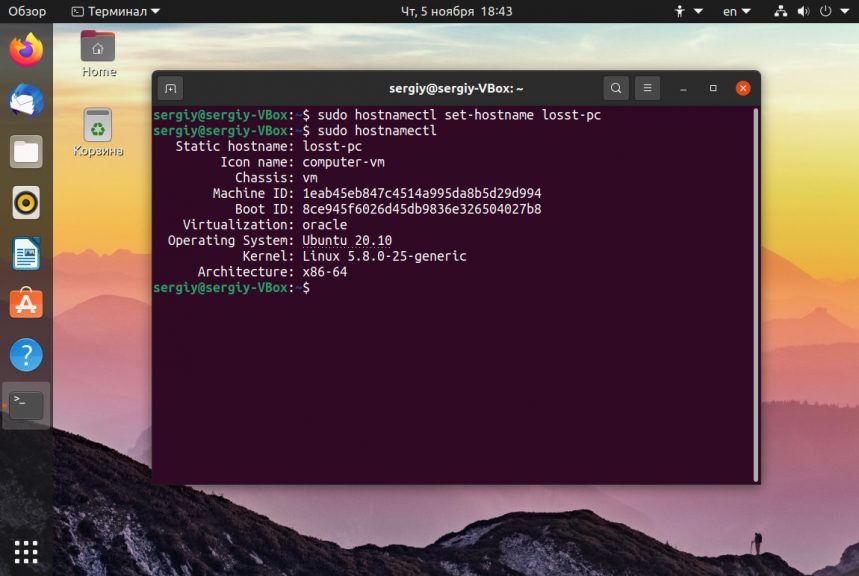
В современных версиях Ubuntu вы можете использовать команду hostnamectl, в отличие от первого варианта изменения сохранятся после перезагрузки:
sudo hostnamectl set-hostname новое_имя
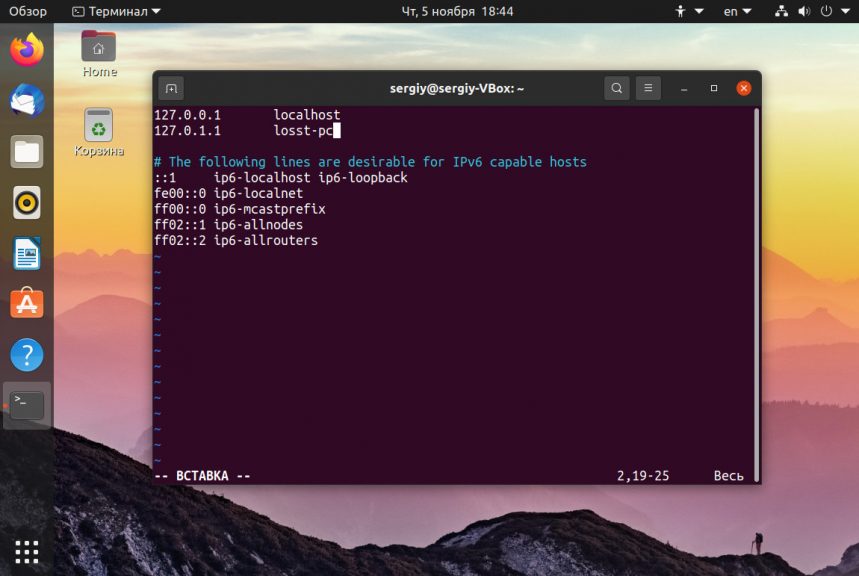
Затем откройте второй файл:
Здесь немного сложнее, найдите строку:
И замените старое имя на новое, после этого необходимо перезагрузить компьютер. Если вы не хотите перезагружать систему, то вы можете просто перезагрузить сервис управления входом пользователей:
systemctl restart systemd-logind.service
Теперь все должно работать правильно. Но это не единственный способ сменить имя хоста в Ubuntu.
Не меняется имя компьютера
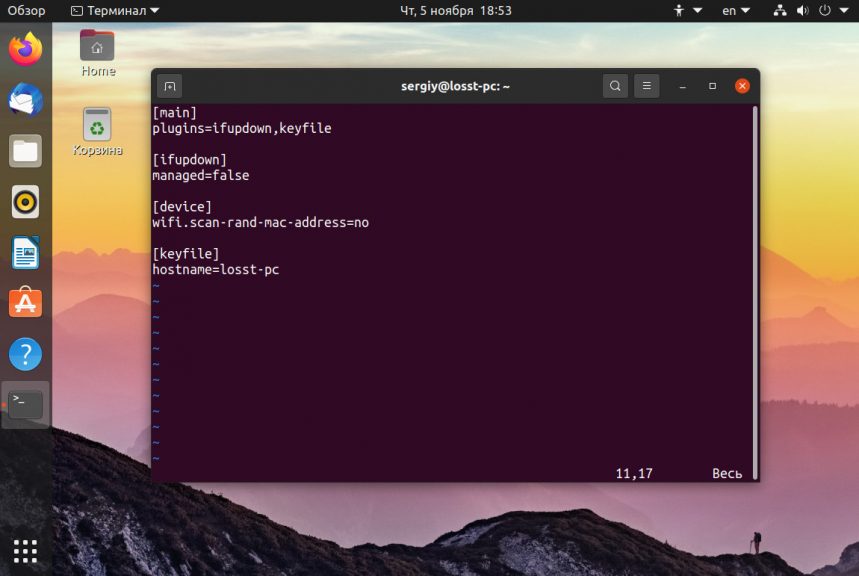
Если вы поменяли имя компьютера, а после перезагрузки восстанавливается все как было, например, какое-то там dhcpcd0-pc, то, скорее всего, виноват NetworkManager. Здесь решение либо удалить эту программу, либо изменить имя хоста Ubuntu с помощью NetworkManager. Для этого выполните:
sudo vi /etc/NetworkManager/NetworkManager.conf
И добавьте в файл такие строки:
Теперь после перезагрузки NetworkManager поменяет имя хоста Ubuntu на правильное и больше проблем с этим не будет.
Выводы
Вот и все, теперь вы знаете как сменить имя компьютера Ubuntu. Для этого есть вполне достаточно способов, чтобы вы могли выбрать именно то, что нужно. Если у вас остались вопросы, спрашивайте в комментариях!
Обнаружили ошибку в тексте? Сообщите мне об этом. Выделите текст с ошибкой и нажмите Ctrl+Enter.
How to Use the hostname Command in Linux
The Linux hostname command is used to view or change a system’s domain and hostname. It can also check a computer’s IP address.
In this tutorial, we will cover all the ways you can use the hostname command on Linux and how to change your computer’s hostname on a Linux system.
hostname Command Syntax
The hostname command uses the following format:
hostname [options] [new_hostname]Use the [options] parameter to add more specific instructions to the hostname command. Without it, the default output shows your computer’s hostname:
Use the [new_hostname] parameter when you want to change your computer’s hostname.
hostname Command Examples
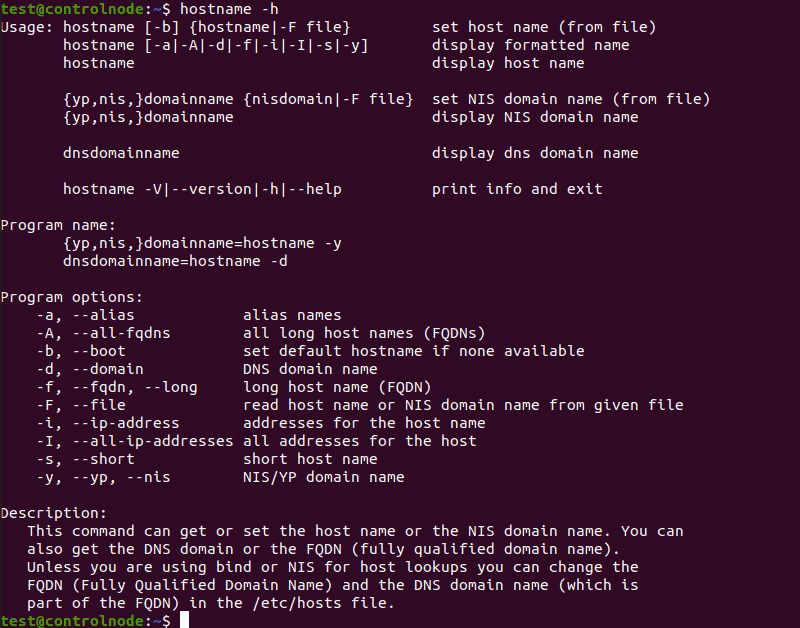
The hostname command has a number of options you can use for more specific outputs:
- -a , —alias : Displays the alias name of the host.
- -A , —all-fqdns : Displays every FQDN (Fully Qualified Domain Name) of the computer.
- -b , —boot : Always set a hostname.
- -d , —domain : Display DNS domain name.
- -f , —fqdn , —long : Display the FQDN.
- -F , —file : Check a file to recover and display the hostname.
- -h , —help : Print the help message as the output.
- -i , —ip-address : Display the computer’s IP address.
- -I , —all-ip-addresses : Display all of the computer’s network addresses.
- -s , —short : Display the short version of the hostname.
- -v , —verbose : Expand all output to verbose.
- -y , —yp , —nis : Display the NIS domain name.
Display Hostname
Using the hostname command without any additional options displays the computer’s hostname:
Display Short Hostname
Use the -s or —short option to display the short version of the hostname, which is cut off at the first dot:
hostname -s hostname --shortDisplay Alias
Use the -a or —alias option to display the alias (substitute hostname) of the host if one is set. There are very few cases where this option is useful, and its use is no longer recommended.
hostname -a hostname --aliasSearch for Hostnames
Use the -F or —file option to search a specific file (such as hostname or hosts) and change your computer’s hostname to match the content of the file:
sudo hostname -F [file path] sudo hostname --file [file path]Note: When using the -F or —file options, also specify the path to the file you want to check.
Force Default Hostname
If you don’t want to have a specific file containing the hostname, or want to leave that file empty, use the -b or —boot option. This makes your computer use the default hostname (localhost) until you set a different one:
Display Domain Name
Use the -d or —domain option to display the name of your DNS domain:
hostname -d hostname –domainDisplay FQDN
If you want to display a system’s FQDN, use the -f , —fqdn , or —long option:
hostname -f hostname --fqdn hostname --longA FQDN contains the short hostname and the DNS domain name.
Display All FQDNs
To display each FQDN of your machine, use the -A or —all-fqdns option:
hostname -A hostname --all-fqdnsThis option lists out all of your network addresses and their DNS domain names. It skips any addresses that it can’t translate.
Note: Different network addresses may translate to same DNS domain names. This can result in duplicate output entries when using -A or —all-fqdns options.
Display NIS Domain
If you’re using NIS (Network Information Service), you can check your NIS domain name with the -y , —yp , or —nis option:
hostname -y hostname --yp hostname --nisChange NIS Domain Name
Use this command with the following format to change your NIS domain name:
sudo hostname -y [NIS hostname] sudo hostname --yp [NIS hostname] sudo hostname --nis [NIS hostname]Display Related Network Addresses
The hostname command also lets your display network addresses tied to a hostname. To do this, use the -i or —ip-address option:
hostname -i hostname --ip-addressThis command only works if the hostname can be resolved.
Display All Network Addresses
Use the -I or —all-ip-addresses option to display all of the host’s network addresses. Unlike -i , this option doesn’t depend on hostname resolution:
hostname -I hostname --all-ip-addressesChange Hostname Until Reboot
You can change your computer’s hostname with the hostname command. To do this, use the following format:
sudo hostname [new hostname]Any changes to the hostname you make using this command will only last until the next reboot.
Change Hostname Permanently
To change the hostname permanently, use a text editor like Nano to make changes to the hostname and hosts files:
sudo nano /etc/hostname sudo nano /etc/hostsYou can also use the hostnamectl command to permanently change the hostname:
sudo hostnamectl set-hostname [new hostname]Additional hostname Options
Use the -V or —version option to print out the version of the hostname software package on your Linux system:
hostname -V hostname --versionIf you need help with any of the commands, use the -h or —help option to print out a help message:
After following this guide, you now know how to use the hostname command in Linux and all the options that can extend its use.
For more Linux commands, check out our Linux Commands Cheat Sheet.
Find Hostname from IP Linux
Names or labels are useful as they allow us to identify one thing or one person from another. Even a person’s name, which might not be globally unique, contains a set of characters that allow a person to become distinguished from another person.
Similarly, computers support labels or names that help give them a unique identity in a network. That is where a hostname comes in. A hostname is a set of alphanumerical characters unique to a computer network, allowing devices to communicate with each other.
Typically, the underlying technology that identifies a computer or a device in a network is a set of numbers known as IP addresses. These are then mapped to a specific name resolved to the IP address of the machine.
In this tutorial, however, I will show you various ways that you can use to get the hostname associated with a specific IP address. The methods discussed in this tutorial will work in almost all Linux and Unix-Like systems.
If you are looking for detailed instructions on how systems such as Domain Names work, check out the resource on the link provided below:
With that out of the way, let us dive in.
Method 1: Ping
The simplest method to get the hostname from an IP address is to use ping. Ping is a simple yet powerful command-line utility that uses ECHO packets to communicate with a host.
NOTE: The following command only works in Windows machines. For Linux, check the next method.
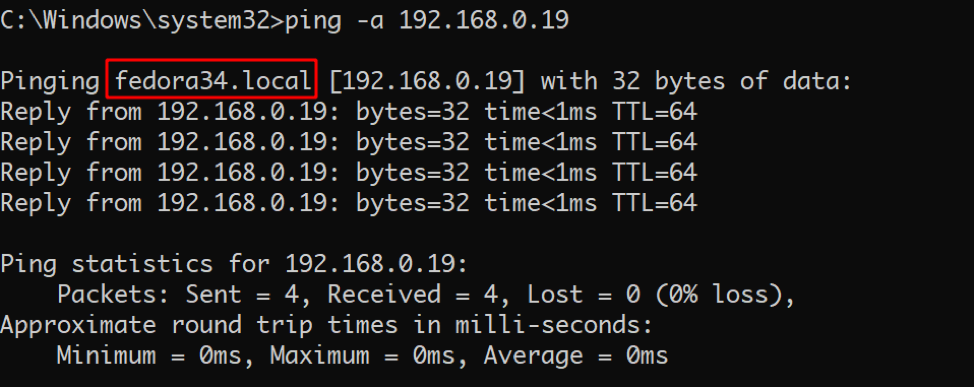
To get a hostname from an IP address with ping, use the command below:
Here is the output from the above command:
The above command is not always reliable; it often only works if the hostname is available in the hosts file.
Method 2: Host Command
The second and common method for getting the hostname from the IP address in Linux is the host command. This simple tool is part of the dnsutil package.
To install the package, use the commands:
Ubuntu/Debian-based distros
