IPv6 on Windows
Prior to Windows Vista and Windows Server 2008, Windows hosts used only MAC addresses to create Interface Identifiers (EUI-64). Globally unique addresses and Link-local ones were created using the segment’s prefix plus the EUI-64 identifier which is generated from the physical address of the host. With the rise of network security, this was found to be a security vulnerability because an IPv6 address can be easily tied to a MAC address, which uniquely identifies physical equipment.
For example, imagine a user with a laptop connecting to an IPv6 network with global prefix X:X:X:X::/64. Via SLAAC, the user’s laptop will generate a globally unique address X:X:X:X:EUI-64. Let’s say the user goes to another place and connects to another IPv6 network with a global prefix Y:Y:Y:Y::/64. Well, the user’s laptop will generate a global unicast address Y:Y:Y:Y:EUI-64, if the user connects to a network Z:Z:Z:Z::/64 it will get IPv6 address Z:Z:Z:Z::EUI-64 and so on. You can clearly see that this creates an opportunity to track the user , because wherever he goes and to whichever network he connects, the second half of the globally unique IPv6 address his laptop generates is always the same. The user can not connect anonymously to any network if someone knows the EUI-64 interface identifier of his laptop. This can be easily exploited in many different ways, for example, websites and apps associating different IPv6 addresses to a particular device or user.
Companies realized that and introduced two concepts that help to improve user’s privacy — Random Interface Identifiers and Temporary IPv6 addresses. Let’s start by looking at what the first term is.
Randomize Identifiers
Randomize Identifiers feature has been introduced as a part of the privacy extension for SLAAC (Stateless Address Auto-configuration). After Windows Vista, this feature is enabled by default, so wherever a Windows host generates an IPv6 address with SLAAC, it always uses a Random Interface ID.
Let’s look at part of the output of ipconfig /all command that displays the Physical address and the Link-local address of a Windows 10 host. You can see that the MAC address is 00-0A-12-34-56-78 and therefore if PC1 uses EUI-64 to generate a link-local address, it should have been fe80::20a:12ff:fe34:5678.
PS C:\Users\Administrator> ipconfig /all Ethernet adapter Eth0: Description . . . . . . . . . . . : Intel(R) PRO/1000 MT Network Connection Physical Address. . . . . . . . . : 00-0A-12-34-56-78 Link-local IPv6 Address . . . . . : fe80::ec94:3519:1f19:711f%8(Preferred)Well, obviously the current link-local address is not created using the MAC address but rather a Random Interface Identifier. This is because the Randomize Identifiers feature is enabled by default. We can check this using the PowerShell command get-netipv6protocol or using netsh interface ipv6 show global in the Windows Command Prompt
PS C:\Users\Administrator> get-netipv6protocol DefaultHopLimit : 128 NeighborCacheLimit(Entries) : 256 RouteCacheLimit(Entries) : 4096 ReassemblyLimit(Bytes) : 67105632 IcmpRedirects : Enabled SourceRoutingBehavior : DontForward DhcpMediaSense : Enabled MediaSenseEventLog : Disabled MldLevel : All MldVersion : Version2 MulticastForwarding : Disabled GroupForwardedFragments : Disabled RandomizeIdentifiers : Enabled AddressMaskReply : Disabled UseTemporaryAddresses : Enabled MaxTemporaryDadAttempts : 3 MaxTemporaryValidLifetime : 7.00:00:00 MaxTemporaryPreferredLifetime : 1.00:00:00 TemporaryRegenerateTime : 00:00:05 MaxTemporaryDesyncTime : 00:10:00 DeadGatewayDetection : EnabledWe can use the following command in PowerShell to change the default behavior of a Windows host and disable the Randomize Identifiers. Disabling this feature forces Windows to use EUI-64 for Interface ID as you can see in the following example.
PS C:\Users\Administrator> set-netipv6protocol -RandomizeIdentifiers Disabled PS C:\Users\Administrator> PS C:\Users\Administrator> ipconfig /all Description . . . . . . . . . . . : Intel(R) PRO/1000 MT Network Connection Physical Address. . . . . . . . . : 00-0A-12-34-56-78 Link-local IPv6 Address . . . . . : fe80::20a:12ff:fe34:5678%8(Preferred)Note that now the link-local address is generated from the MAC address and is exactly the value we expected.
Temporary IPv6 addresses
Another important concept, part of the Privacy Extension for SLAAC, is the use of Temporary IPv6 addresses. The idea behind temporary addresses is to have a public randomized IPv6 address that has a relatively short lifetime and can be used for anonymous outgoing connections. At every reboot, or IPv6 stack on/off, or when the Preferred-Lifetime expires this temporary address is re-generated using a Random Interface Identifier. Therefore, different outgoing connections can be initiated from different Temporary IPv6 addresses which minimize the risk of someone tracking the user by associating the global IPv6 address to physical equipment/user.
Of course, the incoming connections are made to the real Public IPv6 address that doesn’t change. However, in a typical Internet user scenario, all connections are initiated by the user’s machine towards an Internet service (client-server communication).
PS C:\Users\Administrator> get-netipv6protocol DefaultHopLimit : 128 NeighborCacheLimit(Entries) : 256 RouteCacheLimit(Entries) : 4096 ReassemblyLimit(Bytes) : 67105632 IcmpRedirects : Enabled SourceRoutingBehavior : DontForward DhcpMediaSense : Enabled MediaSenseEventLog : Disabled MldLevel : All MldVersion : Version2 MulticastForwarding : Disabled GroupForwardedFragments : Disabled RandomizeIdentifiers : Enabled AddressMaskReply : Disabled UseTemporaryAddresses : Enabled MaxTemporaryDadAttempts : 3 MaxTemporaryValidLifetime : 7.00:00:00 MaxTemporaryPreferredLifetime : 1.00:00:00 TemporaryRegenerateTime : 00:00:05 MaxTemporaryDesyncTime : 00:10:00 DeadGatewayDetection : EnabledYou can verify that this feature is enabled by default using either PowerShell’s command get-netipv6protocol or Command Prompt netsh interface ipv6 show privacy command.
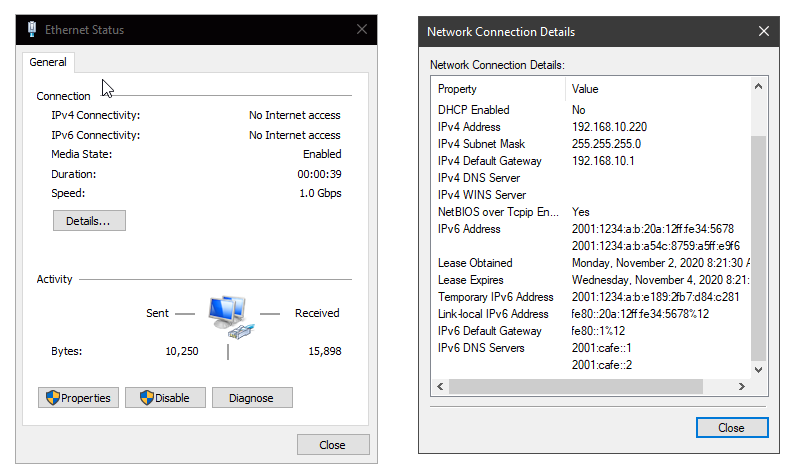
C:\Users\Administrator>netsh interface ipv6 show privacy Querying active state. Temporary Address Parameters --------------------------------------------- Use Temporary Addresses : enabled Duplicate Address Detection Attempts: 3 Maximum Valid Lifetime : 7d Maximum Preferred Lifetime : 1d Regenerate Time : 5s Maximum Random Time : 10m Random Time : 6sIn some cases, you will see multiple Temporary IPv6 Addresses at a time (could be hundreds). This happens when the Maximum Preferred Lifetime of an address expires but there is a connection still opened using this particular address. In this case, another Temporary IPv6 address is created but the old one is not deleted until all opened connections are closed. More information on what the different lifetimes means can be seen in figure 3.
Configuring Global IPv6 Address on Windows 10
There are three methods to configure a Windows 10 hosts with an IPv6 address:
- Method 1: Configure the host manually.
- Method 2: Using SLAAC and a Stateless DHCPv6 server.
- Method 3: Using a Stateful DHCPv6 server.
Manual Address Assignment
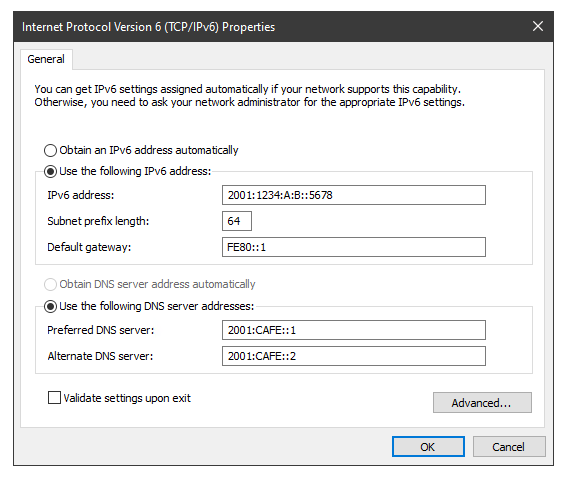
The manual configuration is pretty straightforward. We go to Network Adapters Setting and under Internet Protocol Version 6 Properties we configure everything as shown in Figure 4. This approach is applicable for SOHO networks but it is not a scalable solution for large network environments.
Dynamic Addressing
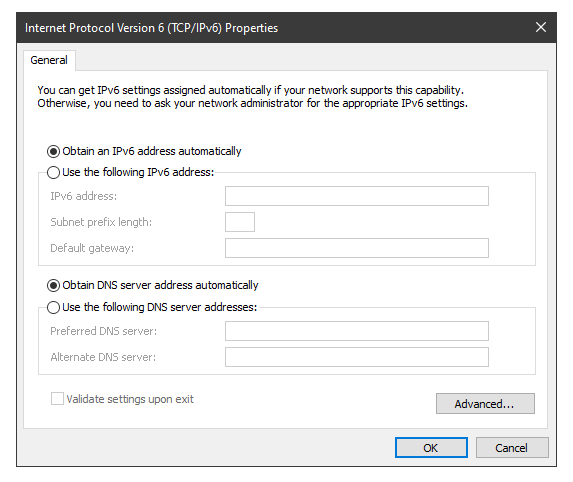
To enable Windows to automatically decide how to configure its IPv6 settings, we just leave it on default settings «Obtain an IPv6 address automatically«. When using this approach, the type of dynamic addressing is decided by the Router Advertisements sent by the Default Router on the segment. Depending on the Autoconfig Flags, the host knows whether to use SLAAC plus Stateless DHCPv6 or to use Stateful DHCPv6.
Keep in mind that, it is up to the network administrators and the company’s policy to decide which addressing method t use. From a Windows perspective, it can generate an IPv6 address using SLAAC and obtain another address using DHCPv6 at the same time. This means that the host will have at least to global unicast addresses. Such an example is shown in figure 6.
The first GUA address is generated via SLAAC and the second one has been obtained from a DHCPv6 server.
- Introduction to IP Version 6
- What is IPv6?
- IPv4 vs IPv6 — Understanding the differences
- IPv6 Address Representation
- IPv6 Address Types
- IPv6 Neighbor Discovery Protocol
- IPv6 Stateless Address Auto-configuration (SLAAC)
- IPv6 on Windows
- Stateless DHCPv6
- Stateful DHCPv6
- IPv6 Routing Overview
- IPv6 Static Routing
Как включить IPv6: настройка протокола на Windows 7 и 10

Давайте для начала разберёмся – что это такое? Как вы, наверное, уже знаете, для общения в сети любое устройство: компьютер, ноутбук, телефон или даже телевизор использует систему IP адресов. Пока в широком использовании существует именно четвертая версия IPv4. Она кодирует путём 4 байтовых цифр. 1 байт может выражать цифру от 0 до 255. Грубо говоря, адресация находится в диапазоне от 0.0.0.0 до 255.255.255.255. В итоге «ай пи» могут получить 4 294 967 296 – чуть больше 4 миллиардов адресов.
Но в 21 веке, который знаменуется «веком интернета» – как говорит практика, свободных «ИП», уже становится мало. В свое время мой провайдер, спокойно выдавал статические IP. Сейчас же эта процедура платная, хотя прошло всего несколько лет.
IPv6 – в общем это новый стандарт, который пока используется очень редко. Адрес при этом имеет размер не 32 Бита как в IPv4, а в 4 раза больше – 128 Бит. Но в скором времени компьютерная и сетевая индустрия полностью перейдут на новый формат адреса. Теперь давайте расскажу, как включить IPv6.
Включение и выключение
ПРИМЕЧАНИЕ! Если подключение идёт к роутеру, при использовании вашего провайдера шестой версии – настройки нужно производить в самом роутере.
Настройки IPv6 уже по-умолчанию установлены на большинстве сетевых устройств. При этом использование протоколов адресов, зависит от вашего провайдера и какой именно версию айпи – он использует. Если провод от провайдера идёт напрямую к вам в компьютер, то настройка достаточна простая для всех версия Windows: 7, 8, 10 и даже XP.


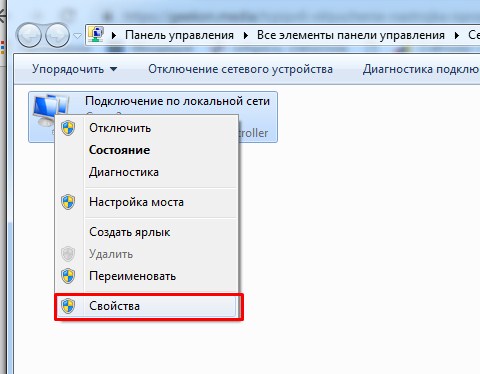
- Теперь очень важный момент. Нужно выбрать именно то подключение, через которое идёт интернет. В моём случае это проводной вариант. Нажимаем правой кнопкой и переходим в свойства.

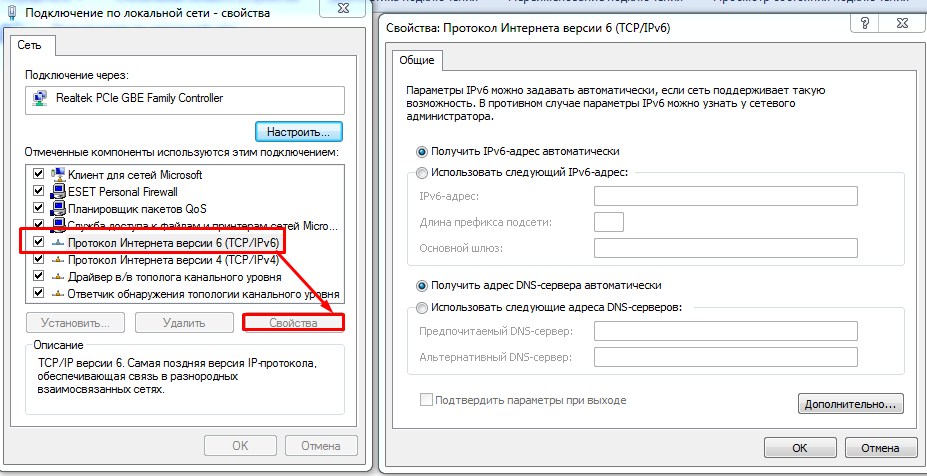
- Выбираем 6 версию TCP и заходим в свойства. По-умолчанию, стоит автономное получение IP от DHCP сервера. Если подключение идёт извне от провода провайдера, то по идее он должен автоматом получить эти данные. Но совсем недавно, некоторые провайдеры стали выдавать настройки статического адреса шестой версии.

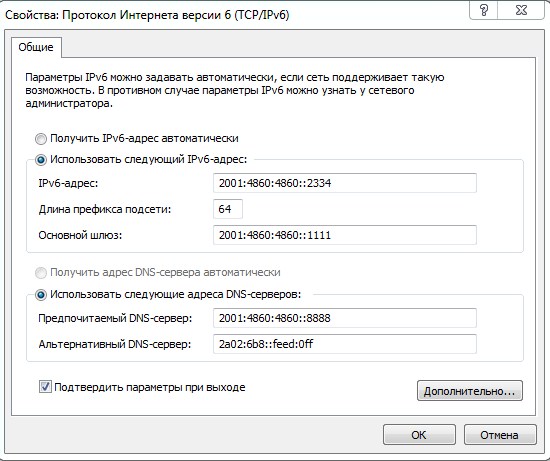
- Эти данные написаны в договоре. В таком случаи, просто переписываем все буковки и циферки как на листке. Для установки адресов вручную, указываем галочки ниже «Использовать следующие…» и прописываем. В самом конце ещё раз проверьте введенные данные и нажмите «ОК».
Если вы в автономном режиме получаете айпишник, то скорее всего у вас также в листе будут указаны DNS сервера вашего провайдера. Но можно указать проверенные ДНС от Google и Яндекс:
Как настроить на роутере
Если интернет у вас подключен к роутеру, то прописывать все данные, в том числе DNS адреса стоит в настройках маршрутизатора. Чтобы зайти в Web-интерфейс роутера, вам нужно быть подключенным к его сети. Можно подключиться по Wi-Fi или по кабелю (вставьте его в свободный LAN разъём на передатчике).
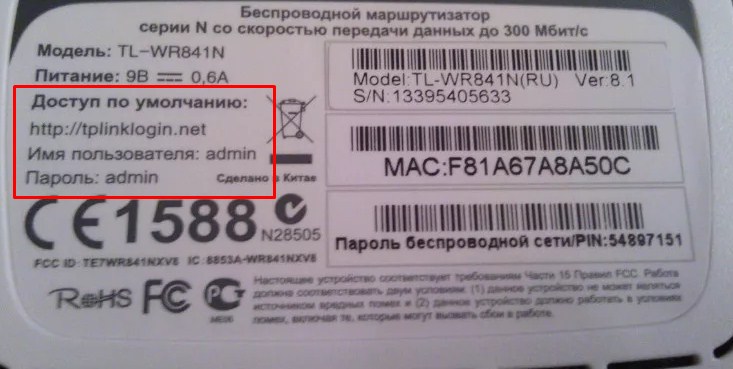
- Открываем браузер и прописываем IP или DNS адрес роутера. Адрес указан на этикетке под корпусом.

- После, вас попросят ввести логин и пароль – эта информация находится там же.
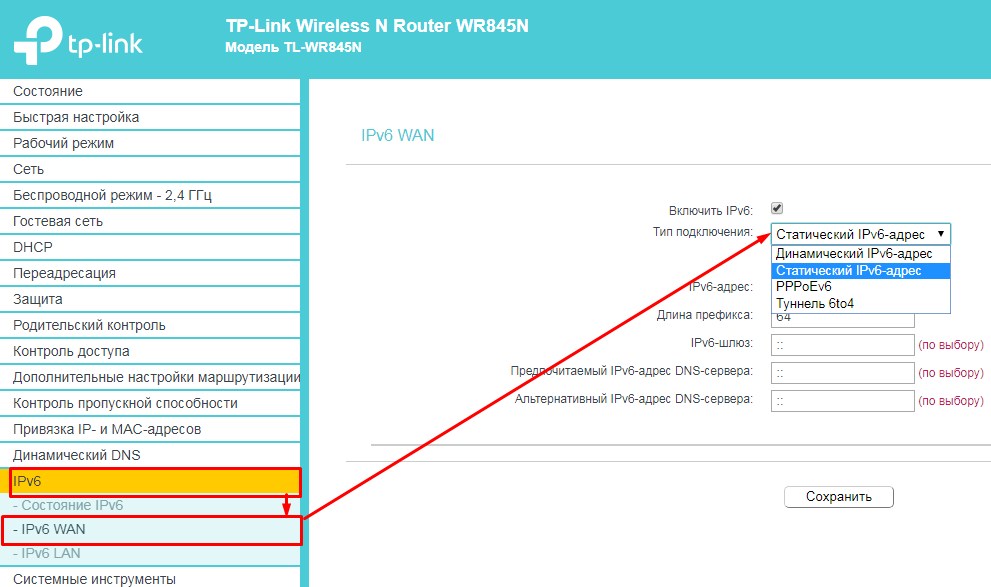
- Далее инструкции будут отличаться в зависимости от прошивки и компании, которая выпустила аппарат. Но сам принцип один и тот же. Покажу на примере TP-Link.
- Почти у всех, данный пункт меню будет отдельно. Ну и называется он соответствующее – «IPv6». Далее нас интересует именно WAN подключение.

- Как видите тут принцип такой же как на IPv4. Есть динамическое подключение – его просто устанавливаешь и ничего вводить не нужно. Статическое – тут нужно как в прошлой главе вручную ввести: IP, Длину префикса, адрес шлюза и ДНС сервера. PPPoEv6 – использует при подключении логин и пароль. Выбираем наш вариант и просто вводим данные из договора от провайдера.
- Проверить включение режима можно на главной вкладке или в «Состояние». Там вы увидите ваш адрес.
Как узнать и посмотреть адрес?

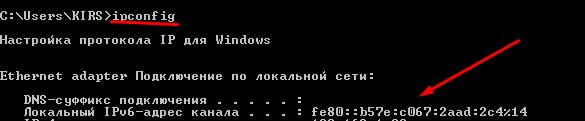
Если подключение идёт напрямую к компу или ноуту, то можно узнать через командную строку. Для этого жмём + R , прописываем «cmd». Далее на черном экране прописываем команду «ipconfig» и смотрим результат. Если вы подключаетесь через роутер, то адрес стоит смотреть в админке аппарата на главной. О том, как туда зайти – я писал в главе выше.