- Quickly setup a localhost environment in Ubuntu
- Install LAMP stack
- Test Apache Webserver
- Test PHP
- Install phpMyAdmin
- Test phpMyAdmin
- Building products is quite hard!
- Thank you for subscribing!
- Localhost 127.0.0.1 – Setup your own Web Server
- What is localhost (127.0.0.1)?
- Definition of 127.0.0.1
- Localhost 127.0.0.1 structure
- Http port for localhost (127.0.0.1)
- Https port for localhost (127.0.0.1)
- Easy web server for localhost
- Simplest web server setup
- Download Apache
- Install Apache on localhost (127.0.0.1)
- Installation in Windows
- Apache installation on Linux
- Install Apache in Ubuntu
- Install Apache on Fedora
- Apache installation on MacOS
- Localhost Web Server Configuration
- How to configure localhost on Linux? [closed]
Quickly setup a localhost environment in Ubuntu
Although, I use Ubuntu, this should apply to a large number of linux distros. Every developer uses a local environment to develop locally before testing it live. I kinda avoid that root by mounting my FTP webspace in Ubuntu and directly working on live files (there is no need of download and upload as you […]
Although, I use Ubuntu, this should apply to a large number of linux distros. Every developer uses a local environment to develop locally before testing it live. I kinda avoid that root by mounting my FTP webspace in Ubuntu and directly working on live files (there is no need of download and upload as you might think), but I wanted to do some CPU intensive job for a client for which I needed to setup a localhost environment, so I thought I would share this with everyone on my blog.
Install LAMP stack
Fire up a terminal (Applications > Accessories > Terminal) and enter this command:
sudo apt-get install lamp-server^

Enter y for yes when it asks to continue after estimation of how much data will be downloaded and how much will be used on disk.
It will install quickly and can take a few minutes depending on your internet speed, and then it will ask you to setup the password for MySQL user root. It is usually left blank on localhost machines as they are used only for development purposes but last time I left it blank, I had to deal with the issues that it didn’t change the password to blank but has something else and I had to turn off the password prompt for root access. Avoid doing all that by just selecting “root” or anything you want as the password of the root user of MySQL.
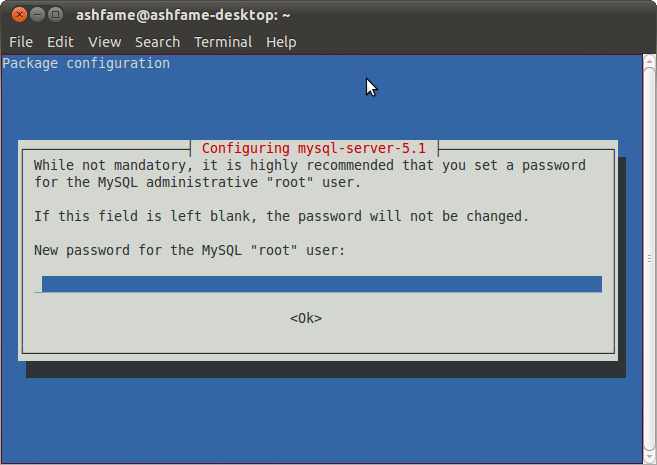
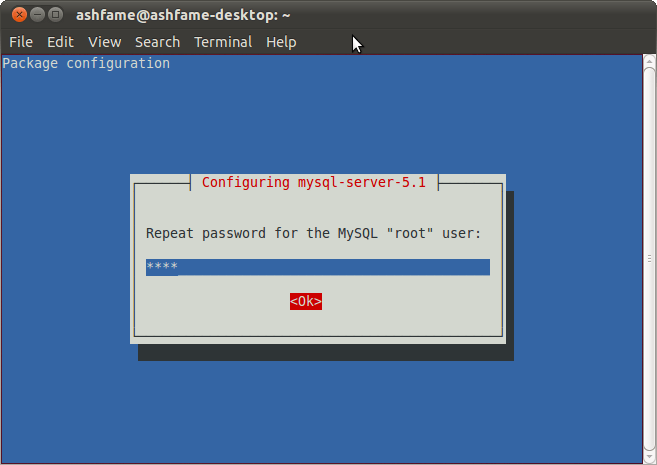
Confirm it once (Type the password and press Tab key).
Test Apache Webserver
Just open http://localhost/ in your browser and it will show up a message “It works!” which means Apache is working fine.
Test PHP
Create a file named phpinfo.php in /var/www/ to check if PHP is working fine.
sudo nano /var/www/phpinfo.php
Enter the content as and save the file by hitting Ctrl + X and then y (for yes) and return key (enter).
Restart Apache webserver by the following command – sudo /etc/init.d/apache2 restart
Now open http://localhost/phpinfo.php and it will show up a page with lots of php related information, if you can see it, PHP is working fine.
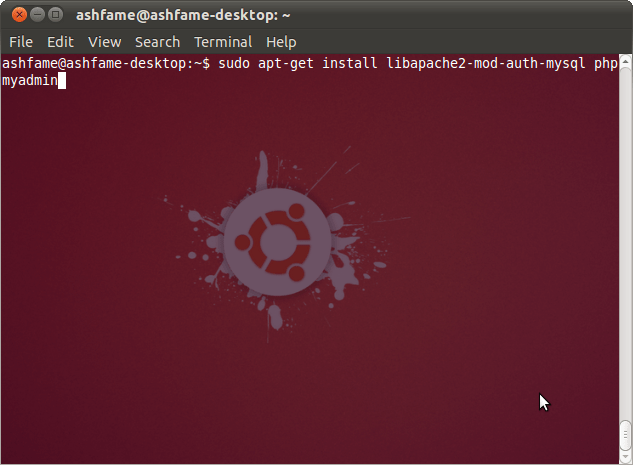
Install phpMyAdmin
Enter this command in terminal – sudo apt-get install libapache2-mod-auth-mysql phpmyadmin
Select Apache as the web server by pressing Space and then Tab key and press enter key.

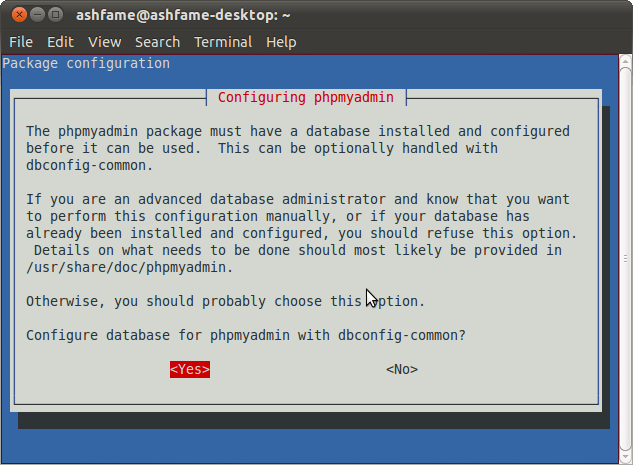
Press Yes to configure database for phpmyadmin.
Provide password which we set as “root” earlier.

Again, enter “root“.

Confirm it, and then you are done.

Test phpMyAdmin
Now open http://localhost/phpmyadmin/ in your brower to access phpmyadmin and you can login with username and password both as root.
Everything is done, you have your web root at /var/www/ where you will need super user permissions to write files, I will do a follow up post on how you can make this easier by keeping your files in your Home directory instead and a bit of extra which will make it totally complete.
Subscribe so that you don’t miss updates! RSS/Email options are in the sidebar.
Building products is quite hard!
Interested in hearing stories of my adventures?
Put your email below. No BS, I promise.
Thank you for subscribing!
I also live tweet stuff, a lot — @ashfame
Localhost 127.0.0.1 – Setup your own Web Server

To access your localhost web server at 127.0.0.1 click on this link.
The IP address 127.0.0.1 is reserved for use by the local web server (localhost), which you can access directly from the navigation bar using any of these 4 ways:
What is localhost (127.0.0.1)?
A localhost web server (whose IP address is 127.0.0.1) is the local implementation of your own web server, reachable from your personal computer and contains all the features of a traditional web server, except the access from the outside (or from the local network).

Definition of 127.0.0.1
In the RFC 5735 (Request for Comment) of the Internet Engineering Working Group (IETF), is specified the use of reserved IPv4 addresses for some defined purpose. In particul ar, an 8-bit loopback address block (for local testing) is defined called 127.0.0.0/8, where the localhost IP address
This IP address 127.0.0.1 is not a public or private IP address, it can only be accessed only from your personal computer, therefore localhost can help to many web development tasks and testing a web server without security risks from internet.

Localhost 127.0.0.1 structure
It is known that localhost (or 127.0.0.1) is a web server mounted on your personal computer, you have all the features from a full web server inside your computer: A root directory and a home directory, to host all directories of your local projects and websites. You can also access these directories through urls that in the default configuration follow this syntax:
– Access through localhost:
http://localhost/wiki/index.html
– Access through 127.0.0.1:
Through that request, you should receive a response from the localhost website.

Http port for localhost (127.0.0.1)
A port of any IP address is a connection that is established for a network interface using the TCP/IP protocol. A network interface allows multiple network connections using different ports, however one port cannot be assigned for more than one simultaneous connection.
In the case of localhost (IP address 127.0.0.1), the standard port allocation is also followed. The standard port for the http protocol is the number 80. In port notation a url must follow this syntax:
Following that syntax, an example of url could be this (the same as 127.0.0.1):
In this example, since 80 is the standard port for the http protocol, we can omit the number 80. Therefore following the same notation for localhost, the above url translates as:
With the same access from the website as indicating port 80.

Https port for localhost (127.0.0.1)
The https protocol means: “secure http”, where a layer of security is added to the http protocol, encrypting all the data obtained from the client. To make the encryption, https uses the TLS/SSL method to encrypt the clients data through a SSL certificate, protecting the client data that is transferred over the network.
The default port for the https protocol is 443. Therefore to access localhost through the https protocol could be seen as follows:
http://localhost:443/index.html
However, this notation is not correct, because 443 is not a port available for plain text (like http of port 80), so 443 requires https encrypted information. A correct url using 443 port for localhost
And since 443 is the default port of the https protocol, the url of localhost in https should finally be shown like this:
Note: If the protocol is http, the default port is 80, and if the protocol is https, the default port is 443, but in neither case is it shown in the url.

Easy web server for localhost
If you are trying to access the IP address 127.0.0.1 (http://127.0.0.1) or localhost (http://localhost) from your browser and you have no answer (page not found), it is very likely that you do not have configured a web server into your local computer.
To create your own web server, you must learn how to configure it on your personal computer before launching a web server on 127.0.0.1 that handles any kind of requests from your LAN or internet. Below we will show you a simple way to create a web server using Apache.
Simplest web server setup
If the operating system of your computer is MacOS, Linux or Windows, you can install an Apache web server. The goal is create an Apache web server to process your localhost requests.
For Windows users, there is an integrated web server called IIS, with this web server you can process your requests, however we will focus on the simplest configuration of an Apache web server.

Download Apache
You must download Apache from its official website. We recommend you download the latest version, although you can download the version that suits you best, you should immediately unzip the file.
Install Apache on localhost (127.0.0.1)
Installation in Windows
If you are using Windows, you will have to go the folder created when unzipping the file, it is called apache24. Depending on the version there are two possible ways:
- In some Windows versions, it will be enough to run the .msi installer of Apache.
- You can move the entire apache24 directory to C:\ for simplify the configuration. To do this, through the command line (cmd) you execute the following commands, as follows:
cd apache24
cd bin
httpd.exe
Running httpd.exe loads the default apache configuration located at httpd.conf and initializes the web server. If the installation has been successful, when open localhost the result should be similar to the one shown in this image:

Apache installation on Linux
To install Apache on Linux, you have to install the package according to the environment in superuser mode:
Install Apache in Ubuntu
sudo apt-get install apache2
Install Apache on Fedora
Then we start the Apache service:
# Start Apache service in Ubuntu sudo systemctl start apache2
# Start the Apache service in Fedora or CentOS sudo systemctl start httpd
To enable the service, we enter the follow command:
# Enable Apache service at boot systemctl enable httpd.service
Finally enter in the browser: localhost (or 127.0.0.1) to verify that the installation has been successful. You should see a message like the following:

If you see this message when open localhost (http://localhost) in your browser, the Apache installation was successful.
Apache installation on MacOS
For MacOS, Apache was installed by default, you just have to enable it from the terminal using the following command:
By the same way as in Linux, you must verify that localhost can be opened in your browser. If there is an answer, the enabling process was successful.
Localhost Web Server Configuration
Once your web server is installed on 127.0.0.1 and localhost have a successful answer, you should customize the default configuration of your httpd.conf file, for example: configure VirtualHosts, change your DocumentRoot (which is the default document directory), Listen for ports, etc.
Apache is a complex web server and have many options to configure, many modules and another features that we will see later. If you want to implement a full web server on localhost (also available at 127.0.0.1), maybe you could consider implementing a LAMP server (Linux – Apache – MySQL – PHP) or WAMP (Windows – Apache – MySQL – PHP).
If you want to build a complete LAMP server, you could check this tutorial, also we recommend the installation of a database manager (MySQL, available from localhost) and PHP (To execute .php files at server code).
It is important to show that the port used for MySQL is different from 80 and 443. We invite you to discover it!
Tags: Apache, fedora, ip, ip addresses, LAMP, linux, localhost, MacOS, MySQL, RFC, ubuntu, WAMP, Websites, Windows,
How to configure localhost on Linux? [closed]
Closed. This question does not meet Stack Overflow guidelines. It is not currently accepting answers.
- This question does not appear to be about a specific programming problem, a software algorithm, or software tools primarily used by programmers. If you believe the question would be on-topic on another Stack Exchange site, you can leave a comment to explain where the question may be able to be answered.
- This question does not appear to be about a specific programming problem, a software algorithm, or software tools primarily used by programmers. If you believe the question would be on-topic on another Stack Exchange site, you can leave a comment to explain where the question may be able to be answered.
I’m trying to set up a virtual machine with CentOS 7 to use it as an Oracle Database Server (I’m new to Linux). I have encountered a problem about the host configuration that as I was reading has to be configured previously.
You see, this is where I collide with my knowledge that I have in windows. I thought it was enough to change the device name like this:
[root@localhost.localdomain ~] # hostname SERVER01 [root@localhost.localdomain ~] # hostname SERVER01 [root @ SERVER01 ~] # And I do not understand why from windows I can not ping the Linux machine only using its hostname ( SERVER01 )
The ping request could not find host SERVER01. Check the name and try again. I understand that the previous configuration of the host in CentOS 7 that I am asked to install the database server has to do with the fact that I can not ping it using SERVER01 . Although I have to clarify that using the IP if I can.
What do I do to make that change in Linux and can ping only using the hostname as it happens in windows?