- How to set MTU PERMANENTLY in CLI
- Смена MTU
- Windows
- Командная строка
- Реестр
- Linux
- Разово
- Постоянно (permanently)
- Роутер
- Читайте также
- Blog
- What is MTU in Linux?
- Why MTU size is must in Linux?
- How to set MTU size in Linux with ficonfig command?
- How to set MTU with ip command?
- That’s all, in this tutorial we have seen how to set MTU in Linux.
- Please Share This Share this content
How to set MTU PERMANENTLY in CLI
I’m using Ubuntu 20.04 in WSL2, and cannot for the life of me permanently set the MTU. No matter what I do, after rebooting, it’s 1500 again. I had the same problem running Ubuntu natively, and switched to windows because Ubuntu doesn’t work over VPN because the MTU is wrong. Is there really no way to permanently set the MTU? I tried /etc/dhcp/dhclient.conf
GNU nano 4.8 /etc/dhcp/dhclient.conf # Configuration file for /sbin/dhclient. # # This is a sample configuration file for dhclient. See dhclient.conf's # man page for more information about the syntax of this file # and a more comprehensive list of the parameters understood by # dhclient. # # Normally, if the DHCP server provides reasonable information and does # not leave anything out (like the domain name, for example), then # few changes must be made to this file, if any. # option rfc3442-classless-static-routes code 121 = array of unsigned integer 8; send host-name = gethostname(); default interface-mtu 1340; supersede interface-mtu 1340; request subnet-mask, broadcast-address, time-offset, routers, domain-name, domain-name-servers, domain-search, host-name, dhcp6.name-servers, dhcp6.domain-search, dhcp6.fqdn, dhcp6.sntp-servers, netbios-name-servers, netbios-scope, rfc3442-classless-static-routes, ntp-servers; #send dhcp-client-identifier 1:0:a0:24:ab:fb:9c; #send dhcp-lease-time 3600; #supersede domain-name "fugue.com home.vix.com"; #prepend domain-name-servers 127.0.0.1; #require subnet-mask, domain-name-servers; timeout 300; #retry 60; #reboot 10; #select-timeout 5; #initial-interval 2; #script "/sbin/dhclient-script"; #media "-link0 -link1 -link2", "link0 link1"; #reject 192.33.137.209; #alias < # interface "eth0"; # fixed-address 192.5.5.213; # option subnet-mask 255.255.255.255; #>#lease < # interface "eth0"; # fixed-address 192.33.137.200; # medium "link0 link1"; # option host-name "andare.swiftmedia.com"; # option subnet-mask 255.255.255.0; # option broadcast-address 192.33.137.255; # option routers 192.33.137.250; # option domain-name-servers 127.0.0.1; # renew 2 2000/1/12 00:00:01; # rebind 2 2000/1/12 00:00:01; # expire 2 2000/1/12 00:00:01; #> I also tried messing with netplan, but I don’t think my system uses that. Also tried /etc/network/interfaces
Смена MTU

Обновлено: 23.06.2019 Опубликовано: 25.10.2017
Рассмотрим процесс смены значения MTU для операционных систем семейства Windows и Linux, а также роутерах.
Windows
Командная строка
Открываем командную строку от имени администратора.
Вводим команду для просмотра текущего значения MTU и названия сетевого интерфейса:
netsh interface ipv4 show subinterfaces
Получаем, примерно, следующее:
MTU Состояние определения носителя Вх. байт Исх. байт Интерфейс
—— ————— ——— ——— ————-
1500 1 81324794839 5376993884 Ethernet
* где 1500 — значение MTU (по умолчанию для сетей Etnernet); Ethernet — название интерфейса.
Меняем MTU следующей командой:
netsh interface ipv4 set subinterface «Ethernet» mtu=1492 store=persistent
* где Ethernet — название сетевого интерфейса, которое мы получили предыдущей командой; 1492 — новое значение MTU
Реестр
Открываем реестр (команда regedit) и переходим по ветке HKEY_LOCAL_MACHINE\SYSTEM\CurrentControlSet\Control\Class\.
Внутри будут находиться другие ветки с названиями 0000, 0001, 0002 и так далее. Необходимо пройтись по каждой и найти ключ DriverDesc со значением, похожим на название нашего сетевого адаптера и записать значение ключа NetCfgInstanceId, например:

Переходим в ветку HKEY_LOCAL_MACHINE\SYSTEM\CurrentControlSet\Services\Tcpip\Parameters\Interfaces. Находим ветку с нашим идентификатором, который мы записали и меняем ключ MTU (при его отсутствии, создаем — тип DWORD):

Чтобы настройки применились выключаем и снова включаем сетевой интерфейс или перезагружаем компьютер.
Linux
Для примера, рассмотрим наиболее популярные дистрибутивы — CentOS и Ubuntu.
Разово
Разово (до перезагрузки) для данных двух систем настройку можно выполнить одной командой:
ip link set mtu 1400 dev eth0
* где 1400 — новое значение MTU; eth0 — сетевой интерфейс, для которого поменяли максимальный размер пакетов.
Постоянно (permanently)
Для систем на базе Debian (Ubuntu) и Red Hat (CentOS) процедура немного отличается.
Открываем настройку сетевых интерфейсов:
К нужному адаптеру добавляем строчку:
iface eth0 inet static
.
mtu 9000
systemctl restart networking
Открываем конфигурационный файл для соответствующего сетевого интерфейса:
Перезапускаем сетевую службу:
systemctl restart network
Роутер
Смена MTU на роутерах различных производителей выполняется, примерно, по одному и тому же принципу — зайти на веб-интерфейс для настройки маршрутизатора, найти раздел с настройкой сети Интернет, задать значение MTU.
Например, для большинства устройств TP-Link: Network — WAN:

Читайте также

Инструкция по смене значения MTU на Windows и Linux
Blog
Dear Friends in this tutorial we will how to set MTU size in Linux and we will also know what is MTU and why it MTU size is must for Linux? So, let’s start and see steps by steps this process.
What is MTU in Linux?
MTU stand for (Maximum Transmission Unit) it’s a size of largest protocol data unit that can communicated in single network layer transaction. MTU depends on underlying network capabilities and must be adjusted manually or automatically to not exceed these capabilities.
For more details about MTU you can Click Here
Why MTU size is must in Linux?
Large packets occupy a slow link for more time than a smaller packet, causing greater delays to subsequent packets, and increasing network delay and delay variation. For example, a 1500-byte packet, the largest allowed by Ethernet at the network layer, ties up a 14.4k modem for about one second.
How to set MTU size in Linux with ficonfig command?
We can set MTU using ifconfig command or ip command. If we don’t have ifconfig command and our Linux is base Operating System, then we can us ip command. Like below: –
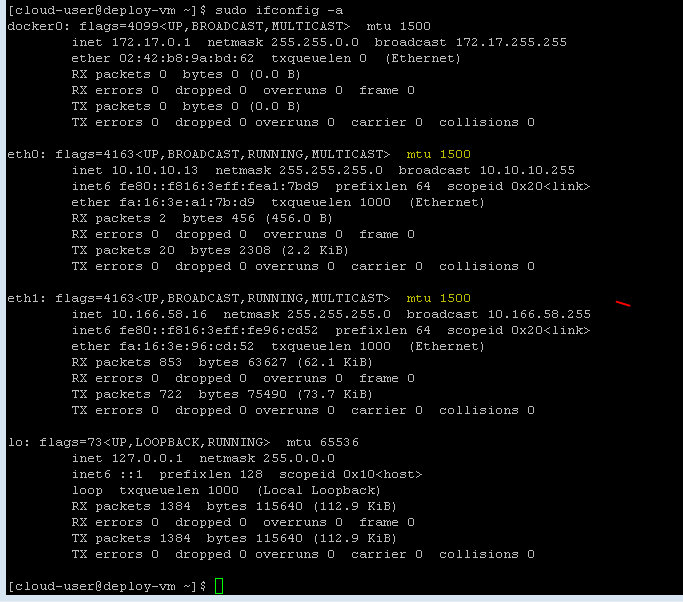
First of we can check current MTU size with ifconfig commands.
[cloud-user@deploy-vm ~]$ sudo ifconfig -a docker0: flags=4099 mtu 1500 inet 172.17.0.1 netmask 255.255.0.0 broadcast 172.17.255.255 ether 02:42:b8:9a:bd:62 txqueuelen 0 (Ethernet) RX packets 0 bytes 0 (0.0 B) RX errors 0 dropped 0 overruns 0 frame 0 TX packets 0 bytes 0 (0.0 B) TX errors 0 dropped 0 overruns 0 carrier 0 collisions 0 eth0: flags=4163 mtu 1600 inet 10.10.10.13 netmask 255.255.255.0 broadcast 10.10.10.255 inet6 fe80::f816:3eff:fea1:7bd9 prefixlen 64 scopeid 0x20 ether fa:16:3e:a1:7b:d9 txqueuelen 1000 (Ethernet) RX packets 2 bytes 456 (456.0 B) RX errors 0 dropped 0 overruns 0 frame 0 TX packets 20 bytes 2308 (2.2 KiB) TX errors 0 dropped 0 overruns 0 carrier 0 collisions 0 eth1: flags=4163 mtu 1600 inet 10.166.58.16 netmask 255.255.255.0 broadcast 10.166.58.255 inet6 fe80::f816:3eff:fe96:cd52 prefixlen 64 scopeid 0x20 ether fa:16:3e:96:cd:52 txqueuelen 1000 (Ethernet) RX packets 633 bytes 48331 (47.1 KiB) RX errors 0 dropped 0 overruns 0 frame 0 TX packets 568 bytes 59074 (57.6 KiB) TX errors 0 dropped 0 overruns 0 carrier 0 collisions 0 lo: flags=73 mtu 65536 inet 127.0.0.1 netmask 255.0.0.0 inet6 ::1 prefixlen 128 scopeid 0x10 loop txqueuelen 1000 (Local Loopback) RX packets 912 bytes 75951 (74.1 KiB) RX errors 0 dropped 0 overruns 0 frame 0 TX packets 912 bytes 75951 (74.1 KiB) TX errors 0 dropped 0 overruns 0 carrier 0 collisions 0 [cloud-user@deploy-vm ~]$
In above output you can see MTU size is 1600 on eth0 and eth1 interface. Now we need to set 1500 MTU on eth0 and eth1. So, we can use below commands.
[cloud-user@deploy-vm ~]$ sudo ifconfig eth0 mtu 1500 [cloud-user@deploy-vm ~]$ sudo ifconfig eth1 mtu 1500
Now we can verify with ifconfig command our changes is completed or not?
You can see in above output we have successfully changed MTU size of eth0 and eth1 from 1600 to 1500 MTU.
How to set MTU with ip command?
If don’t have ifconfig tools, then we can use ip command to change MTU size like below.
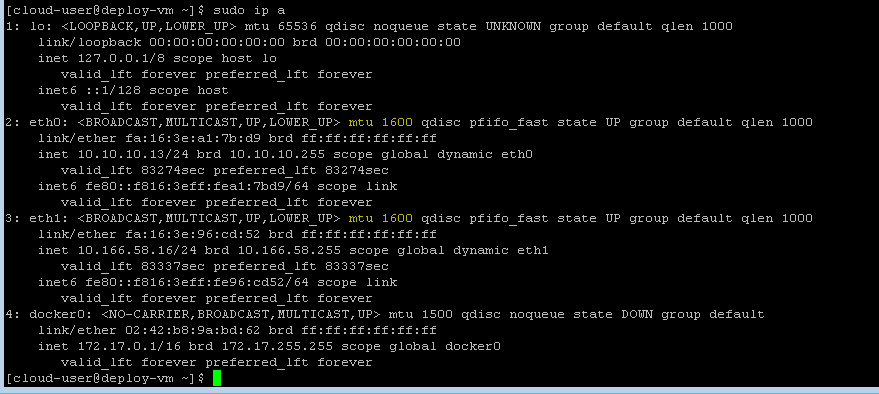
First, we can verify current MTU size with IP command.
[cloud-user@deploy-vm ~]$ ip a 1: lo: mtu 65536 qdisc noqueue state UNKNOWN group default qlen 1000 link/loopback 00:00:00:00:00:00 brd 00:00:00:00:00:00 inet 127.0.0.1/8 scope host lo valid_lft forever preferred_lft forever inet6 ::1/128 scope host valid_lft forever preferred_lft forever 2: eth0: mtu 1500 qdisc pfifo_fast state UP group default qlen 1000 link/ether fa:16:3e:a1:7b:d9 brd ff:ff:ff:ff:ff:ff inet 10.10.10.13/24 brd 10.10.10.255 scope global dynamic eth0 valid_lft 84910sec preferred_lft 84910sec inet6 fe80::f816:3eff:fea1:7bd9/64 scope link valid_lft forever preferred_lft forever 3: eth1: mtu 1500 qdisc pfifo_fast state UP group default qlen 1000 link/ether fa:16:3e:96:cd:52 brd ff:ff:ff:ff:ff:ff inet 10.166.58.16/24 brd 10.166.58.255 scope global dynamic eth1 valid_lft 84973sec preferred_lft 84973sec inet6 fe80::f816:3eff:fe96:cd52/64 scope link valid_lft forever preferred_lft forever 4: docker0: mtu 1500 qdisc noqueue state DOWN group default link/ether 02:42:b8:9a:bd:62 brd ff:ff:ff:ff:ff:ff inet 172.17.0.1/16 brd 172.17.255.255 scope global docker0 valid_lft forever preferred_lft forever [cloud-user@deploy-vm ~]$
You can see in above output we have 1500 MTU in eth0 and eth1 interface.
Now I am going to change is from 1500 MTU to 1600 MTU with ip command like below: –
[cloud-user@deploy-vm ~]$ [cloud-user@deploy-vm ~]$ sudo ip link set mtu 1600 eth0 [cloud-user@deploy-vm ~]$ sudo ip link set mtu 1600 eth1 [cloud-user@deploy-vm ~]$
Now we can verify our MTU size is changed or not with ip a command like below: –
You can see in above output we have successfully changed MTU size with ip command.
Now verify the MTU packet size with ping commands.
[root@urcloud ~]# ping -M do -s 8980 10.167.30.3 PING 10.167.30.3 (10.167.30.3) 8980(9008) bytes of data. ping: local error: Message too long, mtu=9000 ping: local error: Message too long, mtu=9000 ping: local error: Message too long, mtu=9000 ^C --- 10.167.30.3 ping statistics --- 3 packets transmitted, 0 received, +3 errors, 100% packet loss, time 1999ms [root@urcloud ~]# ping -M do -s 8960 10.167.30.3 PING 10.167.30.3 (10.167.30.3) 8960(8988) bytes of data. 8968 bytes from 10.167.30.3: icmp_seq=1 ttl=64 time=0.259 ms 8968 bytes from 10.167.30.3: icmp_seq=2 ttl=64 time=0.269 ms 8968 bytes from 10.167.30.3: icmp_seq=3 ttl=64 time=0.209 ms ^C --- 10.167.30.3 ping statistics --- 3 packets transmitted, 3 received, 0% packet loss, time 2000ms rtt min/avg/max/mdev = 0.209/0.245/0.269/0.031 ms [root@urcloud ~]#
That’s all, in this tutorial we have seen how to set MTU in Linux.
Please Share This Share this content
- Opens in a new window Twitter
- Opens in a new window Facebook
- Opens in a new window Google+
- Opens in a new window Pinterest
- Opens in a new window LinkedIn
- Opens in a new window Viber
- Opens in a new window VK
- Opens in a new window Reddit
- Opens in a new window Tumblr
- Opens in a new window Viadeo
- Opens in a new window WhatsApp