- Configuring System Properties
- Linux
- Windows (starting from .bat file)
- Windows service
- Setting properties for Windows services via command line
- Setting properties for Windows services via the Windows registry
- Confluence Data Center deployed in AWS
- Verifying your settings
- Recognized system properties
- How to Edit Config Files in Ubuntu
- Using Gedit Editor
- Using Nano Editor
- Using Vim Editor
- Using Gvim Editor
- Using Emacs Editor
- Search
- About This Site
- Latest Tutorials
Configuring System Properties
This page describes how to set Java properties and options on startup for Confluence.
See How to fix out of memory errors by increasing available memory for specific instructions for OutOfMemory Errors.
On this page:
Related pages:
Linux
To configure System Properties in Linux installations:
- Edit the /bin/setenv.sh file.
- Find the section CATALINA_OPTS=
(this is JAVA_OPTS= in Confluence 5.5 and earlier) - Refer to the list of parameters in Recognized System Properties.
Add all parameters in a space-separated list, inside the quotations. Make sure to keep the string $» in place.
Windows (starting from .bat file)
To Configure System Properties in Windows Installations When Starting from the .bat File:
- Edit the /bin/setenv.bat file.
- Find the section set CATALINA_OPTS=%CATALINA_OPTS%
(this is JAVA_OPTS=%JAVA_OPTS% in Confluence 5.5 and earlier) - Refer to the list of parameters in Recognized System Properties .
Add all parameters in a space-separated list. Make sure to keep the string %CATALINA_OPTS% in place.
Windows service
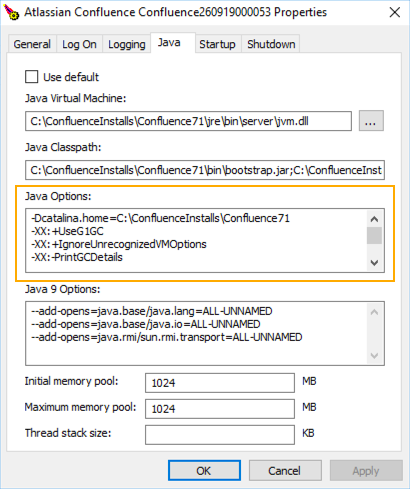
There are two ways to configure system properties when you Start Confluence Automatically on Windows as a Service, either via command line or in the Windows Registry
Setting properties for Windows services via command line
To set properties for Windows services via a command line:
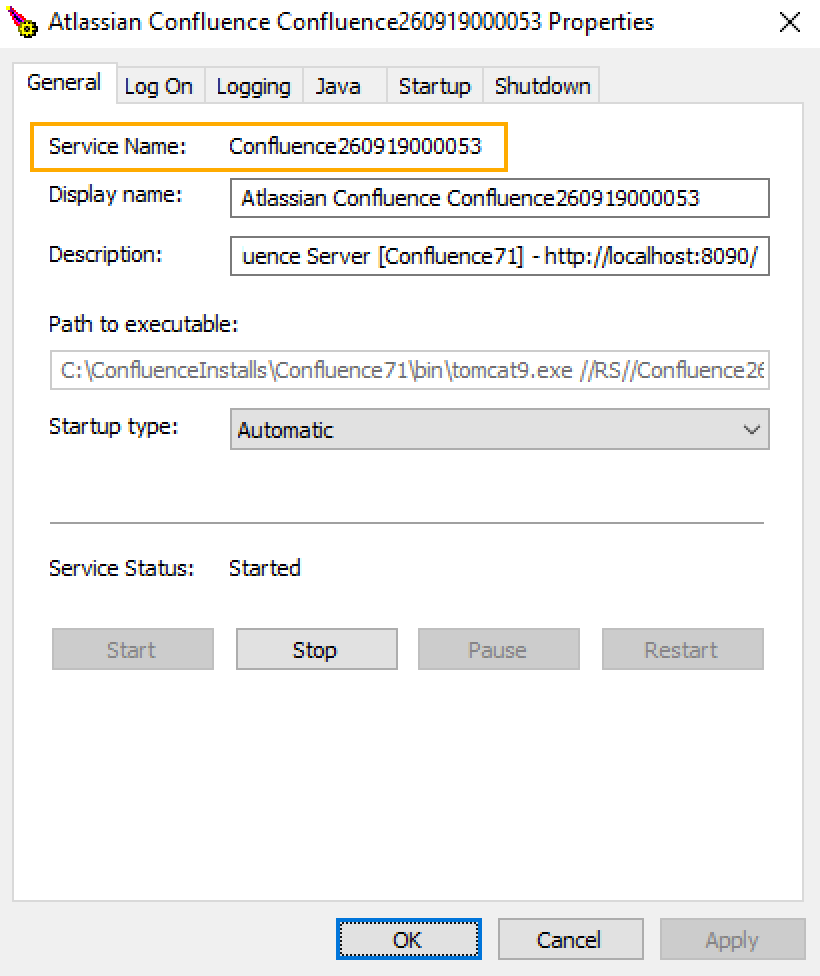
- Identify the name of the service that Confluence is installed as in Windows (Go to Control Panel >Administrative Tools >Services):
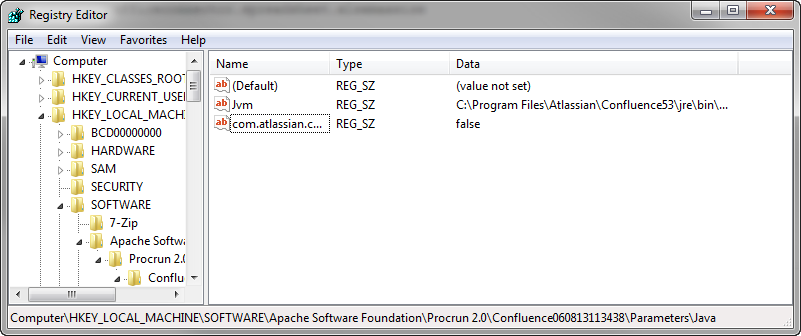
Setting properties for Windows services via the Windows registry
In some versions of Windows, there is no option to add Java variables to the service. In these cases, you must add the properties by viewing the option list in the registry.
- Go to the Registry Editor (Start >regedit.exe).
- Find the Services entry:
64bit : HKEY_LOCAL_MACHINE >> SOFTWARE >> WOW6432Node >> Apache Software Foundation >> Procrun 2.0 >> Confluence service name
32bit: HKEY_LOCAL_MACHINE >> SOFTWARE >> Apache Software Foundation >> Procrun 2.0 >> Confluence service name
Confluence Data Center deployed in AWS
If you’ve used the Quick Start or CloudFormation template to deploy Confluence Data Center in AWS, you will pass system properties via the Cloud Formation Template, and not using the methods described above.
- In the AWS Console, choose Update Stack
- Under Advanced, enter system properties in the Catalina Properties field as follows:
-Xms1024m -Xmx1024m -Dsystemproperty=valueVerifying your settings
To see what Confluence is using, check Viewing System Properties.
Recognized system properties
See Recognized System Properties for the full list of system properties available to your Confluence version.
How to Edit Config Files in Ubuntu

Configuration files contain the information needed to control the operation of a program. Linux users, especially Linux administrators, need to know how to edit configuration files to maintain an Ubuntu server or desktop. Configuration files on Ubuntu are stored in subdirectories of the /etc folder as text files and can be edited with text editors. Some examples of configuration files are /etc/hosts, host.conf, hosts. resolv.conf, /etc/networks, syslog.conf, etc. in Linux-based operating systems.
To make configuration changes, you need to open the file with a text editor and edit it. In this article, I describe several ways to edit configuration files in Ubuntu. The steps described in this guide have been tested on Ubuntu 22.04, but will work on other Ubuntu versions as well.
- Using Gedit Editor
- Using Nano Editor
- Using Vim Editor
- Using Gvim Editor
- Using Emacs Editor
Now let’s take a look at these text editors. By using these editors, you can easily edit files in the terminal .
Using Gedit Editor
Gedit is the default text editor of the Gnome desktop environment. It supports tabs so you can open different files in multiple tabs. It is a simpler and easier text editor as compared to other available text editors.
To edit a config file in the text editor, launch Terminal by pressing Ctrl+Alt+T key combinations. Then type the below command as sudo:
$ sudo gedit /path/to/filename
Replace /path/to/filename with the actual file path of the configuration file that you want to edit. When prompted for a password, enter sudo password.
Example: editing of the /etc/resolv.conf file
![]()
It is like the notepad editor in Windows OS. As soon as the editor window opens, you can start typing or editing without entering in any mode. Once you have done with the editing, press Ctrl+S to save the file.

Using Nano Editor
Nano is the simplest and the most powerful built-in editor in the many Linux distributions. You do not have to learn the Nano editor before using it and also there is no need to remember the commands. They are displayed at the bottom and can be triggered with the Ctrl key. For instance to save a file, press Ctrl+O.
To edit any config file, simply open the Terminal window by pressing the Ctrl+Alt+T key combinations. Navigate to the directory where the file is placed. Then type nano followed by the filename that you want to edit.
Replace /path/to/filename with the actual file path of the configuration file that you want to edit. When prompted for a password, enter sudo password.

Now you can edit and make changes in the config file using nano editor.

Once you have done editing, press Ctrl+O to save and Ctrl+X to exit the Editor.
Using Vim Editor
Vim or Vi editor also comes pre-installed with most Linux distributions. It has no visible prompts or control that can be a little harder for beginners. However, once you learned it, it is a more quick and powerful tool for editing. Using Vim, you can edit and view multiple files in one session.
To open a file in Vim editor, open the Terminal window by pressing the Ctrl+Alt+T key combinations. Then type vi as sudo followed by filename along with the file path like:
Replace /path/to/filename with the actual file path of the configuration file that you want to edit. When prompted for a password, enter sudo password.

Then edit the file using Vim editor. Note that when the editor opens, you enter command mode. Here are the few steps to edit a file in Vim editor:
- To edit the file, Press I from the keyboard to enter into insert mode, here you can do editing just like the normal editor.
- When done with editing, get out of this mode by pressing Esc. It will return you to normal mode.
- To save the file, type :w in command mode
- To quit the editor, type :q in command mode
- To combine the above actions type :wq to save and quit simultaneously.

Using Gvim Editor
Gvim is a Vim editor with a graphical user interface. To install Gvim, launch Terminal by pressing Ctrl+Alt+T. then type the below command in Terminal to start the installation.
$ sudo apt-get install vim-gnome

Once done with the installation, you can open and edit any config file in it. Type the below command with sudo in Terminal to open any config file in Gvim:

Press I to enter in insert mode where you can edit the file.

In Gvim editor, you can do various functions using the toolbar just like any normal GUI application like saving the file, undo, redo, finding a keyword, etc.
Using Emacs Editor
Emacs is also a text editor but it is not a built-in editor. You have to manually install it using the Ubuntu Terminal. It has so many features including a built-in web browser, calculator, calendar, Terminal, etc.
To install Emacs editor, launch Terminal by pressing Ctrl+Alt+T key combinations. Type the below command in Terminal as sudo:

Once done with the installation, you can open and edit any config file in it.
To open a config file using the emacs editor, type emacs followed by filename along with the file path in the below syntax:
$ sudo emacs /path/to/filename
Replace /path/to/filename with the actual file path of the configuration file that you want to edit. When prompted for a password, enter the sudo password.

Edit the file as normal and save it using the toolbar.

You can also open the config file in bash instead of a separate window.
Type the following command as sudo in Terminal:

Edit the file as a normal text file. Then press Ctrl+X and Ctrl+C to save the file. When it prompts for saving the file, press y to save and quit the editor.

So these were some simple editors you can use to easily and safely edit config files in your Ubuntu operating system.
Search
About This Site
Vitux.com aims to become a Linux compendium with lots of unique and up to date tutorials.