- How to set a proxy for terminal?
- 6 Answers 6
- How to Configure Proxy Settings on Ubuntu 20.04
- Setting Up Proxy with Ubuntu Desktop GUI
- Setting up Proxy With Ubuntu Desktop Terminal
- Setting Up Temporary Proxy for a Single User
- Setting Up Permanent Proxy for a Single User
- Setting Up Permanent Proxy for All Users
- Setting Up Proxy for APT
- Как настроить прокси в Ubuntu
- Настройка прокси на Ubuntu через GUI
- Настройка прокси в Ubuntu через терминал
- Выводы
How to set a proxy for terminal?
I am looking to set a proxy for terminal. What I need is I want to send all terminal communications to the internet through a proxy, say tor. I tried to set a system wide proxy set up. But Terminal doesn’t obey the system wide proxy configuration. Is there any other way to do this?
You mean ssh or telnet or . ? Please explain us «terminal communications». You can telnet to some host via proxy or ftp them, but communication from minicom you can not send via net . except like log file .
Is it possible to set a proxy for all network related activities done over the terminal? Instead of setting proxy for wget,curl and others separately. I am looking for such a solution.
Yes, but wget usually work on port 80 or 443, ssh on port 22, telnet on 23, ftp on 20 and 21 . You can use simpleproxy or tinyproxy
How to set this proxy for terminal? Do I explicitly set it for different apps running on terminal or can I set it in terminal such a way that all the commands I run in terminal go through this proxy?
ubuntu terminal needs http proxy, when you use SOCKS5 proxy, like shadowsocks, you can use proxychains to bridge SOCKS5 to http proxy. Check this github.com/shadowsocks/shadowsocks/wiki/…
6 Answers 6
export the below variables in terminal
export http_proxy='http://proxyServerSddress:proxyPort' export https_proxy='https://proxyServerSddress:proxyPort' and use the following commands to disable proxy
unset http_proxy unset https_proxy Terminal is not net application. Maybe is better to say, in your case, terminal is container for net application like ssh , telnet , lftp , wget , lynx .
sudo -H gedit /etc/profile.d/proxy.sh Enter the details in this format.
export http_proxy=http://username:password@proxyhost:port/ export ftp_proxy=http://username:password@proxyhost:port/ export telnet_proxy=http://username:password@proxyhost:port/ This is for when using wget , ftp , lftp , telnet in terminal
ssh has no native SOCKS client support, you need to use a ProxyCommand for that, for instance with socat :
ssh -o ProxyCommand='socat - SOCKS4A:myproxy:%h:%p,socksuser=nobody' user@host Or use things like tsocks to transparently use SOCKS for TCP traffic.
ssh -o ProxyCommand='socat - "SOCKS5:%h:%p|tcp:myproxy:1080"' user@host For HTTP Proxy CONNECT method with socat 2:
ssh -o ProxyCommand='socat - "PROXY:%h:%p|tcp:myproxy:80"' user@host How to Configure Proxy Settings on Ubuntu 20.04
Using a proxy server as an internet access intermediary is a common business scenario. However, personal users can also benefit from increased network security, privacy, and speed provided by proxies.
In this tutorial, you will learn how to set up your Ubuntu 20.04 system to work with a proxy server.
- Ubuntu 18.04 or later
- Access to terminal with sudo privileges
- Proxy info (web or IP address, username, and password)
Note: If you wish to set up one of your machines to act as a proxy, refer to How to Set Up & Install Squid Proxy Server on Ubuntu.
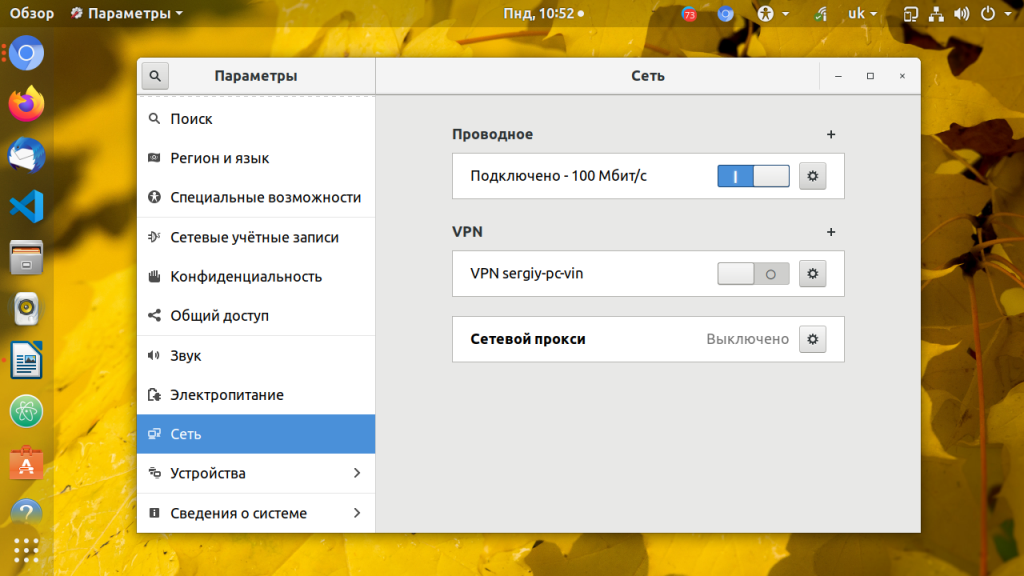
Setting Up Proxy with Ubuntu Desktop GUI
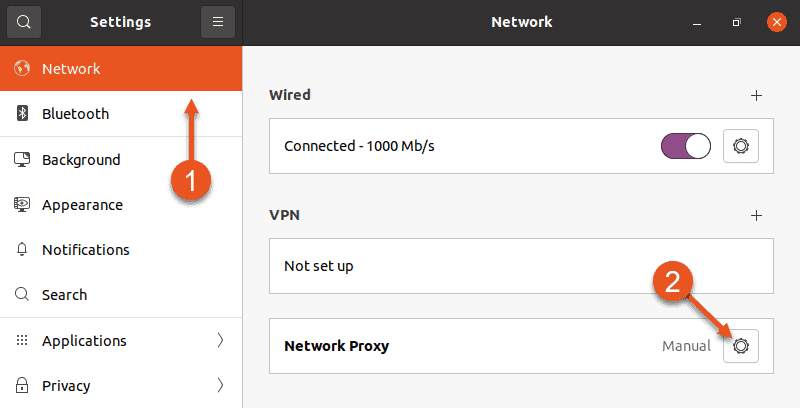
1. To access proxy settings using the Ubuntu GUI, open Ubuntu’s main Settings.
2. Select the Network setting in the menu on the left side of the window.
3. Then, click the cog in the Network Proxy section.
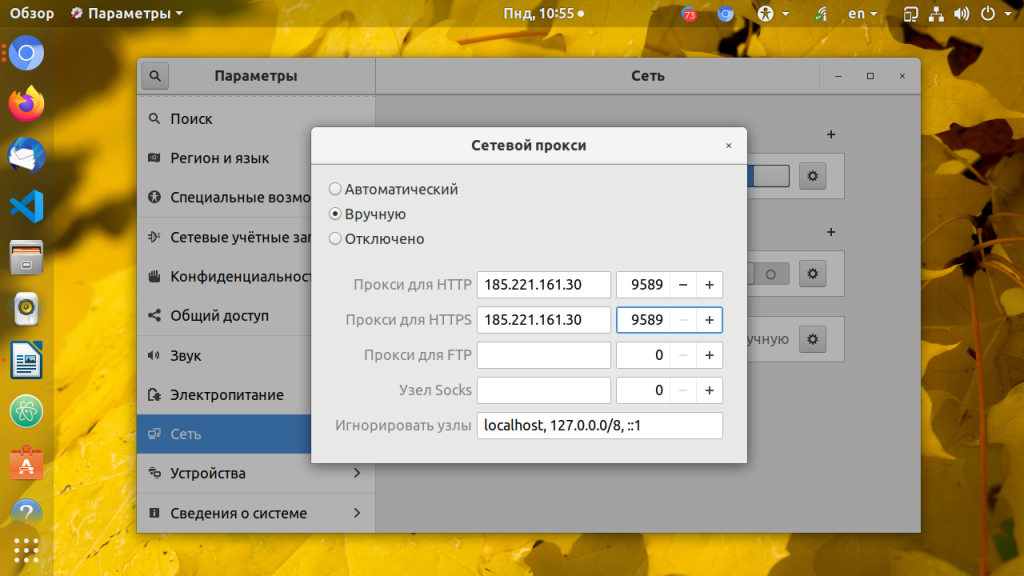
4. A Network Proxy dialogue appears. Choose Manual and enter your proxy info into the fields below.
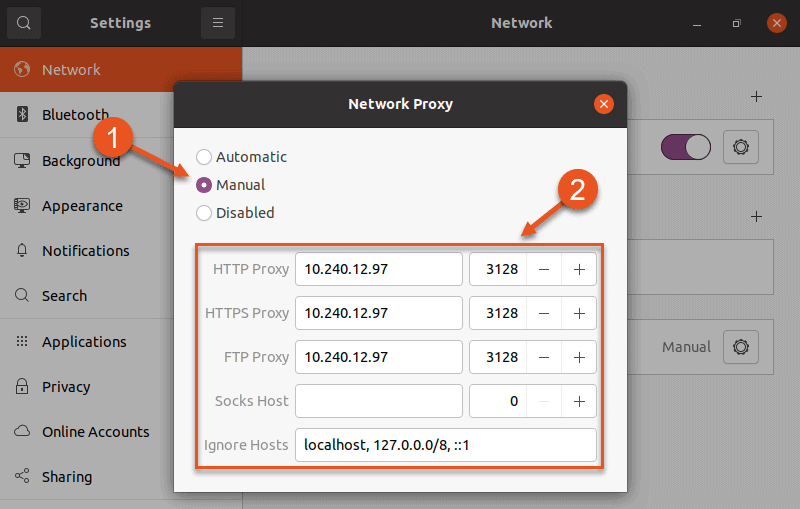
5. Exit the dialogue and Ubuntu will automatically apply the proxy settings.
Setting up Proxy With Ubuntu Desktop Terminal
Use the command line interface for more granular control of proxy settings. This allows you to:
- Make temporary or permanent changes to the configuration.
- Set up proxy for a single user or for all users.
Setting Up Temporary Proxy for a Single User
A temporary proxy connection resets after a system reboot. To establish such a connection for the current user, use the export command.
The syntax for establishing a temporary proxy connection is:
export HTTP_PROXY=[username]:[password]@[proxy-web-or-IP-address]:[port-number] export HTTPS_PROXY=[username]:[password]@[proxy-web-or-IP-address]:[port-number] export FTP_PROXY=[username]:[password]@ [proxy-web-or-IP-address]:[port-number] . export NO_PROXY=localhost,127.0.0.1. 1Provide the proxy address (web or IP), followed by the port number. If the proxy server requires authentication, add your proxy username and password as the initial values.
This is what the set of commands should look like in terminal:

The purpose of the NO_PROXY line is to tell the system that local traffic should ignore the proxy.
Setting Up Permanent Proxy for a Single User
As stated above, proxy settings configured through a terminal window reset after you reboot your system. To make permanent changes for a single user, edit the .bashrc file.
1. Open the file with a text editor of your choice:
2. Now add the following lines at the bottom of the .bashrc file:
export HTTP_PROXY="[username]:[password]@[proxy-web-or-IP-address]:[port-number]" export HTTPS_PROXY="[username]:[password]@[proxy-web-or-IP-address]:[port-number]" export FTP_PROXY="[username]:[password]@ [proxy-web-or-IP-address]:[port-number]" . export NO_PROXY="localhost,127.0.0.1. 1"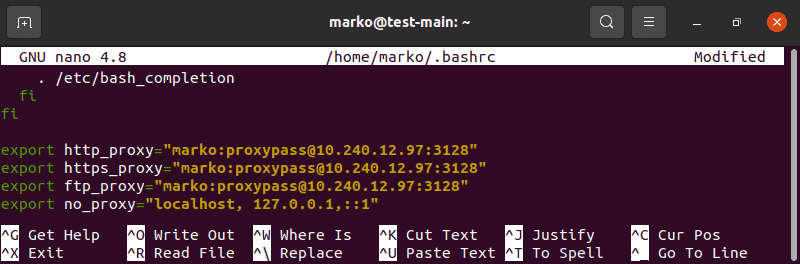
4. Then, run the following command in to apply the new settings to the current session:
Setting Up Permanent Proxy for All Users
To permanently set up proxy access for all users, you have to edit the /etc/environment file.
1. First, open the file in a text editor:
2. Next, update the file with the same information you added to the .bashrc file in the previous scenario:
export HTTP_PROXY="[username]:[password]@[proxy-web-or-IP-address]:[port-number]" export HTTPS_PROXY="[username]:[password]@[proxy-web-or-IP-address]:[port-number]" export FTP_PROXY="[username]:[password]@ [proxy-web-or-IP-address]:[port-number]" . export NO_PROXY="localhost,127.0.0.1. 1"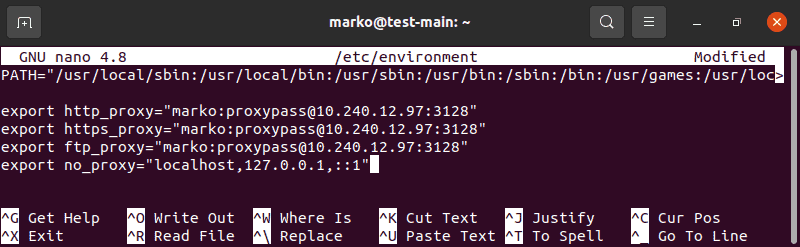
3. Save the file and exit. The changes will be applied the next time you log in.
Setting Up Proxy for APT
On some systems, the apt command-line utility needs a separate proxy configuration, because it does not use system environment variables.
1. To define proxy settings for apt, create or edit (if it already exists) a file named apt.conf in /etc/apt directory:
2. Add the following lines to the file:
Acquire::http::Proxy "http://[username]:[password]@ [proxy-web-or-IP-address]:[port-number]"; Acquire::https::Proxy "http://[username]:[password]@ [proxy-web-or-IP-address]:[port-number]";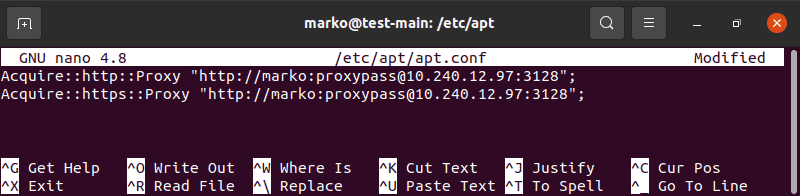
3. Save the file and exit. The configuration will be applied after a reboot.
This tutorial provided instructions on how to set up proxy settings on Ubuntu 20.04. You should now know how to make temporary and permanent changes to your system’s proxy configuration, for a single user or for the entire system.
Как настроить прокси в Ubuntu
С помощью прокси сервера вы можете скрыть свой реальный ip адрес и заставить веб-сайт думать, что вы совсем из другой страны или используете другого провайдера, чем это есть на самом деле. Прокси может использоваться не только для просмотра сайтов интернета, но и для обновления системы, загрузки пакетов через apt и многого другого.
В этой статье мы поговорим о том как выполняется настройка прокси Ubuntu с помощью графического интерфейса или через терминал.
Настройка прокси на Ubuntu через GUI
В Ubuntu можно настроить прокси Ubuntu через стандартное приложение Параметры. Откройте программу, затем перейдите в раздел Сеть и кликните по шестеренке Сетевой прокси:
Здесь надо прописать IP адрес вашего прокси и порт в подходящем поле. Это зависит от типа вашего прокси, например, HTTP/HTTPS или SOCKS:
Если для прокси необходима авторизация, вы можете прописать данные авторизации в поле IP адреса:
логин : пароль @ ip_адрес
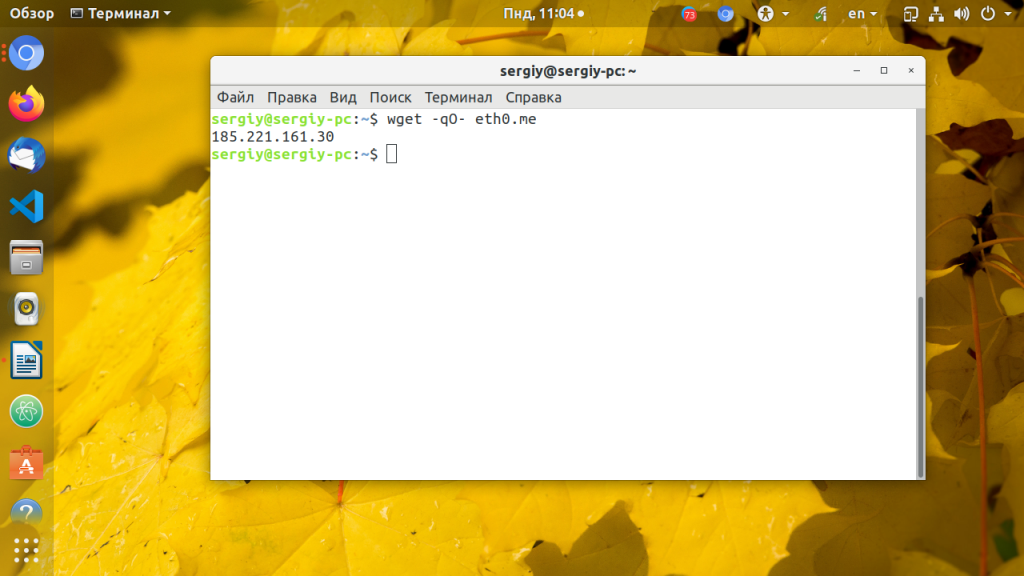
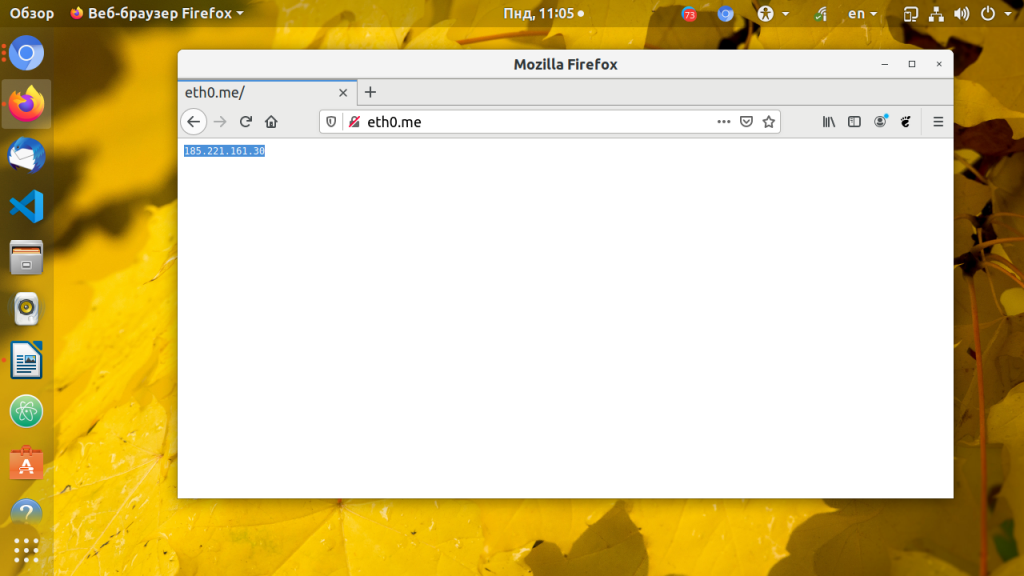
Теперь вы можете проверить работает ли новый прокси по всей системе. Например, через терминал:
Настройка прокси в Ubuntu через терминал
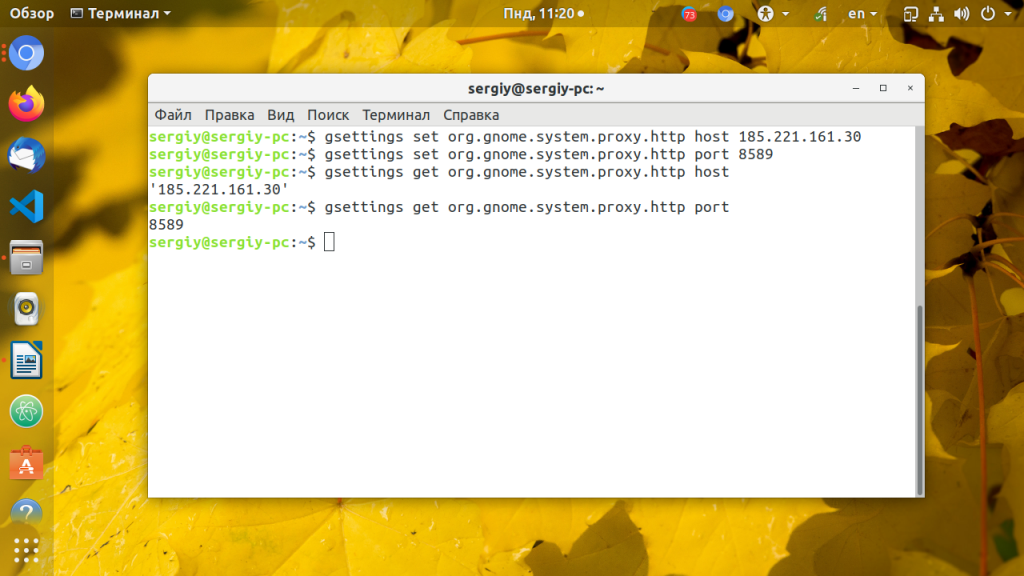
Все настройки среды рабочего стола в Ubuntu хранятся в базе данных DConf, в том числе и настройки прокси сервера. Настройки записываются в виде пар ключ значение. Если изменить какой либо параметр из меню настроек системы все изменения сразу же запишутся в DConf. Из командной строки настройками DConf можно управлять с помощью команд gsettings и dconf. Дальше я покажу как настроить прокси в Ubuntu из терминала с помощью gsettings.
Базовое использование gsettings для работы с базой данных Dconf выглядит следующим образом. Для чтения данных используем:
Рассмотрим подробнее как выполняется настройка прокси через консоль Ubuntu. Выполните следующие команды чтобы установить в качестве прокси сервера my.proxy.com:8000
gsettings set org.gnome.system.proxy.http host ‘my.proxy.com’
gsettings set org.gnome.system.proxy.http port 8000
gsettings set org.gnome.system.proxy mode ‘manual’
Если вы хотите использовать HTTPS/FTP прокси то вам нужно выполнить:
gsettings set org.gnome.system.proxy.https host ‘my.proxy.com’
gsettings set org.gnome.system.proxy.https port 8000
gsettings set org.gnome.system.proxy.ftp host ‘my.proxy.com’
gsettings set org.gnome.system.proxy.ftp port 8000
Для использования SOCKS прокси наберите:
gsettings set org.gnome.system.proxy.socks host ‘my.proxy.com’
gsettings set org.gnome.system.proxy.socks port 8000
Все изменения действуют только для текущего пользователя. Если вы хотите установить прокси для всех пользователей запускайте gsettings от суперпользователя добавив перед командой sudo, например:
sudo gsettings set org.gnome.system.proxy.http host ‘my.proxy.com’
sudo gsettings set org.gnome.system.proxy.http port 8000
sudo gsettings set org.gnome.system.proxy mode ‘manual’
Если вы используете автоматическую настройку прокси можете выполнить следующие команды:
gsettings set org.gnome.system.proxy mode ‘auto’
gsettings set org.gnome.system.proxy autoconfig-url http://my.proxy.com/autoproxy.pac
Для того чтобы удалить прежние настройки прокси и работать напрямую выполните:
gsettings set org.gnome.system.proxy mode ‘none’
Чтобы прописать прокси в Ubuntu с авторизацией, записывайте в поле host логин и пароль в том же формате, который предложен для настройки в графическом интерфейсе.
Утилита apt тоже умеет работать с глобальным прокси, настроенным как описано выше, однако вы можете настроить для неё прокси отдельно через конфигурационный файл /etc/apt/apt.conf. Для этого добавьте в этот одну из строк для активации нужного типа прокси:
Acquire::http::proxy «логин:пароль@ip_адрес:порт/»;
Acquire::https::proxy «логин:пароль@ip_адрес:порт/»;
И непосредственно для активации прокси:
После этого пакетный менеджер apt будет использовать свой отдельный прокси для обновления Ubuntu.
Выводы
В этой небольшой статье мы поговорили о том, как выполняется настройка прокси Ubuntu. Как видите, это совсем не сложно. Если вы хотите зайти с другой стороны и вам нужно настроить прокси сервер, смотрите статью о том как установить squid в Ubuntu.
Обнаружили ошибку в тексте? Сообщите мне об этом. Выделите текст с ошибкой и нажмите Ctrl+Enter.