- How to create virtual block device (loop device/filesystem) in Linux
- Create a file
- Create the loop device
- Create the filesystem
- Mount the loopback filesystem
- Removing loop device
- Enable Encryption on loop filesystem
- Maximum Lopback devices allowed
- Some more articles you might also be interested in …
- How to set up a loop device at boot time?
- 2 Answers 2
- How to Create a Virtual Block or Loop Device in Linux
- How to Create A Loop Device
- 1. Create a File of Desired Size
- 2. Create the Loop Device
- 3. Mount the Loop device
- How to Remove loop device
- Final Words
How to create virtual block device (loop device/filesystem) in Linux
Linux supports a special block device called the loop device, which maps a normal file onto a virtual block device. This allows for the file to be used as a “virtual file system” inside another file. With Linux it’s possible to create a file-system inside a single file. These storage devices are available as device files such as /dev/device_name.
Create a file
1. First step is to create a file of desired size. The following command will create a file that is 1 GB in size:
# dd if=/dev/zero of=loopbackfile.img bs=100M count=10 10+0 records in 10+0 records out 1048576000 bytes (1.0 GB) copied, 1.26748 s, 827 MB/s
2. Verify the size of the file you have just created.
# du -sh loopbackfile.img 1000M loopbackfile.img
Create the loop device
1. Next step is to create a loop device with the file. Use the command “losetup” to create a loop device “loop0”
# losetup -fP loopbackfile.img
Here,
-f – find the first unused loop device. If a file argument is present, use this device. Otherwise, print its name.
-P – force kernel to scan partition table on newly created loop device.
2. To print the loop device generated using the above command use “losetup -a”.
# losetup -a /dev/loop0: [64769]:4199216 (/root/loopbackfile.img)
Create the filesystem
1. Now lets create a ext4 filesystem on the loopback device.
# mkfs.ext4 /root/loopbackfile.img mke2fs 1.42.9 (28-Dec-2013) /root/loopbackfile.img is not a block special device. Proceed anyway? (y,n) y Discarding device blocks: done Filesystem label= OS type: Linux Block size=4096 (log=2) Fragment size=4096 (log=2) Stride=0 blocks, Stripe width=0 blocks 64000 inodes, 256000 blocks 12800 blocks (5.00%) reserved for the super user First data block=0 Maximum filesystem blocks=262144000 8 block groups 32768 blocks per group, 32768 fragments per group 8000 inodes per group Superblock backups stored on blocks: 32768, 98304, 163840, 229376 Allocating group tables: done Writing inode tables: done Creating journal (4096 blocks): done Writing superblocks and filesystem accounting information: done
Mount the loopback filesystem
1. We can now mount the loopback filesystem onto a directory. The “-o loop” additional option is used to mount loopback filesystems.
# mkdir /loopfs # mount -o loop /dev/loop0 /loopfs
2. Verify the size of the new mount point and type of filesystem using below commands.
# df -hP /loopfs/ Filesystem Size Used Avail Use% Mounted on /dev/loop1 969M 2.5M 900M 1% /loopfs
# mount | grep loopfs /dev/loop0 on /loopfs type ext4 (rw,relatime,seclabel,data=ordered)
Removing loop device
If you want remove the new filesystem, use the following steps:
1. Umount and delete the directory /loopfs
umount /loopfs rmdir /loopfs
2. Delete the loopback device “loop0” created using the “losetup -d” command.
3. Finally remove the file “/root/loopbackfile.img” used to create the loop device.
Enable Encryption on loop filesystem
‘losetup’ also allows to enable data encryption in order to get a crypted filesystem. The syntax to created a encrypted loop device si as shown below:
# losetup [ -e encryption ] loop_device file
The following encryption algorithms are accepted:
- NONE use no encryption (default).
- XOR use a simple XOR encryption.
- DES use DES encryption.
DES encryption is only available if the optional DES package has been added to the kernel. DES encryption uses an additional start value that is used to protect passwords against dictionary attacks.
Maximum Lopback devices allowed
You may get an error message ‘no such device’ while creating more than 8 loopback devices. This happens because You are being limited by the amount of loop devices available. Depending on your system, add ‘options loop max_loop=X’ to /etc/modprobe.conf on CentOS/RHEL 5 or create a new file named like disk.conf in directory /etc/modprobe.d on CentOS/RHEL 6. (Where X is number of loop device you need).
Some more articles you might also be interested in …
How to set up a loop device at boot time?
I want to set up a loop device at boot time. I wonder what is the best way to do this. I’ve searched for it on google. Some says adding a udev rule, some says putting a scripts in /etc/init.d , some even modifies the initramfs. So what is the best or right way to do this? Could you please give some details (about how to do)? Thank you.
I would go with /etc/init.d/something , or /etc/rc.local , but I suggest to stay with whatever method that works.
What for? If you want a file to be mounted at boot time, just add it to /etc/fstab with the loop option and mount will take care of configuring the loopback device for you.
@psusi: Thank you for your advice, but for my purpose, mounting is not enough, and in fact the file cannot be simply mounted. It is a disk image rather than a partition image. And I need to know the exact name of the loop device in order to use it to make a virtual disk in VirtualBox. (I make this kind of virtual disk thinking it is easier to share files between virtual machine and the host machine. The built-in shared folder does not work for some application.)
You can just point the virtual machine to the file rather than the loopback device. You also need to be very careful to make sure that you never run the virtual machine ( or have it suspended ) and mount the filesystem on the host at the same time, or you will corrupt the fs. For that reason, it is a much better idea to use networking to have the guest access files the host is sharing via nfs or samba or sshfs.
@Roun: Partitions in the file can still be mounted, though you have to specify the sector offset of the partition from the beginning of the file (e.g. mount /disk.img /mnt -o loop,offset=2048 for the first partition). Offsets can be found using parted or fdisk once the loop device is set up (see my answer below for that).
2 Answers 2
There are at least three «appropriate» ways to do startup things in Ubuntu (presuming you don’t merely want to mount it), listed here in decreasing order of preference:
There’s also to possibility of using udev rules, but it will be convoluted. I recommend against it. The sysvinit script is overkill for such a small thing, so I’ll focus on the other two options. The runlevel change script is simplest (though least preferred), so I’ll start there.
The /etc/rc.local file is simply executed by the /etc/init.d/rc.local sysvinit script, which is (by default) executed last upon switching to any normal «on» runlevel (e.g. when you boot normally, but not when you shut down or go to recovery mode). To implement setting up the boot device, just add this at the end of /etc/rc.local , assuming that your file is called /srv/diskimage and you wish to use /dev/loop0 as the loop device:
losetup /dev/loop0 /srv/diskimage That’s really all there is to it. Of course, replace the filenames with whatever works best on your setup.
If you want to be a bit more specific about it, you can create an Upstart job for it that sets it up once the filesystem holding it has been mounted. An example would be the following, assuming that /srv was the mount point containing your diskimage file:
description "Setup loop devices after filesystems are mounted" start on mounted MOUNTPOINT=/srv task exec losetup /dev/loop0 /srv/diskimage This should be simple enough to follow conceptually: The first line is just a comment for human readers, and it’s instructions to Upstart to wait until the /srv filesystem is mounted, execute the losetup process, and consider yourself finished when the process exits successfully (a «task», as opposed to a service that is persistent). Just put those contents in a file matching /etc/init/*.conf . I would choose /etc/init/losetup.conf , myself.
The advantages of Upstart jobs over /etc/rc.local for such a simple thing are small but important. First, /etc/rc.local is deprecated, and its use as just a «messy sandbox to get things done» is frowned upon by pretty much everyone these days. Among other reasons for frowning upon its use, some programs that do use that file will simply overwrite the contents, and it’s difficult to reconcile different scripts that need to go into the same file. Second, Upstart actually handles the dependency checking for you (making sure the filesystem is mounted first), so if there’s a problem mounting the filesystem it won’t try to set up the loop device. but will once you’ve resolved and mounted it. Third, Upstart is vastly more flexible: you can, for instance, have it be smart enough to find an unused loop device, and «emit» that loop device for use in other upstart jobs, similar to how we used the «MOUNTPOINT» variable in this example above.
How to Create a Virtual Block or Loop Device in Linux
Loop device is getting popular in Linux, specially for isolation. Here’s a quick guide on creating loop devices on Linux.
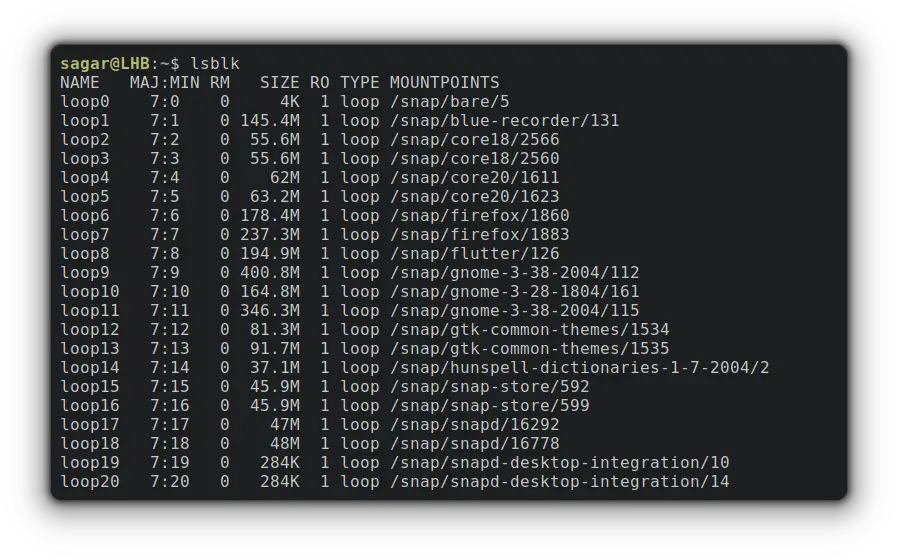
Linux users can have a virtual block device called a «loop device» that maps a normal file to a virtual block, making it ideal for tasks related to isolating processes.
And the best example for utilizing loop devices is snap packages, a sandboxed software solution containing every necessary dependency and mounted as a loop devices:
And if you’re interested in creating your own virtual block device, here’s a simple guide.
How to Create A Loop Device
For ease of understanding, I’ve decided the entire process in the form of simple steps so it can be easier to grasp.
And if you’re interested in learning more about loop device in Linux and its use, I’ll recommend the other guide of ours that covers the basics:
1. Create a File of Desired Size
In the first step, you’re required to create a file as per your needs. For this example, I’ll be creating a file of 3 Giga bytes:
dd if=/dev/zero of=VirtBlock.img bs=100M count=30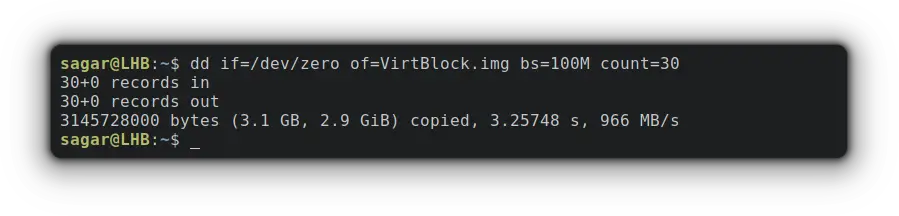
- if=/dev/zero will create a block of 0s to hold data.
- of=VirtBlock.img is where you’ll specify the name. I went with VirtBlock.img.
- bs=100M will set the size of a single block.
- count=30 will create copies of single blocks for given times. Meaning 100Mb * 30 times is about 3 GB in size.
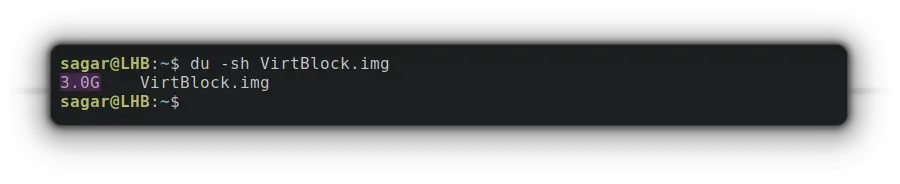
Now, let’s verify the size of the recently created block by the given command:
2. Create the Loop Device
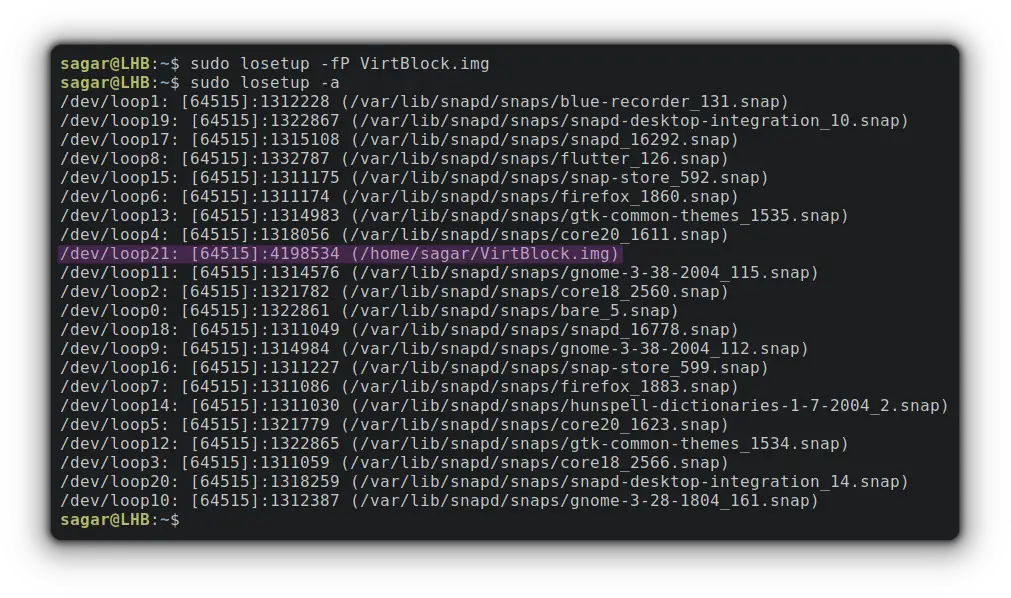
In this step, I’ll be utilizing the losetup utility to create a loop device mapping at a recently created file.
sudo losetup -fP VirtBlock.img- -f (find) will find us unused loop devices and save us from errors like «losetup: TO_BLOCK: failed to set up loop device: Device or resource busy”.
- -P will force the kernel to scan the partition table on the newly created loop device.
Now, its time for us to print all the loop devices using the -a option with losetup as given:
But your block needs to have a file system to create, store and configure files to that block and I’ll be going with ext4:
sudo mkfs.ext4 /home/sagar/VirtBlock.img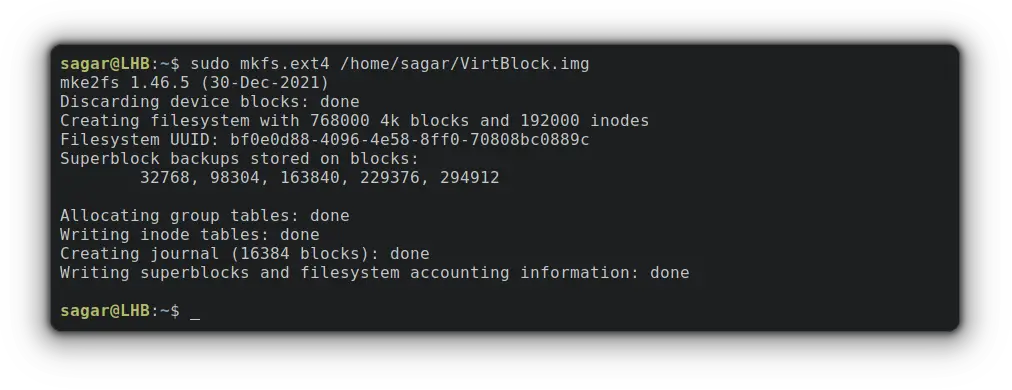
Make sure to use the exact path or it will throw an error. Use the reference from sudo losetup -a command.
3. Mount the Loop device
To mount created loop device, the first step should be creating a mounting directory which can be done through the given command:
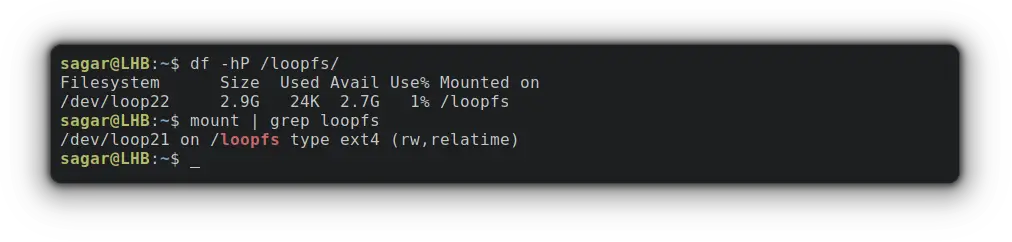
To mount the loop device (mine is loop21), I’ll be using the -o loop option as given:
sudo mount -o loop /dev/loop21 /loopfsNow, you can verify the mounting point and size of the recently mounted loop device:
To verify the file system, you can go with the given command:
How to Remove loop device
Removing a piece of software is always easy than installation/configuration and that’s the same case here!
First, you’ll have to unmount and remove the mounting directory:
sudo umount /loopfs sudo rmdir /loopfsNow, you’ll have to detach the loop device (mine is loop21) which was created by «losetup -d» command:
Finally, you have to remove the file (VirtBlock.img) by the given command:
sudo rm /home/sagar/VirtBlock.imgFinal Words
Using a loop device for isolation is a handy Linux feature.
This guide went through the configuration and removal process in an easy manner. If you encounter any issues, leave a comment and I’ll try to help you out.