- How To: Connect your Raspberry Pi to WiFi
- Connecting to your Raspberry Pi
- Getting your network information
- Configuring your WiFi network
- How to Setup Wifi on Raspberry Pi
- How to setup Wifi on Raspberry Pi
- 1: Setting Wifi on Raspberry Pi’s Terminal
- 2: Enabling Wifi through bootable SD card
- Conclusion
- About the author
- Awais Khan
- Raspberry Pi WiFi Setup: Here are 5 Methods for Raspbian
- Raspberry Pi WiFi Setup in Headless Mode
- Method 1: Using wpa_supplicant File
- Set up WiFi on Raspbian Desktop
- Method 2: Configure WiFi using Welcome Wizard
- Method 3: Connecting from the Taskbar
- Set up WiFi on Raspbian Lite
- Method 4: Using raspi-config Tool
- Method 5: Manual Configuration
- Final Words
- About the Author: Vishnu Mohan
How To: Connect your Raspberry Pi to WiFi
This is an updated guide showing you how to connect your Raspberry Pi to your home WiFi network in cases where you do not have a graphical user interface for your Raspberry Pi.
For this guide you need a Raspberry Pi – and unless you’re using the Raspberry Pi 3 – an external USB WiFi Dongle like this one.
Connecting to your Raspberry Pi
First step is connecting to your Raspberry Pi in order to get to a terminal. You can do this by connecting your Raspberry Pi to a monitor and keyboard – or connecting via Ethernet like described in this guide.
Login to the Raspberry Pi with the default Raspberry Pi credentials:
Username: pi Password: raspberry
Getting your network information
For the purpose of this guide we will be connecting to a WiFi network with the following information:
Every time you see this network name and password in the guide you need to change them to the network name and password of your local network.
If you need to find the network name of your local network you can run the following command in the Raspberry terminal:
This will list all the networks in your vicinity along with some useful information for each network. To find your network name look for something that look like: ESSID:”Test Wifi Network”.
Configuring your WiFi network
To tell the Raspberry Pi to automatically connect to your WiFi network you need to edit a file called: wpa_supplicant.conf.
To open the file in nano type the following command:
sudo nano /etc/wpa_supplicant/wpa_supplicant.conf
Scroll to the end of the file and add the following to the file to configure your network:
Remember to replace this with your own network name and password.
Save and close the file by pressing Ctrl+X followed by Y. At this point the Raspberry Pi should automatically connect to your network.
You can check your network connection by running the following command:
If the output looks something like this (with an inet addr) you are connected:
wlan0 Link encap:Ethernet HWaddr 74:da:38:2b:1c:3d
inet addr:192.168.1.216
Bcast:192.168.1.255 Mask:255.255.255.0 inet6 addr: fe80::8727:5526:a190:b339/64 Scope:Link UP BROADCAST RUNNING MULTICAST MTU:1500 Metric:1 RX packets:6917 errors:0 dropped:229 overruns:0 frame:0 TX packets:2931 errors:0 dropped:1 overruns:0 carrier:0 collisions:0 txqueuelen:1000 RX bytes:10001000 (9.5 MiB) TX bytes:295067 (288.1 KiB)
Sometimes the Raspberry Pi will not connect automatically and require a reboot to connect.
If it doesn’t connect after waiting 2-3 minutes try to reboot the pi using the following command:
How to Setup Wifi on Raspberry Pi
![]()
Setting up your WiFi connection on your Raspberry Pi device is one of the first things you should do in order to start using the internet on Raspberry Pi. The Raspberry Pi device includes built-in wireless support, but you won’t be able to use it until you configure it. WiFi configuration on the Raspberry Pi device is extremely simple, and you will have no trouble configuring it in a matter of seconds. This article is to guide you how to set up a WiFi connection on your Raspberry Pi device in the simplest way possible.
How to setup Wifi on Raspberry Pi
Here, you will find two easiest methods to setup Wifi on Raspberry Pi and you can choose any which you think is best for you.
1: Setting Wifi on Raspberry Pi’s Terminal
The easiest solution to setup Wifi on Raspberry Pi is by using the command “raspi-config” on the terminal of your Raspberry Pi device. You will have to enter the command which is mentioned below in the terminal of your Raspberry Pi device to initiate the setup process of Wifi.

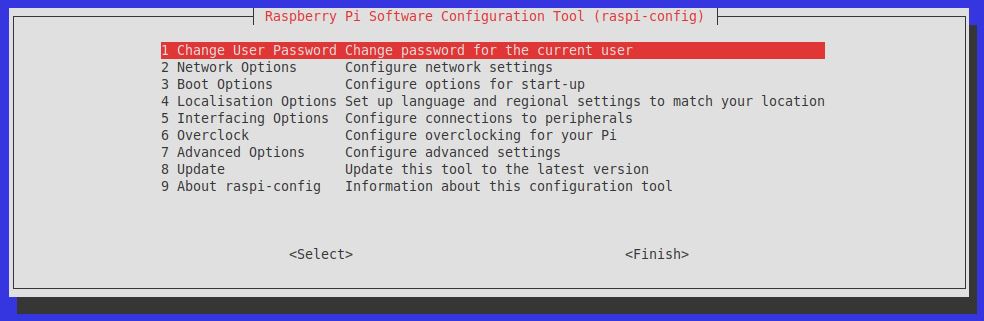
As soon as you press Enter, you will see configuration settings appear on your screen as shown in the below image.
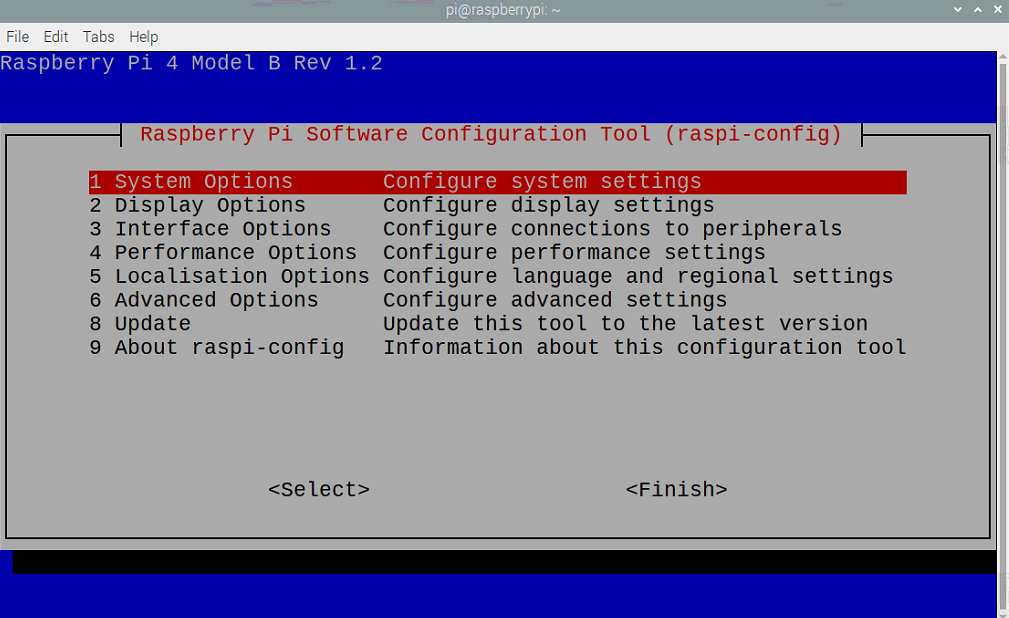
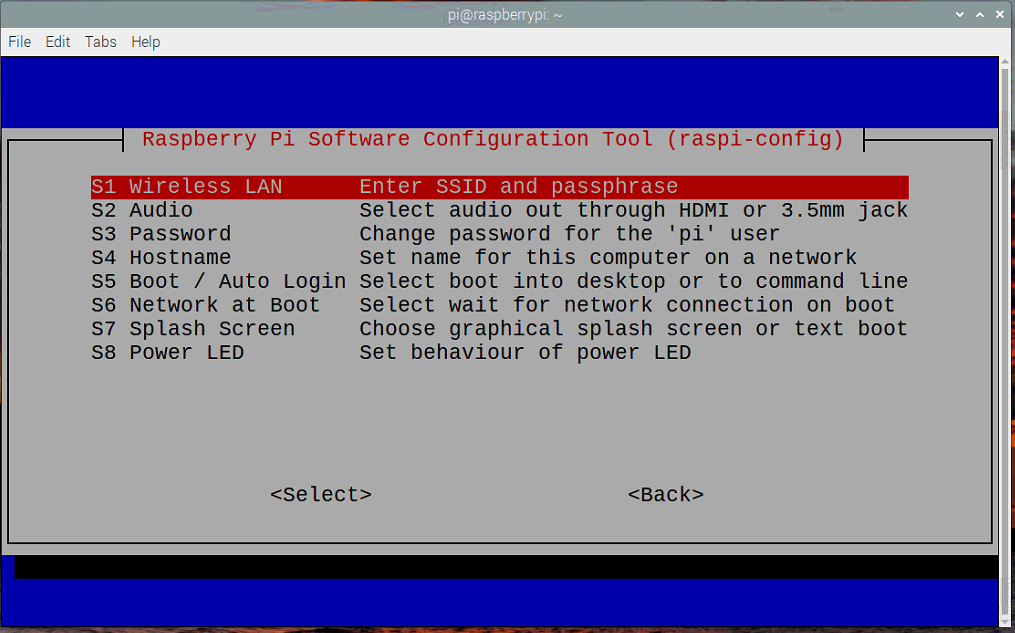
Now, on the above screen, you are seeing 9 options on your Raspberry Pi device configuration mode but you will find the “Wireless LAN” option by pressing the Enter button on the “System Options” first. There you will be able to see the LAN option at the top of the list as shown in the image below.
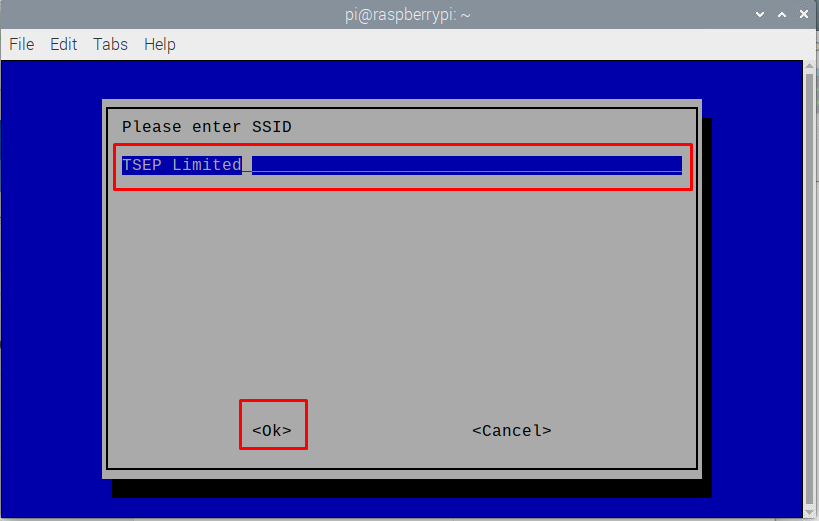
By clicking on the “Wireless LAN” option, you will need to enter your “WiFi name in the option “Please enter SSID”. In our case, it’s “TSEP Limited”. Write the name and then press enter after confirming the option below with “OK”.
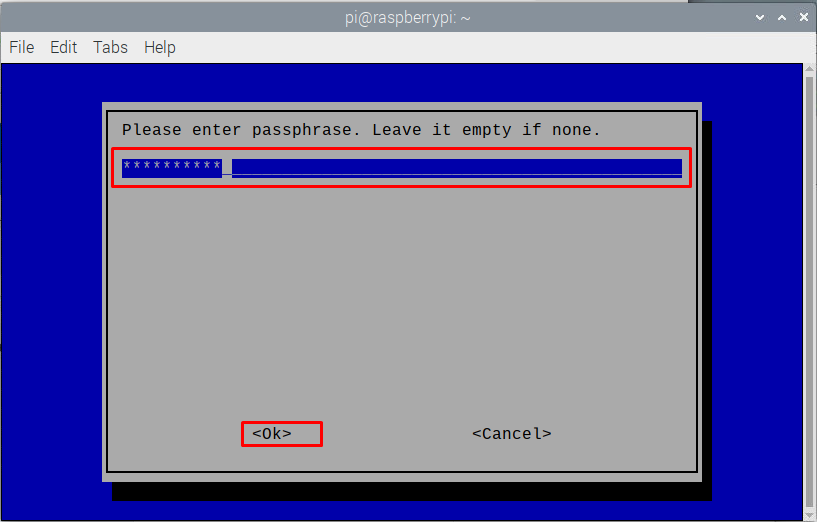
Now that you have entered your “Wifi” name, you will need to enter its password as well.
After successful completion, you will see your Raspberry Pi device connected to Wifi.
2: Enabling Wifi through bootable SD card
When you install the fresh version of your Raspberry Pi on your SD card, you can configure your Wifi by creating a file in your SD card. To complete this step, insert your SD card into the card reader before inserting it into the PC or laptop. Next, create a text file on the SD card named “wpa_supplicant.conf” , paste the text below into it, and save the file.
country =country name ( like UK, PK )
ctrl_interface = DIR = / var / run / wpa_supplicant GROUP =netdev
Replace the “Your-Wifi-Name” with the name of the Wifi you are trying to connect and write the password replacing “Wifi-Password”. Now remove your SD card, and then plug the card into the Raspberry Pi device. When you boot your Raspberry Pi device, you will find your Wifi already connected.
You can also set up the Wifi through the terminal as well by typing the following command.
When you press enter, a configuration file will open, which you can edit by entering your Wifi name and password. After you’ve added them, press “Ctrl+X” to save the settings and then enter to return to the terminal window. This will successfully connect your Wifi and allow you to browse the internet.
Conclusion
If you forget to set up your Wifi after installing a fresh Raspberry Pi OS on your device, don’t panic because you now have enough knowledge on how to set up Wifi on Raspberry Pi after the installation and you won’t have any trouble doing so. This article mentioned two methods to setup Wifi on Raspberry Pi 4, one is through Raspberry Pi configuration settings in the terminal and second is through modifying the “wpa_supplicant.conf” file.
About the author
Awais Khan
I’m an Engineer and an academic researcher by profession. My interest for Raspberry Pi, embedded systems and blogging has brought me here to share my knowledge with others.
Raspberry Pi WiFi Setup: Here are 5 Methods for Raspbian

Setting up a proper WiFi connection on Raspberry Pi is somewhat tricky for beginners. They often face some issues while trying to connect Raspberry Pi to WiFi. One of the main questions I’m receiving from the newbies is Raspberry Pi is not connecting to WiFi, what should I do?
And some others are asking to give a proper Raspberry Pi WiFi setup that they can follow easily. Since I’m getting questions like this regularly, I decided to write a detailed guide to set up a WiFi connection on the Raspberry Pi.
Here I’m gonna hold your hands and walk you through 5 different ways by which you can set up a WiFi connection on Raspberry Pi OS or Raspbian. Note that this is not for any specific Raspberry Pi models (but for Raspbian only) so this will work on all models that support WiFi connectivity.
Raspberry Pi WiFi Setup in Headless Mode
Method 1: Using wpa_supplicant File
Here we going headless mode means we are not gonna use or need a monitor/ display connected to your Pi. This method is applicable if you have just flashed your SD card and want to connect it with WiFi in its first boot. However, it also works with an older sd card that you used on any other wireless network.
All you need to do here is to create a raspberry pi wifi setup wpa_supplicant file and copy it to your SD card. Nothing else. This file will hold the WiFi credentials and tell the Pi to connect automatically at the next booting.
- First, you need to open a text editor (like Notepad) on your computer and copy the following code into it.
country=IN ctrl_interface=DIR=/var/run/wpa_supplicant GROUP=netdev update_config=1 network=
- Now replace YOURSSID and YOURPASSWORD with your WiFi network name and password respectively. The SSID is nothing but Service Set IDentifier and is your network’s name. Also, change the country code if needed.
- Save the file with the name: wpa_supplicant.conf (the file name should be exactly like this).
- Insert your SD card into your computer and copy the wpa_supplicant.conf file into the boot partition.
In case if you want to enable SSH automatically, then you need to create and copy another file named ssh into the same boot partition. You don’t actually need any content in that file. Just create an empty file and you’re done.
Set up WiFi on Raspbian Desktop
Method 2: Configure WiFi using Welcome Wizard
For this method of WiFi configuration on your Pi, we need a desktop connection so that we can directly set it up from the welcome wizard.
If this is your first boot after flashing the SD card, then you will surely come across a welcome wizard with a message like “Welcome to Raspberry Pi”. Subsequently, it will ask for setting up your system.
After booting, once you choose your language and country, you will be taken to a window like this:
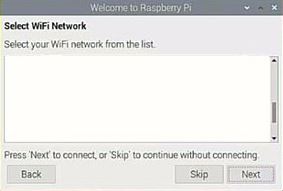
Here select your WiFi network name (SSID) from the list and enter the password. That’s all. Wait for a few moments and you’ll be connected to the network.
Method 3: Connecting from the Taskbar
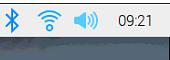
Just in case you missed the welcome wizard or this is not your first boot, you can configure and connect at any time from the taskbar. For this:
- Click on the network symbol at the top of the main panel near the clock.
- You will now see a list of WiFi networks available.
- Choose your preferred network, enter the password.
Set up WiFi on Raspbian Lite
If you are running on the Raspbian Lite version, then you may need some additional help you find out and configure the WiFi properly. On Raspbian Lite, there are 2 methods by which you can do the same. Let’s check it out.
Method 4: Using raspi-config Tool
The raspi-config is a great tool available on Raspbian by default. This will help you configure your wireless network with ease.
- Navigate to the Network Options > Wi-Fi
- Then type your SSID and password.
- Exit the tool.
Your Pi will now connect to the WiFi network and you can proceed with that.
Method 5: Manual Configuration
This method is a bit difficult but may be useful for connecting to big networks that need secure authentication or other complexities.
For manual configuration, the first part is the same as we did in method 1 that is editing the wpa_supplicant.conf file with your desired configuration. The file will be available at /etc/wpa_supplicant/ and you can edit it using the Nano editor. For this, you can use this command:
sudo nano /etc/wpa_supplicant/wpa_supplicant.confThis will open the file and you can see the same content as we have seen in method 1. That’s actually a basic configuration.
If you are interested, you can refer to some more examples here to adapt the configurations to your network for security options like WEP, EAP, etc.
Now, when coming to the network configuration, if you wish to set a static IP on your network, the configuration can be performed in dhcpcd.conf file. Type this command to open the file:
Now scroll down and find the “Example static IP configuration” line and uncomment every line of code that you need. This may include routers, DNS, IP address, etc. Modify the values and save them.
To reflect the changes, just reboot your Pi using the below command.
Final Words
Hopefully, by now you have familiarised all the 5 methods that can be used for Raspberry Pi WiFi setup. Now you can try this yourself and configure your WiFi according to your needs.
Wherever possible, try to use the desktop methods which will be the easiest ones for beginners. For advanced users, they can use any of the methods at any time. But before proceeding with complicated experimentation or modification, consider creating a backup of your sd card. This will be useful at times when you mess up with something.
If you have any comments, drop them in the comment section below.
Found an issue with this article? Report it here, so that I can resolve it.
About the Author: Vishnu Mohan
Vishnu Mohan is an ardent hobbyist of Raspberry Pi projects, who hails from God’s Own Country. He is kind of a minimalist person who believes in keeping things simple & elegant in life. Apart from the techy things, he is passionate about music and cricket. In his free time, he likes to read books and spend quality time with his family and friends.