Set Ubuntu Server to Connect to a Wi-Fi
As we know, this is the era of the Internet. Wherever we go, whatever we do, we are somehow connected to the internet sector. Every device we use for social media, software, and operating systems may need the internet. Every Operating system needs the internet to download files, install and configure updates, etc. Similar to many operating systems, Ubuntu needs a Wi-Fi network, as well. Inside this article, you’ll discover how to use the GUI and console in Ubuntu to join a Wi-Fi network. This seems helpful if you’re running Ubuntu on a server and do not have any connection to a conventional computer. Now, let’s start.
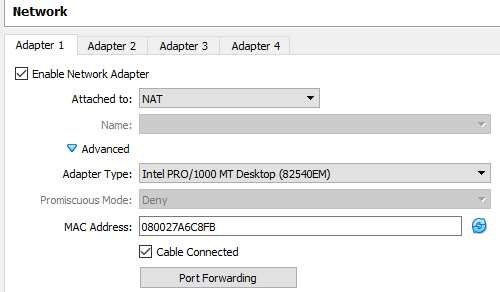
First, we need to check and do some configuration settings for the Ubuntu 20.04 system. We will start from the Oracle Virtual Box interface. So, we have opened the Oracle Virtual Box in our system. Within the Virtual Box, you have to open the Ubuntu Server settings by clicking on the “Settings” icon on the right side. The following window will pop up. Tap on the “Network” option at the left panel of this screen. Tap on the “Adapter1” option on the right pane. Tick the “Enable Network Adapter” option, as shown. Select the “NAT” option from the drop-down list revealed on the screen. Select the Adapter type from the drop-down list and check to mark the Cable Connected option. Apply the changes by tapping on the “OK” button. Now, the network configurations have been applied:
Next, to connect the required Wi-Fi network with your Ubuntu 20.04 system, you need to log in from the Ubuntu system after starting it. After the successful login, you will see an icon of a little triangle at the top right-corner side of your Ubuntu 20.04 desktop. Tap on that sign, and the following dialogue will appear. You have to tap on the Wired Off option to explore it:
Upon expanding the “Wired Off” option, we have two options: Connect and Wired Settings. Tap on the Connect option to connect your Ubuntu 20.04 system with the wired connection or Wi-Fi connection you currently have. You can also check the settings of connection by using the “Wired Settings” option:
Within the Wired Settings, we have chosen the “Network” option. You will see the following screen on your end. You can see that the Wired Connection is 1000 MB per second and is connected to the Ubuntu 20.04 system. You can also see that the VPN is not set, and the network proxy settings are off now. You can change anything you want:
Connect to Wi-Fi by Command Line:
The very first step to link your Ubuntu 20.04 system with a Wi-Fi network on your end is to list all the wireless network connections that are found on the network. So, you need to open the shell console of the Ubuntu 20.04 system using the popular shortcut key, “Ctrl+Alt+T”, on the Linux desktop. After the Linux shell is launched, you need the configuration command to show the configured wireless extensions on your Ubuntu system.
You will see a list of available wireless extensions. The output of the iwconfig command shows that there are no wireless extensions found so far in our system. Your case can be different. You may find an interface like “wlp2s0” in your output having some wireless connection. This interface doesn’t need to have already been connected to Wi-Fi or not. If not, you have to connect it. Another command to find the wireless network interfaces of your system is provided below:
Now, we need to check the network configuration files from the netplan directory of our system. So, you have to use the list command to list out all the configuration files stored in the “netplan” folder. The command for this purpose has been shown in the attached photo. The output shows that the netplan directory contains a single configuration file for the networks.
Now, we need to check and edit this listed configuration file above for a wireless Wi-Fi connection we have found in the above examples, i.e., “wlp2s0”. To do so, we will be using the “sudoedit” command with the path to the file “01-network-manager-all.yaml”. This “sudoedit” command has been used to open the file without any restriction according to the sudo rights of editing. After editing, when you close the file, it will show you the status of the file, i.e., changed for editing happened or unchanged for no editing done on the file.
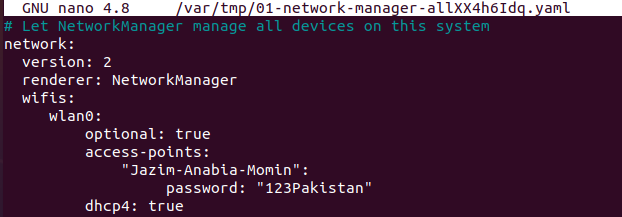
Now, the file is opened in the editor. We have to add the following lines in the file. You can see the name “Jazim-Anabia-Momin” is the SSID name of our network. You can use yours. Then, we have added the password to this Wi-Fi connection. Next, save the editing with Ctrl+S.
Now, return to the terminal using the “Ctrl+X” shortcut in the sudo editor. Applying the edited configuration for network interfaces on our Ubuntu 20.04 system. We need to use the netplan command with the keyword “apply” as per the displayed image below:
After the previous command, if you are still facing some exceptions, then you have to use the debug command shown in the following image with the “apply” keyword. You will see the following debugging command output.
By using the IP instruction, as shown in the image, you should be allowed to see the Wi-Fi adapter linked to the Wi-Fi network if everything worked well.
Conclusion:
Finally, we can say that this article has a bundle of methods to connect the Ubuntu server to a Wi-Fi connection in your circle. We have discussed the GUI method to connect the Ubuntu server to the Wi-Fi connection by changing its configuration settings and editing its network Wi-Fi settings. Plus, we have discussed some commands to connect the Ubuntu server with a Wi-Fi connection. We hope you found this article useful. Check other Linux Hint articles for more tips and information.
About the author
Omar Farooq
Hello Readers, I am Omar and I have been writing technical articles from last decade. You can check out my writing pieces.
Configure WiFi Connections
This section explains how to establish a WiFi connection. It covers creating and modifying connections as well as directly connecting.
Establish a Wireless Connection
This section will show how to establish a wifi connection to the wireless network. Note that directly connecting will implicitly create a connection (that can be seen with “nmcli c”). The naming of such will follow “SSID N” pattern, where N is a number.
First, determine the name of the WiFi interface:
$ nmcli d DEVICE TYPE STATE CONNECTION . wlan0 wifi disconnected -- Make sure the WiFi radio is on (which is its default state):
Then, list the available WiFi networks:
$ nmcli d wifi list * SSID MODE CHAN RATE SIGNAL BARS SECURITY . my_wifi Infra 5 54 Mbit/s 89 ▂▄▆█ WPA2 As an example, to connect to the access point ‘my_wifi’, you would use the following command:
$ nmcli d wifi connect my_wifi password
is the password for the connection which needs to have 8-63 characters or 64 hexadecimal characters to specify a full 256-bit key.
Connect to a Hidden Network
A hidden network is a normal wireless network that simply does not broadcast it’s SSID unless solicited. This means that its name cannot be searched and must be known from some other source.
Issue the following command to create a connection associated with a hidden network :
$ nmcli c add type wifi con-name ifname wlan0 ssid $ nmcli c modify wifi-sec.key-mgmt wpa-psk wifi-sec.psk
Now you can establish a connection by typing:
is an arbitrary name given to the connection and is the password to the network. It needs to have between 8-63 characters or 64 hexadecimal characters in order to specify a full 256-bit key.
Further Information
You will find further information and more detailed examples on following pages:


