- Общий доступ к рабочему столу
- Безопасность
- Подключение
- Клиенты
- Share your desktop
- Security
- Connecting
- Clients
- Stop sharing your desktop
- Advanced Topics
- More Information
- How to enable Screen Sharing on Ubuntu 20.04 LTS
- Installing VNC Server on Ubuntu 20.04 LTS:
- Enable Screen Sharing on Ubuntu 20.04 LTS:
- Finding the IP Address of Your Computer:
- Accessing Your Computer Remotely with Vinagre:
- Accessing Your Computer Remotely with VNC Viewer:
- Conclusion:
- About the author
- Shahriar Shovon
Общий доступ к рабочему столу
Можно разрешить другим пользователям наблюдать за вашим рабочим столом и управлять им с другого компьютера с помощью приложения для просмотра рабочего стола. Настройте Удалённый рабочий стол , чтобы разрешить доступ к своему рабочему столу и настроить параметры безопасности.
Чтобы параметр Удалённый рабочий стол GNOME стал видимым, в системе должен быть установлен пакет Удалённый рабочий стол .
- Откройте Обзор и начинайте вводить: Общий доступ .
- Нажмите Общий доступ , чтобы открыть этот раздел настроек.
- Если переключатель в правом верхнем углу окна Общий доступ выключен, щёлкните по нему, чтобы включить.
Если в текстовом поле рядом с меткой Имя устройства предусмотрено редактирование, то вы можете изменить сетевое имя своего компьютера.
Безопасность
В разделе Аутентификация будут показаны регистрационные данные необходимые для использования в клиентском программном обеспечении на устройстве, с которым устанавливается соединение.
Используйте предложенное значение или введите своё собственное.
Используйте предложенное значение или введите своё собственное.
Нажмите кнопку, расположенную рядом с каждой записью, если хотите поместить содержание записи в буфер обмена.
Нажмите кнопку Проверить шифрование , чтобы посмотреть отпечаток шифрования. Сравните его со значением, показанном клиентом при подключении: они должны совпадать.
Подключение
В разделе Как подключиться показаны Имя устройства и Адрес удаленного рабочего стола , которыми можно воспользоваться для установки соединения с компьютером. Нажмите кнопку рядом с каждым пунктом, если хотите поместить его содержимое в буфер обмена. Установить соединение также можно с помощью вашего IP-адреса .
Когда другой компьютер успешно подключится к вашему рабочему столу, вы увидите значок Общий доступ к экрану в области состояния системы.
Клиенты
Чтобы подключиться к рабочему столу с другого компьютера, вы можете воспользоваться нижеприведенными клиентскими программами.
- Remmina — это GTK-клиент, доступный в формате пакета в большинстве дистрибутивов, а также в виде flatpak . Используйте настройки установленные по умолчанию, в частности, для параметра Глубина цвета в настройках профиля подключения установите значение «Автоматически».
- xfreerdp — это клиент с управлением из командной строки, доступный в формате пакета в большинстве дистрибутивов. Следует передать клиенту параметр /network:auto в командной строке.
- Thincast — это клиент с закрытым исходным кодом. Версия для Linux доступна в виде flatpak . Рекомендуется использовать настройки по умолчанию.
Share your desktop
You can let other people view and control your desktop from another computer with a desktop viewing application. Configure Remote Desktop to allow others to access your desktop and set the security preferences.
You must have the GNOME Remote Desktop package installed for Remote Desktop to be visible.
- Open the Activities overview and start typing Sharing .
- Click on Sharing to open the panel.
- If the Sharing switch in the top-right of the window is set to off, click to switch it on.
If the text below Device Name allows you to edit it, you can change the name your computer displays on the network.
Security
The Authentication section displays the login credentials to be used in the client software on the connecting device.
Use the suggested value or enter your own.
Use the suggested value or enter your own.
Click the button next to each entry if you want to place it in the clipboard.
Click the Verify Encryption button to display the encryption fingerprint. Compare it with the value displayed by the client when connecting: they should be identical.
Connecting
The How to Connect section displays the Device Name and Remote Desktop Address that can be used on the connecting computer. Click the button next to each entry if you want to place it in the clipboard. A connection can also be made using your IP address .
When the other computer is successfully connected to your desktop, you will see the Screen is being shared icon, in your system status area.
Clients
To connect to your desktop from another computer, the following clients are known to work.
- Remmina , a GTK client, is available as a package in most distributions, and also as a flatpak . Use default settings, particularly Color depth ‘Automatic’ in the connection profile settings.
- xfreerdp is a command line client available as a package in most distributions. The option /network:auto should be passed to the client on the command line.
- Thincast is a proprietary client. The Linux version is available as a flatpak . Default settings are recommended.
Stop sharing your desktop
To disconnect someone who is viewing your desktop:
- Click the system menu on the right side of the top bar.
- Click Screen is being shared .
- Click Turn off .
Advanced Topics
The grdctl utility allows you to configure your host settings in a console window. For usage details, type grdctl —help .
H.264 video encoding heavily reduces bandwidth. GNOME Remote Desktop will use H.264 when: the graphics pipeline is used (a requirement of the protocol), the client supports it, and NVENC (NVIDIA’s encoder) is available.
More Information
- Sharing — Share your desktop, files, or media.
- Sharing Settings — Share your screen, or share media and other files over a local network or Bluetooth.
You can choose the displayed language by adding a language suffix to the web address so it ends with e.g. .html.en or .html.de.
If the web address has no language suffix, the preferred language specified in your web browser’s settings is used. For your convenience:
[ Change to English Language | Change to Browser’s Preferred Language ]
The material in this document is available under a free license, see Legal for details.
For information on contributing see the Ubuntu Documentation Team wiki page. To report errors in this documentation, file a bug.
How to enable Screen Sharing on Ubuntu 20.04 LTS
![]()
VNC or Virtual Network Computing is a protocol used to access your computer’s graphical desktop environment and control it from a remote computer.
This article will show you how to install the VNC server on Ubuntu 20.04 LTS and access it from a remote computer. So, let’s get started.
Installing VNC Server on Ubuntu 20.04 LTS:
This article will use the GNOME desktop environment’s built-in Screen Sharing feature to access the Ubuntu 20.04 LTS graphical desktop environment remotely. The GNOME desktop environment uses the Vino VNC server to implement the Screen Sharing function.
The Vino VNC server might not be installed on your Ubuntu 20.04 LTS operating system by default. But it is available in the official package repository of Ubuntu 20.04 LTS. So, you can install it easily.
First, update the APT package repository cache with the following command:

The APT package repository cache should be updated.
To install Vino, run the following command:

To confirm the installation, press Y and then press Enter>.

Vino should be installed.

Enable Screen Sharing on Ubuntu 20.04 LTS:
Once you have vino installed, you can enable Screen Sharing from the Settings app.
Open the Settings app from the Application Menu of Ubuntu 20.04 LTS.
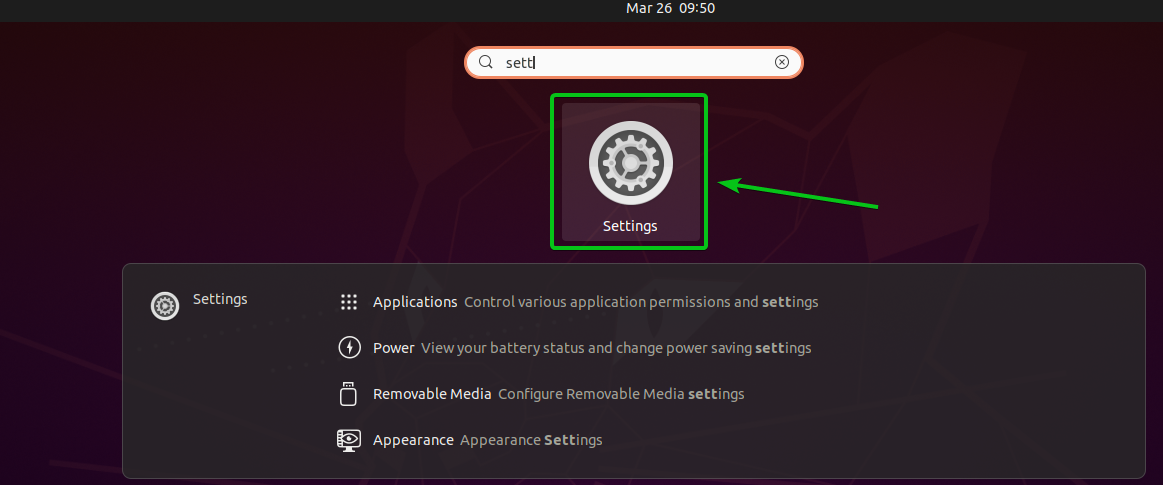
Navigate to Sharing section and click on the toggle button as marked in the screenshot below to enable Sharing.
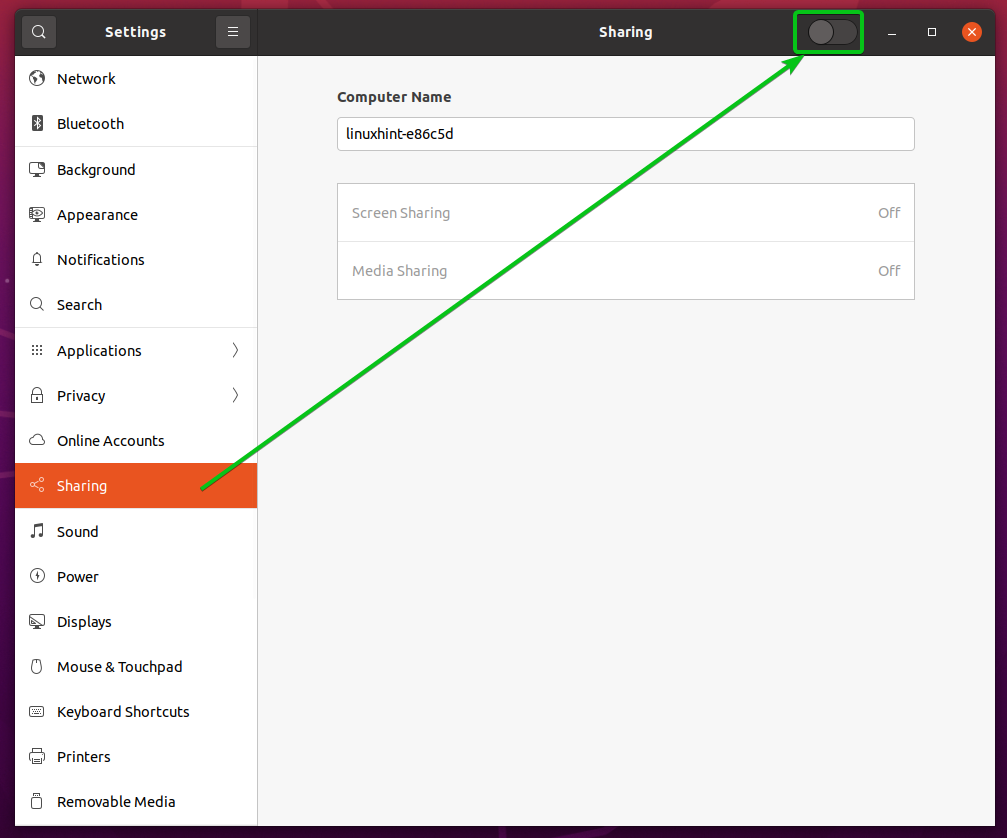
Once Sharing is enabled, click on Screen Sharing as marked in the screenshot below.
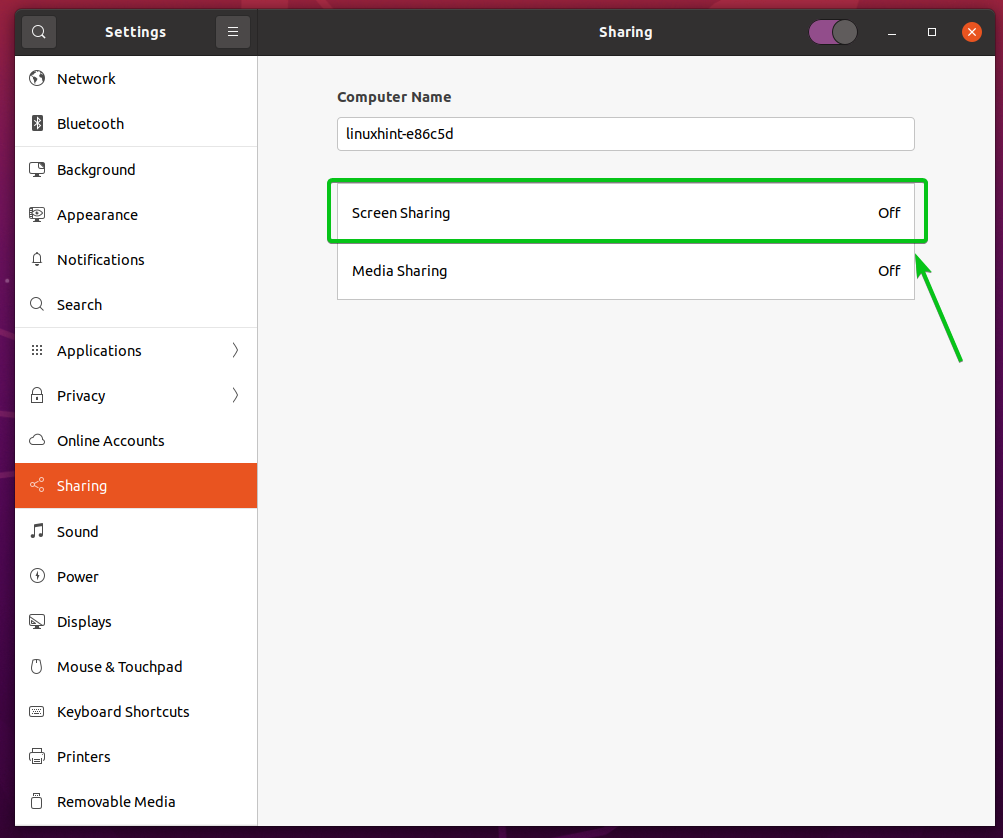
From the Screen Sharing window, click on the toggle button as marked in the screenshot below to enable Screen Sharing.
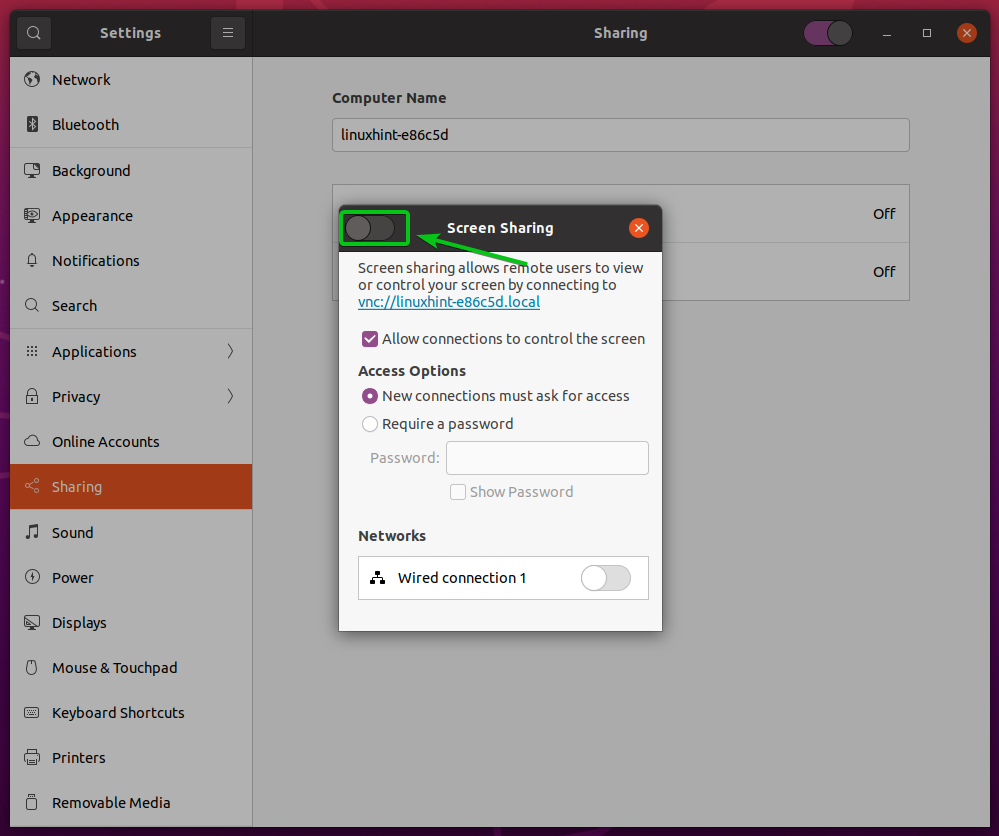
Screen Sharing should be enabled.
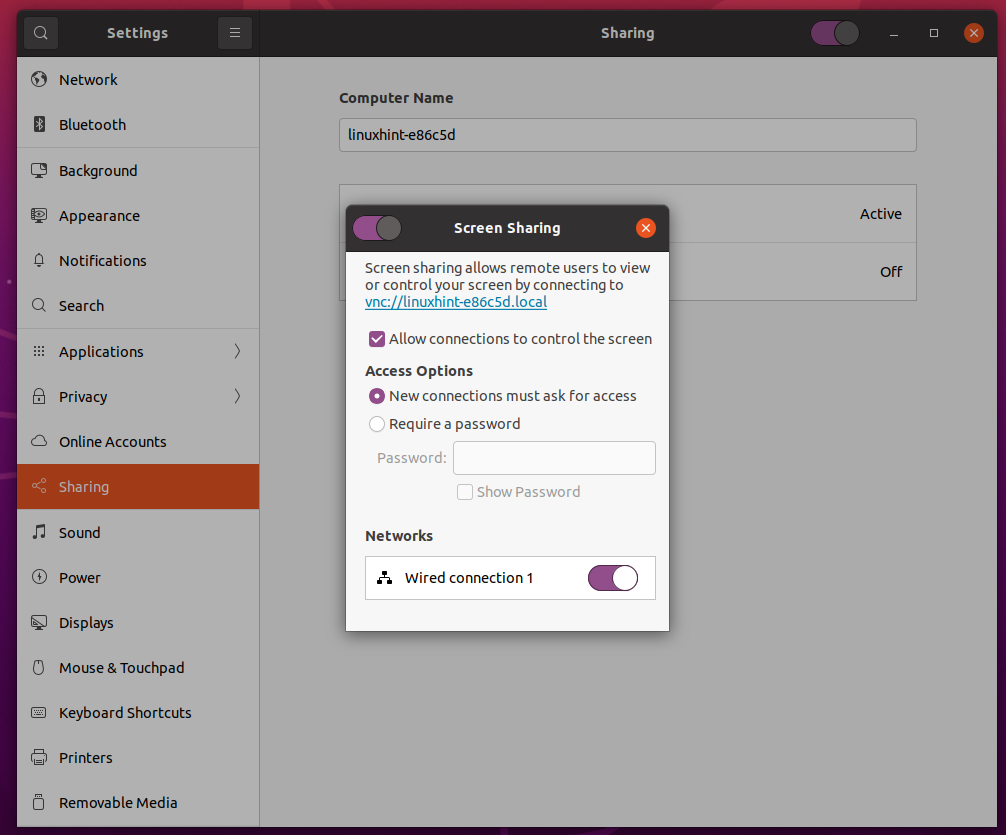
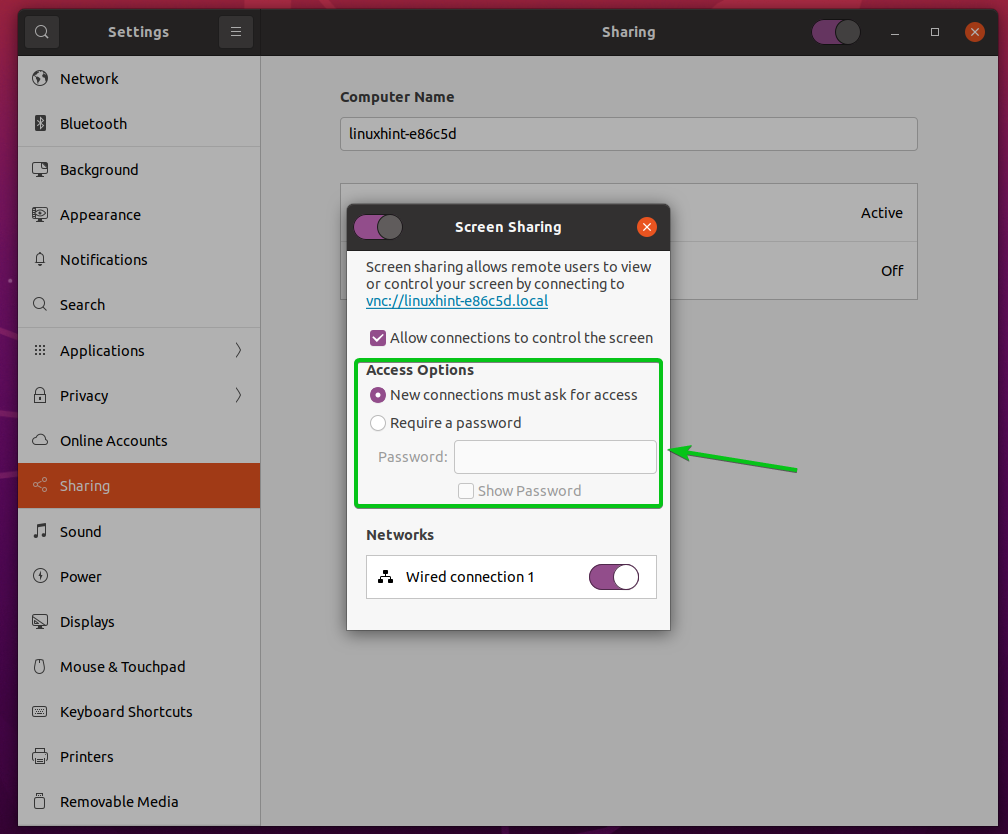
From the Access Options section, you can configure authentication methods for your VNC server.
New connections must ask for access: This is the default authentication method. When this authentication method is selected, you will get a prompt message every time a remote VNC client tries to access your computer. If you allow access to your computer, only then the remote VNC client can access your computer.
Require a password: In this method, you can set a password for the VNC server. The remote VNC client must enter the password to access your computer.
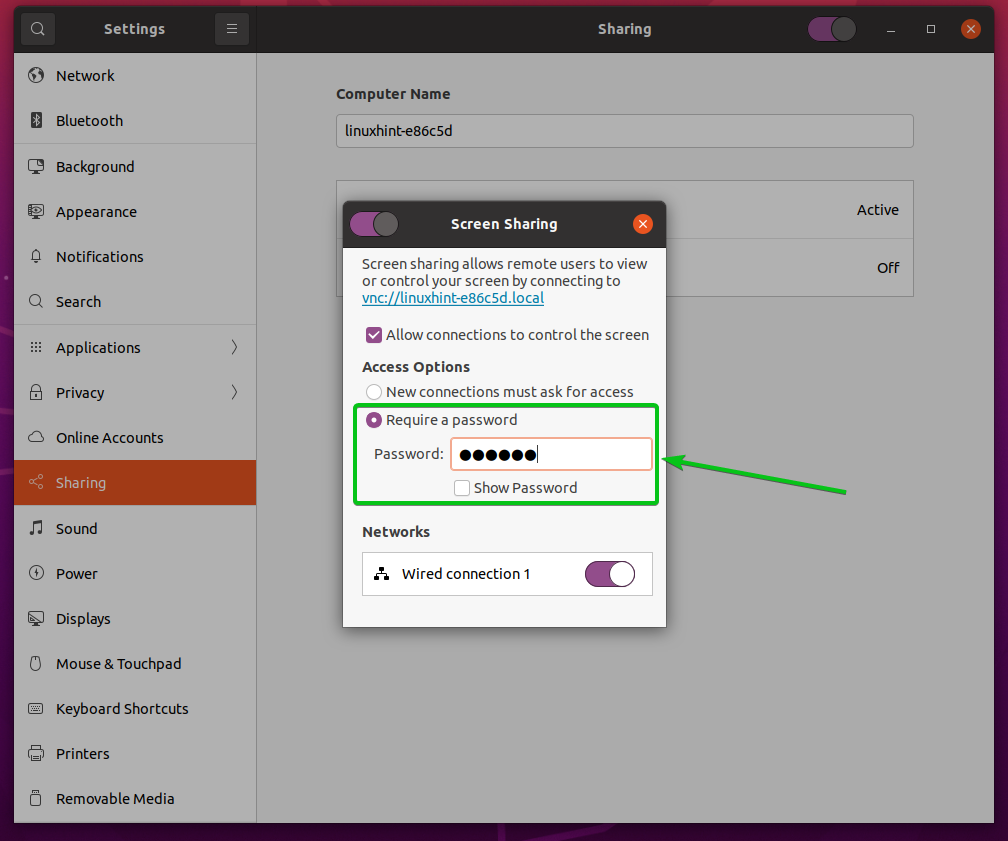
I prefer the password authentication method. So, I will set password authentication for the VNC server in this article.
To set a password for your VNC server, select Require a password from the Access Options section and type in your desired password in the Password textbox as marked in the screenshot below.
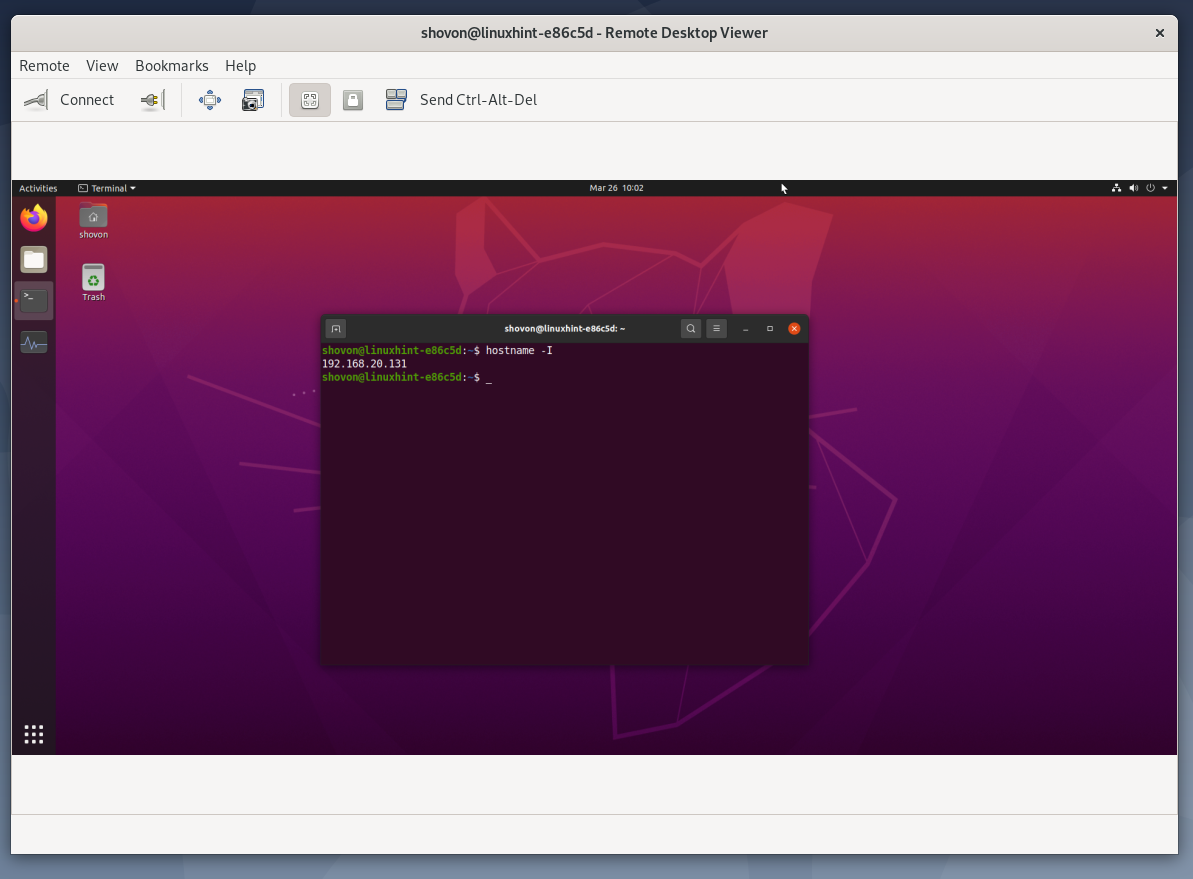
Finding the IP Address of Your Computer:
Once you have Screen Sharing enabled, the person who wants to connect to your computer remotely needs to know your computer’s IP address.
You can find the IP address of your computer with the following command:

The IP address of my computer is 192.168.20.131. It will be different for you. So, make sure to replace it with yours from now on.

Accessing Your Computer Remotely with Vinagre:
This section will use the Vinagre remote desktop client to show you how to connect to your computer via VNC. But you can use other VNC clients as well.
The Vinagre remote desktop client may not be installed on your computer. If you need any help installing Vinagre on your Linux distribution, you can read the article How to Install Vinagre Remote Desktop Client on Linux.
First, open Vinagre remote desktop client from the Application Menu of your computer.
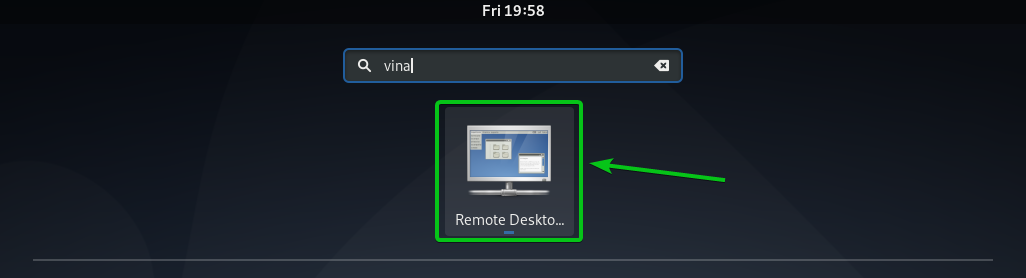
Once Vinagre is opened, click on Connect.

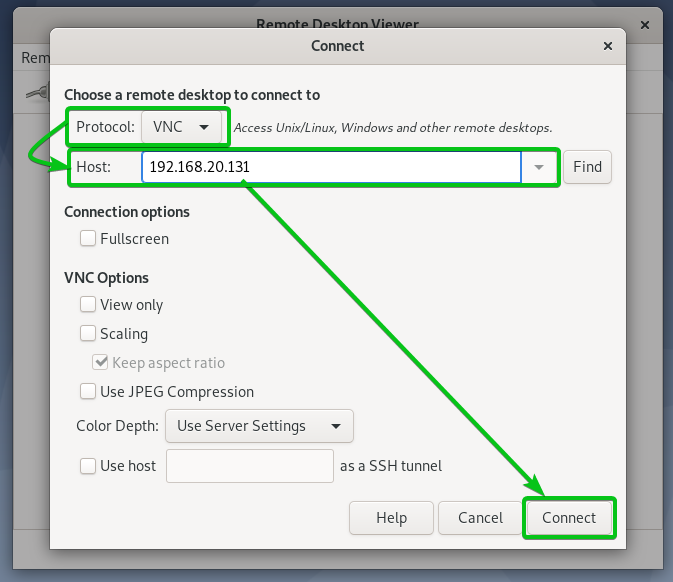
Now, select VNC from the Protocol dropdown menu, type in the IP address of your remote computer in the Host textbox, and click on Connect as marked in the screenshot below.
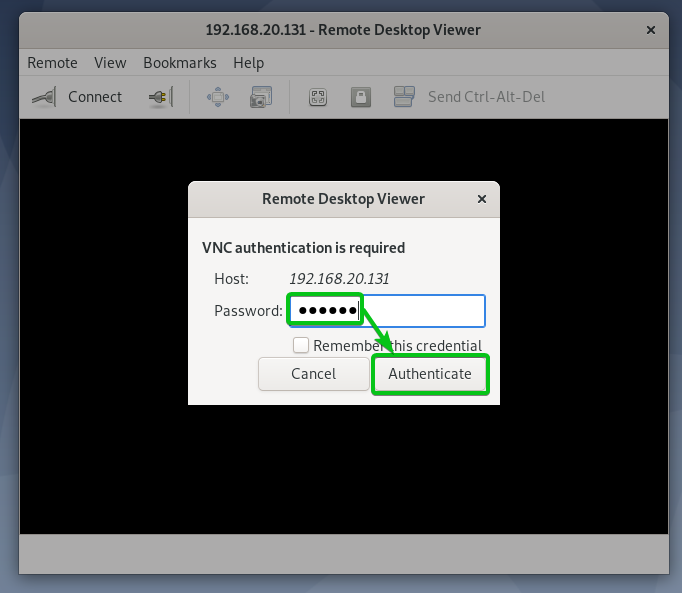
You will be prompted for the VNC password if you have configured password authentication as I did.
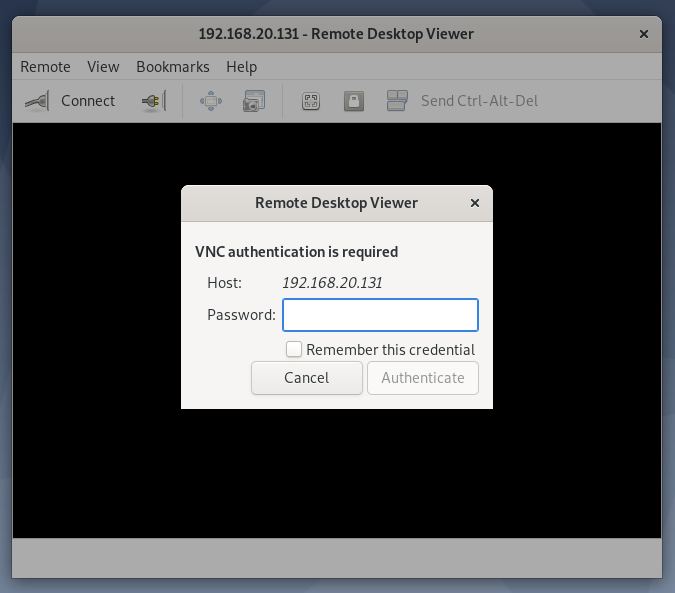
Type in your VNC authentication password and click on Authenticate as marked in the screenshot below.
You should be connected to your Ubuntu 20.04 LTS computer remotely.
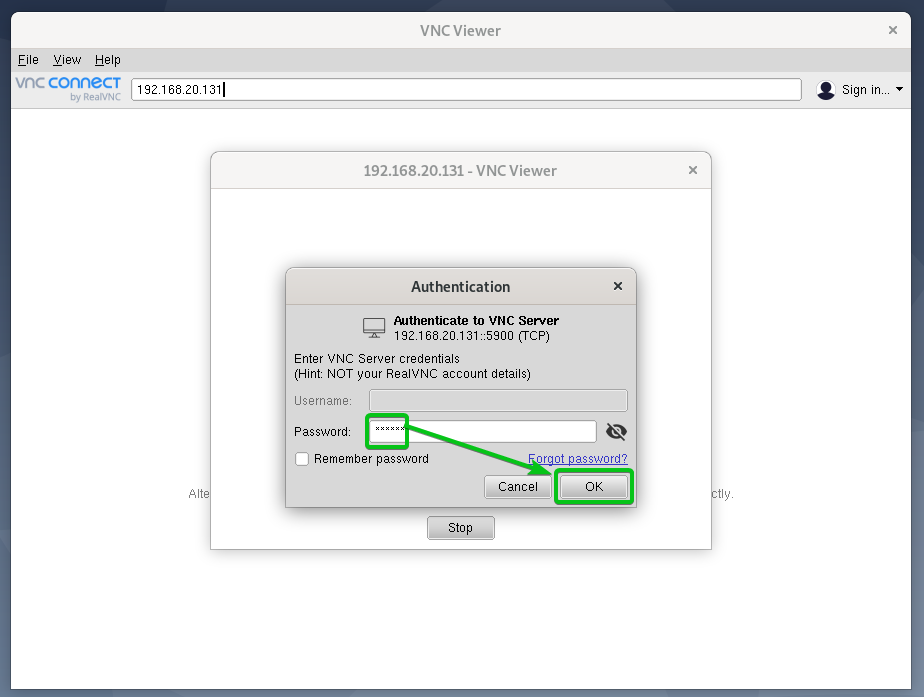
Accessing Your Computer Remotely with VNC Viewer:
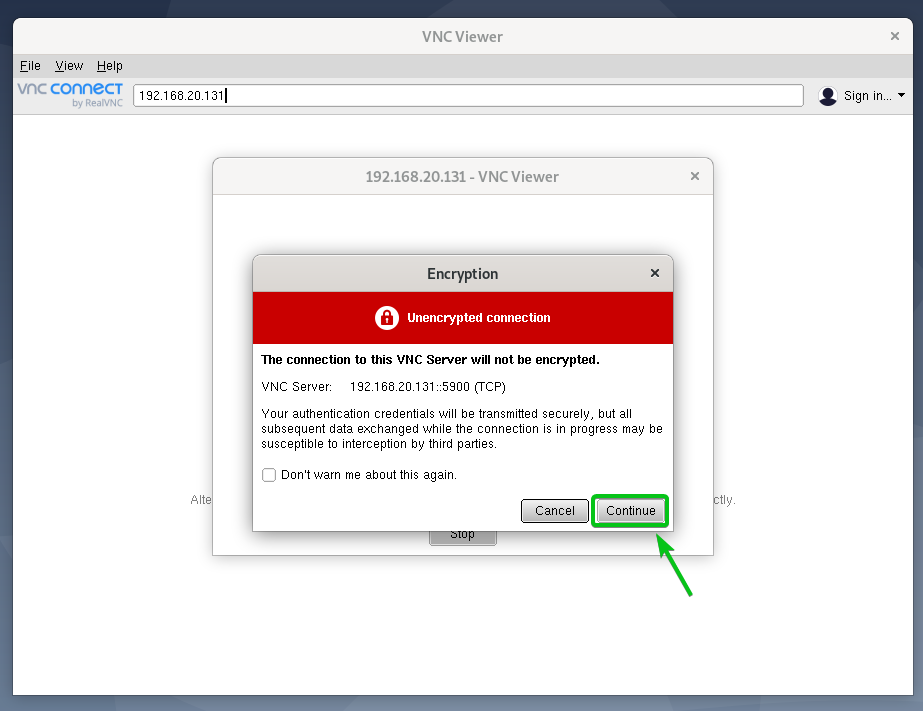
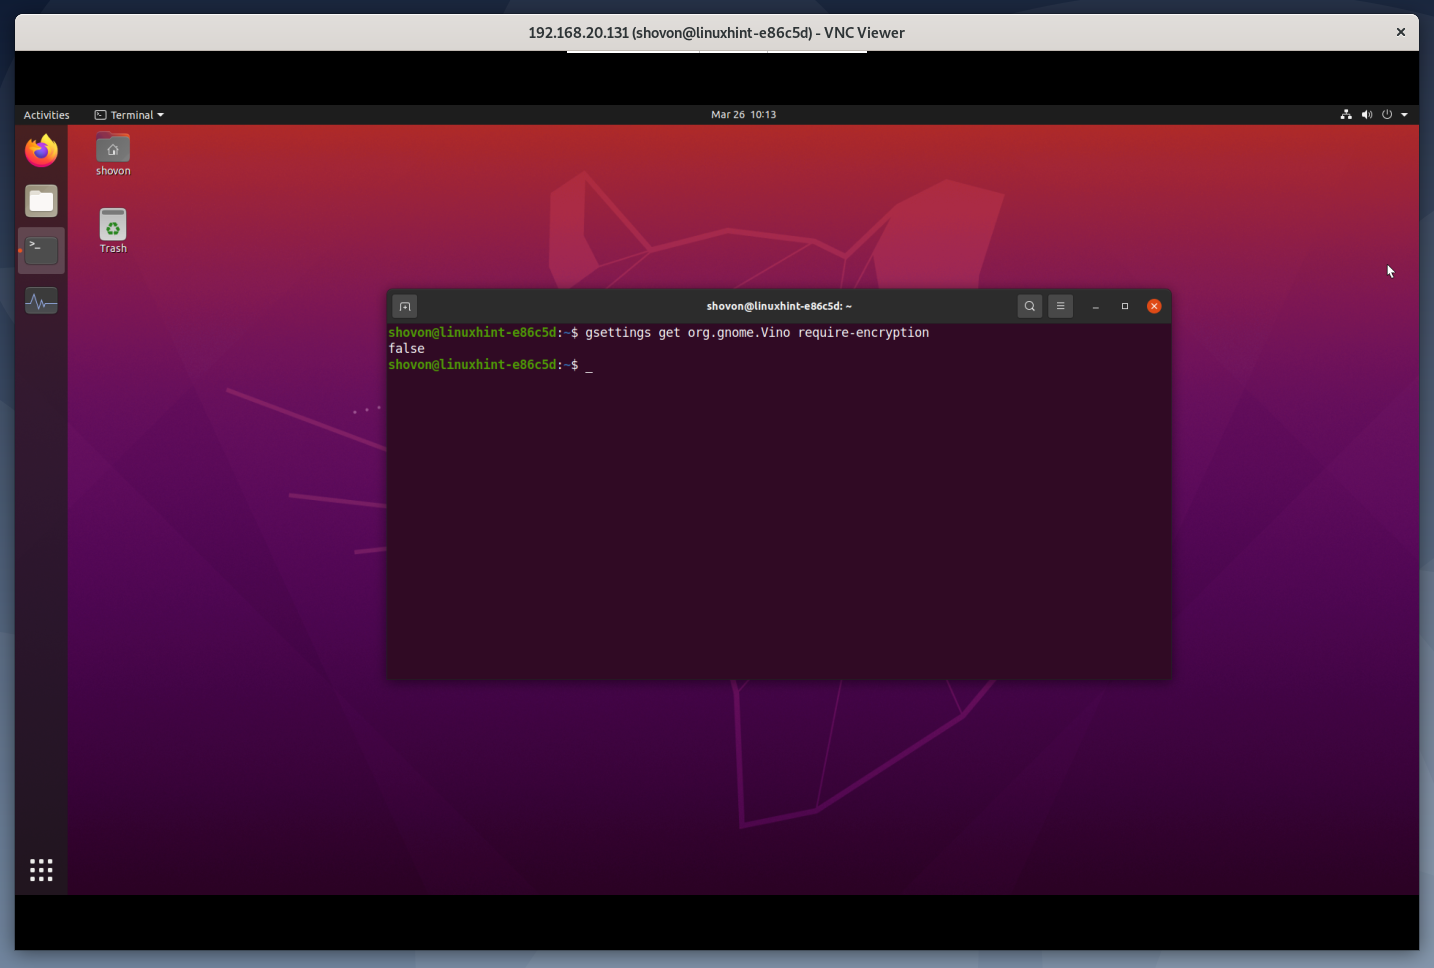
One of the most popular and cross-platform VNC clients is RealVNC’s VNC Viewer. The RealVNC VNC Viewer does not support the type of encryption that the Vino VNC server supports. So, to be able to access your Ubuntu 20.04 LTS computer remotely with the RealVNC VNC Viewer, you need to disable encryption for the Vino VNC server.
To disable encryption for the Vino VNC server, run the following command on your Ubuntu 20.04 LTS computer.

Once encryption is disabled, you can access your computer with the RealVNC VNC Viewer as usual.
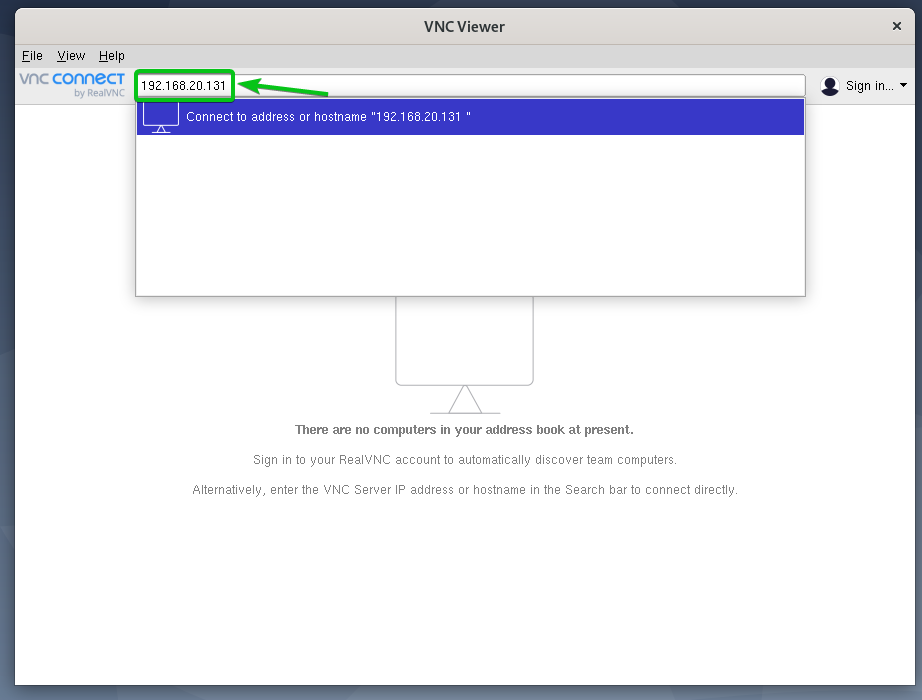
To connect to your computer remotely with the RealVNC VNC Viewer, type in your computer’s IP address in the VNC Viewer app and press .
Click on Continue.
You will be prompted for the VNC password if you have configured password authentication as I did.
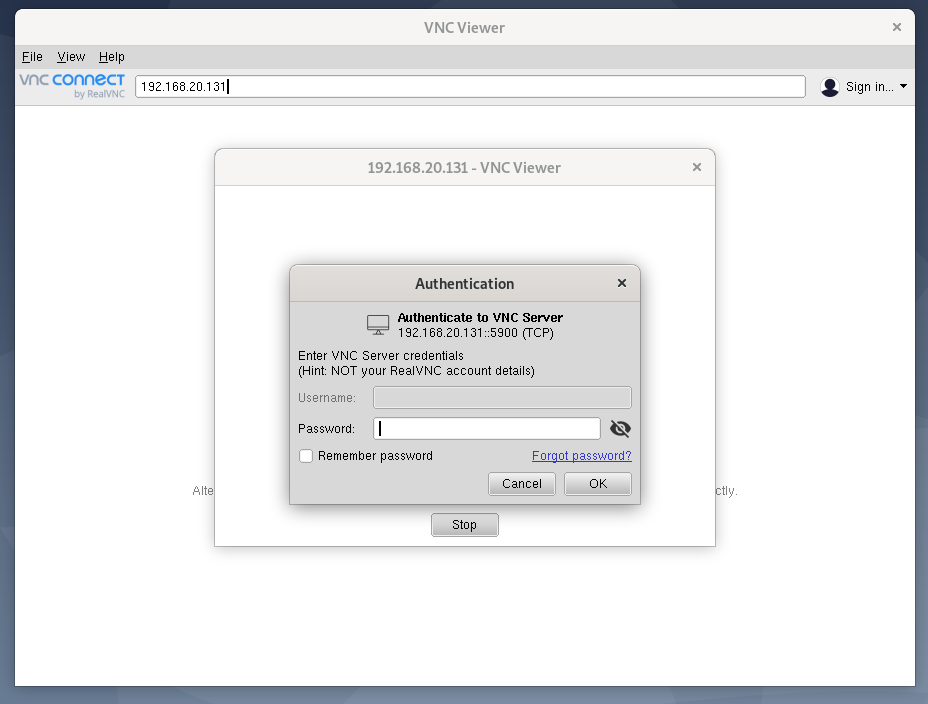
Type in your VNC server’s authentication password and click on OK as marked in the screenshot below.
You should be connected to your Ubuntu 20.04 LTS computer.
Conclusion:
This article shows you how to install the Vino VNC server on Ubuntu 20.04 LTS and enable Screen Sharing from the GNOME Settings app. I have also shown you how to configure authentication methods for the Vino VNC server from the GNOME Settings app and disable Vino VNC server encryption from the command-line. I have shown you how to access your Ubuntu 20.04 LTS computer remotely using the Vinagre remote desktop client and RealVNC VNC Viewer.
About the author
Shahriar Shovon
Freelancer & Linux System Administrator. Also loves Web API development with Node.js and JavaScript. I was born in Bangladesh. I am currently studying Electronics and Communication Engineering at Khulna University of Engineering & Technology (KUET), one of the demanding public engineering universities of Bangladesh.