- Best Solutions to Transfer Files between Windows and Mac.
- Transfer Files between Windows and Mac with Cloud Drives
- Transfer Files between Windows and Mac through Network
- USB Flash Drives to Transfer Files between Mac and Windows
- Use Portable Hard Disks to Transfer Files
- NAS Enabled Hard Drives to Transfer Files
- Transfer Files between Mac and Windows by Email
- Smartphones as Flash Drives to Transfer Files
- Transfer Files between Windows and MAC over WiFi
- Как обмениваться файлами по беспроводной сети между Mac и ПК с Windows
- Как передавать файлы между MacOS и Windows Computer без проводов
- Как обмениваться файлами с ПК на Mac без проводов
Best Solutions to Transfer Files between Windows and Mac.
Once you switch from a PC to a MAC, you will likely want to transfer the files from one to the other. The easiest method to transfer these files is over WiFi. There is no need for additional cables or hardware required to transfer larger files between Mac and Windows as long as both computers are on the same network or have access to the internet.
This article describes the methods for transfer large files between Mac and Windows over WiFi using free Cloud Services, a WiFi network, and a Flash drive or Hard Disk.
Transfer Files between Windows and Mac with Cloud Drives
The best and free solution to transfer files as is to use a Cloud service. If you are not tech-savvy, rather than going through the network setup, these cloud apps are easy to use. Most of the cloud services like Dropbox, Google Drive, SkyDrive, etc., are available for both the MAC and PC. These Cloud Drive transfer is the most reliable method and does not require additional hardware.
When using the cloud services to transfer files, you can install the Windows and MAC applications in your system and copy files from your hard disk (Windows System hard disk) to the cloud drive. Once you drag or copy and paste the files onto the cloud drive, these files will then sync with your second system. In the second system (MAC), you can copy synced files from cloud drive to your system hard disk to make sure a local copy on your system hard disk.
Dropbox is one of the best drive solutions available with multip platform support both for PCs and Smartphones. Dropbox is offering 2GB free space and most of the time you can delete the files after transferring to free up space on the cloud drive. You can earn up to 18GB by referral and available on almost all platforms, that can download from DropBox website.
Google Drive, direct from Google also supports and sync files between Windows PC and Mac. Google Drive store files up to 10GB size and offers 15GB free space. You need only a valid Gmail account, and you can install the applications on your PC and MAC system to share files. You can download the Google Drive Application from Google Drive website.
SkyDrive is a cloud service from Microsoft that offers the software for MAC and Windows to install and share files. You can share photos, documents, and other important files between MAC and PC using SkyDrive. This drive offers a 7GB free space and downloads from SkyDrive website.
Transfer Files between Windows and Mac through Network
The next solution as long as you have a home network is to transfer files between Windows and Mac through the network. Before you start, make sure both systems are on the same network. You can’t transfer files remotely from one machine to another one. Both machines should be on the same network to transfer files with each other.
The example below demonstrates Windows PC as the host and the first step is to Enable File Sharing on Windows. This process may be slightly different based on the Windows operating system you are using.
- Windows 10: Control Panel > Network and Internet > Network and Sharing Center > Advanced Sharing Settings > File and Printer Sharing > Turn on File and Printer Sharing.
- Windows 7: Control Panel > Network and Sharing Center > Choose Homegroup and Sharing options > Change Advanced Sharing Settings > click “Turn on File and Printer Sharing.”
- Windows Vista: Control Panel > Network and Sharing Center > Expand the File Sharing drop-down > click on “Turn on File and Printer Sharing.”
- Windows XP: Control Panel > double-click Network Setup Wizard and run it.
Once your Windows PC is ready for file sharing, then the next step is to connect Mac to Windows. Before you start, make sure that followed all the setting on Windows PC as we specified above. Also, please make sure both machines are connected to the same network.
Now open the Finder window on MAC, on the left pane under the “Shared” you can see shared machines. Select the name of the windows machine and click to open up the folder. You can drag and drop files into this folder to share between MAC and Windows.
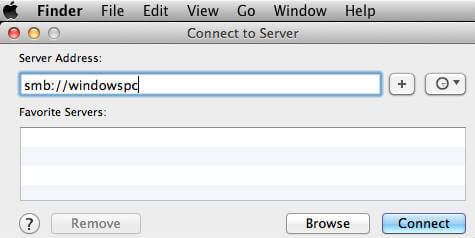
If you are unable to see the Windows machine on MAC finder, then Click on Finder > Go > Connect to Server (Command+K). Type in the prefix smb:// followed by the IP address or hostname of the windows machine. (like smb://192.168.1.101 or smb://windowspc ).
USB Flash Drives to Transfer Files between Mac and Windows
Since USB drives are an easy and portable solution, we can start with the USB drives to transfer files. Flash drives are available in the range of 16GB to 256GB for a very low price. Please see the fast transfer USB 3 USB SanDisk flash drive from Amazon that supports to transfer up to 5 times faster (90MB/s) than standard USB 2.0 drives.
USB drives, by default formatted into FAT32, which is compatible with both Mac and Windows. Two drawbacks on this format are that FAT32 supports maximum file size into 4GB and FAT 32 format is more susceptible to disk errors and offers no security. We strongly recommend this method for a temporary purpose file transfer.
Use Portable Hard Disks to Transfer Files
Even though the hard drives are a one-time investment, you can rely upon these drives to transfer large files between PC and Mac. You can have portable Hard disks with a USB port to transfer files between Mac and Windows.
The portable drives are coming in different storage capacity in Terabytes as regular hard disk and also Solid State Drives. SSDs are fast compared to regular hard drives and we already listed a couple of best external SSDs. When you use a portable Hard Drive, please make sure to format hard disk FAT32 to get access for both Mac and Windows OS system.
The hard drives are readily available in the market that offers compatibility with both OS with some additional software. You can get a Seagate Slim USB 3 2TB hard drive from Amazon for $69.99.
NAS Enabled Hard Drives to Transfer Files
Now you can connect your external Hard Disk as a part of your Home Network. The Hard Disk price is coming down, and the storage capacity is growing in terabytes in the market. There are two smart solutions to use the hard disk to transfer filer. The first one is to depend on NAS (Network Attached Storage) devices that are a little bit expensive, but very reliable solution.
There is one WD 4TB My Cloud Personal Network Attached Storage from Amazon with 4TB size and can buy from Amazon for $167.00. Hard drives are coming with a built-in network card and directly connect to a home network and transfer files between all devices on the same network.
The second low-cost solution is to buy a WiFi router with USB Port (Asus Dual-Band Router with USB from Amazon for $69.00). This router USB port can be used to connect the external hard disk to the home network. You can use this guide to Connect External Hard Disk to Home Network over WiFi.
Transfer Files between Mac and Windows by Email
Email file transfer doesn’t need any additional setup or knowledge. However, we recommend this as the least solution to transfer files. You can send the email attachment from one machine and open the email in the second machine and download the attached file.
Emails are capable of attaching large files size in GBs. However, emails are still not offering large file transferring like cloud dives or SMTP transfer. Please refer to our solution to email LARGE file attachment for those who want to transfer large file attachments.
Smartphones as Flash Drives to Transfer Files
Even you can use your iPhone as a portable drive to transfer the files in between MAC and PC. Please see the post here iPhone as a portable hard disk for your Mac and for the PC please see iPhone as a portable hard disk for your Windows.
Transfer Files between Windows and MAC over WiFi
There are plenty of methods to transfer files between Mac and Windows. If you are not tech-savvy and don’t have large files, then the best choice is Cloud Drives or USB Flash Drives.
Use a Portable Hard Drive or USB drive to transfer your files, if you are ready to spend money on external discs. Transfer files via your network, if you have large size files to transfer. The alternative choice is to use NAS based drives and use as local cloud storage for the entire home network.
Disclosure: Mashtips is supported by its audience. As an Amazon Associate I earn from qualifying purchases.
Как обмениваться файлами по беспроводной сети между Mac и ПК с Windows
Временами мне нужно обмениваться файлами по беспроводной сети между Mac и ПК. Это происходит со мной как на работе, так и дома, так как не все используют macOS. Хотя это и не так просто, есть способ преодолеть разрыв без помощи каких-либо сторонних приложений.
Что касается требований, вам нужно иметь доступ к IP-адресу, который вы можете легко получить. Кроме того, вы должны ввести свою учетную запись и пароль для подтверждения процесса. Как только соединение установлено, все общие папки будут легко доступны в вашем распоряжении.
Как передавать файлы между MacOS и Windows Computer без проводов
Примечание. Убедитесь, что оба компьютера Mac и Windows подключены к одной сети.
Шаг 1. Запустите Системные настройки на вашем Mac.

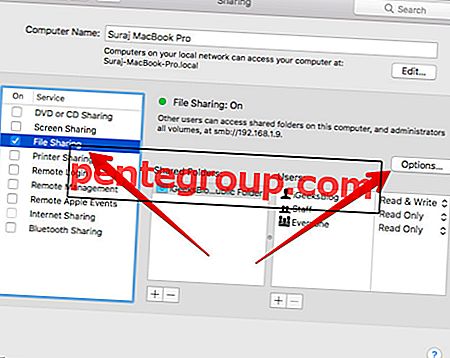
Шаг 2. Теперь нажмите на Общий доступ .

Шаг 3. Далее вам необходимо установить флажок рядом с «Общий доступ к файлам» .
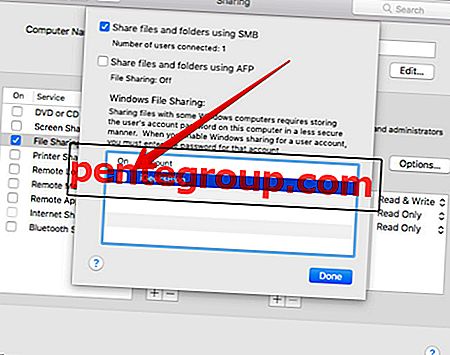
Затем нажмите на Опции .
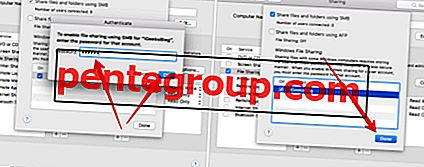
Шаг № 4. Затем вам необходимо установить флажок для учетной записи пользователя, которой вы хотите поделиться с компьютером с Windows.
Затем введите свой пароль Mac и нажмите « Готово».
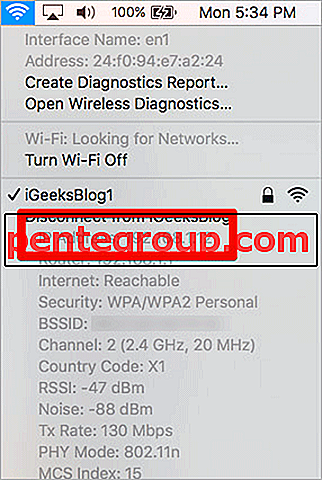
Шаг № 5. Далее, нажмите клавишу параметров и нажмите значок Wi-Fi. Затем запишите IP-адрес .
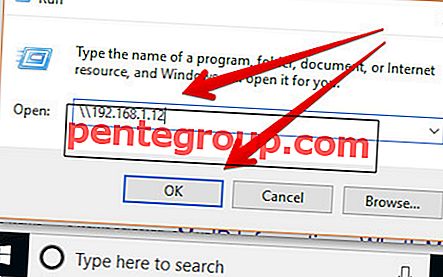
Шаг № 6. Теперь вам нужно нажать Windows + R на вашем ПК для быстрого доступа к Run. Затем введите «\\», а затем IP-адрес, который вы только что записали. Затем нажмите ОК.
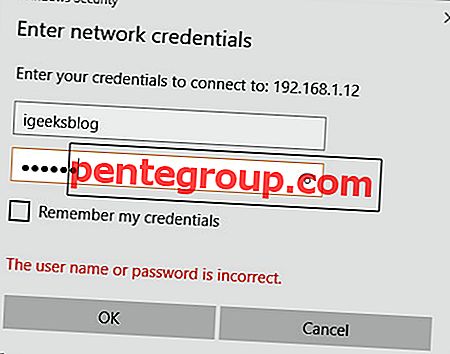
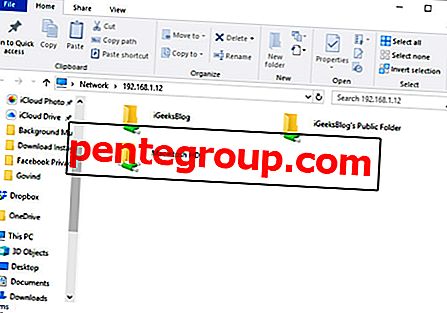
Затем введите свою учетную запись Mac и пароль . После этого вы сможете легко получить доступ к файлам общей учетной записи на вашем ПК.
Процесс обмена файлами с ПК на Mac так же прост, как только вы сделали обходной путь .
Как обмениваться файлами с ПК на Mac без проводов
Примечание. Убедитесь, что ваш ПК с Windows и Mac подключены к одной сети.
Шаг 1. Откройте «Командную строку» на вашем ПК и введите «ipconfig» .

Шаг 2. Теперь проверьте значение, которое находится рядом с «IPv4-адресом» . Это внутренний IP-адрес вашего компьютера. Обязательно отметьте это где-нибудь.

Шаг 3. Затем откройте Finder на вашем Mac.
Затем нажмите и удерживайте «Command + K» . Затем введите «smb: //» и IP-адрес вашего ПК. Затем нажмите Enter.

Шаг № 4. Затем вы должны ввести имя пользователя и пароль для ПК с Windows.
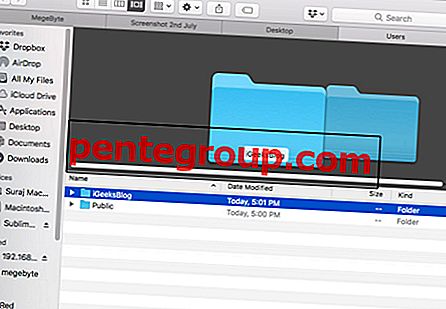
Шаг № 5. Теперь выберите « Пользователи» и нажмите « ОК».

После этого вы получите доступ к папкам общего доступа на вашем устройстве MacOS.
Подведение итогов:
Я хотел бы, чтобы процесс был немного более заранее. Пока у нас нет лучшего решения, используйте эту тренировку, чтобы снять барьер. Если вам часто приходится делиться файлами, я бы посоветовал вам использовать эффективное приложение для обмена файлами, такое как Dropbox. Это также предлагает беспрепятственное сотрудничество и доступно бесплатно.
Есть вопросы? Дайте нам знать, что в комментариях ниже.
Вы можете также сослаться на эти сообщения:
- Как добавить Emoji в электронные письма в почтовом приложении в macOS Mojave
- Как изменить системный акцент в MacOS Mojave на Mac
- Как выполнить обновление системы в MacOS Mojave на Mac
- Как использовать Continuity Camera в macOS Mojave и iOS 12
Нашли это руководство полезным? Загрузите наше приложение и следите за обновлениями с нами через Facebook, Twitter и Google Plus, чтобы никогда не пропустить наши последние новости.