- Install Latest Ubuntu 19.10 on VMware and Configure VMware Shared folders with Windows 10 Host
- Part 1: Installing Ubuntu 19.10 on VMware Workstation
- Part 2: How to Install VMware tools manually on Ubuntu 19.10
- Part 3: Setup VMware Shared folders between Ubuntu & Windows 10 (or any versions)
- Part 4: Download link of the pre-installed Ubuntu 19.10 VMware image
- You Can Read Next
- How to Install TrueNAS in VirtualBox – Windows 11 Host
- iTunes For Linux – How to Download and Install
- How to Take Screenshot on Linux (Ubuntu, Mint & Others)
- Install OpenSUSE LEAP 15.1 in VMware – Download Pre-installed Image
- 30 thoughts on “Install Latest Ubuntu 19.10 on VMware and Configure VMware Shared folders with Windows 10 Host”
- Share linux folder with windows vmware
- Prerequisites
- Procedure
- What to do next
- how to share a folder between WIN10 and ubuntu installed with VMWare 12?
- 2 Answers 2
- Step-by-step instructions on how to share a Windows folder under Ubuntu 17.04
Install Latest Ubuntu 19.10 on VMware and Configure VMware Shared folders with Windows 10 Host
Ubuntu is one of the leading Linux distribution many people like to get hands-on experience. It has desktop and server versions. In this guide, I will show how to install the latest Ubuntu 19.10 on VMware workstation with working VMware tools and setting up a VMware shared folder between the guest OS and host Windows 10 OS.
Installing another OS such as Ubuntu Linux on a Windows 10 computer by using virtualization software like VMware is the best way to experiment with any kind of new OS. You do not need to install on the physical hard disk or modify the Windows 10 boot loader to have Linux OS with Windows.
Also, VMware’s ‘Easy Install’ feature makes this installation super easy. You can find more about ‘Easy Install’ from the official VMware site.
- Install Ubuntu on VMware by using the ‘Easy Install’ method. This step will also install the VMware tools provided you have the working internet on the host computer.
- Guide to install VMware tools manually.
- Setup and test the VMware shared folders between host and guest computer.
- The download link of the pre-installed Ubuntu 19.10 VMware image that I used in this guide.
Part 1: Installing Ubuntu 19.10 on VMware Workstation
1) Download the latest desktop version of Ubuntu from the official site. It is an ISO file.
2) Make sure you have the newest version of VMware workstation. If you have VMware player, you may not find some of the options, but it works well for this purpose.
3) Create a new virtual machine and browse the ISO file. VMware will detect the OS type from the ISO file and show that it can use ‘Easy Install’.
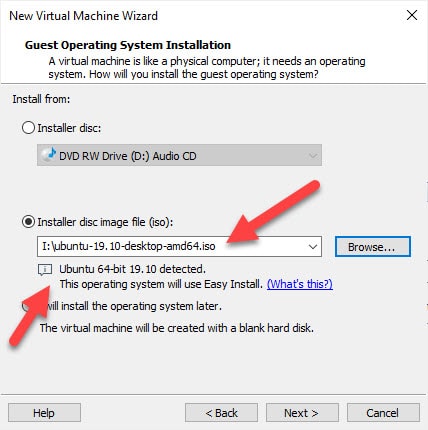
‘Easy Install’ is like an unattended method of installing a new OS. Once we provide the required details, it will do all steps during the installation process and finalize the OS installation without any user intervention.
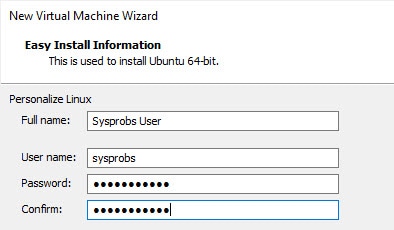
4) Provide user account details that will be used in Ubuntu Linux VM.
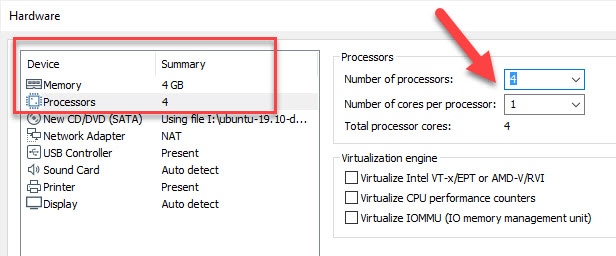
5) I always prefer to store the virtual hard disk as a single file. Before completing the setup and powering on the VM, click the Customize Hardware button.
6) Set enough processor cores and memory for the VM. I configured 4 processor cores and 4GB of RAM.
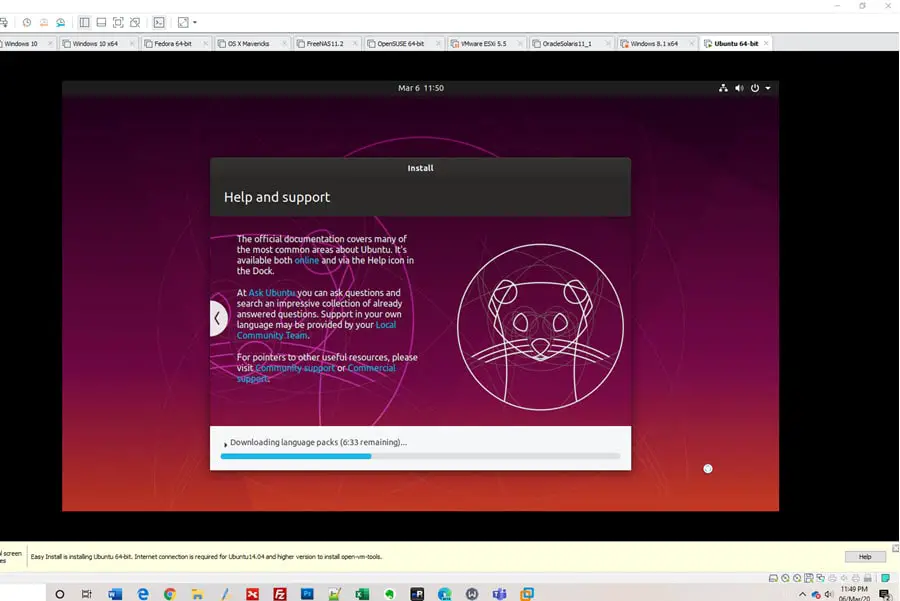
7) Power on the VM now. Make sure you have working internet on the host computer. The installation will use the internet to download the latest packages for Ubuntu 19.10 OS and install VMware tools. It will create the partitions and do all the necessary steps to install the OS properly. Once everything installed automatically, you will get the login screen after a few minutes.
8) Typing the same password you set while configuring the virtual machine will let you log in.
9) To verify whether the VMware tools installed successfully during the ‘Easy Install’, check the full-screen mode, and change the VMware console screen to different sizes, the VM will adjust and work on fit-to-screen view. That confirms the proper working VM tools. Also, you will feel the smoothness inside the VM while working.
Part 2: How to Install VMware tools manually on Ubuntu 19.10
Let’s assume for some reason you need to install the VMware tools manually. Then, follow these steps:
10) After powering on the VM, click on ‘VM’ from the menu and select the ‘Install VMware Tools’ option. This will mount the installation ISO file inside the VM.
11) Access the CD drive from the Ubuntu Linux VM, and copy the VMware Tools file to the Desktop (or any location). It is a compressed file; we need to extract it. You can open this gzipped compressed file by double-clicking it. Then select the content and extract as shown below. In this example, I’m extracting to the same Desktop folder.
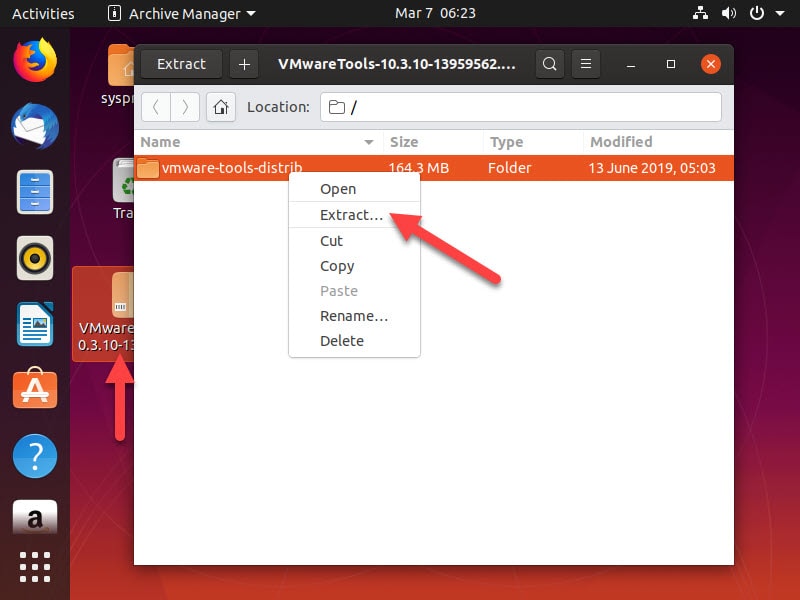
Now you will see the extracted folder on the desktop.
12) Open Terminal and browse the extracted folder.
13) Type sudo ./vmware-install.pl -d
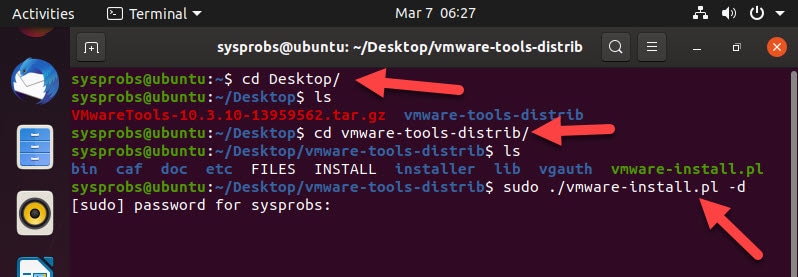
You need to re-enter your password which has root access to allow the installation.
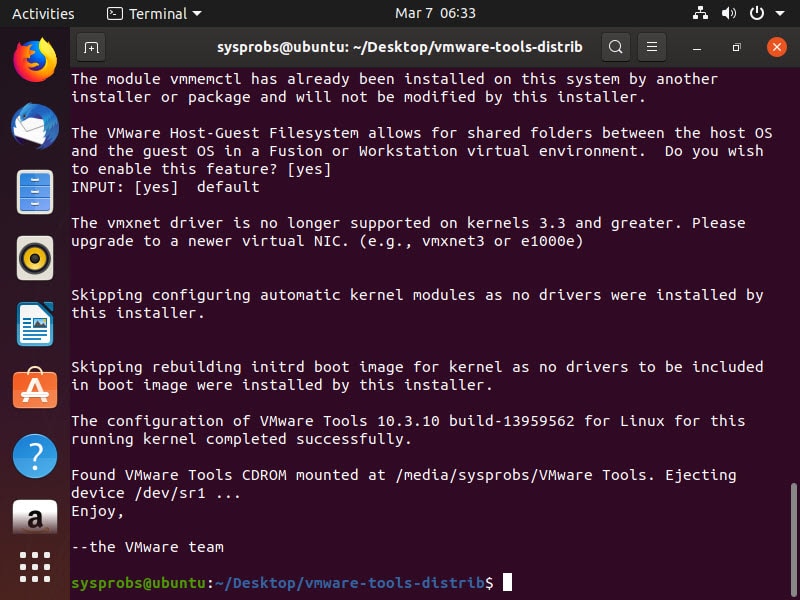
14) Reboot the VM once the installation completed. Now we have successfully installed the VMware tools manually on Ubuntu 19.10. These methods are applicable for any desktop or server version of Ubuntu.
Part 3: Setup VMware Shared folders between Ubuntu & Windows 10 (or any versions)
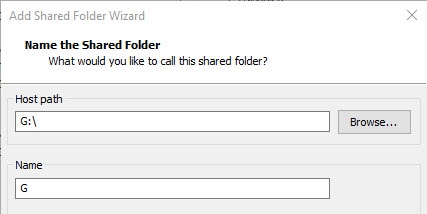
15) Setting up shared folders between Linux and Windows machines is super easy nowadays. Once the VMware tools installed successfully, go to the settings of the virtual machine and click the options tab.

Here you can add a folder or partition from the Windows 10 host computer. I’m adding a partition in this example.
16) Enable the share and select the ‘Read Only’ option if you do not need to write anything from the Linux guest OS to this Windows share/partition. Most of the time, we do not need to select the ‘Read Only’ option.
Press OK to save the settings.
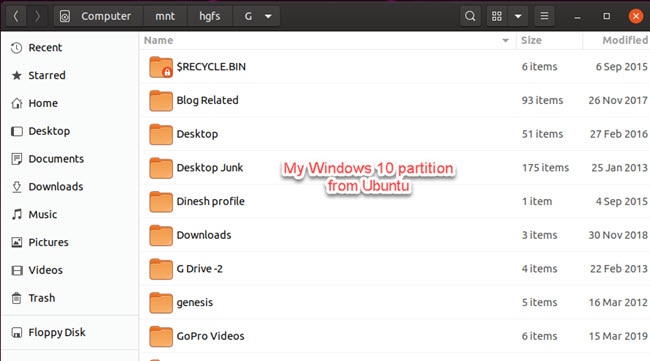
17) Now inside the VM, go to Computer –> mnt -> hgfs folder. Here you will find the share which is coming from the Windows host computer.
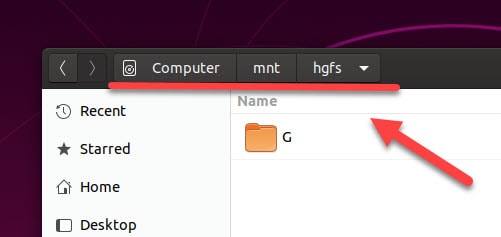
If you haven’t selected the ‘Read-only’ option, now you should be able to write/modify folders/files on this share.
This method helps to transfer and share folders and partitions between guest and host computers without setting up a network.
Part 4: Download link of the pre-installed Ubuntu 19.10 VMware image
If you need to avoid the installation and update process, you can download the latest Ubuntu 19.10 pre-installed image for VMware below. It is in 7zipped format. You need to extract the file to get the VMDK file. Then create a new Linux Ubuntu virtual machine from a VMware workstation, player, or even on the vSphere and attach this VMDK file instead of creating the new virtual hard disk.
If any of the above solutions did not fix the Windows PC issues, we recommend downloading the below PC repair tool to identify and solve any PC Issues.
Dinesh
Dinesh is the founder of Sysprobs and written more than 400 articles. Enthusiast in Microsoft and cloud technologies with more than 15 years of IT experience.
You Can Read Next
How to Install TrueNAS in VirtualBox – Windows 11 Host
iTunes For Linux – How to Download and Install
How to Take Screenshot on Linux (Ubuntu, Mint & Others)
Install OpenSUSE LEAP 15.1 in VMware – Download Pre-installed Image
30 thoughts on “Install Latest Ubuntu 19.10 on VMware and Configure VMware Shared folders with Windows 10 Host”
Hi Dinesh
I am a new user of Ubuntu. Please tell me how to install ubuntu 10.10 in Windows.
Mano France
I installed ubuntu 10.10 on vmware 3.1.1, after installation when i go to Virtual Machine->Install VMWare Tools… it doesn’t load the ISO image, instead it tries to download from the internet… can i manually do this, because the PC i’m using is not connected to the internet?
the last step: sudo ./*.pl requires the user to enter his own password not the root password!
Hi Dinesh,
Thanks for the tutorial. can’t wait to try it out. hopefully it works. but will have to wait a long time for ubuntu and vmware to download as i have a very slow internet spped 🙁 384kbps
The drag and drop isn’t working properly. I can get things out of the VM, but the add things inside, it is not allowed…. any suggestions?
VMware shared folders and drag and drop is an issue with this method.
Try this manual vmware tools installation steps, it works fine for me,
Its clearly explained here
https://www.sysprobs.com/install-vmware-tools-manually-ubuntu-11-04-vmware-shared-folders
Its probably the first post i have made in 3 years, and that is because the post helped me much in to getting up to speed with Linux env!
I had a problem with the VMWare Tools installation because my CD-ROM drive had a different CD in it. When I started the installation of VMWare Tools, it showed the icon on the desktop, but showed no contents. (Clicking on the properties showed me the other CD’s name). I ejected the other CD and tried again, and it worked.
Wanted to share in case someone else has the same problem.
Thank you, very good this article.
Ubuntu 11.04 GUI is not loading. it says
what should I do to get the GUI run??
Share linux folder with windows vmware
You are using an outdated browser. Please upgrade your browser to improve your experience.
You can enable folder sharing for a specific virtual machine. To set up a folder for sharing between virtual machines, you must configure each virtual machine to use the same directory on the host system or network share.
Prerequisites
- Verify that the virtual machines use a guest operating system that supports shared folders. See Guest Operating Systems That Support Shared Folders.
- Verify that the latest version of VMware Tools is installed in the guest operating system.
- Verify that permission settings on the host system allow access to files in the shared folders. For example, if you are running Workstation Player as a user named User, the virtual machine can read and write files in the shared folder only if User has permission to read and write them.
Procedure
- Select the virtual machine and select Player > Manage > Virtual Machine Settings .
- On the Options tab, select Shared Folders .
- Select a folder sharing option.
Option Description Always enabled Keep folder sharing enabled, even when the virtual machine is shut down, suspended, or powered off. Enabled until next power off or suspend Enable folder sharing temporarily, until you power off, suspend, or shut down the virtual machine. If you restart the virtual machine, shared folders remain enabled. This setting is available only when the virtual machine is powered on. - (Optional) To map a drive to the Shared Folders directory, select Map as a network drive in Windows guests .
This directory contains all of the shared folders that you enable. Workstation Player selects the drive letter.
If you specify a directory on a network share, such as D:\share , Workstation Player always attempts to use that path. If the directory is later connected to the host on a different drive letter, Workstation Player cannot locate the shared folder.
Characters that the guest operating system considers illegal in a share name appear differently when viewed inside the guest. For example, if you use an asterisk in a share name, you see %002A instead of * in the share name on the guest. Illegal characters are converted to their ASCII hexadecimal value.
The shared folder appears in the Folders list. The check box next to folder name indicates that the folder is being shared. You can deselect this check box to disable sharing for the folder.
What to do next
View the shared folder. On Linux guests, shared folders appear under /mnt/hgfs . On Solaris guests, shared folders appear under /hgfs . To view shared folders on a Windows guest, see View Shared Folders in a Windows Guest.
how to share a folder between WIN10 and ubuntu installed with VMWare 12?
How can I share a folder between WIN10,on which I installed VMware Workstation (12.1.0 Player for Windows)? It is working well together, but useful to share documents in between 2 OS. Thanks Merry Xmas & Happy New Year Serros
You can either use an NSF or Samba network share which may be difficult for you to setup, or you can mount a shared folder in your Ubuntu system
2 Answers 2
Step-by-step instructions on how to share a Windows folder under Ubuntu 17.04
- Under Windows create a shared folder, say winshare, and enable it in the VM config.
- In the VM install open-vm-tools with sudo apt install open-vm-tools
- Create a folder on your desktop with mkdir ~/Desktop/share
- Add the following line to your .bashrc: mountpoint -q ~/Desktop/share || vmhgfs-fuse .host:/winshare ~/Desktop/share
If you have not installed the vmtools from the VMWare ‘CD’ for your Ubuntu guest, you will need to do so first. Please note that open-vm-tools from the Ubuntu repositories does not currently support file sharing in Ubuntu.
Start your Ubuntu virtual machine, and in the VM window, choose «VM->Install VMWare Tools». This will mount the CD containing the VMWare tools on your virtual machine. In your Ubuntu installation, use the file manager to extract the contents of VMwareTools-10.0.5-3228253.tar.gz from the CD to a directory on your Ubuntu installation. The version of the .tar.gz file will change with VMWare versions.
Open a terminal window ( alt + ctrl + t ) and navigate to the directory where you extracted the VMWare tools. Enter the subdirectory «vmware-tools-distrib» and then enter the command sudo ./vmware-install.pl using the default for all prompts that the program gives you.
Shutdown your virtual machine at this point
In your VMWare control window, edit the settings of the virtual machine. Under ‘Options->Shared Folders’ you can add a directory from your host machine that you would like to be able to use on your guest machine. Choose to ‘Always enable’ the use of shared folders.
In your Ubuntu machine you will find this folder located at /mnt/hgfs/