- Как сделать общую сетевую папку в Linux (настройка SMB в Linux)
- Install and Configure Samba
- What you’ll learn
- What you’ll need
- 2. Installing Samba
- 3. Setting up Samba
- What we’ve just added
- 4. Setting up User Accounts and Connecting to Share
- Connecting to Share
- If you’d like to take your configuration further…
Как сделать общую сетевую папку в Linux (настройка SMB в Linux)
Начните с установки пакетов samba и smbclient.
В Debian, Linux Mint, Ubuntu, Kali Linux и их производных для установки samba выполните команду:
sudo apt install samba smbclient
В Arch Linux, BlackArch и их производных выполните команду:
sudo pacman -S samba smbclient
Следующая команда не сработает, если отсутствует файл /etc/samba/smb.conf. Если у вас тоже нет этого файла, то создаёте его заглушку — к настройке самого файла smb.conf мы вернёмся позже:
sudo touch /etc/samba/smb.conf
Теперь нужно добавить пароль для пользователя Samba. Действует следующее правило: имя пользователя должно быть таким же, как у вашего текущего пользователя, а пароль можно установить иной, отличный от вашего системного пароля.
Для установки пароля Samba, выполните следующую команду:
Если вы хотите, чтобы у пользователя не было пароля, то укажите опцию -n.
Создайте папку, которая станет совместно используемой:
Узнаем абсолютный путь до папки ~/linuxshare:
Откройте для редактирования файл /etc/samba/smb.conf:
sudo gedit /etc/samba/smb.conf
Добавьте туда строки вида:
[ИМЯ_ПАПКИ] comment = Samba на Linux path = /home/ИМЯ_ПОЛЬЗОВАТЕЛЯ/ИМЯ_ПАПКИ valid users = ИМЯ_ПОЛЬЗОВАТЕЛЯ read only = no browsable = yes
Обратите внимание, что все пробелы в строках выше являются обязательными.
Для моих данных это строки:
[linuxshare] comment = Samba на Linux path = /home/mial/linuxshare valid users = mial read only = no browsable = yes
Теперь запустим службу SMB:
sudo systemctl start smb.service
Для добавления службы в автозагрузку выполните:
sudo systemctl enable smb.service
Для подключения к этой общей сетевой папке на Linux нужно использовать IP адреса компьютера Linux.
Создадим файл, чтобы сетевая папка не была пустой:
echo "Документ на Linux" > ~/linuxshare/document.txt
Посмотрите локальный IP адрес компьютера, на котором запущена Linux:
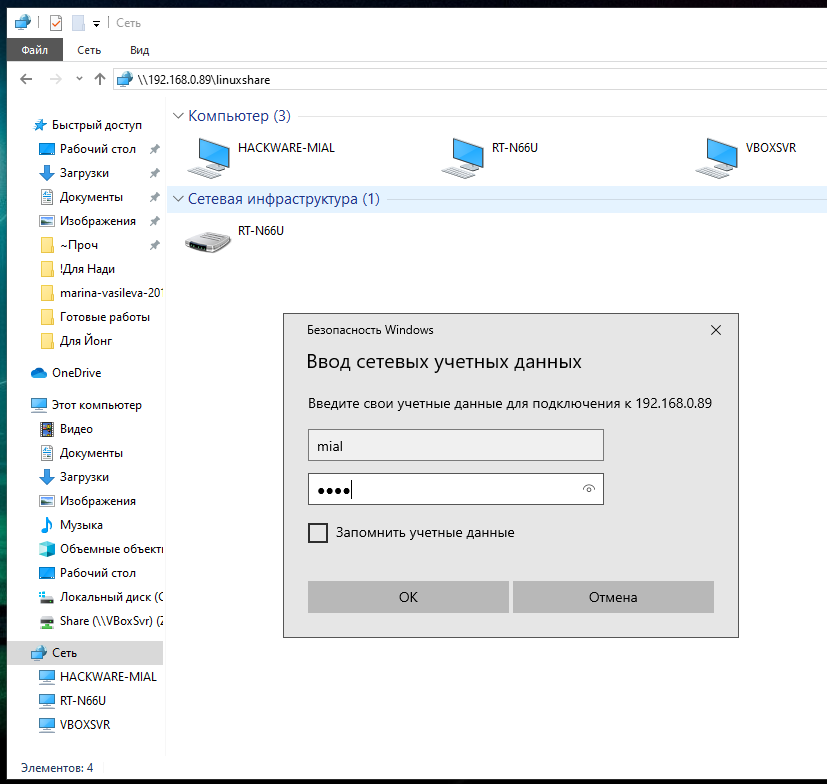
У меня этим IP является 192.168.0.89, а папку, как мы помним, я создал с именем linuxshare, тогда в Windows я перехожу в проводнике во вкладку «Сеть» и подключаюсь к этой папке следующим образом:
Вводим учётные данные (которые мы установили командой smbpasswd):
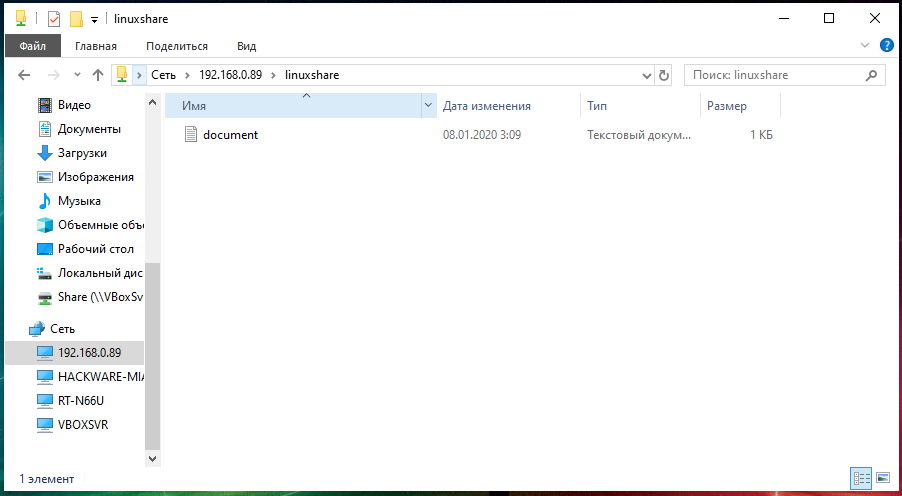
Видим содержимое совместно используемой папки, размещённой на Linux с помощью SMB:
Для подключения к сетевой папке из консоли Linux, запустите команду вида:
sudo smbclient //IP_АДРЕС/Папка -U ПОЛЬЗОВАТЕЛЬ
sudo smbclient //192.168.0.89/linuxshare -U mial
После ввода пароля нам становится доступным содержимое сетевой папки.
Install and Configure Samba
A Samba file server enables file sharing across different operating systems over a network. It lets you access your desktop files from a laptop and share files with Windows and macOS users.
This guide covers the installation and configuration of Samba on Ubuntu.
What you’ll learn
What you’ll need
If you have everything ready, let’s dive straight into the installation process on the next step!
Originally authored by Aden Padilla.
2. Installing Samba
sudo apt update sudo apt install samba We can check if the installation was successful by running:
The following should be its output:
samba: /usr/sbin/samba /usr/lib/samba /etc/samba /usr/share/samba /usr/share/man/man7/samba.7.gz /usr/share/man/man8/samba.8.gz 3. Setting up Samba
Now that Samba is installed, we need to create a directory for it to share:
The command above creates a new folder sambashare in our home directory which we will share later.
The configuration file for Samba is located at /etc/samba/smb.conf . To add the new directory as a share, we edit the file by running:
sudo nano /etc/samba/smb.conf At the bottom of the file, add the following lines:
[sambashare] comment = Samba on Ubuntu path = /home/username/sambashare read only = no browsable = yes Then press Ctrl-O to save and Ctrl-X to exit from the nano text editor.
What we’ve just added
Now that we have our new share configured, save it and restart Samba for it to take effect:
sudo service smbd restart Update the firewall rules to allow Samba traffic:
4. Setting up User Accounts and Connecting to Share
Since Samba doesn’t use the system account password, we need to set up a Samba password for our user account:
sudo smbpasswd -a username Note
Username used must belong to a system account, else it won’t save.
Connecting to Share

On Ubuntu: Open up the default file manager and click Connect to Server then enter:

On macOS: In the Finder menu, click Go > Connect to Server then enter:
On Windows, open up File Manager and edit the file path to:
Note: ip-address is the Samba server IP address and sambashare is the name of the share.

You’ll be prompted for your credentials. Enter them to connect!